| In the preceding section of this Chapter I discuss and demonstrate how to execute simple queries on a MySQL database. A simple query, as I'm calling it, could be defined as one that begins with INSERT, UPDATE, DELETE, or ALTER. What all four of these have in common is that they return no data, just an indication of their success. Conversely, a SELECT query generates information (i.e., it will return rows of records) that has to be handled by other PHP functions. The primary tool for handling SELECT query results is mysqli_fetch_array(). This function returns one row of data at a time, as an array. You'll want to use this function within a loop that will continue to access every returned row as long as there are more to be read. The basic construction for reading every record from a query is while ($row = mysqli_fetch_array ($query_result)) { // Do something with $row. }
This function takes an optional parameter dictating what type of array is returned: associative, indexed, or both. An associative array allows you to refer to column values by name, whereas an indexed array requires you to use only numbers (starting at 0 for the first column). Each parameter is defined by a constant listed in Table 7.1. Table 7.1. Adding one of these constants as an optional parameter to the mysqli_fetch_array() function dictates how you can access the values returned.mysqli_fetch_array() Constants |
|---|
Constant | Example |
|---|
MYSQLI_ASSOC | $row[`column'] | MYSQLI_NUM | $row[0] | MYSQLI_BOTH | $row[0] or $row[`column'] |
To see how many records were returned by a query, use mysqli_num_rows(): $num = mysqi_num_rows($query_result);
Once you are done with a query result set, you can release the memory used by that result with mysqli_free_result($query_result);
Like using mysqli_close(), this isn't required but is more professional. To demonstrate how to handle results returned by a query, I will create a script for adding an expense to the database. In the script, a pull-down menu will be created based upon the values in the expense_categories table. The overall structure of the script will be very similar to add_expense_category.php. To retrieve query results: | | 1. | Create a new PHP document in your text editor (Script 7.3).
Script 7.3. The add_expense.php script retrieves the values from the expense_categories table to create a pull-down menu. This pull-down menu is part of a form used to add expenses to the database. | | | 2. | Begin with the standard HTML code.
<!DOCTYPE html PUBLIC "-//W3C//DTD XHTML 1.0 Transitional//EN" "http://www.w3.org/TR/xhtml1/DTD/ xhtml1-transitional.dtd"> <html xmlns="http://www.w3.org/1999/ xhtml" xml:lang="en" lang="en"> <head> <meta http-equiv="content-type" content="text/html; charset= iso-8859-1" /> <title>Enter An Expense</title> </head> <body>
| | | 3. | Begin the PHP section and include the MySQL connection script.
<?php require_once (`../mysql_connect.inc. php');
Because both steps of this script (displaying and handling the form) require database access, I'll need to include this file immediately within the PHP, rather than within the conditional, as I had done previously (see Script 7.2).
| 4. | Create the main conditional.
if (isset($_POST[`submitted'])) {
Once again, this conditional will determine which role (handle or display the form) the script will be playing.
| | | 5. | Check all of the required form fields.
[View full width] if (isset($_POST[`expense_category_ id']) AND (!empty($_POST[`expense_ amount']))AND  (!empty($_POST [`expense_description']))) { (!empty($_POST [`expense_description']))) {
For this script, I'm checking three fields: the expense_category_id, the expense_amount, and the expense_description.
| 6. | Create the appropriate MySQL query.
[View full width] $q = "INSERT INTO expenses VALUES (NULL, {$_POST[`expense_category_ id']}, `" . addslashes ($_POST [`expense_amount']) . "`, `" . addslashes($_POST[`expense_description']) . "`, NOW())";
This query differs slightly from that in Script 7.2 because I have incorporated the addslashes() function. This function will automatically escape any problem characters. You will learn more about this issue later in the chapter, but I'm going to start using this technique from here on.
| 7. | Run the query and report upon the results (Figure 7.9).
Figure 7.9. If there were no problems adding the expense to the database, a basic message is displayed. 
$r = mysqli_query ($dbc, $q); if (mysqli_affected_rows($dbc) == 1) { echo `<b><font color="green">The expense has been added! </font></b>'; } else { echo `<b><font color="red">The expense was not entered into the table!</font></b>'; }
As with the previous script, the error message would normally be due to a problem with the SQL query.
| | | 8. | Complete the first part of the main conditional.
} else { echo `<b><font color="red">You missed a required field! </font></b>'; } } else {
If you wanted to make the script more professional, you could add conditionals here to specify which field or fields in particular were omitted. As it stands (Figure 7.10), a minimal amount of form validation is performed.
Figure 7.10. If any of the three required fields are not filled out, the user sees this message and the query is not run on the database. 
| 9. | Start the HTML form.
echo`Enter an expense:<br /> <form action="add_expense.php" method= "post"> <p>Expense Category: <select name= "expense_category_id">';
The expense_category_id pull-down menu will be created by PHP using the stored values in the database. The first step in making this happen is to create the initial SELECT tag in the HTML form.
| | | 10. | Generate a pull-down menu based upon the expense_categories table.
$r = mysqli_query ($dbc, `SELECT * FROM expense_categories ORDER BY expense_category'); while ($row = mysqli_fetch_array ' ($r, MYSQLI_NUM)) { echo "<option value=\"$row[0]\"> $row[1]</option>\n"; }
Turning a table into a pull-down menu is a three-step process:
- Create the query and run it.
- Retrieve the results using mysqli_fetch_array() within a loop.
- Print out the <option> HTML values for each returned row.
For my querywhich I directly run in the mysqli_query() function without the use of a $q or $query variableI have decided to select everything from the table, ordering it by the expense_category. The ORDER BY aspect of the query will dictate the order of the pull-down menu. The mysqli_fetch_array() function is fed the MYSQLI_NUM parameter so that I can only refer to the returned values using indexes (which isn't difficult since there are only two columns).
| 11. | Free up the MySQL resources.
mysqli_free_result($r);
Since the query returned several rows of data, I'm going to run the mysqli_free_result() function after fetching all the results. This isn't required but is a good technique.
| | | 12. | Complete the HTML form.
[View full width] echo `</select></p> <p>Expense Amount: <input type= "text" name="expense_amount" size= "10" maxlength="10" /></p> <p>Expense Description: <textarea name="expense_description" rows= "5" cols="40"></ textarea></p> <input type="hidden" name= "submitted" value="true" /> <input type="submit" name="submit" value="Submit!" /> </form>';
The form finishes the HTML for the pull-down menu and displays the last two input boxes. Make sure that the name of your submitted hidden input is the same (capitalization included) as it is in the script's main conditional.
| 13. | Finish the script.
} mysqli_close($dbc); ?> </body> </html>
As the MySQL connection was established prior to the main IF conditional, it needs to be closed after this conditional.
| 14. | Save the file as add_expense.php, upload it to your Web server, and test in your browser (Figure 7.11).
Figure 7.11. This script brings in the values of the expense_categories table as a pull-down menu that can be used when a user adds an expense. 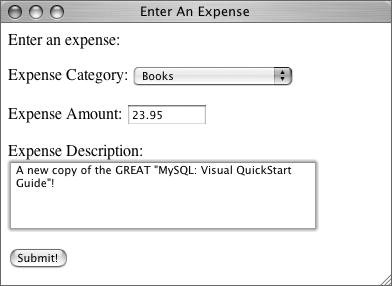
To see the result of the mysqli_fetch_array() function, in conjunction with a while loop, also check out the HTML source (Figure 7.12).
Figure 7.12. Viewing the HTML source of the page (Figure 7.11) reveals the pull-down menu code created by PHP. 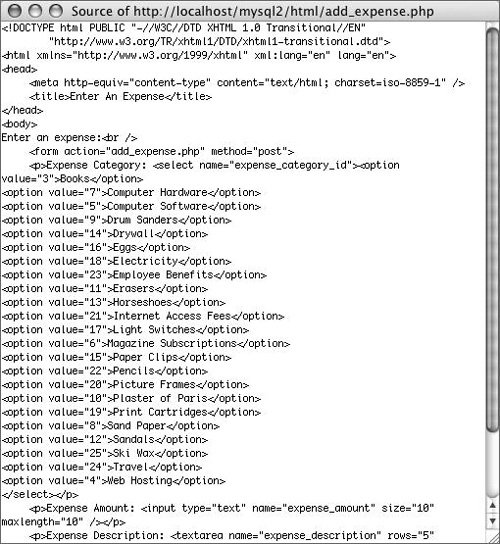
|
 Tips Tips
The function mysqli_fetch_row() (which you might run across) is the equivalent of mysqli_fetch_array($query_result, MYSQLI_NUM); The function mysqli_fetch_assoc() is the equivalent of mysqli_fetch_array($query_result, MYSQLI_ASSOC); The mysqli_multi_query() function allows you to execute multiple queries at once. To do so, each query needs to be separated by a semicolon. If these queries return records, you'll need to handle them differently than you would a single SELECT query result. See the PHP manual for code examples.
|