Tools for SQL Server 2005
If you have installed the client tools for SQL Server 2005, you will have a cascading menu on the Start menu for SQL Server 2005 containing some or all of the shortcuts in Figure 3-26.
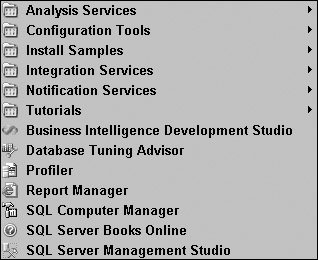
Figure 3-26:
Some of these items are installed with optional SQL Server components. We're concerned only with the iconized shortcuts in the lower section of this menu. These are described in the following table.
| Menu Option | Description |
|---|---|
| Business Intelligence Development Studio | This tool uses a set of project templates in the Microsoft Development Environment (the same interface as Visual Studio.NET 2005). It is used to create and manage database queries and objects, Reporting Services reports, Analysis Services cubes, and Integration Services packages (formerly called DTS). |
| Database Tuning Advisor | The Tuning Advisor is the successor to the Index Tuning Wizard in SQLServer 2000. It takes the features of the SQLServer Profiler to the next level by actively monitoring database sessions. These sessions are analyzed and then the Advisor suggests configuration changes and enhancements to improve database efficiency and performance. The new interface simplifies the complex process of running workload query scripts and profiler traces to test, among other elements, index usage, execution plan efficiency, caching, and I/O costing. |
| Profiler | The SQLServer Profiler is an extensive troubleshooting and optimization tool. It can be used to monitor a broad range of database activity, or to pinpoint specific events. Operations can be captured and recorded for later playback. Events and activities can be recorded as scripts or logs to text files or to a database. |
| Report Manager | This is the main web browser interface for Reporting Services. It is used for both report and folder management and for viewing reports. Report server administrators use this application to define security and server configuration settings. Users can browse and view reports, create subscriptions and report snapshots, and export reports in various formats. |
| SQLComputer Manager | This management console replaces several utilities in earlier SQL Server versions. With it, administrators can configure network libraries, services, and maintenance tasks. |
| SQLServer Books Online | SQLServer Books Online (BOL) is the online help system for all SQL Server tools and features. Books Online opens in a separate window with options to search keywords and browse the index of topics. To launch Books Online from within a SQLServer tool, press F1. Context-sensitive help is available from within Query Analyzer when you highlight a keyword and then press Shift+F1. |
| SQLServer Management Studio | Management Studio combines the best features of Enterprise Manager, Query Analyzer, and Analysis Services Manager with the new capabilities of SQLServer 2005. This is the central management and design interface for all SQLServer, databases, objects, and various types of queries. |
SQL Computer Manager
The SQL Computer Manager combines the functionality of the Server Network Utility, Client Network Utility, and Service Manager from SQL Server 2000 into one central tool. With this Microsoft Management Console (MMC) snap-in, the database administrator can start, stop, and pause any SQL Server–related service without having to scroll through the huge list of services that are presented with the standard Windows Services management console. The SQL Computer Manager can also be used to manage server and client network libraries by enabling and disabling supported libraries and specifying the individual settings for the libraries such as TCP port assignments and IP listeners.
The SQL Computer Manager is a very straightforward interface. Each SQL Server–related service and network configuration is listed in the tree view, as shown in Figure 3-27, and can be controlled using right-click menu selections.
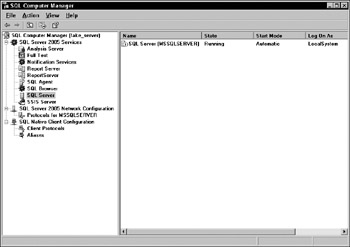
Figure 3-27:
SQL Server Management Studio
The Management Studio is specifically used for SQL Server and offers more functionality and greater flexibility than Enterprise Manager did in earlier versions. The Microsoft Management Console interface, used by Enterprise Manager and several other administrative utilities, is a very generic approach to system management that has been outgrown by an application as robust as SQL Server.
When you open the Management Studio, you are prompted to connect to a server. When working with the local server using standard Windows security, you can simply leave the default settings and connect with the Connect button.
The Amazing Floating, Docking, Hiding Tool Windows
At first glance, this interface looks a bit like Visual Studio (with dockable tool windows that can auto-show and hide themselves, and can be pinned down using the familiar thumbtack icons). That's because Microsoft has designed the Management Studio to use the Visual Studio 2005 shell. SQL Server 2005 and Visual Studio 2005 have been jointly developed so that there is seamless interaction between the two environments. This new developer-centric view of database management comes as quite a shock to many database administrators who have considered themselves more of an engineer than a developer. However, once the initial shock wears off, most have learned to love the new interface for the amount of control and flexibility it brings to database administration. When you open the Microsoft SQL Server Management Studio in the default view, you will see two tool windows docked on the left side. These can be undocked, moved, and hidden as you please. Note the three little icons in the top-right corner of each window (see Figure 3-28):
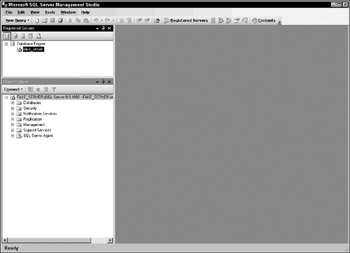
Figure 3-28:
-
Down arrow — If you click the down arrow, the pop-up menu will display options for working with this window.
-
Thumbtack — The thumbtack is used to pin the window down (when the tack is positioned vertically). If a window is unpinned, it will auto-hide when the mouse pointer is moved away, leaving a small icon on a vertical tab. To show a hidden window, simply hover the mouse pointer over the tab. I generally will pin a window down if I'm going to use it frequently and then unpin to hide it when I need the screen space for other things. With a little practice, I think you'll find that this can be a convenient feature, especially if you are working on a small monitor.
-
X — The familiar X icon will close the tool window entirely. Rather than closing windows, I recommend that you use the auto-hide feature so you can easily show the window when you need it in the future.
If you do close a window, or you need one of the windows that is not shown in the designer by default, these can be opened from the View menu.
To reposition a tool window, you can also just grab it by the title bar using the mouse pointer, and then drag to undock and move it around the design surface. Something interesting happens when you do this. Before showing you how to use the docking tools, allow me to provide some context for this feature.
Between 1997 and 2001, I spent a good deal of my time traveling around the United States teaching programming classes at Microsoft certified training facilities. Visual Basic had become wildly popular and I taught five or six Visual Basic courses on a regular basis. One particular course, the introductory-level VB course, became very routine for me. On the first day of the class, I would introduce the Visual Studio Integrated Development Environment and walk students through some exercises to get them accustomed to the interface. I explained that the various tool windows could be undocked by dragging them around with the mouse. When you dragged the window close to the edge of the container window, it would stick to that edge of the window. It took about 2 minutes to show the students how to do this and then another 20 minutes to go around the room and help everyone put everything back. It was a little difficult to get the windows to stick back in their original location.
When a window is undocked and you drag it around the main window, guide diamonds are displayed — like points of a compass — to assist with the docking window placement (see Figure 3-29). When you hover over one of the guide diamonds, the docking target area of the window is designated with a translucent shaded rectangle.
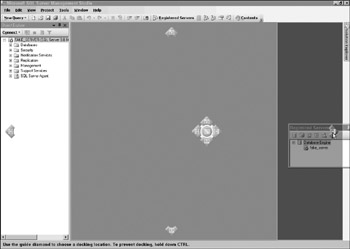
Figure 3-29:
As you see in Figure 3-30, you can also use the guide diamonds in the center cluster of the window. If a window is already docked in that area, using the center guide will dock your window adjacent to the existing window.
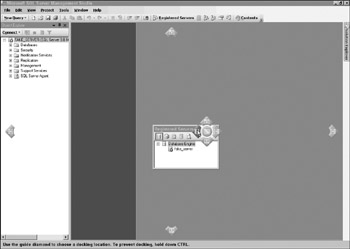
Figure 3-30:
The result of the previous docking selection is shown in Figure 3-31.
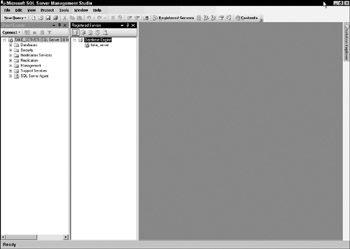
Figure 3-31:
If you hover over an existing docked window, a separate set of guides will appear, allowing you to dock within this space or to create tabbed documents where the windows share screen real estate with other windows in the same space (see Figure 3-32).
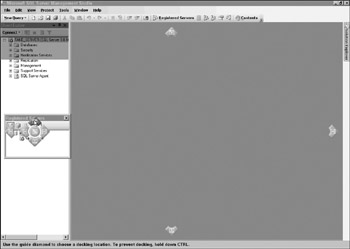
Figure 3-32:
Now my tool windows are back where they started (see Figure 3-33). If you get into trouble and can't place a window where you want it, click to set focus to the window and then use the Window menu on the standard menu bar to toggle the window back to either Floating or Dockable. This should allow you to reposition the window however you wish.
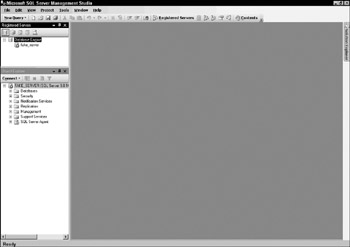
Figure 3-33:
What's in a Project?
The project and solutions paradigms have become commonplace among application developers using Microsoft programming tools. These same concepts are now extended into the database design space. These concepts are actually quite simple. A project is simply a collection of files that support a common application or purpose. In the programming world, project files typically consist of class files, code modules, forms, and configuration files. In a database project, common files can include scripts, diagrams, documentation, and Integration Services packages. The project is simply the glue that binds all of these files together.
A solution is simply a catalog of one or more projects. Often, an application is constructed in different phases and there may be multiple designers or developers in charge of different components, perhaps even different versions of the same application or database. Each of these may equate to a project that rolls-up into a larger solution.
You can create a new project by selecting New Project from the File menu. This opens the New Project dialog shown in Figure 3-34. Select the icon to create a SQL Server Scripts project, give the project a name, and either verify or change the path. I typically keep all of my projects in a special folder on a network share. By default, files are saved in folders created under My Documents\SQL Server Management Studio\Projects\.
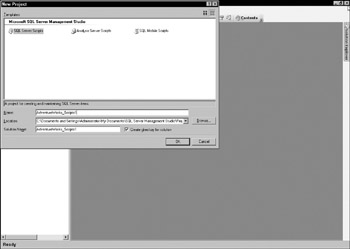
Figure 3-34:
It's important to note that this path is user profile–specific. In other words, if another user were to log in to the same computer, these files would not be available at the same path. If you plan to share projects between users, it's advisable to use a network share or common folder.
Object Explorer
This window displays a tree view of database objects, somewhat similar to the Enterprise Manager for SQL Server 2000. Connections can be made to multiple database servers and each server is displayed at the root level of the tree with a small icon to indicate the state of the server. In Figure 3-35, the small arrow (green on screen) indicates that SQL Server is running. Folders represent groups of like objects or special features. Click the plus sign icon to expand a folder to view the items in this container. Expanding a specific database folder reveals folders representing the related Tables, Views, and other objects. Right-click any folder to create an object of that type and right-click any object for options related to that object.
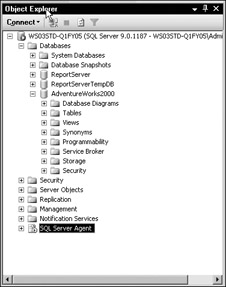
Figure 3-35:
If you continue to expand, drilling down to a table and then the columns for that table, you will see that summary information is displayed for each column (see Figure 3-36).
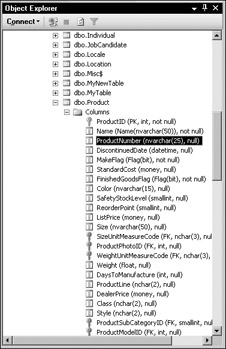
Figure 3-36:
Detailed information is available for the selected column as well as for a variety of other objects. Right-click the item in the tree view to see all of the related options (see Figure 3-37). Select the Properties menu item to view and modify the properties. With a little experience, you should find this interface very intuitive and easy to use.
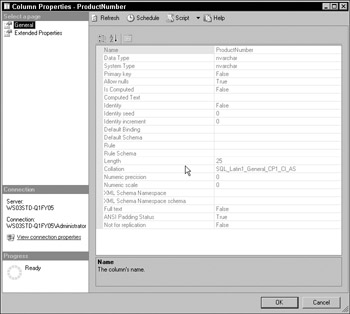
Figure 3-37:
Writing Queries
A number of different types of queries are used to return results from different types of data sources and data structures. Each of these specialized query types is now brought into one tool. This includes the following:
-
Database Engine Queries in Transact-SQL
-
Analysis Services queries using Multi-Dimensional Expressions (MDX)
-
Analysis Services Mining Model queries using Data Mining Expressions (DMX)
-
Analysis Services configuration scripts using XML for Analysis (XMLA)
Creating a query in SQL Server Management Studio involves defining a connection to a data source and providing a design window. A query can be saved to a script file or simply used as a temporary workspace. To create a new SQL query, use the New Query drop-down button. From the menu, select Database Engine Query, as shown in Figure 3-38.

Figure 3-38:
This opens another connection dialog for the query. Even if you intend for the query to run against the same data source that you specified earlier for the main Management Studio interface, you are prompted for this information when creating a new query.
With the new query window open, you must specify the database you would like to use. You can do this can in one of two ways. With a query window open, the SQL Editor toolbar is displayed with a drop-down list of available databases from the current data source (server). Drop this list down and select the database. All of the examples in this book for SQL Server 2005 use the AdventureWorks2000 database (see Figure 3-39). Using the database drop-down list has the same effect as typing the SQL command USE (database name).

Figure 3-39:
Now for a simple query: To list all of the columns in all of the rows in the Product table, type the following SQL expression:
SELECT * FROM Product Go ahead and type this text into the query window and click the Execute button on the SQL Editor toolbar. That's the button with the red exclamation mark. When you do this, your computer will go to work and look up about 500 product records. You'll probably see the hard disk light come on for a few seconds while SQL Server performs this action. While the query is running, a small, animated icon of a spinning world is displayed in the status bar at the bottom of the window. When it's done, summary information will be displayed with the running time and the number of records returned. The first few rows are displayed in a new window pane at the bottom of the Management Studio window, as shown in Figure 3-40.
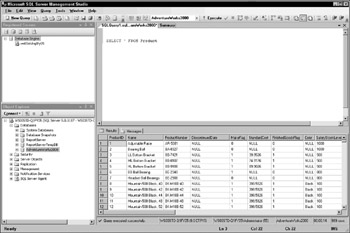
Figure 3-40:
Anything else that you would do to retrieve data will likely be an extension of this simple exercise.
Scripting Options
SQL statements can be very verbose and often require a lot of typing. Much of this work can be minimized by letting the Management Studio do the work for you. Most common actions can be scripted automatically using a few simple menu selections. There are several different methods for scripting a query and many actions to perform so I'm not going to demonstrate them all. The menu selections are self-explanatory for the most part. The following Try It Out should get you started.
Try It Out
Using the Object Explorer, expand the AdventureWorks2000 database and then the Tables folder. Under this folder, you will see a list of all of the tables in the database. You want to generate script to return all of the columns in the Contact table. Scroll down until you see dbo.Contact. Right-click this item and navigate through the menus, as you see in Figure 3-41. You want to generate a SELECT statement to read and return rows from the table. You also want to display the script in a new query window, so choose New Query Editor Window.
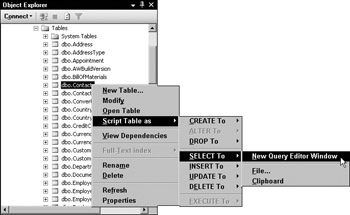
Figure 3-41:
The SELECT statement is generated and displayed in a new window (see Figure 3-42). You should know that many options when using SQL can affect the way a query looks on the screen, but don't matter that much to SQL Server. The automated script is formatted to make it easy to read. You should note a couple things about the format of this SQL script. First of all, the square brackets containing column names are optional. This is done so SQL Server can use names containing spaces. There are none here so it really doesn't matter. Also, take a look at the last line starting with the word FROM. The script includes the database name, schema name, and then the table name separated by periods. The database name is optional when you have elected to set this as a current database. Auto-generated script is generally very descriptive.
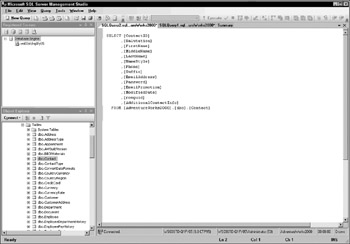
Figure 3-42:
Finally, execute this query using the Execute button on the SQL Editor toolbar. After a few seconds, results will be displayed in a grid at the bottom of the window. Look at the status bar in Figure 3-43: nearly 20,000 contact rows were returned in about 2 seconds. Of course, the time it takes to run a query will depend on several factors, so your results may be different from mine.
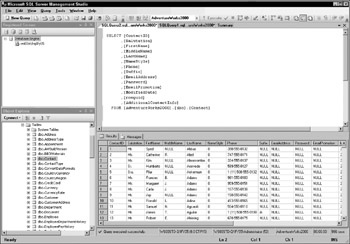
Figure 3-43:
Using the Graphical Query Designer
The single-table queries written so far are fairly simple. Now you can start building a more complex query. To use the graphical query designer, right-click the query window and choose Design Query in Editor... from the menu. If you need to edit existing query text, you can highlight the SQL and use this same technique to make changes using the query builder. Another method for invoking the graphical query designer is to start creating a new view. You won't actually save your query as a view. If you read the previous section about the SQL Server 2000 design tools, I'm going to repeat myself a bit here. The following Try It Out demonstrates building a query using the AdventureWorks sample database, but the mechanics of this tool are identical to those used in Enterprise Manager with some minor enhancements. For consistency, I'll use the first technique in the following example.
Try It Out
Using the Object Explorer, right-click the Views folder under the AdventureWorks2000 database. On the pop-up menu, select New View, as shown in Figure 3-44.
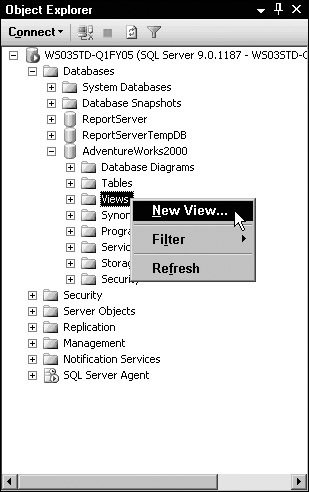
Figure 3-44:
The query window changes to a window split into four different panes. I'll explain how each of these panes is used as you continue. On top of the new designer window, the Add Table dialog (shown in Figure 3-45) is displayed to prompt you for the tables to be used in this query. Note that the schema names are displayed in parentheses following the table names. This is of little consequence since all of the tables in the AdventureWorks2000 database are in the dbo schema. You can either double-click each table one at a time or hold down the Ctrl key and click to select multiple tables. For this exercise, choose the Product, ProductCategory, and ProductSubCategory tables to be added to this query. Click the Add button to add these tables to the query and then click Close when you're done.
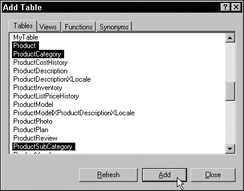
Figure 3-45:
Four panes in the designer window, each represents the query in a different way:
-
Diagram pane
-
Columns pane
-
SQL pane
-
Results pane
The first three panes are synchronized, and changes made to the query in any one of these panes will be reflected in the others. A window graphically representing each table is placed into the top-most diagram pane of the designer. The graphical query designer draws lines from column names in each of these tables, with a diamond on each. This represents an inner join derived from the existence of corresponding relationships that exist in the database design. For example, in the definition for the ProductCategory table, a relationship, or foreign key constraint, is defined between the ProductCategoryID column and the ProductCategoryID column in the ProductSubCategory table. The Query Designer is smart enough to translate this relationship into a join statement, between these tables. The diamond tells you that this is an inner join and that records will only be returned if corresponding values exist in the joined columns for both of these tables.
One thing that can be a little confusing when discussing your interaction with the columns pane is the use of the word Columns. Each column that is to be returned from the query is displayed as a row in the columns pane grid. It would be convenient if they could be referred to as fields rather than columns; however, the tool makes reference to "Columns" in the first column of the grid. This means that in our conversations regarding this interface, we are left to distinguish the columns (or fields) of the query from the columns in the grid, which represent attributes or characteristics to the query columns.
The View Designer toolbar is displayed above this window. If you have used the graphical query designer in Enterprise Manager, Access, or earlier versions of Visual Studio, you'll probably notice that the toolbar icons have been given a facelift and that a new button has been added. The right-most button will add a derived table expression. You'll learn about derived tables and subqueries in Chapter 6. The View Designer toolbar is shown in Figure 3-46.
![]()
Figure 3-46:
Hover the mouse pointer over each button to show a pop-up tooltip and display a short caption describing the button's feature. The toolbar options are described in the following table.
| Icon | Toolbar Button | Description |
|---|---|---|
| | Diagram Pane | Toggle show/hide diagram pane |
| | Criteria Pane | Toggle show/hide criteria pane (previously called the columns pane) |
| | SQL Pane | Toggle show/hide SQL pane |
| | Results Pane | Toggle show/hide results pane |
| | Execute | Execute the query and display results |
| | Verify SQL | Check the SQL expression for errors |
| | Group By | Add the Group By SQL clause and aggregate functions to the expression |
| | Add Table | Open a dialog to add tables, views, or user-defined functions to the query |
| | Add New Derived Table | Add a derived table/subquery expression to the query |
To choose columns to be returned, check the boxes in the table windows in the order that they appear in Figure 3-47. As you do this, these column names will be added to the columns pane and to the SELECT clause in the SQL pane. Note that there are three different Name columns between the three tables. Because the column names in a query must be unique, the designer creates aliased names for the ProductSubCategory and ProductCategory Name columns as Expr1 and Expr2. This satisfies this rule but the aliases' names aren't exactly optimal.
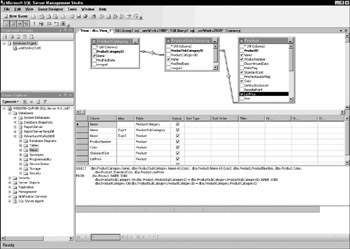
Figure 3-47:
I'd prefer to use more intuitive names for the three Name columns. In the columns pane (second section of the designer), add or replace the text with the alias names from Figure 3-48. Call the ProductCategory.Name Category. The ProductSubCategory.Name is SubCategory, and the Product.Name will be known as ProductName. Also, under the Sort Order column, type or select the values 1, 2, and 3 for these three columns.

Figure 3-48:
The query is now ready to return data. The Execute button has a red exclamation mark icon. You can also use keyboard shortcuts: Ctrl+E or the F5 key. Click the Execute button and you should see rows returned in the grid in the fourth pane of the designer window (see Figure 3-49).
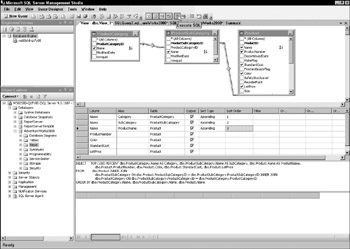
Figure 3-49:
The query results are displayed in the Results grid, in the fourth section of the designer window (see Figure 3-50). If you leave this window open and have a large number of rows returned from a query, you may be prompted by the designer to clear these results and free-up memory on your workstation.
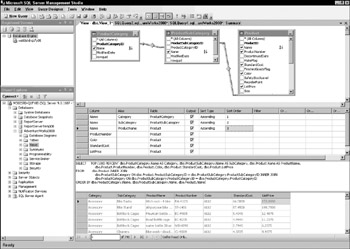
Figure 3-50:
You can experiment by adding and removing columns and changing the sort order and alias names. I didn't intend to save this query as a view or script file so if you close the query window, just indicate that you don't want to save changes. Remember that to get to the graphical query designer, you told the SQL Management Studio that you wanted to create a view.
| Note | Views and other database programming objects are discussed in Chapter 10. |
Using Templates
Unless you have a perfect memory, there will be many times in your journey with SQL Server that you will need some assistance. I'd say that about ninety-eight percent of the SQL I write is from memory because the vast majority of the time, I need to do fairly common things: Select, Insert, Update, Delete, and so on. The rest of the time, I'll either need to jog my memory or learn to use a command I haven't had to use before. I have enough trouble just remembering the names of my kids let alone how to rebuild an index with a specific fill-factor. So, I'll either need to look this up in Books Online and/or go find an example. Most of the time, it's more helpful to just to see the script than it is to learn about the command and exactly how it affects the mechanics of the database engine.
Script templates simply provide a starting point for queries. A template is really just a piece of script saved to a file that you open in the SQL Query Designer and then modify to suit your needs. The Templates Explorer window is optional. Use the View menu or Templates Explorer button on the toolbar to enable this window if it isn't already visible (see Figure 3-51). Templates are organized into categories. Simply expand the folder icons on the tree view to find the template you are looking for.
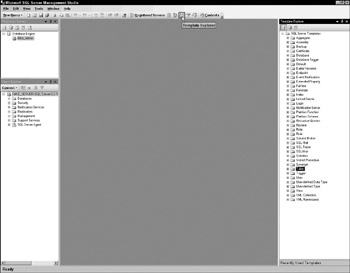
Figure 3-51:
Now, create a query to add columns to an existing table. This is easy to do using a template. Find the folder for table-related templates, expand it, and then find the template labeled Add Column. Right-click this item to display the pop-up menu and select Open to use the template in a new query, as shown in Figure 3-52.

Figure 3-52:
This action opens a new query editor window with a copy of the template. Note the color-coding used to help distinguish keywords, commands, and comments in the SQL text (see Figure 3-53). With the skeleton of the query written for you, it's a fairly simple matter to replace the generic placeholders with your own text and then execute the query.
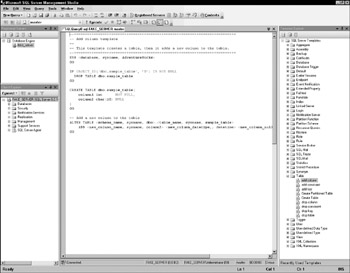
Figure 3-53:
Business Intelligence Development Studio
SQL Server 2005 offers one more tool in its arsenal of design and solution development applications. This one is the granddaddy of them all and represents the final merger of database administration and software development tools. Whereas the Management Studio is implemented in a Visual Studio shell, the Business Intelligence Studio is an actual instance of Microsoft Visual Studio and is a very robust application used by application developers to create desktop software, web site solutions, and business components. So, what's it doing in the suite of tools installed with SQL Server? To answer this question effectively, you need to understand Microsoft's vision for the present and future state of business solutions. Since the inception of Microsoft Visual Basic in the very early 1990s, Bill Gates has promoted the notion of making software development capabilities accessible to just about anyone who could drive a computer mouse. He has evangelized empowering the information worker by bringing advanced design and development capabilities to the desktop and making them intuitive and easier to use. In the latter part of the last decade (and century) we saw disparate programming language tools merge into toolkit suites such as Visual Studio, for use by many types of application developers. Now we see the same tool being placed into the hands of database professionals.
I think that this stage in the evolution of this tool is, in large part, a reflection of our changing industry. Not long ago, the lines between programmer, architect, and database administrator were well defined. We stayed out of each other's way and didn't tread on another's turf. The IT industry shakedowns following the dot com bust and economic recession, along with maturing technology, have redefined professional roles. Now we wear more hats and are driven to do more with less. I'd submit that we have the opportunity to do more with more: more information, more computing power, better-utilized talent, and, yes; more bandwidth. We all have more bandwidth to move information around but we're expected to use more of our mental bandwidth to take on more and get more done more effectively than before. Regardless of the reasons, here we are and the industry demands tools that let us do it all from our desktops.
What can you do with this amazing tool? Just about anything related to designing and developing software and database solutions. In a standard installation of SQL Server 2005, you will have the Business Intelligence Projects item you see in the left-most pane of Figure 3-54. After installing SQL Server 2005, I also installed Visual Studio, which has added additional project type templates to the integrated development environment.
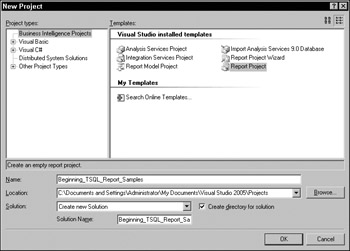
Figure 3-54:
You have several opportunities to apply your SQL skills in application development and data presentation solutions that you create using this environment. One such opportunity is to design reports with SQL Server Reporting Services. Reports can use parameterized queries to filter data and provide advanced reporting features (see Figure 3-55). The report designer contains an integrated SQL query designer that will enable you to create, debug, and test queries for reporting.
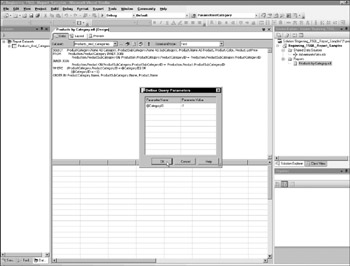
Figure 3-55:
Chapter 12 leads you, step-by-step, through the process of creating a report in the Business Intelligence Studio. This is an effective means to quickly take the results of a query and present them to users in the right format (see Figure 3-56). Reporting Services enables you to transform data into useful information, delivered to a user's web browser, desktop, and Office applications. Reports may be viewed on demand or by automated e-mail or file share subscriptions.
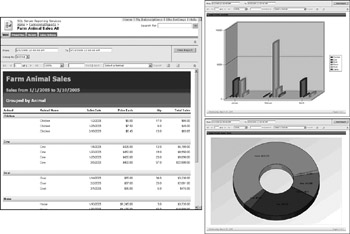
Figure 3-56:
SQLCMD Command-line Utility
There are times when a system administrator just needs to get the job done and execute SQL script without the frills of a desktop user interface. SQL Server 7 and 2000 had this capability in a simple command-line utility called OSQL. OSQL also ships with SQL Server 2005 for backward compatibility and is part of the standard installation package. However, OSQL doesn't support some of the new capabilities introduced in SQL Server 2005. The recommended tool for command-line scripting is now called SQLCMD. This can be executed in a command prompt window for any folder on your database server. This is most definitely the old-school method for executing SQL, but sometimes it's actually easier than using newer, more sophisticated tools.
To use SQLCMD, open a command prompt window. One way to do this is to click the Windows Start button and select Run from the program menu. In the Run dialog, type CMD and click OK. It doesn't matter what path you see at the command prompt. To see the list of available commands, just type SQLCMD -? and press Enter (see Figure 3-57). Although the SQLCMD command itself is not case-sensitive, the switches used with it are; for example, the switch "-e" specifies that the SQLCMD commands should be echoed back, but the switch "-E" indicates using trusted security.
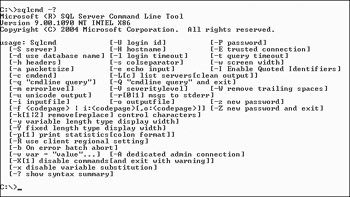
Figure 3-57:
Just about any SQL command can be executed using this utility, but it's typically used to execute batch scripts for system maintenance. Here's a quick example of a SELECT query to show how results are returned.
Because SQLCMD isn't a particularly interactive environment, some actions must be performed using a single-line command. When you launch SQLCMD, you must provide login information — either a username and password for SQL Server authentication, or a switch to indicate that you want to use integrated Windows security. This example uses integrated security by using the –E switch (this stands for Enterprise security.) Note that the documentation for the –E switch shows that this means trusted connection. When you press Enter, a new prompt is displayed:
1> This indicates that you are now working in the SQLCMD environment rather than at the command prompt. It also lets you know that this is the first line in a batch process. SQLCMD runs all commands in batch mode and doesn't actually execute any commands until you explicitly tell it to, using the GO command. I'll continue to enter SQL commands and then type GO when I'm ready to execute the entire batch (see Figure 3-58).
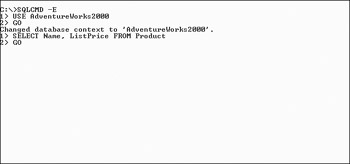
Figure 3-58:
In the SQL SELECT command, I only asked to return two columns and the results used up most of my screen real estate. Each character type column will use the maximum number of allocated characters. This means that if you have a column defined as VarChar(255), even if the actual data doesn't take up this much space, this column will require 255 characters of screen space, not allowing much room for anything else (see Figure 3-59). Another drawback to using this interface for returning data is that little of the result set is held in memory after the query runs. You can scroll the command window up to view some text but this is very limited.
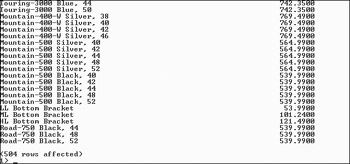
Figure 3-59:
The EXIT command is used to leave SQLCMD and return to a command prompt. Type EXIT again to close the command prompt window.
EAN: 2147483647
Pages: 131