Tools for SQL Server 2000
If you have installed the client tools for SQL Server on your computer, the Microsoft SQL Server menu will appear on your Start menu with some or all of the shortcuts shown in Figure 3-1.
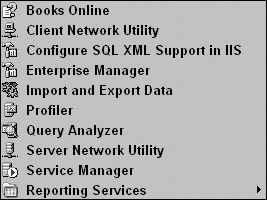
Figure 3-1:
The following table provides a brief overview of these tools, and then you'll take a look at those related to Transact-SQL in detail.
| Menu Option | Description |
|---|---|
| Books Online | SQL Server Books Online (BOL) is the online help system for all SQL Server tools and features. Books Online opens in a separate window with options to search keywords and browse the index of topics. To launch Books Online from within a SQL Server tool, press F1. Context-sensitive help is available from within Query Analyzer when you highlight a keyword and then press Shift+F1. |
| Configure SQL XML Support in IIS | This option will only be available if you have Internet Information Services installed. It allows a SQL Server database to be configured as a web folder, accessible through HTTP requests. Data may be queried using a URL and through a variety of XML-based techniques. Data is typically returned as XML to be used within a web page or an XML transform script. |
| Enterprise Manager | Database server administrators and database developers use Enterprise Manager to perform a variety of useful tasks. This is the central management interface for most database management activity. |
| Import and Export Data | This shortcut launches the Data Import/Export Wizard. This is actually a simplified interface for creating and running Data Transformation Services (DTS) packages and tasks. It can be used to copy and move practically any database objects and data from and to most any standard data source (including text files, dBase, FoxPro, Excel, Access, Paradox, SQL Server, and other ODBC-compliant sources). |
| Profiler | The SQL Server Profiler is an extensive troubleshooting and optimization tool. It can be used to monitor a broad range of database activity, or to pinpoint specific events. Operations can be captured and recorded for later playback. Events and activities can be recorded as scripts or logs to text files or to a database. |
| Query Analyzer | This ad-hoc query utility is the tool of choice for most SQL-savvy database users. It gives database designers, developers, and administrators an unconstrained free-form environment to test and run SQL script in a multi-window interface, connected to multiple database servers. SQL scripts can be generated for nearly all database objects from the object browser. Commands can be saved to script files and can be used to build database objects in different databases and on different servers. |
| Server Network Utility | The client and server network utilities are used to install and configure database network libraries, which provide low-level, network protocol-specific connectivity to database servers. |
| Service Manager | This simple utility provides a convenient tool for managing the Windows services, which comprise the features of SQL Server. It is also accessible from the Windows System Tray, in the lower-right corner of the desktop. |
| Reporting Services | SQL Server Reporting Services is an add-on, server-based, enterprise reporting product from Microsoft that integrates with SQL Server. It is freely available to licensed owners of SQL Server to be used on the same server and requires a separate installation. This shortcut leads to another menu with Reporting Services features. |
Enterprise Manager
This is the administrative console for SQL Server 2000. It's actually a snap-in for the Microsoft Management Console (MMC) so it may look familiar if you have worked with other Windows administrative tools. Later, you'll see how to customize the MMC so you can have all of your tools in one place.
To open Enterprise Manager, select the shortcut from the start-up menu by clicking the Start button and then select All Programs Microsoft SQL Server Enterprise Manager (see Figure 3-2).
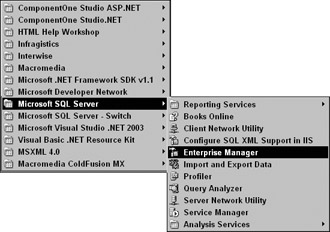
Figure 3-2:
Assuming that you have the appropriate level of security access to get to your databases, it's just a simple matter to drill down to the database on your registered server. Here's a quick tour to get you started. On the left side of the window, you will see a tree view pane that lets you navigate through various nodes and folders that represent feature areas and server and database objects. You can resize this pane as needed. The right pane shows items related to the selection on the left. This view can be modified to show more or less detail by using options on the View menu. Figure 3-3 shows the initial view after opening Enterprise Manager. Note that on my system, I have groups and registrations for several servers and databases. You will only see those that have been set up on your system. The demonstrations here will be using only the local database server. If you have installed the client tools on your local computer and SQL Server is on a different computer, you will need to create a registration for the remote server. You can easily do this by right-clicking the node labeled SQL Server Group and selecting New SQL Server Registration.
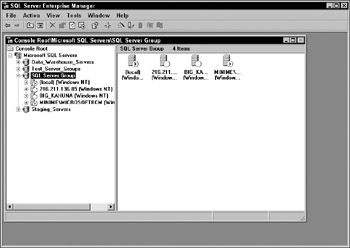
Figure 3-3:
One anomaly of this tool is that it opens with one window inside the other. For simplicity, I recommend that you maximize the inner snap-in window so it fills the console window. To do this, click the rectangular-shaped icon in the upper-right corner of the smaller window.
In the left pane, click the tree node labeled Microsoft SQL Servers. This will display groups used to organize remote connections to any SQL Server database servers available to you. The default group is called SQL Server Group. If you click the little plus sign icon next to any item in the tree, it will expand to show related items under that node. Expand the SQL Server Group to show any registered servers. Your local server should be registered by default. You can also add registrations for additional servers by right-clicking the group and choosing New Server Registration. The local server will either be labeled (local) or with the name of the SQL Server 2000 instance specified during installation. Expand this node to reveal databases and administrative items for this server. Expand the Databases node and select the AdventureWorks2000 sample database.
Enterprise Manager is not a query-editing tool, but it contains some features that use or generate Transact-SQL script. You can use Transact-SQL in a few different ways in the Enterprise Manager. You can enter the Transact-SQL Query Designer by choosing to create a new view or to return records from a table. For writing complex queries containing multi-table joins and groupings, this is a very useful technique even if you don't plan to save the script as a view.
You can also create stored procedures and user-defined functions from Enterprise Manager and just type the SQL directly into the related editor window.
| Note | You learn how to create these database objects in Chapter 10. |
Using Query Designer Window
This section takes a brief look at the Query Designer tool. I haven't discussed the components of SQL statements yet but I want to show you the mechanics of this tool. This tool is available in several different Microsoft products including Visual Studio 6, Visual Studio.NET, SQL Server Reporting Services, and Microsoft Access Data Projects.
Try It Out
-
Using Enterprise Manager, expand the nodes in the left pane. If you haven't done so already, start with Microsoft SQL Servers SQL Server Group (local). Note that this node may also be labeled (local) (Windows NT) depending on the operating system.
-
The next node to expand is Databases. Expand the AdventureWorks2000 database and right-click the icon labeled Views.
-
From the right-click Action Menu, select New View.
Now you should be looking at a new window that contains four panes arranged vertically. This is the Query Designer window. Figure 3-4 shows the initial view before you add tables.
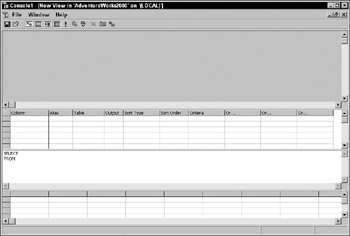
Figure 3-4:
How It Works
The Transact-SQL Query Designer is actually a utility (separate from Enterprise Manager) that can be called from a few different places within Enterprise Manager, including the Database Diagram tool and on the Action menu in the Tables node of Enterprise Manager. The easiest way to open the Query Designer window without actually having to retrieve data from a table is to choose the option to create a new view. You don't have to save the expression as a view. In fact, this is one of the most convenient techniques to use when you just need to quickly create a SQL expression to copy and paste into another tool or window. In the following Try It Out, you use this technique to create a simple multi-table query. After you build the query, I will show you a few of the features and toolbar options.
The Query Designer contains four panes that can be resized and scrolled individually. Each of these panes can be hidden and shown using buttons on the toolbar. The top area is the diagram pane. It graphically displays tables and views included in the query. Joins are depicted as lines between each table window.
The second pane is the grid pane and is for managing the columns for the tables in the query. The grid pane allows you to specify column aliases, calculations and expressions, output, and sorting options.
The third pane is the SQL pane. SQL syntax will be generated automatically from selections and settings in the tables and columns panes and placed in the SQL pane. SQL expressions can also be typed or changed directly in the third pane. As long as the SQL syntax is supported by the graphical view, the tables and columns pane content will be updated to reflect these changes. There are a few expressions that the Query Designer can't represent graphically. These include unions and some types of subqueries. Query Designer is a very smart tool and, with these few exceptions, will handle almost anything else you can throw at it.
On the toolbar, the right-most icon is used to add tables to the query. Click this icon to open a window listing all of the tables in the AdventureWorks2000 database. The same dialog can be accessed by right-clicking the diagram pane and selecting Add Table from the resultant Action Menu. For future reference, note that this dialog (shown in Figure 3-5) can be used to add views and functions as well.
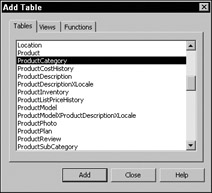
Figure 3-5:
Now add the Product and ProductSubCategory tables to this query. Click ProductSubCategory to select it from the list and click the Add button. Now, do the same for the Product table — select it from the list and click Add. Both of these tables should have been added to the top-most pane in the Query Designer and a thick line intersected by a diamond should be visible, as shown in Figure 3-6.
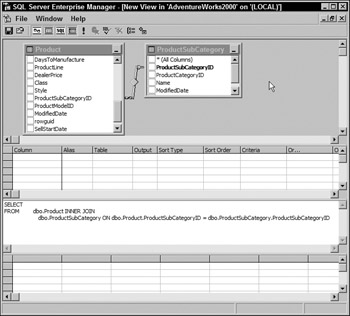
Figure 3-6:
The line between the two tables represents a join. The Query Designer assumes there should be a join between these tables because a relationship was designated between these tables when the database was created. If you need to, you can use the mouse to move the tables and resize them in the designer for clarity. This won't actually affect anything other than your ability to see what's going on. The line end on the ProductSubCategory table side shows a key icon because this table contains the primary key column in the join. The ProductSubCategoryID column is used to ensure that there can be only one subcategory with a particular CustomerID value. The little infinity symbol on the Product table end of the line means that for one ProductSubCategory there can be many products (usually based on tables having a one-to-many relationship). The ProductSubCategoryID column in the Product table is a foreign key. Its value may be duplicated but a related ProductSubCategoryID must exist in the ProductSubCategory table. The diamond shape indicates that this is an inner join. This means that related records must exist in both of the tables participating in the join. In other words, subcategories that don't have products won't be included in the query's result set. If it were permissible in the design of this database, products without related subcategories also would not be included. Due to a foreign-key constraint that the database designer used to define this relationship, this condition isn't allowed.
The next step is to choose the columns you'd like to output from the query. Use the check boxes in each of the table windows. Check the Name, ProductNumber, Color, and ListPrice columns for the Product table and the Name column for the ProductSubCategory table. Note that this places these column names into the grid in the second pane, or column list.
You will notice that because the Name column has been selected in both tables, the Query Designer has created an Alias for the Name column from the ProductSubCategory table. The Query Designer does this automatically any time a duplicate name appears in the column list for a SELECT statement. The Alias that the Query Designer chooses, "Expr1," is probably not what you want. This is easy to correct. Either in the SQL pane or the Column pane, change Expr1 to SubCategory. The other columns can also be aliased as desired to make the column headers more intuitive for anyone who runs this query in the future. For this query, alias the Name column from the Product table as well as to Product.
In the third pane, you will see the actual SQL expression. The fact is that the SQL expression is the only thing you're building. Everything else in this designer is derived from this expression. Figure 3-7 shows the designer window thus far.
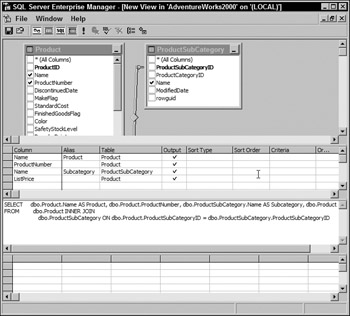
Figure 3-7:
Notice the text in the Alias column for the Name field in the Product table. Because this field name is the same as the Name field in the ProductSubCategory table, an alias should be defined to make these column names more readable. You can address this by defining a meaningful alias for both the product name and the subcategory name. Place the cursor in the alias column on the first row, representing the ProductSubCategory Name field, and type SubCategoryName. This will be the name of this field.
Now do the same for the second row, representing the Name field for the Product table: replace the text Expr1 with ProductName. The Query Designer also allows you to change the sort order for your result list by specifying a Sort Type and Sort Order. For your query you want the results ordered by the ProductSubCategory, Product, and ListPrice in that order, but you want the ListPrice to be sorted from the most expensive to the least expensive. The resultant query designer should look like that shown in Figure 3-8.
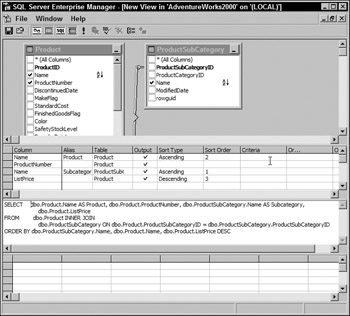
Figure 3-8:
The Query Designer also allows for executing the query to view the results. You can do this by clicking the dark red exclamation point icon on the toolbar. This executes the query and displays records in the results pane grid at the very bottom of the Query Designer window. An important aspect of this particular feature to keep in mind is that when executing a query in Query Designer you are actually opening an updateable cursor to the underlying data objects. Any changes to the data in the results pane are immediately applied to the underlying tables. This may sound very useful, but in reality it is quite dangerous and has the added downside of consuming very large amounts of server resources. I would strongly recommend not executing the query in Query Designer. Instead, copy the query to Query Analyzer or the query window in SQL Server Management Studio and execute it there. The results window in these latter tools does not hold any locks or create cursors to hold the data. Figure 3-9 shows the Query Designer with the results pane populated (which again, is not recommended).
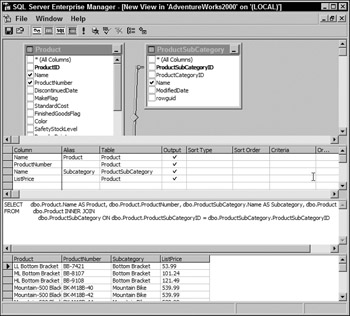
Figure 3-9:
If you leave this window open and have a large number of rows returned from a query, you may be prompted by the designer to clear these results and free up memory on the SQL Server.
To finish this short tour of the Query Designer tool, take a look at the toolbar to see some additional features. First of all, you can launch the Query Designer in a few different ways. Further in this section, you open a table and use the Query Designer to filter and sort rows. Figure 3-10 shows the Query Designer toolbar.
![]()
Figure 3-10:
Because the Query Designer is a multipurpose tool that has been incorporated into different products for different reasons, some of these features may not be enabled. For example, Cancel Filter isn't enabled in this environment. In some applications, buttons may be added or hidden. In Microsoft Access, sorting buttons are added to the toolbar. On the toolbar (as with most Microsoft products), if you hover the mouse pointer over a button, a pop-up tooltip displays a short caption describing the button's feature.
The toolbar options are described in the following table.
| Icon | Toolbar Button | Description |
|---|---|---|
| | Save | Save SQL expression to a script file |
| | Properties | View the properties dialog to specify advance query options and query parameters |
| | Diagram Pane | Toggle show/hide diagram pane |
| | Columns Pane | Toggle show/hide columns pane |
| | SQL Pane | Toggle show/hide SQL pane |
| | Results Pane | Toggle show/hide results pane |
| | Execute | Execute the query and display results |
| | Cancel Execution | Cancel query execution if in process |
| | Verify SQL | Check the SQL expression for errors |
| | Cancel Filter | Not used in Enterprise Manager |
| | Group By | Add the Group By SQL clause and aggregate functions to the expression |
| | Add Tables | Open the Add Table dialog to add tables and views to the diagram pane |
Using the Query Designer to View a Table
There are a few different ways to use features of the Query Designer. Another method, in Enterprise Manager, is to view records from a table in a grid. Simply right-click any table and choose Open Table from the menu. Selecting any of the three submenu options (Return All Rows, Return Top, or Query) will show the Query Designer window in a customized view. Remember, however, that returning data with the Query Designer does not come without risk or cost.
Try It Out
Using Enterprise Manager, drill down to the Product table in the AdventureWorks2000 database. Right-click the table icon and, from the pop-up window, choose Open Table. A new menu option is displayed. From this menu, select Return All Rows. Figure 3-11 shows the results pane filled with product records.
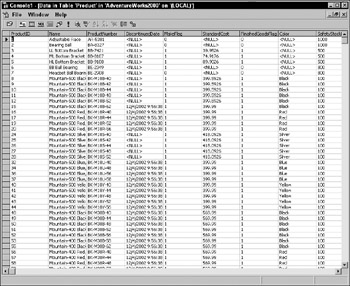
Figure 3-11:
For simplicity and to avoid redundancy, this section doesn't step you through the same exercise just used. In this case, you will modify a SQL expression and then view the outcome in the columns pane. Click the SQL Pane toolbar button (the one on the left labeled SQL). The SQL pane is displayed above the results grid and contains the following expression:
SELECT * FROM Product Spaces and carriage returns are ignored so don't be concerned with these. The designer makes it a point to format expressions and try to make them more readable. This isn't a concern right now. For this example, this expression reads as follows:
SELECT * FROM Product You can add text to a new line or just append it to the existing text on the same line as long as there is at least one space between each word. Modify this statement so it reads as follows:
SELECT * FROM Product WHERE StandardCost > 100
Click the Run button (the exclamation mark) on the toolbar and the results should be updated to show only products with a cost greater than $100. Figure 3-12 shows these results.
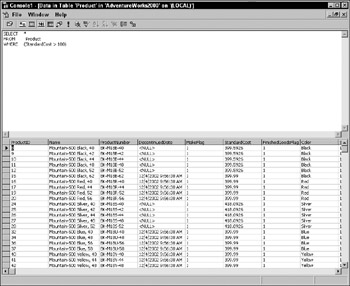
Figure 3-12:
The Query Designer did a couple of things. The first thing it did was reformat the query text, placing parentheses around the text following the word WHERE. Don't be concerned with this. The Query Designer is just trying to be helpful. The results were also refreshed to show only records where the StandardCost field values met the criteria.
The last step is to modify the SQL expression (see Figure 3-13) by adding the ORDER BY clause to the end, and then click the Run button on the toolbar.
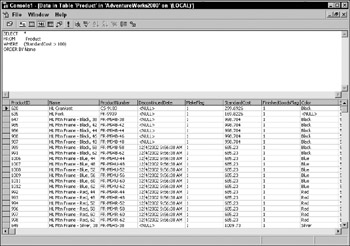
Figure 3-13:
You can see that the designer added parentheses. This was actually not necessary in this simple query but it doesn't hurt anything. You can leave these on or off for the next step.
For a little variety, close the inner console window and right-click the Product table again. Choose the Open Table menu as before, but this time choose Query from the submenu, as shown in Figure 3-14.
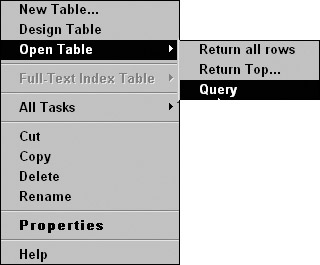
Figure 3-14:
You should see the Query Designer window with four panes displayed.
Now add one more bit of text to the expression that will sort the list by the ProductNumber column. Again, add text to the expression so it looks like this:
SELECT * FROM [dbo].[Product] ORDER BY ProductNumber
Click the Run button to view the results. Figure 3-15 shows the records sorted by the product number.
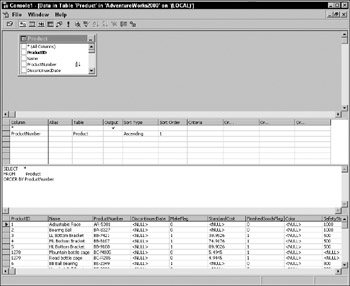
Figure 3-15:
Finally, take a look at the query from another viewpoint. Click the Diagram Pane (second toolbar button) and the Column Pane (third toolbar button) and you will see that the Query Designer is able to decipher your SQL expression into a graphical form. Granted, this is a very simple expression but later in the book you will see how this tool can be used to work with more complex, multi-table queries — which will save you a lot of time and effort. Figure 3-16 shows the Query Designer with all of the panes visible.
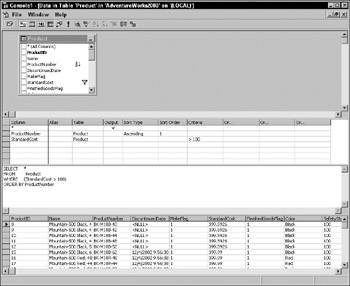
Figure 3-16:
How It Works
Using the toolbar, you can show any combination of the diagram pane, columns pane, and/or SQL pane. If you were to show the SQL pane after displaying a table's rows in this manner, you would see that the expression, SELECT * FROM (table name), had been executed for you. To sort or filter the rows for this table, you can use the Query Designer options as if you were creating a query from scratch.
Note how the Query Designer represents the WHERE clause and the ORDER BY clause in the columns grid. The placement of these expressions in the columns criteria grid can be very useful when working with complex operations. The SQL WHERE clause can often be a little difficult to read without a lot of practice. The Query Designer makes it a point to add sets of parentheses to separate logical expressions (even in cases where you might not choose to use them). As you work with complex WHERE conditions, you may find it beneficial to copy and paste queries into the designer window to see how the designer parses and interprets the logic.
Query Analyzer
This tool has evolved and matured as SQL Server has grown up over the years. Previously known as the ISQL Windows Client, Query Analyzer is the main console for talking to SQL Server 2000.
To launch Query Analyzer, you can either choose SQL Query Analyzer from the Tools menu in Enterprise Manager or Query Analyzer from the Microsoft SQL Server program group on the Windows Start menu.
Although the look and feel is much like Enterprise Manager, Query Analyzer is not a snap-in for the MMC. A query window is opened by default and, like Enterprise Manager, is not maximized inside the main application window. Multiple query windows can be opened and each can be used to open or save to a script file.
Here's a quick tour. The main menu bar and toolbar gives you access to all of Query Analyzer's features. Again, the purpose here isn't to undertake a comprehensive discussion of these features, but you should be familiar with this application. This section lists each feature as it is arranged on the main menu bar.
On the File menu, you will find options to manage connections to database servers. If you initially open Query Analyzer from the Start menu, you will be prompted to connect to a server. Choosing the menu option to create a new connection will open the same dialog window. You will also find options to open and save SQL script files. A script file is a text file containing SQL commands and expressions.
On the Edit menu, you will find the standard clipboard options: Cut, Copy, and Paste. These features are useful when working with text and can also be accessed using the right-click menu and standard keyboard shortcuts. Below the standard edit features are Find, Replace, Go to line, and Bookmark features that are invaluable when debugging or editing large SQL scripts. The Edit menu also contains two template options. The first one inserts template syntax into the query window and the second gives you the ability to replace template placeholders with appropriate values. Templates are useful to give designers a standard starting place. For example, you may establish a standard template for creating stored procedures that include a block header and corporate contact information. Templates are stored as text files with the .TQL extension and can be created and saved from Query Analyzer. Several standard templates come installed with SQL Server.
The Query menu includes options to change the active database for a connection, execute, or just parse the active query window. Results can be output to unformatted text, to a grid, or to a text file. The text option uses a monospaced font. Variable-length columns are formatted in columns to use their maximum width. The Display Estimated Execution Plan or Show Execution Plan translates individual query operations into graphical icons, depicting the precedence order and data flow between each step. The Current Connection Properties menu option allows you to set query behavior options that will be applied only to the current connection.
On the Tools menu, you can manage indexes, statistics, and set program options. The Manage Indexes option allows you to create and drop indexes. The Manage Statistics option is used to create, update, or delete column statistics. The query optimizer uses statistics to construct the execution plan when a query is executed. The statistics managed by this option are not index statistics, but column statistics. Index statistics are created by SQL Server to determine whether an index is useful for a particular query. Column statistics can be created by the database administrator or automatically by SQL Server if the Auto Create Statistics database option is turned on. These column statistics help the query optimizer create optimal query plans without the overhead incurred by an index. For more information on this particular feature check out Books Online under the topic "statistical information, creating."
SQL Script and Batch Conventions
Query Analyzer can execute SQL in two ways. With either method SQL expressions are simply typed directly into the query window. You can then either execute all script in the window or select part of the script and execute only the selected statements.
You are going to use Query Analyzer to write and execute the same query as you did using the Query Designer in the previous exercise. After opening the Query Analyzer, you will connect to the local database server and then designate Northwind to be the active database. In the following Try It Out you'll enter a couple different queries and then execute them, one at a time and then all at once.
Try It Out
Open Query Analyzer from the Windows Start menu. You should find the shortcut in the Microsoft SQL Server group. You will be prompted to connect to a database server. If your database server is not installed locally, select or type the server name and then indicate whether you are using Integrated Windows security or supply a username and password. The connection dialog window is shown in Figure 3-17. To connect to your local server using integrated security you can simply type a period in the SQL Server drop-down list and then select the Windows authentication option under the Connect using option. Note that in the drop-down list labeled SQL Server, there is a default entry. At first it may not be apparent but a single period (.) signifies the local database server. This has the same meaning as (local) and LocalHost on most systems. If your SQL Server is installed locally, make no changes to these settings and click OK.
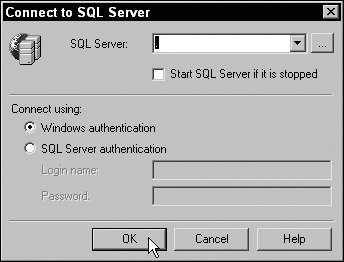
Figure 3-17:
Query Analyzer is a multi-document interface, which means that the larger parent window contains one or more child windows. As you can see in Figure 3-18, the inner query window is freestanding and can be repositioned within the parent window space. This is useful if you need to manage multiple queries or different database connections. For this example, maximize this window so it occupies all of the available space. To do this, click the small rectangular maximize button in the top-right corner of the smaller window.
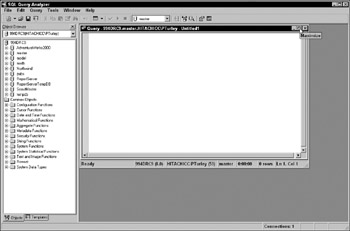
Figure 3-18:
In the middle of the toolbar, you will see a drop-down list. If you drop it down, you'll see that it has a yellow drum icon next to each database name. Don't do anything with this. I just want you to know where it is. Notice that it shows that you are currently using the Master database.
Two ways exist to indicate the database with which you want to work. One method is to select the database from this drop-down list and the other is to execute the SQL statement USE (database name). In the database window, type the following text:
USE AdventureWorks2000 GO
One database is always active. This code changes the active database to AdventureWorks2000. The GO statement means all of the previous statements must finish executing before any more statements can run. This is known as a batch directive. SQL code before or after a batch directive is called a batch. There will be more on this later.
Add some more text to the query window. Enter a carriage return and then the following SQL text:
SELECT * FROM Product WHERE StandardCost < 4 Note the various colors applied to the text. Blue text represents key words and commands that Query Analyzer recognizes. Object names are in gray text, and red text is used for literal text values. These colors are selected by default, but they can be changed to anything you want from the Options dialog on the Tools menu. On the toolbar, just to the left of the current database drop-down list, you will find a green arrow. The pop-up tip should display Execute Query (F5). Click this button or press F5 to execute the query. You will see a results grid displayed at the bottom of the Query Analyzer window.
Add another GO statement and then another SELECT statement. The entire query window content should now look like this:
USE AdventureWorks2000 GO SELECT * FROM Product WHERE StandardCost < 4 GO SELECT LocationID, Name FROM Location GO
Because you've already executed the first set of SQL statements, you'll see that the current database is now AdventureWorks2000. Therefore, it's not necessary to run this again. Highlight the last SELECT line only and click the Execute button again. The results are shown in Figure 3-19.
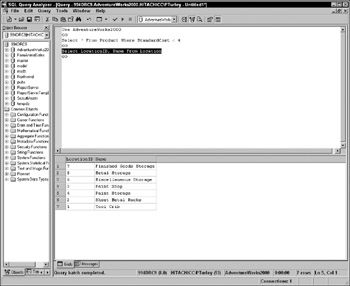
Figure 3-19:
As you can see, only the highlighted expression was executed. Now deselect the highlighted text by clicking anywhere else in the query window and click the Execute button again. As Figure 3-20 shows, without any query text highlighted, both queries are executed and the results are displayed in separate result panes at the bottom of the Query Analyzer window.
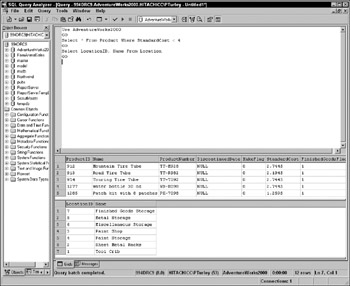
Figure 3-20:
Query Analyzer is where I live. After I've opened it once, I leave it open because I'm going to go back. In my opinion, the only query functionality missing from Query Analyzer is the Query Designer you looked at in Enterprise Manager. If you would like to create a query in the Query Designer and then analyze and massage the script in Query Analyzer, this is easy enough to do. Create the query in Enterprise Manager using the previous technique and then copy and paste the SQL into the query window in Query Analyzer.
Object Browser
The most recent addition to Query Analyzer, since SQL Server 7.0, is the object browser. If you are an application developer and you have worked with Microsoft development tools, you should know that this has nothing to do with the object browser in Visual Studio or Visual Basic for Applications. However, it's a very useful feature that will provide a lot of help and save you a significant amount of work.
The object browser can be used to find practically any database object in both the system catalog and any user databases. If you need help with a system function, view, or stored procedure, this is a convenient way to learn about the input arguments and data types you will need to call or use these objects. You can also generate the calling script for any object.
Let's step through a few scenarios. These are not complete walk-through exercises, just simple examples.
Hypothetically, say that I know my database contains a table with a name containing the word "sales." I could search the system tables if I knew how they were structured and what columns to look at. Fortunately, this isn't necessary. Located in the Master database is a set of system views with names prefixed with INFORMATION_SCHEMA. Using the object browser, I drill down into the Master database and browse through the views. I know that the Information Schema views are used to return easy-to-read metadata about various database objects. I find the INFORMATION_SCHEMA.TABLES view and expand this node to see the columns. This tells me that the name of the table can be found in the Table_Name column. Armed with this information, I type a query expression into Query Analyzer: SELECT * FROM INFORMATION_SCHEMA.TABLES WHERE Table_Name LIKE '%sales%'. The results show any tables with a name including the word "sales" and their associated properties.
I would like to insert rows into the Products table but I don't know all of the column names. I use the object browser to find the Products table in the appropriate database, right-click the table name, and select Script Object to Clipboard as Insert from the pop-up menu. This generates SQL script and places it on the in-memory clipboard. Next, I place the cursor in the query window and use the keyboard shortcut, Control+V, to paste the script into the query window. The script includes placeholders for the literal values I replace to perform the insert operation.
Using Books Online
Books Online is the user documentation and help system for SQL Server 2000. From the graphical tools for SQL Server, such as Enterprise Manager or Query Analyzer, just press the F1 key to open Books Online. In Query Analyzer, you can also highlight key words in your SQL script and press Shift+F1 to navigate to the specific help topic related to the key word.
Here's a little-known secret: Books Online was updated extensively after the release of SQL Server 2000 and is not updated along with the service packs. To update Books Online you must download the latest version from the Microsoft SQL Server web site at www.microsoft.com/sql. If you don't have the update, I recommend that you download and install it. The updated version has corrected many inconsistencies and added a very large amount of new data, especially about the extended XML capabilities that have been added to SQL Server 2000.
OSQL Command-line Utility
The OSQL utility is a command-line interface used to run scripts and queries for SQL Server 2000. This program can be used at a command prompt in any folder. Like most command-line utilities, it is self-documenting. To run OSQL, open a command prompt window. One way to do this is to click the Windows Start button and then select Run from the program menu. In the Run dialog, type CMD and click OK. A list of all command-line options can be displayed by using the -? Switch (type OSQL -?). Figure 3-21 shows the complete help listing.
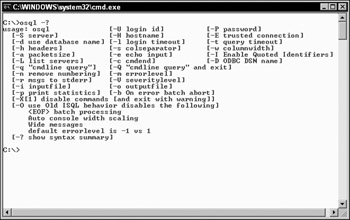
Figure 3-21:
To execute a query, first create a connection to the local SQL Server using Windows integrated security with the command OSQL –E. The E stands for Enterprise security, which means the same thing as Windows integrated security. This returns a numbered batch prompt. This is OSQL's way of saying "First command, please." You can see this in Figure 3-22.
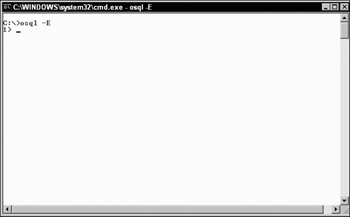
Figure 3-22:
Each prompt will be enumerated until you issue a GO command. At this point, all commands in the preceding batch will be executed and then a new batch begins at line 1. Any SQL statements may be executed at the OSQL prompt. It is necessary to set the current database before working with data. This is done with the USE statement, followed by the GO command, as shown in Figure 3-23.
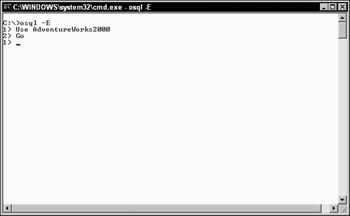
Figure 3-23:
Note how the batch line numbers start over after the GO command is issued. This example uses a simple SELECT statement so you can see the return values from a query. The command window before I press Enter is shown in Figure 3-24.
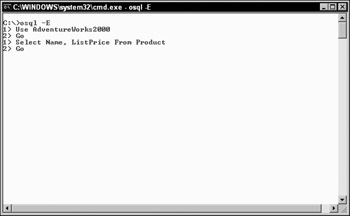
Figure 3-24:
Figure 3-25 shows the command window after I enter the second GO command and press the Enter key.
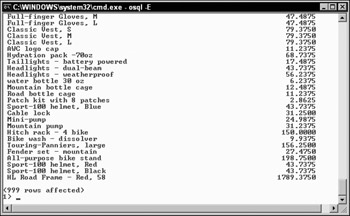
Figure 3-25:
As you see, this is a no-frills environment. It's not as elegant as the Query Analyzer but it's also very simple and uncluttered. System and database administrators often go to the command prompt to run scripted maintenance tasks. Executing a script file is quite easy. As you've seen, scripts are most easily created from Enterprise Manager and Query Analyzer. You could also use Notepad to create a script file. After saving the SQL text to a script file, simply execute OSQL and pass the script file as a parameter, like this:
OSQL –E –I C:\MyScript.sql If you are using SQL Server authentication rather than Integrated Windows security, the command line would use the –U and –P parameters followed by username and password, like this:
OSQL –Uusername –Ppassword To close the OSQL utility, use the EXIT command. If you executed OSQL from a command prompt window, this will return control to the command prompt. The EXIT command can also be used to close this window.
EAN: 2147483647
Pages: 131