Creating and Editing an XML Configuration File
As you've seen, creating and editing an XML configuration makes your package deployment more flexible. In the following procedures, creating an XML configuration file entails extracting data from a source table and then loading the data into a Microsoft Office Excel file. These transformation processes simulate the data-delivering routines that you might perform when working in a data warehouse or an enterprise environment.
Opening the SSIS Project and Executing the Package
You cannot run the Package Installation Wizard until you create an SSIS project. In this procedure, you'll create a new SSIS project to which you will add a data flow task.
Create a New SSIS Project
-
To open the SSIS project, in Windows Explorer, navigate to C:\Documents and Settings\<username>\My Documents\Microsoft Press\is2005sbs\Chap08\.
-
Double-click
 Chap08.sln. The project opens in Business Intelligence Development Studio (BIDS).
 -
In BIDS, locate the Solution Explorer window on the right side of the design environment. Make sure this window is visible and not autohidden so you can see all of the files in the project.
-
Find the
 NewProducts.dtsx file under the SSIS Packages folder. Double-click
  NewProducts.dtsx to open this package in the designer.
You have now opened the project. It's time to execute the project.
-
In Solution Explorer, right-click
 NewProducts.dtsx, and then click Execute Package.
Wait until the package has executed successfully before starting the next step.
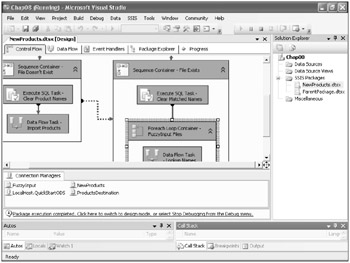
Notice that in the design window, as each task is completed successfully, the color of the task blocks changes from yellow to green. When the package has executed successfully, the task blocks should be green, and the bottom of the screen should read "Package execution completed. Click here to switch to design mode, or select Stop Debugging from the Debug menu." Your screen should resemble the following illustration:

When a package is executed, it creates an output file.
-
To view the output file, switch to Windows Explorer.
-
Navigate to C:\Documents and Settings\<username>\My Documents\Microsoft Press\is2005sbs\Chap08\Data.
-
Double-click
 ProductsDestination.txt.
Notice that there are 62 records in the QuickStartODS database ProductNames table.
-
Switch to BIDS.
-
On the Debug menu, click Stop Debugging.
Creating an XML Configuration File
In this procedure, you'll create an XML configuration file named ![]() NewProducts.dtsConfig. You'll then configure the XML configuration file to store the ConnectionString property.
NewProducts.dtsConfig. You'll then configure the XML configuration file to store the ConnectionString property.
Create an XML Configuration File
-
In BIDS, on the SSIS menu, click Package Configurations. The Package Configurations Organizer opens.
-
In the Package Configurations Organizer, select the Enable Package Configurations check box.
Note Configurations can be enabled or disabled for a package configuration. If you disable a package configuration, the property values stored in the package are used, and the property values in the configurations are ignored.
-
Click Add to start the Package Configuration Wizard. The Welcome To The Package Configuration Wizard page appears.
-
On the Welcome To The Package Configuration Wizard page, click Next. The Select Configuration Type page appears.
-
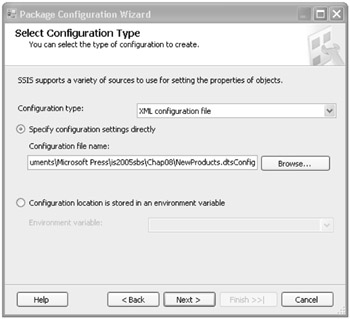
On the Select Configuration Type page:
-
In the Configuration Type drop-down list, select XML Configuration File.
-
Ensure that the Specify Configuration Settings Directly option is selected.
-
In the Configuration File Name text box, type C:\Documents and Settings\<username>\My Documents\Microsoft Press\is2005sbs\Chap08\NewProducts.dtsConfig.
Your screen should look similar to this:

You have now selected the type of configuration to create.
-
-
Click Next. The Select Properties To Export page appears.
-
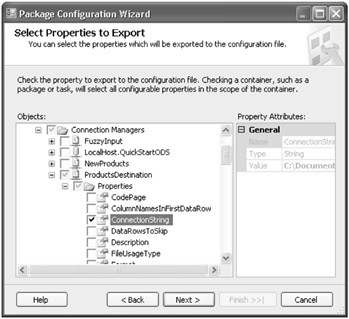
On the Select Properties To Export page:
-
In the Objects pane, locate the Connection Managers folder, expand ProductsDestination, and then expand the Properties folder.
-
Select the ConnectString check box.
You have now selected the properties that will be exported to the configuration file.
Your screen looks like this:

Notice that in the Property Attributes pane, the Name, Type, and Value of the ProductsDestination connection manager connection string is displayed. These values will be written to the XML configuration file.
-
-
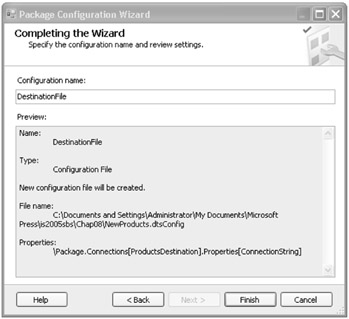
Click Next. The Completing The Wizard page appears.
-
To specify the configuration name, on the Completing The Wizard page, in the Configuration Name text box, type DestinationFile.
-
Click Finish to close the Completing The Wizard page.

-
Click Close to close the Package Configurations Organizer.
Editing the XML Configuration File
In this procedure, you'll edit the XML configuration file by replacing the ProductDestination.txt file with the XMLProductDestination.txt file. This change will enable the package to write product records to the ![]() XMLProductsDestination.txt file.
XMLProductsDestination.txt file.
Edit the XML Configuration File
-
In Windows Explorer, navigate to C:\Documents and Settings\<username>\My Documents\Microsoft Press\is2005sbs\Chap08\NewProducts.dtsConfig.
-
Right-click
 NewProducts.dtsConfig, click Open With, select Microsoft Visual Studio Version Selector, and then click OK.
 -
In SSIS, on the
 NewProducts.dtsConfig tab, find <ConfiguredValue> in the XML file:
-
On the Edit menu, click Find and Replace, and then click Quick Find.
-
In the Find and Replace box, in the Find What box, type <ConfiguredValue>.
-
Click Find Next.
-
<ConfiguredValue> is highlighted in the XML file.
Notice the values of the attributes contained in the <Configuration> tag.
-
-
Between the <ConfiguredValue> tags, locate the destination file named
 ProductsDestination.txt.
 -
Rename the destination file
 ProductsDestination.txt
  XMLProductsDestination.txt.
 -
On the File menu, click Save
 NewProducts.dtsConfig.
 -
Close the SSIS file.
Note When this configuration is enabled, the package writes product records to the
 XMLProductsDestination.txt file.
Testing the Package with the New Configuration
Now that you have created and edited the XML file, you need to test the package to ensure that it is functioning properly and that it created the correct .txt file.
Test the Package
-
Switch to BIDS.
-
In BIDS, in the Solution Explorer pane, right-click
 NewProducts.dtsx, and then click Execute Package.
 -
Wait until the package has executed successfully.
-
Switch to Windows Explorer.
-
In Windows Explorer, navigate to C:\Documents and Settings\<username>\My Documents\ Microsoft Press\ is2005sbs \Chap08\Data.
-
In the Data folder, verify that the package created the
 XMLProductsDestination.txt file.
EAN: 2147483647
Pages: 152