Configuring Error Output
When a data flow component applies a transformation to column data, extracts data from sources, or loads data into destinations, errors can occur. Errors usually occur because of unexpected data values, such as when an expression fails to evaluate because a column value is zero.
Types of Errors
Errors fall into one of the following two categories:
-
Errors An error indicates an unequivocal failure and generates a NULL result.
-
Truncation A truncation is less serious than an error. You can elect to treat truncations as errors or as acceptable conditions.
Error Options
Many data flow components support error outputs that enable you to control how the component handles errors. You have the option to ignore the error, redirect the row to the component's error output, or fail the component. The following list describes these options.
-
Fail Component When this option is chosen, the data flow task fails when an error or truncation occurs.
-
Ignore Failure When this option is chosen, the error or truncation is ignored, and the data row is directed to continue on to the next transformation. For example, if a Lookup transformation fails, you can have a Derived Column transformation set the failed lookup column to Unknown.
-
Redirect Row This option allows you to continue processing successfully transformed rows and to redirect error rows to a data destination where they can be examined and perhaps reprocessed.
| Note | By default, all components are configured to fail on error or truncation. |
The following set of procedures shows you how to create a package that will read a file containing customer data and then look up geography data from the is2005sbsDW database Dim-Geography table. It is important to track the rows of data where the lookup is unsuccessful. You will configure the lookup task to redirect lookup error rows to a file for later investigation.
Exploring the LookupGeography Package
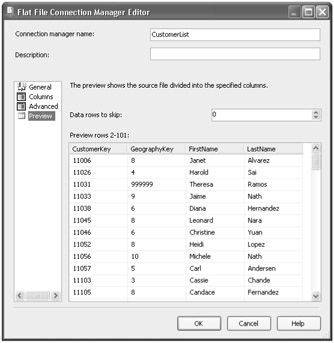
Before you begin the process of configuring error output, it's important to open and explore the LookupGeography package. You will use the Flat File Connection Manager Editor to preview the data in the ![]() CustomerList.txt file and to verify that the correct database is selected. The following steps will walk you through the procedure.
CustomerList.txt file and to verify that the correct database is selected. The following steps will walk you through the procedure.
Open and Explore the Package
-
In BIDS, in Solution Explorer, double-click
 LookupGeography.dtsx. The package opens in design mode.
Note The LookupGeography package already contains a flat file and an OLE DB connection manager.
-
In the Connection Managers pane, right-click CustomerList, and then click Edit. The Flat File Connection Manager Editor opens.
-
In the Flat File Connection Manager Editor, in the left pane, click Preview.
-
The data contained in the
 CustomerList.txt file, which is located in the C:\Documents and Settings\<username>\My Documents\Microsoft Press\is2005sbs\Chap04\Data folder, is displayed.
Your screen now looks like this:
-
Click OK to close the editor.
-
In the Connection Managers pane, right-click LocalHost.is2005sbsDW, and then click Edit. The Connection Manager dialog box opens.
-
In the Connection Manager dialog box, in the Connect To A Database frame, in the Select Or Enter A Database Name drop-down list, verify that is2005sbsDW is selected.
-
Click OK to close the Connection Manager dialog box.
Creating a Task
Before you can configure error output, you need to create a task that can be used to read a file containing customer data. In this procedure, you will create a new Data Flow task named Data Flow Task - Lookup Geography.
Create the Data Flow Task - Lookup Geography Task
-
On the Toolbox menu, in the Control Flow Items group, drag Data Flow Task onto the Control Flow design surface. The new Data Flow task appears on the Control Flow designer.
-
In the Properties list, locate Name, and then change the name property from Data Flow Task to Data Flow Task - Lookup Geography.
-
In the Control Flow designer, double-click Data Flow Task - Lookup Geography.
Notice that the Data Flow tab is now selected, and you have switched from the Control Flow designer to the Data Flow designer.
Creating and Naming a Flat File Source
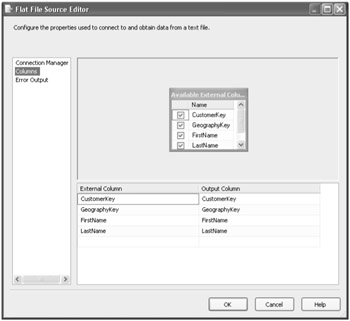
Now that you have created the Data Flow Task - Lookup Geography task, you can create the flat-file source that will be used to read the file containing customer data. In this procedure, you will create a flat-file source and name it Flat File Source - CustomerList. You will then map the Connection Manager columns to the Flat File Source columns.
Create a Flat File
-
On the Toolbox menu, in the Data Flow Sources group, drag Flat File Source onto the Data Flow design surface. The new Flat File Source appears on the Data Flow designer.
-
In the Properties list, locate Name, and then change the name property from Flat File Source to Flat File Source - CustomerList.
-
In the Data Flow designer, double-click Flat File Source - CustomerList. The Flat File Source Editor dialog box opens.
-
In the Flat File Source Editor, in the Flat File Connection Manager drop-down list, ensure that CustomerList is selected.
-
In the left pane, click Columns to map the Connection Manager columns to the Flat File Source columns.
Your screen looks like this:
-
Click OK to close the Flat File Source Editor.
Adding a Data Conversion Transformation
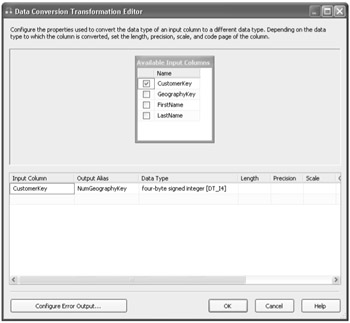
In this procedure, you'll create a Data Conversion transformation named Data Conversion - NumGeographyKey.
To use the Lookup transformation, the source column and the lookup column must have the same data type. In this procedure, you'll use a Data Conversion transformation to convert the GeographyKey column in the source file to an integer.
Convert the GeographyKey Column to an Integer
-
On the Toolbox menu, in the Data Flow Transformations group, drag Data Conversion onto the Data Flow design surface. The new Data Conversion transformation appears on the Data Flow designer.
-
In the Properties list, locate Name, and then change the name property from Data Conversion to Data Conversion - NumGeographyKey.
-
In the Control Flow designer, click Flat File Source - CustomerList, and then drag its output (green arrow) onto Data Conversion - NumGeographyKey.
-
Double-click Data Conversion - NumGeographyKey. The Data Conversion Transformation Editor opens.
-
In the Data Conversion Transformation Editor, in the Available Input Columns table, select the CustomerKey check box.
Notice that a row was added to the table in the bottom pane.
-
In the bottom pane, in the Output Alias column, type NumGeographyKey.
-
In the Data Type column, select four-byte signed integer [DT_14].
Your screen looks similar to this:
-
Click OK to close the Data Conversion Transformation Editor.
Adding a Lookup Transformation
Now that the GeographyKey in the source file matches the data type of the key column of the lookup table, you can add the Lookup transformation to obtain additional columns of data. In this procedure, you will add a Lookup transformation named Lookup - Geography.
Add a Lookup Transformation
-
On the Toolbox menu, in the Data Flow Transformations group, drag Lookup onto the Data Flow design surface. The new Lookup transformation appears on the Data Flow designer.
-
In the Properties list, locate Name, and then change the name property from Lookup to Lookup Geography.
-
In the Control Flow designer, click Data Conversion - NumGeographyKey, and then drag its output (green arrow) to Lookup - Geography.
-
Double-click the Lookup - Geography transformation. The Lookup Transformation Editor opens with the Reference Table tab selected.
-
In the Lookup Transformation Editor, in the OLE DB Connection Manager drop-down list, ensure that LocalHost.is2005sbsDW is selected.
-
Ensure that the Use A Table Or View option is selected, and then select [dbo].[Dim-Geography].
The [dbo].[DimGeography] table is now selected.
-
Click the Columns tab.
-
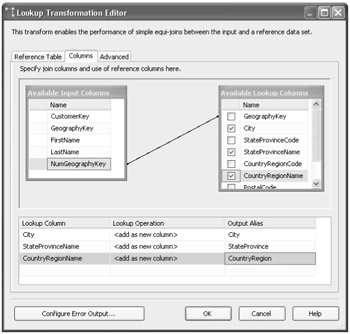
In the Available Input Columns table, drag NumGeographyKey and drop it on GeographyKey in the Available Lookup Columns table.
The lookup join is now established.
-
In the Available Lookup Columns table, select the City, StateProvinceName, and CountryRegionName check boxes.
-
In the bottom pane, in the Output Alias column, click StateProvinceName and rename it StateProvince.
-
In the Output Alias column, click CountryRegionName and rename it CountryRegion.
Your screen looks like this:
-
At the bottom of the screen, click Configure Error Output. The Configure Error Output dialog box opens.
-
In the first row, click the Error column, and then select Redirect Row.
-
Click OK to close the Configure Error Output dialog box.
-
Click OK to close the Lookup Transformation Editor.
Adding a Flat File Destination for Lookup Errors
In this procedure, you will write lookup errors to a file for later investigation and possible reprocessing. First, you will create a flat-file destination and name it Flat File Destination - Lookup Errors. Then, you will drag Lookup - Geography error output to Flat File Destination - Lookup Errors and create a new connection manager named LookupErrors. Finally, you will use the Flat File Destination Editor to associate the input columns with the destination columns.
Write Lookup Errors to a File
-
On the Toolbox menu, in the Data Flow Destinations group, drag Flat File Destination onto the Data Flow design surface.
-
In the Properties list, locate Name, and then change the name property from Flat File Destination to Flat File Destination - Lookup Errors.
-
In the Control Flow designer, click Lookup - Geography, and then drag its error output (red arrow) to Flat File Destination - Lookup Errors. The Configure Error Output box opens.
-
Click OK to close the Configure Error Output dialog box.
-
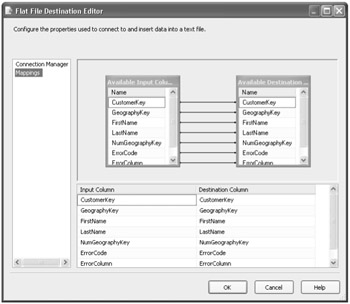
Double-click Flat File Destination - Lookup Errors. The Flat File Destination Editor opens.
-
In the Flat File Destination Editor, click New to create a new connection manager. The Flat File Format dialog box opens.
-
In the Flat File Format box, ensure that the Delimited option is selected, and then click OK.
-
In the Flat File Connection Manager Editor box, in the File Name box, type Lookup-Errors.
-
Click Browse. The Open dialog box appears.
-
Navigate to C:\Documents and Settings\<username>\My Documents\Microsoft Press\is2005sbs\Chap04\Data.
-
Select
 LookupErrors.txt, and then click Open.
 -
In the Flat File Connection Manager Editor, at the bottom of the box, select the Column Names In The First Data Row check box.
-
Click OK to close the Flat File Connection Manager Editor.
-
In the Flat File Destination Editor, ensure that the Overwrite Data In The File option is selected.
-
In the left pane, click Mappings.
The input columns are now associated with the destination columns.
Your screen looks like this:
-
Click OK to close the Flat File Destination Editor.
Adding a Flat File Destination for Successful Lookups
In this procedure, you'll write successful rows to another flat file. First, you will create a flat-file destination and name it Flat File Destination - NewCustomerList. Then, you will drag Lookup - Geography successful lookup output to Flat File Destination - NewCustomerList and create a new connection manager named NewCustomerList. Finally, you will use the Flat File Destination Editor to associate the input columns with the destination columns.
Write Successful Rows to Another Flat File
-
On the Toolbox menu, in the Data Flow Destinations group, drag Flat File Destination onto the Data Flow design surface.
-
In the Properties list, locate Name, and then change the name property from Flat File Destination to Flat File Destination - NewCustomerList.
-
In the Control Flow designer, click Lookup - Geography, and then drag its successful lookup output (green arrow) to Flat File Destination - NewCustomerList.
-
Double-click Flat File Destination - NewCustomerList. The Flat File Destination Editor opens.
-
In the Flat File Destination Editor, click New to create a new connection manager. The Flat File Format dialog box opens.
-
In the Flat File Format dialog box, ensure that the Delimited option is selected, and then click OK.
-
In the Flat File Connection Manager Editor, in the File Name box, type NewCustomerList.
The connection manager is now named NewCustomerList.
-
Click Browse. The Open dialog box appears.
-
Navigate to C:\Documents and Settings\<username>\My Documents\Microsoft Press\is2005sbs\Chap04\Data.
-
In the File name box, type
 NewCustomerList.txt, and then click Open.
 -
In the Flat File Connection Manager Editor, at the bottom of the box, select the Column Names In The First Data Row check box.
-
Click OK to close the Flat File Connection Manager Editor.
-
In the Flat File Destination Editor, ensure that the Overwrite data in the file check box is selected.
-
In the left pane, click Mappings.
The input columns are now associated with the destination columns.
-
Click OK to close the Flat File Destination Editor.
Executing the Package and Checking the Results
In the previous exercises, you created the task named Data Flow Task - Lookup Geography and the flat-file source named Flat File Source - CustomerList to read data from a text file. You then created a Data Conversion transformation named Data Conversion - NumGeographyKey to convert the data in an input column and copy it to a new output column. You added a Lookup transformation named Lookup - Geography to perform lookups. After this was completed, you wrote lookup errors to a file. Finally, you added a flat-file destination for successful lookups. Now that you have completed these steps, you are ready to execute the package and review the results. The following steps will show you how to accomplish this.
Execute the Package and Check the Results
-
In BIDS, in Solution Explorer, right-click
 LookupGeography.dtsx, and then click Execute Package.
 -
After the execution is complete, on the Debug menu, click Stop Debugging.
-
In Windows Explorer, navigate to C:\Documents and Settings\<username>\My Documents\Microsoft Press\is3005sbs\Chap04\Data.
-
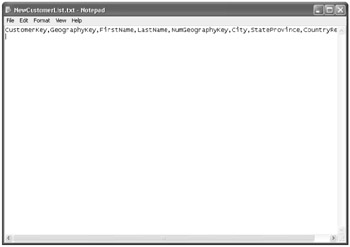
In the Data folder, open the file named
 NewCustomerList.txt and verify that it contains customer and geography data.
Your screen looks like this:
-
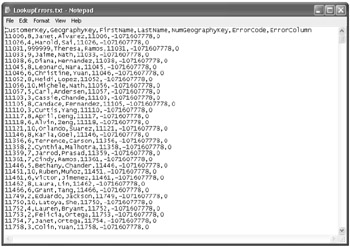
In the Data folder, open the file named
 LookupErrors.txt and verify that it contains lookup failures with customer data but that it doesn't contain any geography data.
Your screen looks like this:
EAN: 2147483647
Pages: 152