Using Data Flow Transformations
The objective of the following set of procedures is to extract data from a source table and then load the data into a Microsoft Office Excel file. These transformation processes simulate data-delivering routines that you might perform when working in a data warehouse or enterprise environment.
Specifically, you'll first create a package for cleansing data from a flat file source and then place the results in a separate flat file destination. After this is accomplished, you'll use the Conditional Split transformation to extract specific rows from the source and then use the Derived Column transformation to trim the extracted rows. Finally, you will add a Multicast transformation to send the same output to two different destinations: a text file and a SQL Server 2005 database table.
Opening and Exploring the SSIS Project
Before you create a new package, it's important to open and explore the Chap04_Project SSIS project so that you become familiar with the packages that have been created for this project. The SSIS Packages folder contains two packages: LookupGeography and NewProducts. The following steps will walk you through a preview of these packages.
Open and Explore the SSIS Project
-
In Windows Explorer, navigate to the C:\Documents and Settings\<username>\ My Documents\Microsoft Press\is2005sbs\Chap04\ folder.
-
Double-click the
 Chap04_Project.sln file.
The project opens in SQL Server Business Intelligence Development Studio (BIDS).
-
In BIDS, locate the Solution Explorer window on the right side of the design surface.
Make sure this window is visible and not set to Auto-Hide, so you can see all of the files in the project.
-
In Solution Explorer, if necessary, expand the SSIS Packages folder.
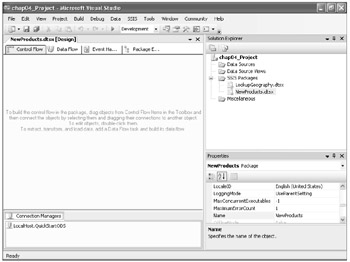
Notice that two packages have been created: LookupGeography and NewProducts.
-
Double-click
 NewProducts.dtsx to open this package in design mode.
Your screen looks similar to this:
-
Locate the Connection Managers pane in the lower-left pane.
Notice that the NewProducts package already contains an OLE DB connection manager called LocalHost.QuickStartODS.
-
Right-click LocalHost.QuickStartODS, and then click Edit.
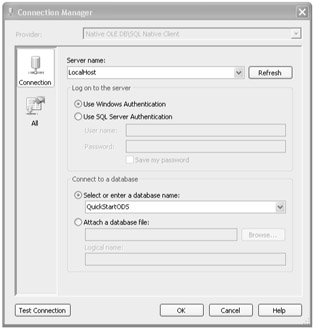
The Connection Manager dialog box appears.
Your screen now looks like this:
-
Verify that the connection manager references the QuickStartODS database on the localhost:
-
Verify that in the Server Name box, LocalHost is selected.
-
Verify that in the Connect To A Database frame, in the Select Or Enter A Database drop-down list, QuickStartODS is selected.
-
Click OK.
-
Preview the NewProducts.txt File
-
In Windows Explorer, navigate to the C:\Documents and Settings\<username>\ My Documents\Microsoft Press\is2005sbs\Chap04\Data folder.
-
Double-click the
 NewProducts.txt file to open it in Notepad.
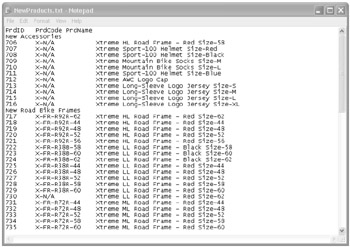
Your screen looks like this:
Notice that the
 NewProducts.txt file contains a list of product names and attributes. There is a header row containing column names, and there are sub-header rows containing product subcategories.
 -
Close the
 NewProducts.txt file.
Creating the Data Flow Task
A Data Flow task encapsulates the data flow engine that moves data between sources and destinations, providing the facility to transform, clean, and modify data as it is moved. Creating a Data Flow task and adding it to a package control flow makes it possible for the package to extract, transform, and load data.
In this procedure, you will create the data flow task named Data Flow Task - Import Products. To build the control flow in a package, you drag objects from the Control Flow Items group in the Toolbox onto the Control Flow designer. To edit the object, you double-click it and then change various properties, such as its name.
Create the Data Flow Task
-
In BIDS, on the left side of the screen, click Toolbox. The Toolbox menu appears.
Your screen looks like this:
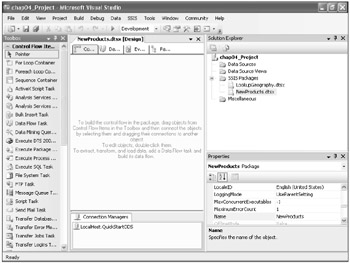
Scroll through the list and note the number and types of objects that are available in the Toolbox.
-
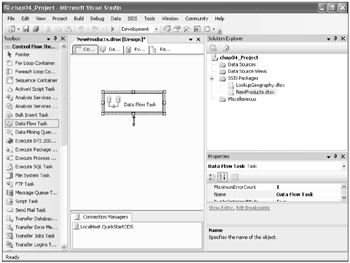
On the Toolbox menu, in the Control Flow Items group, drag Data Flow Task onto the Control Flow design surface. The new data flow task appears on the Control Flow designer.
Your screen should look similar to this:
-
In the Properties pane, located on the right side of the screen, make sure that Data Flow Task is selected.
-
Click the Alphabetical button to alphabetize the Properties list.
-
In the Properties list, locate Name, and then change the name property from Data Flow Task to Data Flow Task - Import Products.
Your screen now looks like this:
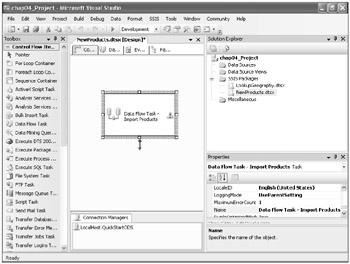
Notice that the name of the data flow task in the Data Flow designer is now Data Flow Task - Import Products.
Using a Flat File Source
A Flat File source reads data from a text file. The text file can be in delimited, fixed-width, or ragged-right format.
-
Delimited format This format uses column and row delimiters to define columns and rows.
-
Fixed-width format This format uses width to define columns and rows.
-
Ragged-right format This format uses width to define all columns except for the last column, which is delimited by the row delimiter.
Configuring a Flat File Source
You can configure the Flat File source in the following ways:
-
Add a column to the transformation output that contains the name of the text file from which the Flat File source extracts data.
-
Specify whether the Flat File source interprets zero-length strings in columns as null values.
In the following procedure, you will create a data adapter named Flat File Source - NewProducts.
Create a Data Adapter
-
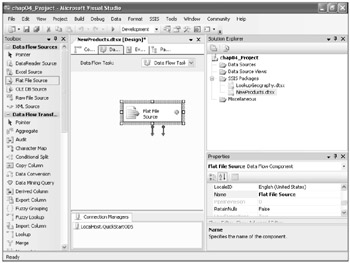
In BIDS, on the Toolbox menu, in the Data Flow Sources group, drag Flat File Source onto the Data Flow design surface. The new data adapter appears on the Data Flow designer.
Your screen looks like this:
-
In the Properties list, locate Name, and then change the name property from Flat File Source to Flat File Source - NewProducts.
Your screen now looks like this:
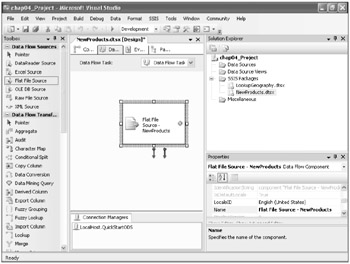
Notice that the name of the data adapter in the Data Flow designer is now Flat File Source - NewProducts.
Adding a Connection Manager
Now that you have created the Flat File Source - NewProducts data adapter, you are ready to create a new connection manager. You use the Flat File Source Editor to create the new connection manager. After you have created the connection manager, you will specify its properties and file format. Finally, you will define the columns for the connection manager.
Add a Connection Manager
-
In BIDS, on the Data Flow designer, double-click the Flat File Source - NewProducts data adapter. The Flat File Source Editor dialog box appears.
-
In the Flat File Source Editor dialog box, click New to create a new connection manager.
-
In the Connection Manager Name box, type NewProducts.
-
Next to the File Name box, click Browse and navigate to C:\Documents and Settings\ <username>\My Documents\Microsoft Press\is2005sbs\ Chap04\Data\.
-
Click
 NewProducts.txt, and then click Open.
Your screen looks like this:
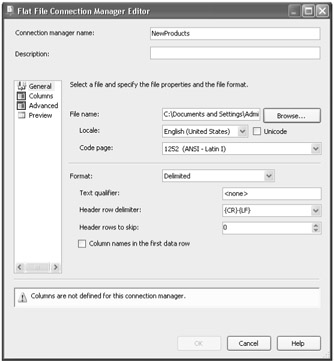
Notice the message at the bottom of the Flat File Connection Manager Editor box that reads "Columns are not defined for this connection manager."
In the Flat File Connection Manager Editor box, you can specify file properties and the file format.
-
Ensure that the default values in the following table are selected.
The default value for the other properties is correct for
 NewProducts.txt.
 Open table as spreadsheet
 Property
Default Value
Locale
English (United States)
Code Page
1252 (ANSI - Latin I)
Format
Delimited
Text Qualifier
<none>
Header Row Delimiter
{CR}{LF}
Header Rows To Skip
0
-
At the bottom of the editor box, select the Column Names In The First Data Row check box.
-
In the left pane, click Columns.
Your screen now looks like this:
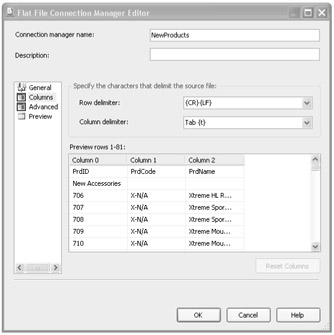
Notice that a table appears with three columns and data for rows 1–81. Rows 1–81 are a preview of the rows to be extracted from the file.
Notice that in the Specify The Characters That Delimit The Source File frame, you can change the row and column delimiters, if necessary.
-
In the left pane, click Advanced.
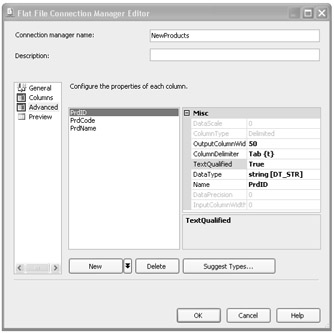
Your screen now looks like this:
-
In the Configure The Properties Of Each Column pane, click PrdID, and then, in the right pane in the second column, change PrdID to ProductID.
-
Click PrdCode, and then, in the right pane in the second column, change PrdCode to ProductCode.
-
Click PrdName, and then, in the right pane in the second column, change PrdName to ProductName.
Notice the other default values for a column. You can change these properties if needed.
-
Click OK to close the Flat File Connection Manager Editor.
-
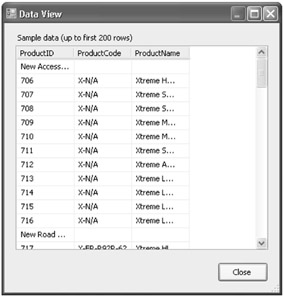
In the Flat File Source Editor, click Preview to see sample rows from the source data file. The Data View dialog box opens.
Your screen looks like this:
-
Click Close to close the Data View box.
-
Click OK to close the Flat File Source Editor.
Adding a Conditional Split Transformation
In this procedure, you will add a Conditional Split transformation named Conditional Split - Valid Product Rows. The first step you must perform is separating the rows you want to keep from the rows you want to discard. In this procedure, you will discard the subcategory sub-header rows (ProductID begins with New) and the rows where the product is not available (ProductCode begins with X-N/A). The best tool to perform this job is the Conditional Split transformation. Conditional Split transformations determine from input which output channel to use, based on the result of an expression.
Add a Conditional Split Transformation
-
In BIDS, on the Toolbox menu, in the Data Flow Transformations group, drag Conditional Split onto the Data Flow design surface. The new Conditional Split transformation appears on the Data Flow designer.
-
In the Properties list, locate Name, and then, in the right column, change the name property from Conditional Split to Conditional Split - Valid Product Rows.
-
In the Data Flow designer, click the Flat File Source - NewProducts data adapter to select it and then drag its output (green arrow) onto the destination Conditional Split - Valid Product Rows.
Your screen looks like this:
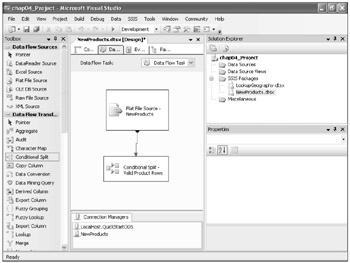
This sets the Flat File Source - NewProducts data adapter as the input for the Conditional Split - Valid Product Rows transformation. Now you're ready to configure the output channels of the Conditional Split.
-
Double-click Conditional Split - Valid Product Rows. The Conditional Split Transformation Editor opens.
-
At the bottom of the editor, change the Default output name from Conditional Split Default Output to DiscardRows.
Your screen now looks like this:
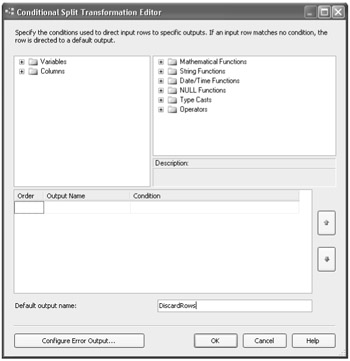
Note All rows that don't meet one of the conditions go to the default output. In this case, it's worth giving the default output a meaningful name.
-
To create an additional output, in the middle pane, click the column under Output Name, and then type ValidRows.
Note With Conditional Split, you get multiple output channels (green arrows). Giving names to the output channels makes it easier to choose the right one.
-
Click the column under Condition, and then type SUBSTRING([ProductID],1,3) != <;$QD>New<;$QD> && SUBSTRING([ProductCode],1,5) != <;$QD>X-N/A<;$QD>.
You can copy the preceding expression, or you can copy the expression from C:\Documents and Settings\<username>\My Documents\MicrosoftPress \is2005sbs \Chap04\Expressions\ConditionalSplit.txt and then paste it in the text area under the Condition column.
Your screen now looks like this:
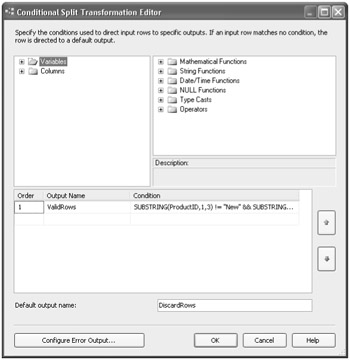
This expression includes two data-cleansing filters. The first is used to evaluate whether the first three characters of ProductID indicate a sub-header row. If the row is a sub-header row, the row is sent to the default output that you named DiscardRows. The second expression filters rows in which the Product Code indicates a product that is not available.
Tip To help you type expressions, you can expand the folders in the upper-left pane of the editor to access functions and type casts and operators. The expression syntax is similar to C and C#. For a full description, see the SQL Server 2005 Books Online topic, "Integration Services Expression Reference" at the following URL: http://msdn2.microsoft.com/en-us/library/ms141232.aspx.
-
Click OK to close the Conditional Split Transformation Editor.
Adding a Derived Column Transformation
After you have separated the rows you want to keep, the next step is to discard part of the product name data (the size value) in those rows. In this procedure, you'll add a Derived Column transformation named Derived Column - Replace ProductName, using ValidRows output from ConditionalSplit - Valid Product Rows.
Add a Derived Column Transformation
-
In BIDS, on the Toolbox menu, in the Data Flow Transformations group, drag Derived Column onto the Data Flow design surface. The new Derived Column transformation appears on the Data Flow designer.
Note The Derived Column transformation applies transformations to an existing column or creates a new column.
-
In the Properties list, locate Name, and then, in the right column, change the name property from Derived Column to Derived Column - Replace ProductName.
-
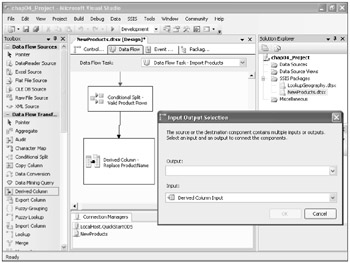
In the Data Flow designer, click Conditional Split - Valid Product Rows to select it, and then drag its output (green arrow) to the destination Derived Column - Replace ProductName.
Tip Even though you defined two outputs, the Conditional Split transformation shows only one output (green arrow). If you later click Conditional Split again, you will notice a new green arrow that you could use to connect an unassigned output to another destination.
The Input Output Selection dialog box opens to let you choose which output to connect to the input of the destination component.
Your screen should look similar to this:
-
In the Input Output Selection dialog box, in the Output drop-down list, select Valid-Rows.
-
Click OK to close the Input Output Selection dialog box.
-
In the Data Flow designer, double-click Derived Column - Replace ProductName. The Derived Column Transformation Editor opens.
-
In the editor, in the left pane, expand the Columns folder.
-
Click ProductName and drag it to the first row of the Derived Column Name list.
-
Click the first row under Derived Column and select Replace ProductName.
Tip You can make the results of an expression transform an existing column or create a new column. In this case, the source is not worth keeping. In reality, even when you "replace" a column, it creates a new space in the buffer and simply maps the name of the column to the new space.
-
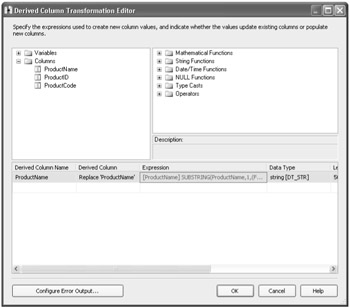
Click the first row under Expression, and then type: SUBSTRING(Product-Name,1,(FINDSTRING(ProductName,"Size",1) - 2)).
Your screen now looks like this:
-
This expression is used to strip off the size portion of the product name. You can copy the preceding expression, or you can copy the expression from C:\Documents and Settings\<username>\My Documents\Microsoft Press\is2005sbs\Chap04\ Expressions\DerivedColumn.txt and paste it into the Expression text box.
-
Click OK to close the Derived Column Transformation Editor.
Viewing the Properties of the Derived Column Transformation
Now that you have added the Derived Column transformation named Derived Column - Replace ProductName and used it to discard part of the product name data, you are ready to view the properties of the new transformation. In this procedure, you will use the Advanced Editor to view the properties of the Derived Column transformation. This editor enables you to view or change advanced properties of the component.
View the Properties of the Derived Column Transformation
-
In BIDS, in the Data Flow designer, right-click Derived Column - Replace ProductName, and then click Show Advanced Editor. The Advanced Editor For Derived Column - Replace ProductName dialog box opens.
This editor enables you to view or change advanced properties of the component.
-
In the editor, click the Input And Output Properties tab.
-
In the left pane, expand Derived Column Input, expand the Input Columns folder, and then click the ProductName column.
Your screen looks like this:
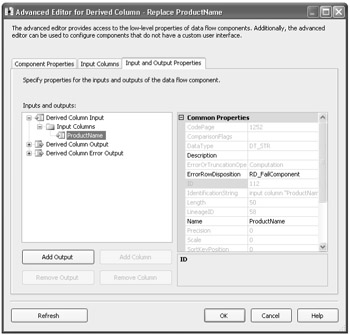
Notice the Expression versus FriendlyExpression custom properties. Expression uses the lineage identifier to create an internal representation of the column. FriendlyExpression is the string value that you provided in the Expression text box.
-
Click OK to close the editor.
Adding a Flat File Destination Data Adapter and Executing the Package
The final step of this data-cleansing process is to write the results to a text file. In the first procedure, you will add a flat-file destination data adapter named Flat File Destination - Products Destination with a new connection manager named ProductsDestination. After you have added the flat-file destination data adapter, you will execute the package and view the results.
Add a Flat-File Destination Data Adapter
-
In BIDS, on the Toolbox menu, in the Data Flow Destinations group, drag Flat File Destination onto the Data Flow design surface. The data adapter appears on the Data Flow designer.
-
In the Properties list, locate Name, and then, in the right column, change the name property from Flat File Destination to Flat File Destination - ProductsDestination.
-
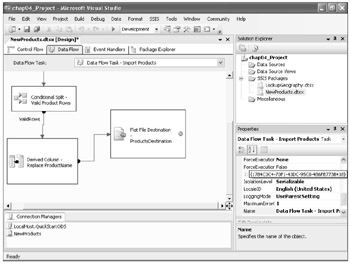
In the Data Flow designer, click Derived Column - Replace ProductName to select it, and then drag its output (green arrow) to Flat File Destination - ProductsDestination.
Your screen should look similar to this:
-
In the Data Flow designer, double-click Flat File Destination - ProductsDestination. The Flat File Destination Editor opens.
-
In the editor, click New to create a new connection manager. The Flat File Format dialog box opens.
-
In the Flat File Format dialog box, ensure that the Delimited option is selected, and then click OK.
-
In the Flat File Connection Manager Editor, in the File Name box, type Products-Destination.
Notice that the other fields in the editor box populate (that is, Locale, Code Page, and so on).
-
Next to the File Name box, click Browse.
-
In the Open box, navigate to C:\Documents and Settings\<username>\My Documents\ Microsoft Press\is2005sbs\Chap04\Data.
-
In the File Name box, type
 ProductsDestination.txt, and then click Open.
 -
At the bottom of the Flat File Connection Manager Editor box, select the Column Names In The First Data Row check box.
-
In the left pane, click Columns.
Notice that the data flow metadata is used to set the column names of the output file.
-
Click OK to close the Flat File Connection Manager Editor.
-
In the Flat File Destination Editor, ensure that the Overwrite Data In The File check box is selected.
-
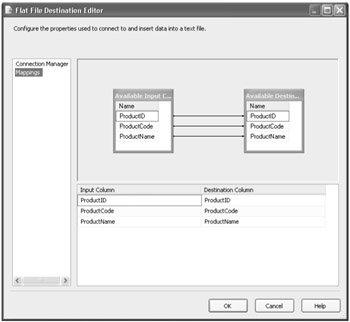
In the left pane, click Mappings to associate the input columns with the destination columns.
Your screen looks like this:
-
Click OK to close the Flat File Destination Editor.
Execute the Package
-
In BIDS, in Solution Explorer, right-click
 NewProducts.dtsx and click Execute Package.
The package is saved and executed in debug mode.
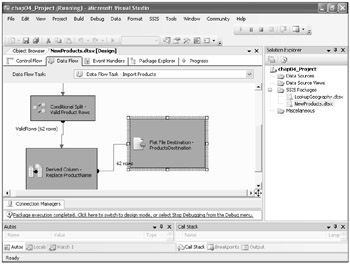
In the designer, notice that the task blocks turn green as each task is successfully completed. When the package has successfully executed, it should read, "Package execution completed. Click here to switch to design mode, or select Stop Debugging from the Debug menu at the bottom of the screen."
Your screen looks similar to this:
-
After execution is complete, on the Debug menu, click the Stop Debugging button.
-
In Windows Explorer, navigate to the C:\Documents and Settings\<username>\My Documents\Microsoft Press\is2005sbs\ Chap04 \Data folder.
-
Double-click the
 ProductsDestination.txt file to open it.
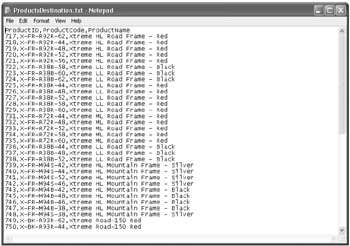
Your screen now looks like this:
-
In the ProductsDestination.text file, confirm that the correct rows with properly transformed data (product names without size) appear in the file.
-
Close the ProductsDestination.text file.
Sending Output to Different Destinations
Now you're ready to send the results of the Derived Column transformation to two destinations: a database table and the existing flat-file destination. In the first procedure, you will add a Multicast transformation named Multicast - File and Database to the NewProducts package. Then you will add a SQL Server destination data adapter named SQL Server Destination - ProductNames and create a database table named ProductNames. Finally, you will create the Execute SQL Task - Delete From ProductNames task that deletes the data from the ProductNames table and then execute the package and evaluate the results.
Add a Multicast Transformation
-
In BIDS, on the Toolbox menu, in the Data Flow Transformations group, drag Multicast onto the Data Flow design surface. The Multicast transformation appears on the Data Flow designer.
Note Both Multicast transformations and Conditional Split transformations have multiple outputs; however, with Multicast transformations, each output gets all the rows.
-
In the Properties list, locate Name, and then change the name property from Multicast to Multicast - File and Database.
-
Delete the connector (green arrow) between Derived Column - Replace ProductName and Flat File Destination - ProductsDestination.
-
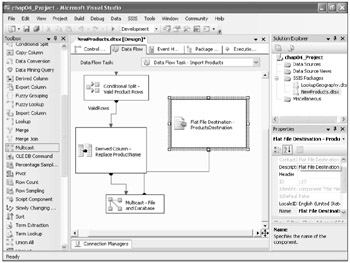
Drag the output (green arrow) from Derived Column - Replace ProductName onto the Multicast - File and Database transformation.
-
Drag the output (green arrow) from the Multicast - File and Database transformation onto Flat File Destination - ProductsDestination.
Your screen now looks similar to this:
Note As long as you don't do anything to change the lineage of the columns, you can break and read flows without remapping. If you do anything that might affect the columns, you must discard the mapping and re-create it.
Add a SQL Server Destination Data Adapter
-
In BIDS, on the Toolbox menu, in the Data Flow Transformations group, drag SQL Server Destination onto the Data Flow design surface. The Destination data adapter appears on the Data Flow designer.
-
In the Properties list, locate Name, and then change the name property from SQL Server Destination to SQL Server Destination - ProductNames.
-
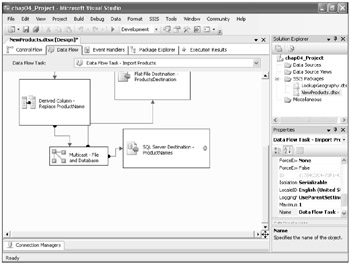
Drag the output (green arrow) from Multicast - File and Database Transformation onto SQL Server Destination - ProductNames.
Your screen now looks similar to this:
Now that you have added the SQL Server Destination data adapter, you will create a new table named ProductNames.
-
In the Data Flow designer, double-click the new data adapter named SQL Server Destination - ProductNames. The SQL Destination Editor dialog box opens.
-
In the editor, ensure that the LocalHost.QuickStartODS is selected as the OLE DB connection manager.
-
To create a new table:
-
To the right of the Use A Table Or View drop-down list, click New. The Create Table dialog box opens.
-
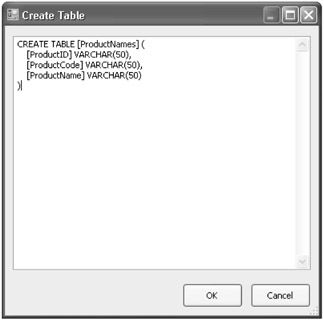
In the Create Table dialog box, delete the text between the two brackets that reads SQL Server Destination - Product Names and replace it with ProductNames.
Your screen looks like this:
-
Click OK to close the Create Table dialog box.
The connection manager will create a table for you, but it defaults to the name of the data adapter.
Note Notice that you don't have the option to overwrite the data as you had when you added the Flat File Destination data adapter. Therefore, in the following procedure, you will delete the data from the ProductNames table.
-
-
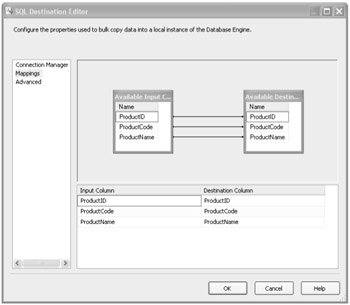
In the SQL Destination Editor, in the left pane, click Mappings to create mappings between the input and destination columns.
Your screen now looks like this:
-
Click OK to close the SQL Destination Editor.
Important Before loading the ProductNames table, be aware that this task will delete any records that it might already contain.
Create the Task that Deletes Data from the Table
-
On the Toolbox menu, in the Control Flow Items group, drag Execute SQL Task onto the Control Flow design surface. The new Execute SQL task appears on the Control Flow designer.
-
In the Properties list, locate Name, and then change the name property from Execute SQL Task to Execute SQL Task - Delete From ProductNames.
-
In the Control Flow designer, double-click Execute SQL Task - Delete From Product-Names. The Execute SQL Task Editor opens.
-
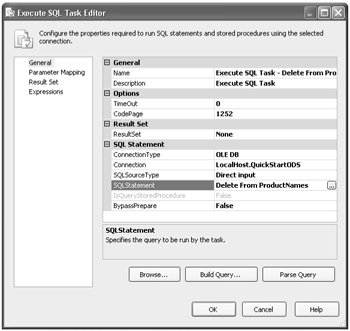
In the Execute SQL Task Editor, in the right pane, under SQL Statement, click Connection, and then, in the right box, select LocalHost.QuickStartODS.
-
Under SQL Statement, click SQLStatement, and then click the ellipses button in the right box. The Enter SQL Query dialog box opens.
-
In the Enter SQL Query box, type Delete From ProductNames.
-
Click OK to close the Enter SQL Query box.
Your screen now looks like this:
-
Click OK to close the Execute SQL Task Editor.
-
In the Control Flow designer, click the Execute SQL Task - Delete From ProductNames task, and then drag the precedence constraint (green arrow) onto Data Flow Task - Import Products.
Your screen looks similar to this:
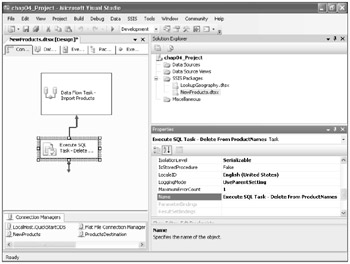
The precedence constraint ensures that Execute SQL Task - Delete From ProductNames successfully deletes the data in the ProductNames table before Data Flow Task - Import Products populates the table.
Execute the Package and Check the Results
-
In BIDS, in Solution Explorer, right-click
 NewProducts.dtsx, and then click Execute Package.
 -
After the execution is complete, on the Debug menu, click Stop Debugging.
-
Open Microsoft SQL Server Management Studio.
-
In SQL Server Management Studio, in the left pane, in Object Explorer, expand the Databases folder, expand QuickStartODS, and then expand the Tables folder.
-
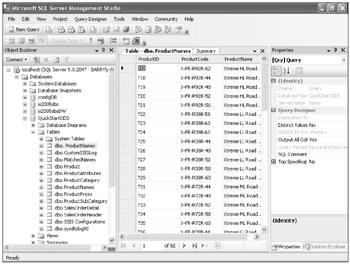
In the Tables folder, right-click dbo.ProductNames, and then click Open Table.
Tip If you don't see dbo.ProductNames listed, right-click the Tables folder, and then click Refresh.
The Table - dbo.ProductNames tab appears in the right pane, and the table populates with data.
-
Confirm that the table includes the correct rows with properly transformed data (product names without size).
Your screen now looks like this:
EAN: 2147483647
Pages: 152