Chapter 12: Performance Tuning and Monitoring
|
|
It’s one thing to deploy applications on an IIS machine, and it’s another to make sure your applications and server perform well from the user’s perspective. The topic of performance tuning is an important one in a fast-paced world where users will move on if a page is not returned a few seconds after clicking it, and where they will abandon a purchase if an online credit card returns an HTTP error code. This chapter looks in detail at how to tune IIS servers, sites, and applications to ensure that response time and throughput are sufficient to meet the needs of potential users. It also looks briefly at the subject of performance monitoring in general and how to monitor IIS machines using tools included with Windows Server 2003.
Tuning IIS
I’ll begin by focusing on tuning IIS itself to ensure that web applications run on it with the best possible levels of scalability, reliability, and performance. Of course, bad application coding can nullify many of the performance gains from any actions you take tuning IIS; so later in this chapter, in the section titled “Additional Server Tuning Tips,” I’ll discuss performance issues relating to specific types of applications such as ASP, ASP.NET, ISAPI, and CGI. First, however, I’ll focus more generally on how to tune IIS for the widest possible range of applications to run well.
Choosing an Isolation Mode
Tuning IIS for maximum performance, reliability, and security starts with a simple decision: will you be running your server in worker process isolation mode or IIS 5 isolation mode? To ensure the highest level of performance and best security, you need to configure your servers to run in worker process isolation mode so they can take full advantage of the new architectural features of IIS 6, including:
-
Using application pools and worker processes with their associated tuning features of recycling, idle timeout, request queue limits, CPU monitoring, processor affinity, web gardens, health monitoring, rapid-fail protection, startup and shutdown time limits, and queue length limits.
-
Using ASP.NET as an application development platform with its associated benefits of XML integration, improved performance, broader programming language support, and faster development using Web Forms.
To change the isolation mode in which your IIS machine runs, use IIS Manager to open the properties sheet for the Web Sites node and select the Services tab (Figure 12-1). The default mode for your server depends on whether you have upgraded from a previous version of IIS or performed a fresh install, as discussed previously in Chapter 8, “Creating and Configuring Applications.”
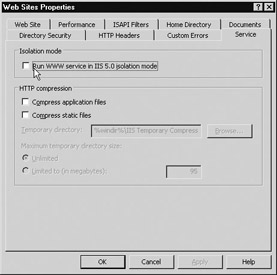
Figure 12-1: Configuring isolation mode
If you are running your server in IIS 5 isolation mode, you should be aware that running applications with an application isolation setting of High (Isolated) incurs an additional performance penalty due to the RPC mechanism used by COM. When using this mode, configure your applications to run as either Medium (Pooled) or Low (IIS Process) isolation wherever possible, with the former being preferable from a reliability standpoint.
Regardless of which isolation mode you choose for running your IIS machine, you can still take advantage of quality of service tuning features such as HTTP keep-alives, HTTP Compression, limiting connections, connection timeouts, bandwidth throttling, and CPU monitoring. You can also enhance the performance of IIS by editing various metabase parameters and Registry settings, though some of these are not available when running in IIS 5 isolation mode.
| Tip | You can’t run IIS 6 in both isolation modes simultaneously; so if some of your legacy applications require that you run them in IIS 5 isolation mode to work properly, consider setting up an additional IIS 6 machine running in IIS 5 isolation mode that is used specifically for hosting such legacy apps. Then configure your main IIS 6 machine to run in worker process isolation mode and use it for your newer applications. |
Tuning Application Pools
Assuming that you’ve configured your server to run in worker process isolation mode, let’s look at how to take advantage of the architectural enhancements of this new mode to tune IIS for optimal performance. I discussed these new features of IIS 6 in Chapter 2, “IIS 6 Architecture”; now you’ll learn how to enable and configure them. Note that application pool settings apply to ASP, ASP.NET, and ISAPI applications but not to CGI applications, which are handled differently by IIS.
Recycling
Worker process recycling increases reliability by allowing IIS to periodically restart worker processes servicing an application pool. This can be useful when web applications are buggy and hang or fail due to memory leaks and other conditions.
Recycling can be configured in different ways. Specifically, a worker process (w3wp.exe) can be recycled:
-
Manually, using IIS Manager.
-
After a specified number of minutes of inactivity have elapsed. This setting is enabled by default and set to 1740 minutes or 29 hours.
-
After the worker process has handled a specified number of requests. The default value if this setting is enabled is 35,000 connections.
-
At one or more specific times during the day, for example at 2:00 A.M. during a nightly maintenance window. The default value if this setting is enabled is the current server time.
-
Once the utilization of virtual memory by the worker process reaches a specified threshold level. The default value if this setting is enabled is 500MB.
-
Once the utilization of privately allocated system physical memory by the worker process reaches a specified threshold level. The default value if this setting is enabled is 192MB.
-
Programmatically by coding an ISAPI application within the application pool to declare itself unhealthy to the WWW Service by using HSE_REQ_REPORT_UNHEALTHY, a new ServerSupportFunction for ISAPI extensions supported by IIS 6.
Tip If you configure recycling to occur at specific times of the day and you change the system clock settings, manually recycle worker processes once to ensure that automated recycling will occur at the correct times afterward.
By default, IIS 6 is configured to recycle worker processes based on the second criteria, that is, after the worker process has been inactive for a certain period of time (Figure 12-2). The settings on this properties sheet can be configured at two different levels:
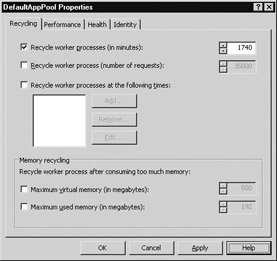
Figure 12-2: Enabling and configuring worker process recycling
-
Application Pools By right-clicking the Application Pools node in IIS Manager and selecting Properties, you can configure all worker processes in all application pools to recycle according to the same criteria.
-
Specific Application Pool By right-clicking a specific application pool such as the DefaultAppPool and selecting Properties, you can configure all worker processes associated with that specific pool to recycle the same way.
Note that application pools inherit their recycling settings (and all other settings) from the parent Application Pools node, although you can override these settings for each pool. As usual, you must be a member of the Administrators group on the local machine (or a member of Domains Admins in a domain scenario) to perform these tasks.
To manually recycle worker processes for a specific application pool, right-click the pool and select Recycle. You cannot recycle all application pools simultaneously using IIS Manager; you have to recycle each pool separately.
| Tip | If your IIS machine serves only static HTML pages, you can disable worker processing for all application pools. If you are serving dynamic content that has been thoroughly debugged and tested, you can also disable recycling, although you may want to leave it enabled just in case undetected bugs manifest themselves. After all, users are the best beta testers for finding bugs! If it can be broken, a user will somehow break it! |
Looking at things from an internal or architectural perspective, there are two basic ways that recycling can occur:
-
Overlapped recycling IIS starts up a new worker process while leaving the old one to drain its HTTP request queue of current requests (terminating the worker process does not terminate the associated request queue, as these request queues are managed by Http.sys within the TCP/IP stack and not by IIS). Once the request queue is drained, the old worker process has nothing to do and gracefully shuts itself down. If the old process does not shut down within a specific time interval, however, IIS will force it to terminate and shift the remaining contents of the request queue to the new process. Either way, because the new process starts before the old one finishes, there is never any interruption in service and users will be unaware of anything strange happening.
-
Nonoverlapped recycling Under certain workload conditions, IIS may forcefully terminate the old worker process and then start a new one to replace it. A condition where this might occur is if there are insufficient memory or CPU resources for IIS to create a new worker process unless it kills the old one first. Another condition where this might occur is when a worker process becomes blocked and can’t function properly, with the result that IIS terminates it and starts a new one to replace it.
If you have multiple worker processes servicing a given application pool and you configure the pool to recycle after a specific interval of time (or after a specific number of requests have been processed), IIS staggers the recycling of these processes so they aren’t all recycled at the same time. This is because recycling a worker process generates momentary system overhead, and recycling multiple processes simultaneously could therefore cause the server to incur a brief but noticeable performance hit.
When might you want to configure recycling for worker processes? Which conditions might you configure to trigger recycling? Here are a few scenarios:
-
Your ASP, ASP.NET, or ISAPI applications have bugs in them and it’s not feasible for you to fix them at present. For example, if your application has difficulty running for an extended period of time and tends to hang or crash after running for a while, consider configuring recycling based on time interval or number of requests. You might also consider configuring recycling at a specific time each day during off-peak hours.
-
Your applications have memory leaks or cause the memory heap to become fragmented with time. If the problem is a memory leak, configure recycling to occur based on allocated memory growing above a specified size. If the problem is excessive fragmentation of the memory heap, configure recycling to occur based on virtual memory size becoming too large.
-
If your IIS machine is experiencing intermittent problems of an undetermined nature, try configuring recycling based on time interval, number of requests, or at specific times of the day. If this fixes the problems, you may have buggy applications.
-
As administrator you’ve noticed that an application within an application pool has failed for some undetermined reason. If this is the only time this has happened to the application, consider recycling the pool containing the application as opposed to restarting IIS and interrupting all applications running on the server. In particular, if you were using IISReset previously to keep your applications running normally, try using recycling instead.
Tip Of course, the best solution to buggy applications is to get rid of the bugs! One way an IIS admin can help is to become part of the development team to advise developers on issues such as memory and network resource limitations that might affect how their applications run within the company infrastructure.
Idle Timeout
Idle timeout allows IIS to shut down worker processes that aren’t doing anything. When a web application receives its first HTTP request, a worker process is started up to service the pool where the application resides (unless a worker process is already running for this purpose). When an application stops receiving requests, having this worker process continue to run idly is unnecessary and wasteful of resources, so, by default, IIS spins down a worker process after a period of inactivity. By default, this occurs after 20 minutes of inactivity, but you can configure a longer or shorter time (or disable idle timeout entirely) using the Performance tab of the application pool (Figure 12-3). Or, as mentioned previously, you can configure this setting for all application pools by using the properties sheet of the Application Pools node.
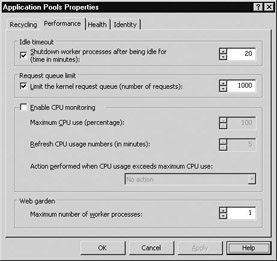
Figure 12-3: Enabling and configuring idle timeout
When is this idle timeout feature helpful for enhancing web server performance? Here are a few scenarios:
-
If your server is low on system resources (few CPUs, small memory), idle timeout lets you conserve valuable resources to ensure the availability of applications running on your server.
-
If your server is under heavy load from client requests, idle timeout lets you better manage your system resources. In this case, you may want to reduce the idle timeout setting from its default value of 20 minutes to ensure that idle worker processes are terminated quickly to release system resources.
-
If you have an application that is frequently in an idle state for some reason, this feature can again free up system resources.
On the other hand, setting idle timeout too aggressively low can create its own set of problems. For example, idle timeouts should not be set lower than the idle session termination interval for ASP or ASP.NET sessions, or user connections could be terminated during a session, resulting in data loss and user frustration. Also, since spinning up a worker process briefly involves extra utilization of resources, setting idle timeout too low could result in more system resources being utilized instead of less—sort of like switching a fluorescent light on and off frequently (a fluorescent light uses much more electricity when it is being started up, a process that typically takes a couple of seconds, than when it is running steadily). Like most server performance issues, balance is the key here.
Request Queue Limits
Another setting you can configure on the Performance tab (refer to Figure 12-3) is the request queue limit. A request queue is a kernel-mode queue used by Http.sys to queue and forward HTTP requests to the associated application pool. By default, IIS is configured to monitor the number of requests in these queues and to limit them to 1000 requests per queue. If the queue becomes full and more requests come in, IIS rejects these additional requests and immediately returns an “HTTP 503—Service Unavailable” response to the client.
If the request queue grows too large, the server’s performance will seem sluggish from the client’s perspective. Limiting the queue prevents that. You can enable or disable the request queue limit for all applications within an application pool, and you can increase or decrease the limit for the number of requests to be queued.
CPU Monitoring
Another setting you can configure on the Performance tab is CPU monitoring. By enabling this feature (it is disabled by default), you can track the CPU usage for worker processes associated with an application pool, specifying how often CPU usage is to be measured and the maximum usage allowed (Figure 12-4). Should usage exceed the maximum level specified, you can configure IIS to perform one of the following actions:
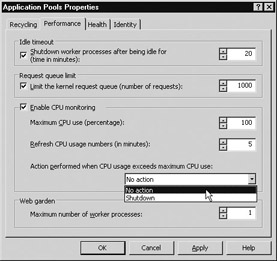
Figure 12-4: Enabling and configuring CPU monitoring
-
No action The worker process is allowed to continue, but an error event is written to the event log recording the occurrence.
-
Shutdown All worker processes associated with the pool are shut down, gracefully if possible and forcefully if necessary. Then the application pool itself resets and new worker processes are started up.
Tip Don’t set the maximum CPU usage value too low, or the pool may be reset often and impact server performance. Also, don’t set the refresh interval too low, as this will generate extra overhead on your server.
Web Gardens
Web gardens is a feature of IIS 6 that lets multiple worker processes service a single application pool. This enhances performance several ways:
-
If one worker process for the pool stops responding for some reason, the others can take up the load.
-
When several worker processes are servicing an application pool, new TCP connections are assigned on a round-robin basis to each worker process. This results in reduced resource contention and smoothing out the workload by distributing it equally among the worker processes.
Enabling a web garden is simple: just increase the setting for maximum number of worker processes from one to the value you desire on the Performance tab (refer to Figure 12-4). A value of one here means web gardens is disabled for the pool.
Health Monitoring
Another performance-related feature of worker processes is health monitoring. This involves the WWW Service “pinging” worker processes periodically to ensure they are still running properly. If a worker process responds to a ping, it is assumed to be healthy. If it doesn’t respond, it is assumed to be sick—that is, to be hung or to lack sufficient thread resources to be able to respond.
This ping is a system message sent from the WWW Service to the worker process. The WWW Service also maintains a communications channel with each worker process, and, if this channel is dropped, it has the same effect as a response not being returned from a ping.
If a worker process is determined to be sick, IIS can take one of two actions:
-
Terminate it and start a new worker process to replace it—in other words, recycle the worker process. This occurs regardless of whether recycling is configured on the Recycling tab of the pool’s properties sheet.
-
Release it (leave it running but not servicing IIS requests), start a new worker process to replace it, and run a preconfigured action configured by the Administrator, for example, starting a debugger and attaching it to the orphaned worker process. To enable releasing of sick worker processes, you must edit the metabase and change the OrphanWorkerProcess property to true. To configure the action to occur for the orphaned process, modify the OrphanActionExe property.
In both cases, an event is also written to the event log to leave a record of the problem. By default, IIS is configured to terminate unhealthy worker processes and not release them. This is usually recommended, since allowing worker process to be released could result in large numbers of orphaned worker processes running on your machine and consuming valuable system resources. You can change how IIS handles sick worker processes by modifying the metabase. See Chapter 14, “Working with the Metabase,” for more information on metabase settings and how to modify the metabase.
You can enable pinging of worker processes and specify the time interval between pings using the Health tab of the properties sheet for an application pool (Figure 12-5). By default, pinging is enabled and occurs every 30 seconds after the last response was received from the pinged worker process. This default ping interval is usually suitable for most cases. The ping timeout value (the time that the WWW Service waits for a response before declaring the worker process unhealthy) is configured in the metabase as 90 seconds and can be changed by editing the metabase.
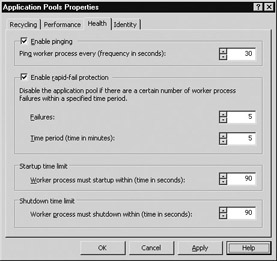
Figure 12-5: Enabling and configuring pinging
Rapid-Fail Protection
IIS also has a feature that allows it to detect when multiple worker processes servicing an application pool are unhealthy. This feature is called rapid-fail protection, and it lets you specify a maximum number of consecutive failures of worker processes to occur within a specified interval of time. If these conditions are exceeded (the default is five failed worker processes within five minutes), IIS stops the application pool serviced by these processes, taking it offline until an Administrator can determine the cause. Until the pool is brought online again, users trying to access applications within the pool will receive “HTTP 503—Service Unavailable” errors.
To enable and configure rapid-fail protection settings, use the Health tab (refer to Figure 12-5), either for an individual application pool or for all pools using the Application Pools node in IIS Manager.
| Note | Other reasons an application pool might stop include a nonexistent identity being configured on the Identity tab for the pool, a job object reaching its time limit, or an Administrator manually stopping the pool using IIS Manager. |
Startup and Shutdown Time Limits
These limits, found on the Health tab, refer specifically to unhealthy worker processes. If the WWW Service pings a worker process and the process fails to respond, the process is assumed to be sick and is marked for termination. The worker process is then given the time specified by the shutdown limit to gracefully shut itself down, but, if this time has elapsed and the process is still running, it is forcefully terminated. It’s best to tune this setting relative to your server workload to ensure graceful shutdowns. The startup value specifies the time interval within which a new worker process should be started to replace the sick one, and this startup time should generally be less than or equal to the shutdown time. The default value for both time intervals is 90 seconds.
Processor Affinity
A final feature relating to worker process performance is processor affinity, which lets you establish an affinity (association or connection) between a worker process and a specific CPU on an SMP machine. This can increase performance by utilizing CPU caches more effectively, because when a thread moves from one CPU to another the first CPU’s cache must be flushed. By establishing affinity between worker processes and CPUs, such cache flushes can be eliminated, reducing overhead and freeing up processing resources.
The down side of using this feature is that it may prevent threads from migrating to the least busy CPU if that CPU is bound to a specific worker process. As with all performance tuning settings, you should test this one after enabling it to see if it helps or hurts. To enable processor affinity, configure the SMPProcessorAfffinityMask property in the metabase.
Quality of Service
In addition to tuning application pools, you can tune IIS performance by enabling and configuring the various quality of service (QoS) features of IIS. These QoS features include:
-
HTTP keep-Alives Reusing TCP connections for multiple HTTP requests.
-
HTTP compression Making more effective use of bandwidth for HTTP sessions.
-
Limiting connections Restricting the number of simultaneous connections.
-
Connection timeouts Reclaiming system resources by closing idle connections.
-
Bandwidth throttling Ensuring that clients can access other services on your web server.
Let’s look at each of these different features and how to use them to enhance IIS performance.
HTTP Keep-Alives
The original HTTP 1.0 specification was inefficient because each time an HTTP request was made, a TCP session was established and then torn down. That meant that a page with four embedded images would require five client TCP connections, each requiring a three-step TCP session acknowledgement and a two-step session termination, adding to the session overhead.
The HTTP 1.1 specification improves on this considerably and allows multiple HTTP requests to be pipelined into a single TCP connection. It also provides a feature known as HTTP keep-alives, which allows you to keep TCP connections between client and web server open for a period of time in case further HTTP requests are made. Using keep-alives has a significant positive impact on web server performance, and you can enable or disable this feature as follows:
-
In IIS Manager, right-click the Web Sites node and select Properties.
-
Switch to the Web Site tab and select or clear the Enable HTTP Keep-Alives check box (Figure 12-6).
-
Click Apply and then OK.
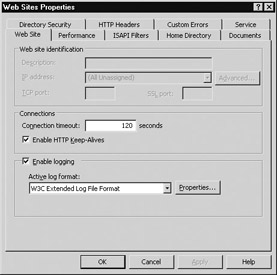
Figure 12-6: Enabling HTTP keep-alives
This procedure will enable keep-alives for all websites running on your IIS machine, but you can also enable or disable keep-alives for individual websites by using the Web Site tab of a website’s properties sheet. Note that keep-alives are enabled by default on IIS, and you should generally leave it this way. The Connection Timeout setting determines the length of time that keep-alives keep TCP connections alive, 120 seconds by default.
| Note | Disabling keep-alives will prevent client access to websites configured for anonymous access or Integrated Windows Authentication. Only Basic Authentication will allow clients to access websites where keep-alives are disabled. |
HTTP Compression
If your connection bandwidth is limited or your websites generate large amounts of content, you can utilize your bandwidth more efficiently by enabling HTTP Compression on IIS. This feature allows IIS to compress static HTML files and/or dynamic response content, but it comes at a price: higher CPU utilization to compress the files. Like all performance tuning actions, the trick is to try enabling this feature and see if it improves performance or makes it worse by monitoring performance for a while and comparing it to your previously established baseline. Furthermore, this feature only works with clients that support it, which means any web browser developed after 1998:
-
Internet Explorer 4 or higher (version 5 or higher on Macintosh platforms)
-
Netscape Navigator 4.5 or higher (earlier versions support it but are buggy)
-
Opera 5 or higher
Note HTTP Compression is a feature of the HTTP 1.1 specification, where it is known as “content encoding.”
HTTP Compression has more of a performance hit for dynamic content than static because when static HTML files are compressed the results are cached so they can be reused when the file is requested again. Dynamic content, however, must be compressed each time it is requested, which requires additional processing, so don’t enable HTTP Compression if your web server CPU utilization is already in the high zone, for example, if your %ProcessorTime counter averages around 80 percent or more.
To enable HTTP Compression for all websites on your machine, do the following:
-
Right-click the Web Sites node in IIS Manager and select Properties.
-
Select the Service tab.
-
Select the Compress Application Files check box to compress dynamic content if desired.
-
Select the Compress Static Files check box to compress static HTML files if desired (Figure 12-7).
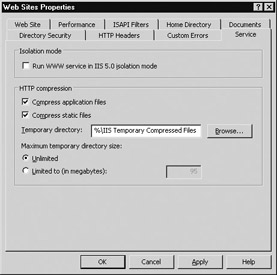
Figure 12-7: Enabling and configuring HTTP Compression
If you enable compression of static files, you can also configure the directory where compressed files will be cached. In addition, you can specify the maximum amount of files in megabytes that can be cached or leave this setting as Unlimited to allow unlimited caching. Note that HTTP Compression can only be configured globally at the Web Sites level and not for individual websites on your IIS machine.
| Security Alert! | If you enable static content compression, make sure the temporary directory is located on an NTFS volume and that it is not shared. |
Limiting Connections
If you have other important network services running on your IIS machine, for example, using it as a file server or e-mail server, then you may need to limit the number of simultaneous connections that IIS will allow to enable clients to access these other services. This is called limiting connections and is configured on
-
The Performance tab on a properties sheet for a website (Figure 12-8).
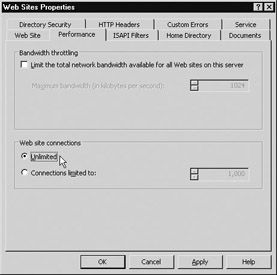
Figure 12-8: Configuring website connections limit -
The FTP Site tab on the properties sheet for an FTP site.
It can also be configured globally for all websites using the Web Sites node in IIS Manager and for all FTP sites using the FTP Sites node.
There are some things you need to consider when configuring these settings:
-
The default setting is Unlimited, which means that IIS does not try to limit the number of incoming connections it accepts. If IIS is not able to handle all incoming connections, this setting may result in users finding the server slow or unresponsive.
-
If a specific connection limit is configured (the suggested value is a maximum of 1000 incoming connections for websites), then when this limit is exceeded, the server will return an “HTTP 403.9 Forbidden—Too Many Users” message to clients exceeding the limit. This may be preferable to the default Unlimited setting because at least the users will know why the web server is not responding to their requests.
-
The default connection limit for FTP sites is different: it is set to 100,000 connections by default, not to Unlimited as it is for websites.
-
If you have connection limits configured differently for individual websites (or FTP sites) and at the global Web Sites (or FTP Sites) level, note that IIS checks the global limits first before checking the site-level limits for this setting.
-
Limiting connections is also useful for dealing with denial-of-service (DoS) attacks against your web or FTP server, as these attacks are designed to overload your machine with large numbers of forged connection attempts. Although firewalls and IDS devices really form the front wall against such attacks, this is another good reason for not using the default Unlimited value for this setting.
-
To determine what specific connection limit you should configure for your server, monitor the Current Connections, Maximum Connections, and Total Connection Attempts counters for the WWW and FTP services for a period of time using System Monitor. Performance counters and System Monitor are discussed in the section “How to Monitor Performance.”
Connection Timeouts
I mentioned connection timeouts previously in conjunction with HTTP keep-alives. Connection timeouts allow networking subsystem resources to be reclaimed when connections become idle and are no longer needed. To enable connection timeouts, enable HTTP keep-alives as previously discussed, and specify a value using the list box (the default is 120 seconds).
You can also tweak this feature further by editing the Registry to modify the MinFileBytesPerSec key, which limits the amount of time the client has to receive a response to its request (see the section “Registry Tuning Tips” for more information). The default value for this property is 240 bytes per second. In general, it should not be set lower or you may open your server to a form of DoS attack where the attacker establishes a connection with your server, requests a large file such as downloading an image, and then throttles the connection at the client to some unreasonably slow rate such as 1 byte per second, causing the server to take forever to serve just one file to one client.
Connection timeouts can be configured at the global level for websites or FTP sites. To configure connection timeouts for individual websites, use the Web Site tab; for individual FTP sites, use the FTP Site tab.
Bandwidth Throttling
Bandwidth throttling is another IIS QoS feature and lets you control how much network bandwidth your individual websites use and how much bandwidth IIS uses as a whole. Like limiting connections discussed above, bandwidth throttling can be a useful way of ensuring clients can access other network services running on your IIS machine.
Bandwidth throttling is enabled and configured on the Performance tab (refer to Figure 12-8), and the suggested setting is 1024 kilobytes/second. This value can then be increased or decreased based on your studies of performance counters related to network traffic on your server. In general, you should consider throttling bandwidth if your machine utilizes more than 50 percent of available network bandwidth.
Unlike other features, global bandwidth throttling settings do not override those configured for individual websites. Instead, global bandwidth throttling settings affect the bandwidth used by all websites on the machine that are not configured for bandwidth throttling. Note also that global throttling only affects websites and not FTP sites or other IIS services like SMTP or NNTP.
| Note | Apparently this feature never worked properly in earlier versions of IIS, even though it was there in the GUI. Let’s hope it now works properly in version 6! |
Registry Tuning Tips
While most IIS configuration settings are stored in the metabase, there are some important settings related to performance stored in the Windows registry. Of course, be careful when editing the Registry because you can wreck your server and may not be able to recover it short of a fresh install. We’ll look briefly at some settings that can have an impact on the performance of IIS. Note that when you change any of these settings you usually need to restart IIS for the change to take effect.
The following are some Registry settings that can be used to globally tune IIS performance. Usually, if you cannot find the key on your own IIS machine, it means the default value is being used. To change this to some other value, first create the key on your machine.
I should briefly mention FTP site monitoring, a feature that lets you display information concerning current sessions between FTP clients and your site, including the identity of the connected user, when the user established the connection, and how long the connection has been active. To display the FTP User Sessions box showing this information, click the Current Sessions button on the FTP Sites tab of the properties sheet for your site (Figure 12-9).
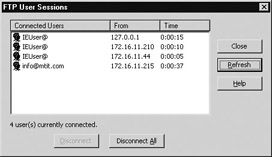
Figure 12-9: Using FTP connection monitoring
Note that anonymous connections using Internet Explorer as your FTP client show up here as IEUser@ in the Connected Users column, while anonymous connections from other clients like the Windows command-line FTP client show up as the user's e-mail address (or whatever the user types as their password when connecting). Authenticated clients will show up showing the username of the connected user. Note that you can also use the FTP User Sessions box to disconnect one or more users by selecting them and clicking Disconnect, or you can disconnect all users by clicking Disconnect All. To get the most recent statistics, click the Refresh button.
First, here are some keys under HKLM\SYSTEM\CurrentControlSet\Services\ Inetinfo\Parameters that relate to Inetinfo.exe and hence affect IIS as a whole:
-
CacheSecurityDescriptor The default value of 1 enables caching of security descriptors for file objects, which speeds retrieval of cached content when some other authentication method than anonymous is being used.
-
CheckCertRevocation The default value of 0 disables checking client certificates for evocation. Changing this to 1 to enable revocation checking can have a terrible impact on your server’s performance and should only be used in an intranet situation where the feature is required.
-
DisableMemoryCache Setting this key to 0 enables static file caching on your IIS machine, so leave it set to this value on production servers.
-
ListenBackLog Specifies the maximum number of active connections that should be held in the queue to await attention from the server. The default value is 25, but this can be increased up to 50 for improved performance when the server is under heavy load.
-
MacCachedFileSize Controls the maximum size of files that can be cached and is 256KB by default. If your server has files in its content directories larger than this setting, these files will not be cached. You may need to increase this setting if your server is used for serving up large files such as images or video clips to clients.
-
MaxPoolThreads Controls how many pool threads can be created for each processor, not counting threads used by ISAPI applications. The default value is 4 and this should generally not be set to higher than 20. If you are running more than four CGI applications on your server (IIS only supports four concurrent GGI applications by default), then increase this value to improve performance.
-
MemCacheSize Specifies the size in megabytes of the file cache. If this key does not exist, then IIS controls the cache size dynamically, adjusting it every 60 seconds and using no more than half of the available physical memory on the machine. You might specify a lower setting if you have other important network services running on your machine, or specify a higher setting if your machine is a large, dedicated web server.
-
MinFileBytesPerSec Discussed earlier in the section called “Connection Timeouts,” this key can range from 1 to 8192 and has a default value of 240. It can be adjusted to help protect against certain kinds of DoS attacks against your web server.
-
ObjectCacheTTL The default value of 30 seconds specifies how long objects are held in the static file cache before being phased out. If your web server is serving predominantly dynamic content or if system memory is in short supply, you can lower this value to enhance performance and prevent system memory from being used for caching objects. If you set the value to 0xFFFFFFFF, it disables the cache scavenger and lets cached objects stay in the cache until they are overwritten. If your server is serving mainly static content or has tons of available system memory, consider disabling the cache scavenger optimal utilization of memory or raising the value to several minutes for improved performance.
One Registry setting under HKLM\SYSTEM\CurrentControlSet\Services\ASP\ Parameters relates specifically to Active Server Pages applications:
-
DisableLazyContentPropagation When you update your IIS machine with a large amount of content in one fell swoop, the default value of 0 propagates content using lazy propagation, so the web server is not overwhelmed and brought to a standstill. You should leave this setting to its default value of 0 for production machines, but, on development machines, you can change it to 1 to give priority to updating your content.
A Registry setting under HKLM\SYSTEM\CurrentControlSet\Services\W3SVC\ Parameters relates to the WWW Service:
-
UploadReadAhead Specifies the amount of request data that IIS will accept from a client before passing control to the requested application, which is then responsible for accepting the remainder of the request data. If you have lots of RAM on your server, you can try increasing this upward from its default value of 48KB to see if performance improves.
A couple of settings under HKLM\SYSTEM\CurrentControlSet\Services\HTTP\ Parameters relate to the operation of the HTTP Listener (Http.sys) and hence also affect IIS as a whole:
-
UriMaxCacheMegabyteCount The default value of 0 lets Http.sys use its own heuristic to determine how much memory should be used for its cache, but you can specify any value up to 0xFFFFFFFF hexadecimal to tune the performance of Http.sys.
-
UriScavengerPeriod The default value of 120 specifies the interval in seconds between times when the URI cache scavenger runs to flush (remove) stale entries. The valid range is from 10 to 0xFFFFFFFF.
Tip There are additional Registry settings you can configure to control certain aspects of the WWW and FTP services on IIS. See the Registry Reference in the IIS Help file for more information.
Metabase Tuning Tips
Although I am deferring a full treatment of the XML metabase until Chapter 14, there are some metabase properties that can specifically affect performance, especially for ASP, ASP.NET, and ISAPI applications, so let’s look at some of these here. Note that when you change any of these settings, you usually need to restart IIS for the change to take effect. Here are some metabase properties followed by a description of how they can be tweaked to tune IIS:
-
AppAllowDebugging ASP debugging should only be enabled on development servers because it causes IIS application threads to become serialized—that is, each application can execute only one thread at a time. On production servers, make sure this property is set to False, or application performance will degrade.
-
AspBufferingOn Make sure this is set to True on production servers to ensure application output is saved in the output buffer before flushing to clients. If it’s set to False, applications stream their output directly to clients, which may seem to improve performance for the first client but it won’t for subsequent ones. When developing applications, you may want to turn buffering off for testing purposes.
-
AspQueueConnectionTestTime Sometimes users who are impatient keep submitting the same request from their browser over and over again, wondering why the web server doesn’t respond. Often such users then abandon their requests before the server responds and move on to another site, leaving multiple unfulfilled requests waiting in the queue for that application’s pool. By setting the value for this property to something small like 3 seconds, you can force the server to check if the client is still connected before starting execution of the requested application and wasting your server’s time.
-
AspScriptEngineCacheMax By increasing the value of this property, you can increase the number of scripting engines ASP can cache in memory from its default setting of 125 to some large value. This should generally only be done for large, complex sites with thousands of pages.
-
AspScriptFileCacheSize Closely related to the previous property, this specifies how many precompiled ASP templates can be cached on your machine. Caching ASP templates dramatically increases performance of ASP applications, and possible settings here include –1 for caching all requested script files, 0 for disabling ASP caching, and any numerical value for specifying a maximum number of cached templates. Disabling ASP caching has a terrible impact on performance, so only configure a zero value for this property in a development environment, not on production servers. For servers that have sites with only a small number of frequently requested ASP pages, you can set this property to a small value to free up more system memory.
-
CacheISAPI Setting this property to True causes ISAPI extensions to be cached in memory after use and kept there until the server is stopped. Setting it to False causes the extension to be unloaded from memory once it is no longer required. Caching ISAPI extensions in memory can improve performance, so set it to True for production servers.
Additional Server Tuning Tips
I’ll conclude this section with a few additional tuning tips, in no particular order, to help you get the most out of your IIS machine.
Add RAM
In general, the quickest, easiest, and cheapest way of improving the performance of your IIS machine is to add more RAM and rely on the self-tuning capability of IIS to get the most out of the additional memory.
Maximize Data Throughput Setting
Adding more RAM is not enough—you also need to make sure your server is configured to use it wisely. Although an IIS machine is really an application server, when you perform a clean install of Windows Server 2003, the resulting server configures itself by default for best performance as a file server instead, even if you install the additional IIS components on your machine. To change this and get the most out of IIS, do the following:
-
Click Start | Control Panel, select Network Connections, and open Local Area Connection.
-
On the Local Area Connection Status box, select the General tab, and click the Properties button.
-
On the Local Area Connection properties sheet, select File and Print Sharing for Microsoft Networks and click Properties.
-
Note that the default setting on the File and Print Sharing for Microsoft Networks Properties sheet is Maximize Data Throughput for File Sharing (Figure 12-10). Change this to Maximize Data Throughput for Network Applications and click OK.

Figure 12-10: Maximizing data throughput
Your IIS machine is now configured as an application server, which should give better performance than the default file server setting. This setting provides
-
Support for a larger amount of physical memory
-
Improved SMP scalability on multiprocessor machines
-
Better support for distributed applications that employ their own memory caching
-
Improved networking performance
Note, however, that if your IIS machine is serving only static content, the performance gains from changing this setting will be minimal.
Use RAID 0
By employing disk striping without parity you can get the maximum performance from your hard disk subsystem, but if you really want to gain the most from this be sure to use a hardware RAID system instead of the software RAID included with Windows Server 2003. Using software RAID places additional demands on your processor subsystem, whereas hardware RAID offloads these demands to the RAID unit instead.
Defragment Regularly
Windows Server 2003 does a better job of defragmenting NTFS drives than the earlier Windows 2000 Server platform did, so be sure to take advantage of this by defragmenting your server’s drives regularly to ensure optimal performance of your disk subsystem.
Paging File
Configuring a fixed (but generously large) paging file size will ensure your paging file doesn’t become fragmented, and distributing your paging file across multiple drives (each with their own controllers) can also significantly improve performance of your hard disk subsystem.
Add a Processor
Using an SMP-capable motherboard allows you to add an additional CPU when needed to increase the processing power of your machine and help avoid bottlenecks; it also takes advantage of the new processor affinity feature of IIS 6 discussed earlier in this chapter.
Avoid CGI
Port your old CGI applications to ASP or ASP.NET (or to ISAPI for even better performance) to avoid the performance penalty incurred using the older CGI program execution model.
Avoid ISAPI Filters
The new wildcard mapping feature of IIS 6 lets you use ISAPI extensions where previously you might have used ISAPI filters. The result will generally be improved performance, so avoid ISAPI filters wherever possible, or rewrite them to work as extensions. Another alternative to consider is porting ISAPI applications to HTTP modules using .NET programming tools.
Avoid FTP User Isolation
Although the new FTP user isolation feature is a great idea, performance of your server can suffer when you create hundreds of user directories with this method, especially if you are using local authentication instead of Active Directory. If you must use FTP user isolation, make sure you set up a separate IIS machine as your FTP server and keep your websites on a different machine.
Avoid Remote Virtual Directories
For best performance when using virtual directories to store website content, keep your virtual directories on your local IIS machine instead of having them map to a share on a remote network server.
Avoid Footers on Web Pages
Adding document footers using the Documents tab of your website’s properties sheet can incur a significant performance hit on your server, especially if the site is heavily used. If you must use document footers, make sure you store them on the local machine as HTML snippets, not whole HTML pages, and use them only for static pages, not dynamic ones. I’ll discuss document footers in more detail in Chapter 16, “Publishing with IIS.”
Avoid Too Much Logging
If you configure IIS to log website traffic, remember that logging consumes processor, memory, and disk resources. If you are using IIS in a service provider scenario and are hosting hundreds or even thousands of sites on a single box and you must log traffic for your sites, consider using the new centralized binary logging feature of IIS 6, which logs traffic to multiple sites in raw format to a single log file. Centralized binary logging is a global property of IIS that must either be used for all sites or none and is enabled as follows:
-
Click Start, choose Run, type cscript.exe adsutil.vbs SET W3SVC/CentralBinaryLoggingEnabled true, and click OK.
-
Stop and start the WWW Service by typing net stop W3SVC followed by net start W3SVC.
Raw log files will now be created by IIS using the extension *.ibl for Internet Binary Log. To read these logs, you can use the parsing tool included with the IIS 6 Resource Kit or create your own using the IIS 6 SDK available from msdn.microsoft.com.
Avoid Remote Logging
This version of IIS allows you to write log files to a remote network share specified using a UNC path. While this seems like a great idea because it lets you centralize your log files for several IIS machines, in reality it’s not so good because remote logging is slower than storing log files on the local machine. The issue is not really IIS but network latency at work; so, if your file server is on the same network segment, the performance hit might be minimal, but test this before implementing remote logging in a production environment.
Another issue to consider is that remote logging transmits ASCII log files over the network in clear text, which constitutes a security hazard. The way around this is to encrypt communications between IIS and the file server using IPSec, but this adds another performance hit, since encryption is a processor-intensive task.
Avoid ODBC Logging
If you enable ODBC logging on IIS, kernel-mode caching is disabled resulting in degraded performance, so it’s usually best to avoid using ODBC logging and use W3C Extended logging instead. If you must use ODBC logging on IIS, make sure you don’t use the SA account for logging to Microsoft SQL Server as this constitutes a security risk.
Avoid Using Custom Logging Modules
The same issue that degrades performance when ODBC logging is used affects custom logging modules: IIS disables kernel-mode caching when a COM-based logging module is installed. So avoid using custom logging if at all possible on IIS.
Disable Indexing
By default, IIS enables content indexing for all web sites. If your sites have large amounts of content but won’t be implementing user search pages, save CPU cycles by disabling: clear the Index This Resource check box on the Home Directory tab of the property sheet for your website.
Using Host Headers
If you are an ISP and plan to use IIS for hosting hundreds or even thousands of sites per machine, you may have decided to use host headers to reduce the number of IP addresses each server will need. If so, don’t be concerned about the possible performance penalty of using host headers, as there doesn’t seem to be any significant impact of using them on IIS.
Use Clustering
For high-end web servers such as those used for e-commerce sites, using Windows clustering and network load balancing (NLB) to set up a web farm ensures the highest level of reliability for sites running on IIS. For an explanation of how to use these features, see any good book on general Windows Server 2003 administration. An alternative to NLB is to use third-party load-balancing tools such as Cisco’s Content Services Switch or F5’s BigIP Load Balancer, which are both excellent alternatives to Microsoft’s NLB.
|
|