IP Address and Domain Name Restrictions
|
|
IIS can also allow or deny users access to all sites, a particular site, a virtual directory, or even a file, all based on the identity of the computer that the user is using. This identity can be specified either as the machine’s IP address or as its DNS domain name (if it has one). Using this method you can block a single computer, a group of computers on a TCP/IP subnet, or even all computers from a given DNS domain from accessing sites or portions of sites on your IIS machine. To use this feature, select the Directory Security (or File Security) tab on the properties sheet for your site, directory, or file, and click the Edit button under IP Address and Domain Name Restrictions to open the dialog box with the same name (Figure 10-12).
Note that, by default, all client computers are allowed access to your site, file, or directory. You can now proceed to define specific rules to lock out access from specific computers, networks, or domains. Alternatively, you can deny access to everyone and then allow access for specific computers, networks, or domains. As an example, say your IIS machine has IP address 172.16.11.215, and for test purposes you want to block access to all clients on the local subnet having network ID 172.16.11.0 and subnet mask 255.255.255.0. To lock this network out, click Add to open the Deny Access dialog box, select Group of Computers, and enter the network ID and subnet mask in the fields provided (Figure 10-13).
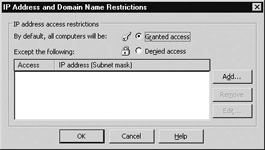
Figure 10-12: Configuring IP address and domain name restrictions
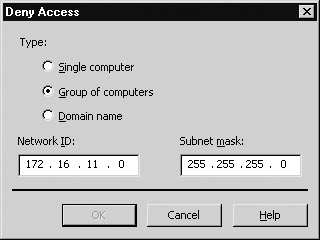
Figure 10-13: Locking out a subnet of hosts
Click OK to return to the IP Address and Domain Name Restrictions box, and notice that you now have a rule created to lock out clients on the local network (Figure 10-14).
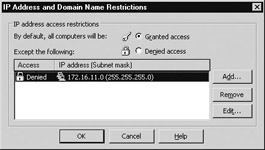
Figure 10-14: Rule for blocking hosts
Click OK and then Apply to apply your rule. To test whether it works, go to another machine such as 172.16.11.210 on the local subnet and try opening the Default Web Site. You should get the following error message: “HTTP Error 403.6—Forbidden: IP address of the client has been rejected.”
| Note | IP address restrictions can also be configured for FTP sites using the Directory Security tab on the properties sheet for your FTP site. The main difference between how this feature is implemented for FTP and websites is that FTP site restrictions can only be based on computer or subnet, not on DNS domain. |
When would you use IP address and domain name restrictions for securing IIS? I can only think of two scenarios where this might be useful:
-
If your web server is experiencing attack from a specific computer, network, or domain on the Internet, you can use this feature to block all access to your server from the attacker. Remember though that you may be blocking out legitimate clients if the attacking computer is a compromised system.
-
If you are using your web server strictly for corporate intranet use and therefore know exactly which IP addresses legitimate client computer will have, you can allow access to only those IP addresses. Of course, IP addresses can be spoofed, so this may give you a false sense of security. Note that if you use this approach and allow specific computers, networks, or domains to access your site, there is an implicit Deny All in place here—all clients are denied access unless specifically allowed.
In other words, this IIS security feature is not all that useful. Firewalls are much better at doing this sort of thing than IIS!
| Note | You should generally try to avoid the domain option when using this feature; that is, don’t allow or deny access to your site based on the client’s DNS domain. Enabling this feature would mean that IIS would have to perform a reverse DNS lookup each time a client tried to connect. This takes time and consumes additional system resources and can severely impact your web server’s performance. |
Putting It All Together
You now have enough info to put together the entire four-step process IIS uses to secure sites, directories, and files:
-
IP address and domain restrictions are used first to allow or deny access.
-
The user is authenticated next using the configured authentication methods.
-
Web permissions are next applied to determine the level of access the user has for the resource, regardless of the user’s group membership.
-
NTFS permissions are applied last to more granularly control the level of access the user has for the resource based on group membership.
That’s the security model for IIS, and it applies to both static (HTML) and dynamic (ASP, ASP.NET, CGI, or ISAPI) content. But for dynamic applications, there’s another level of security that IIS uses in addition to these: application security.
|
|