Web Interface for Server Administration
|
|
When you install Web Edition on a machine and log on to Windows, Internet Explorer tries to connect to the Administration website on the IIS machine. The Administration website is configured to require Basic Authentication secured by Secure Sockets Layer (SSL) encryption, and this is what generates the additional logon screen that appears (see Figure 6-1).

Figure 6-1: Logging on to the Web Interface for Server Administration (WISA)
| Tip | If you select the Remember My Password check box, the next time you log on to Windows, this second logon screen will appear prepopulated with your username and password—all you need to do is click OK. Of course, this can be a security risk if you left your administrative workstation unlocked! |
When you enter your administrator credentials and click OK, your credentials are encrypted using SSL and are submitted to the Administration website for authentication. Once authenticated, the logon screen disappears and the Welcome page of the Administration website appears (see Figure 6-2). As viewed in the browser, this site is known as the Web User Interface for Microsoft Windows Server Administration, or Web Interface for Server Administration (WISA) for short. In other words, whether I call it the Administration website, the Remote Administration (HTML) component of IIS, or the Web Interface for Server Administration (WISA), I’m talking about one and the same thing.
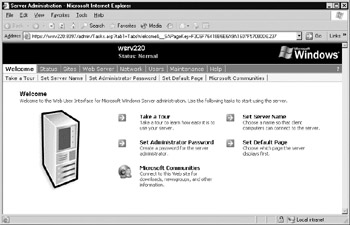
Figure 6-2: The Welcome page of WISA
| Security Alert! | The Administrator account must not have a null password if you are going to use WISA to manage IIS (this is also the case for administering IIS using Remote Desktop). |
WISA is configured to start automatically each time you log on to Windows (there’s a shortcut to a script that starts it in the Startup programs group). You can also open WISA several other ways on the local machine:
-
Select Start | choose All Programs | select Administrative Tools | and select Web Interface for Remote Administration.
-
Select Start and choose Run; then type %SystemRoot\System32\ ServerAppliance\SecureLaunch.vbs and click OK.
-
From the command line, change to the %SystemRoot\System32\ServerAppliance directory and type securelaunch.vbs.
-
Open Windows Explorer and navigate to the %SystemRoot\System32\ ServerAppliance folder and double-click SecureLaunch.vbs.
You can also open WISA on the local machine using any of the following URLs:
-
http://127.0.0.1:8098
-
http://localhost:8098
-
http://computer_name:8098 where computer_name is the name (NetBIOS or DNS) of the local machine
-
http://IP_address:8098 where IP_address is any IP address not specifically assigned to a website on the local machine (There may be multiple IP addresses assigned if the server hosts multiple websites, and the Administration website is configured to respond to all unassigned IP addresses on the machine.)
For example, you could click Start | Run, type http://localhost:8098, and click OK to open Internet Explorer; then connect to the Administration website, enter your credentials, and access the WISA Welcome screen.
| Note | The %SystemRoot\System32\ServerAppliance directory contains the various DLLs and .asp pages that make Remote Administration (HTML) work. In particular, the %SystemRoot\System32\ServerAppliance\web directory contains the .asp pages of the Administration website, as you can determine by opening the properties sheet for the Administration website in IIS Manager and selecting the Home Directory tab. |
A couple of tips on using WISA:
-
Don’t forget to use https:// instead of http:// when opening WISA, since the Administration website only works with SSL (8099 is the non-SSL TCP port for the site, but accessing it using that port doesn’t do anything).
-
When opening WISA for administering a remote Web Edition machine over a network or Internet connection, use http://computer_name:8098 or http://IP_address:8098.
Let’s now take a look at the various pages of the WISA interface, which include the Welcome, Status, Sites, Web Server, Network, Users, Maintenance, and Help pages.
| Note | Don’t forget to activate your copy of Web Edition after you first log on, unless you are an enterprise or volume licensing customer that is not required to activate. |
For greater security, you may want to restrict which computers are allowed to connect to the Administrator website and use WISA to manage IIS. To do this, open the IIS Manager console on the machine, right-click the Administration website and select Properties and then the Directory Security tab. Click Edit under IP Address And Domain Name Restrictions, select Denied Access, and click Add. Then specify which computer (single IP address), group of computers (IP network ID plus subnet mask), or domain name you want to allow access to the Administration website. (You can also do this remotely using the Remote Desktop option on WISA’s Maintenance page, as described in the section “Maintenance Page,” later in this chapter)
| Security Alert! | If you leave your WISA browser window open for an extended period of time without using it, the SSL connection to the Administration website will time out for security reasons, and you will have to reopen the WISA shortcut or URL again. |
Welcome Page
Let’s begin by examining the layout of the WISA interface (refer back to Figure 6-2). At the top of each page is the status area, which displays the name of the server and its current status. This page can be customized to include a company logo, privacy policy, or other information if desired. If you click the status information, it will take you to the status page, which I’ll discuss in a moment. Beneath the status area are two navigation bars: a primary one you can use to select different types of administrative tasks such as managing users or network settings, and a secondary one whose options vary depending on which primary task you select. Beneath the navigation bars is the main content area, which contains web elements that let you select a particular task or perform the task you’ve selected.
The task options on the Welcome page are
-
Take A Tour Opens a Help window that has information on working with WISA.
-
Set Server Name Lets you change the name of the server, add a DNS suffix that is appended to the server name to create a fully qualified domain name (FQDN), and specify whether the server is to belong to a workgroup or domain. Any changes you perform here will be reflected in the more common GUI tools for managing Windows Server 2003. For example, changing the server name causes the change to be reflected on the Computer Name tab of the System utility in Control Panel, and adding a DNS suffix causes this suffix to appear on the DNS tab of the Advanced TCP/IP Settings properties sheet of your Local Area Connection. Some changes, like changing the server name, require that the server be rebooted before they take effect, and WISA will prompt you in this regard.
-
Set Administrator Password Lets you change the password for your local Administrator account on the server. You must be logged on with the local Administrator account to change its password using this method. To change the password for domain accounts, use the Active Directory Users And Computers console and connect to a domain controller on your network.
-
Set Default Page Lets you specify either the Welcome or Status page as the default page that appears when you open WISA.
-
Microsoft Communities Opens the Windows Server Community home page on Microsoft’s website. This page has links to downloads, newsgroups, events, and so on, that might be of interest to users of Microsoft Windows server products.
Status Page
If you select the Status page link (or click the Status message at the top), you’ll open WISA’s Status page where you’ll find alerts (if there are any) and other status information about web server. The Status message at the top displays Normal, Information, Warning, or Critical, depending on the current state of your system, and the Status page provides you with more details. When you first log on to your server, you will find several alerts prompting you to change the server name (which is a good idea if you let Setup randomly assign your machine a name), change the administrator password (if necessary to make it more secure), and install a new server certificate to replace the default one installed during Setup (to provide secure SSL communications with the Administration website). If you click any of these alerts, additional information will be displayed underneath. Clicking the Clear Message link will clear the alert without addressing the issue that generated it. To resolve the issue, select the appropriate nav function on the WISA screen, such as changing the computer name or admin password.
Interestingly enough, the server certificate issue can’t be resolved using WISA. Instead, you have to open the IIS Manager console, open the properties sheet for the Administration website, select the Directory Security tab, and click Server Certificates to start the Web Server Certificate Wizard. We’ll look at this later in Chapter 10 when we talk about securing IIS. For now let’s just clear all the alerts so that Status: Normal appears in green in the Status area, and move on to the next page.
Sites Page
The Sites page displays all the websites installed on your server, and can be used to pause, stop, and start them. You can also click Create to create a new website from scratch (we’ll look at this in the next chapter, “Creating and Configuring Websites”), Delete to remove a site, and Modify to change the settings for the site. You cannot pause, stop, start, delete, or modify the Administration website because to do so could interfere with the operation of the WISA interface. Nor can you modify the configuration of the Default Web Site using this tool (Microsoft expects that you will leave this site unchanged and create new websites instead as needed). You can, however, change the port number of the Administration website, as you’ll see when you get to the Network page. Finally, if you have a large number of websites configured on the machine, you can use the Search feature to find a site based on its description, IP address, TCP port number, host header name, or status. I’ll talk more about what determines the identity of a website in the next chapter.
Web Server Page
The Web Server page lets you manage various aspects of web and FTP sites on your server. We’ll look at them in detail because there are a few tricky issues to explain.
Web Master Settings
The Web Master Settings page lets you configure master settings for all websites on your machine (see Figure 6-3). These settings include
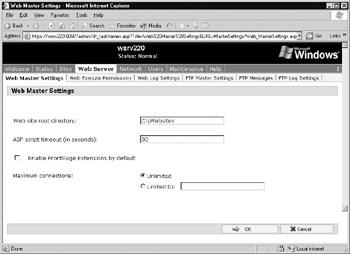
Figure 6-3: Configuring the Web Master Settings page for your remote server
-
Specifying the Web Site Root Directory, which is where content for new websites is located. The default location is C:\Websites\site_name, where site_name is the name you use to describe the site. The first time you create a new website on the machine, the C:\Websites directory and a subdirectory under it is automatically created and assigned as home directory. If the site name is Sales, for example, the home directory created for the site will be C:\Websites\Sales. If you change C:\Websites to something else on the Web Master Settings page, home directories for existing sites will be unchanged, but all future websites you create will have home directories in the new location.
-
Specifying the ASP Script Timeout (in Seconds), which is a timeout value for Active Server Pages applications in the website. The default timeout is 90 seconds. If you change the value here, it changes for all websites on your machine, both existing ones and new ones you create (including the Default and Administration websites).
-
Specifying whether to Enable FrontPage Extensions By Default for all new websites you create on the machine. You still have to manually configure FrontPage Extensions on existing websites using the Modify button on the Sites page. You must first install the FrontPage component of IIS using Add Or Remove Programs in Control Panel, and then enable FrontPage Extensions globally on the Web Master Settings page (so that new sites will have these extensions enabled by default), and manually enable them for each existing site you create on your server using the Modify button on the Sites page. If you enable FrontPage extensions on this page but haven’t installed the FrontPage 2003 Server Extensions component, you won’t receive any warning message here. I’ll talk more about configuring FrontPage extensions in the next chapter.
-
Specifying the Maximum Connections, which means limiting the number of web client connections to each site to a specified value. This allows you to manage bandwidth more efficiently. I’ll discuss configuring website settings in the next chapter; connection limiting is covered in Chapter 12, “Performance Tuning and Monitoring.”
Web Log Settings and Web Execute Permissions
The Web Log Settings page lets you configure logging options for all websites on your machine, including the logging format and time between logs. Website logging is a useful feature for troubleshooting HTTP connections; I’ll discuss it more in the next chapter.
The Web Execute Permissions page lets you specify whether scripts and executables should be allowed to run for each website. The possible options you can choose for Default Execute Permissions are
-
None
-
Scripts only
-
Scripts and Executables
What you do is first choose one of the preceding options for your Default Execute Permissions and then select either
-
Apply To All Websites That Use The Default Value This option applies your Default Execute Permissions setting to any new websites you create on the server (it has no effect on existing sites).
-
Apply To All Websites (Override Individual Settings) This option applies your Default Execute Permissions setting to all existing websites and any new ones you create. It has no effect, however, on the Default and Administration websites.
I’ll talk more about Execute permissions in Chapter 8, “Creating and Configuring Applications,” and also in Chapter 10.
FTP Settings
The three options for configuring FTP work only if you have already installed the FTP component of IIS using Add Or Remove Programs in Control Panel. The options are
-
FTP Master Settings This includes enabling FTP for content uploading, specifying a directory listing style, and specifying maximum connections and connection timeout values. Selecting the Enabling FTP For Content Uploading option will stop the Default FTP site and create a new FTP site called Web Site Content, whose root directory is C:\Web Site Content FTP Root. Selecting any of the other options applies the selected setting to all FTP sites on the server.
-
FTP Messages This lets you specify welcome, exit, and maximum connection messages for FTP users.
-
FTP Log Settings This lets you configure logging options for all FTP sites on your machine, including the logging format and time between logs. FTP site logging is a useful feature for troubleshooting FTP connections.
Network Page
The options on the Network page let you perform a variety of tasks, including
-
Identification Performs the same tasks as the Set Server Name option discussed in the earlier “Welcome Page” section.
-
Global Settings Lets you configure the various TCP/IP settings that you usually configure using the Advanced TCP/IP Settings properties sheet for Local Area Connection. The settings you can configure here include specifying additional DNS suffixes, modifying the HOSTS and LMHOSTS file, and related tasks.
-
Interfaces Lets you rename and configure network interfaces on your server. For each interface, you can modify the IP address, subnet mask, or default gateway; change from static to dynamic addressing; add additional IP or default gateway addresses; specify a metric; and specify DNS and WINS server addresses.
-
Administrator Performs the same tasks as the Set Administrator Password discussed in the “Welcome Page” section.
-
Administration Web Site Lets you specify the IP address and port to which a browser must connect to access the Administration Web Site and use the WISA. By default, the Administrator Web Site is configured to respond to any IP address on the server and to port 8098 for secure (SSL) access. For example, if the server’s network interface has five IP addresses assigned, you can use any of these addresses in the URL https://IP_address:8098 to open the WISA interface. If you prefer, you can specify a single IP address for opening WISA while the remaining addresses are used as identifiers for other websites hosted on the server. If you change the secure port on this page, you will immediately be required to log on again to WISA using the new port. There is also an additional port configured for nonsecure access to the Administration Web Site (TCP port 8099); but because SSL is required for running WISA, it doesn’t really do anything.
-
Telnet Lets you enable and start the Telnet service on your machine, making it a Telnet server that supports up to two concurrent connections from Telnet clients. Telnet is another tool you can use for remotely administering IIS machines, and is discussed later in this chapter in the section entitled “Using Telnet.”
Users Page
The Users page lets you create, delete, configure, and manage local user accounts and groups on the server. For user accounts, you can perform common tasks like disabling accounts, changing passwords, and creating home directories; for groups, you can add or remove members to the group. In short, you can perform many of the tasks usually performed using Local Users And Groups in the Computer Management console.
Maintenance Page
The Maintenance page lets you perform common configuration and maintenance tasks for your server. These include setting the date and time, shutting down or restarting the server (you can also schedule a shutdown to occur at a specific time), and changing language settings. If you schedule a shutdown or restart and change your mind, you can cancel it by selecting Maintenance | Shutdown | Scheduled Shutdown | No Scheduled Shutdown Or Alert. Note that if you select Maintenance | Shutdown, click the scheduled alert listed under Showdown Related Alerts, and then select Clear Message, the alert is cleared but the event remains scheduled!
On this page you can also select
-
Logs Lets you view, clear, display, or download Application, Security, System, and Web Administration logs. The first three logs are normally viewed using Event Viewer, while the web logs are generated by IIS for troubleshooting various issues (web logs are discussed in the next chapter). For Event logs, you can also view the details (verbose mode) of each event you select, and you can download Event logs in three formats: .evt for viewing in Event Viewer, and .log or .csv for importing into Excel and other programs.
-
Set Alert E-Mail Lets you enable or disable having the system send e-mail messages to administrators when alerts are generated (see Figure 6-4). This requires that the SMTP service be running on your IIS machine (which it is by default in Web Edition). To configure this feature, select the types of alerts (critical, warning, and/or informational) to send by e-mail, the e-mail address of the administrator, and the IP address or FQDN of the SMTP server to use for forwarding the mail. Click the Test button to see if it works; and if it does, click OK to save the changes. In a normal Internet environment, you may not need to configure anything else to make this feature work (providing your ISP’s SMTP host is configured to receive e-mail from your network’s DNS domain). If you’re using Exchange Server as your Internet SMTP host, however, you will need to ask your Exchange administrator for the name of the SMTP gateway to use.
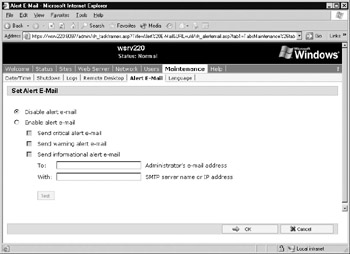
Figure 6-4: Configuring Set Alert E-Mail for your remote server -
Remote Desktop Connection Lets you download and install the Remote Desktop ActiveX Control so you can connect to your server using Remote Desktop Web Connection and perform administrative tasks as if you were sitting right at the server’s local console. However, you must first enable the Remote Desktop feature on the server by using the Remote tab of the System utility in Control Panel—-and you can’t perform this step using WISA! I covered Remote Desktop in the previous chapter, “Administering Standard/Enterprise Edition,” so I won’t go into it further here.
The Verdict on Remote Administration (HTML)
WISA is not just an IIS administration tool but also a web browser interface for managing general aspects of remote servers. WISA not only lets you create and configure websites but also lets you manage user accounts, modify network settings, rename your server, and so on. These are common general server administration tasks, and WISA lets you perform them remotely from anywhere in the world using a web browser as your interface. This is cool, but only a limited number of tasks can be directly performed using WISA. For example, you can create new local user accounts and change their password or create home directories for them, but you can’t configure a user profile or logon script for these accounts. Also, you can’t configure startup settings for network services, share folders, manage devices, or run System Monitor. In fact, WISA’s deficiencies are emphasized by the fact that the Maintenance page includes an option for opening a Remote Desktop Connection to the server so that you can perform tasks that WISA itself cannot be used for!
What’s the point then? Using the MMC or Remote Desktop, you can do anything an administrator needs to do to manage a server, and Remote Desktop Web Connection even lets you do this using a web browser. WISA seems to be a holdover from an earlier Microsoft initiative to “webify” every aspect of remote administration, and it is really no longer required because it is made obsolete by Remote Desktop Web Connection. About the only advantage of WISA over other administrative tools is that it provides a simplified interface for performing some common web server administration tasks. For this reason, you might be tempted as administrator to allow subordinates to use WISA for managing certain aspects of departmental web servers. Remember, however, that to use WISA you must be a member of the local Administrators group, and this gives you the inherent ability to do anything on the server (even though the interface itself limits you to certain predefined tasks).
Another problem I have with WISA is that it’s generally slower and more cumbersome than using the MMC or Remote Desktop. In addition, you can only use WISA for administering IIS 6 machines, not machines running earlier versions of IIS. I’ve covered WISA here because it’s an integral part of IIS 6 on the Windows Server 2003 platform, but whether you finally decide to use it or not is your choice!
|
|