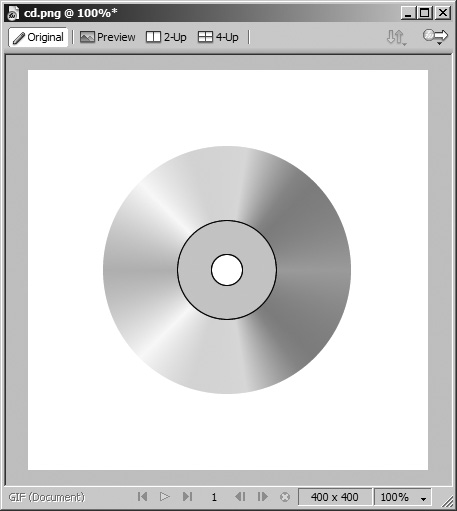
| To create the surface of the CD, you will fill the larger circle with a gradient. Gradients are schemes in which colors gradually blend from one to another to create a smooth color transition. A gradient must have at least two colors defined, but you can define as many colors as you want and change the angle that the gradient follows. 1. | Select the larger circle. Choose Gradient > Cone from the Fill category pop-up menu in the Property inspector.
 The center section of the Fill category pop-up menu contains the various gradient fills you can use. Later you might want to experiment with these different looks. The Cone gradient creates the appearance of looking down on a cone shape. Because you "punched" a hole in the center of your circle, you don't see the tip of the cone on your circle. You should see the color variation in the circle using the default colors of black and white. The center section of the Fill category pop-up menu contains the various gradient fills you can use. Later you might want to experiment with these different looks. The Cone gradient creates the appearance of looking down on a cone shape. Because you "punched" a hole in the center of your circle, you don't see the tip of the cone on your circle. You should see the color variation in the circle using the default colors of black and white.
You can edit the gradient to change the colors and the angle of the blend. Look at your circle. You'll see a black horizontal line, with a circle handle on one end and a square handle on the other.
The circle handle indicates the starting point of the gradient. (On a Radial or Cone gradient, the circle represents the center of the gradient.) The square handle controls the width of the gradient.
Note The black horizontal line is difficult to see over the black portion of the gradient, but you should be able to see it in the middle of the circle. If not, turn off the ruler guides. | 2. | Move the pointer over the line. Drag the line when you see a circular arrow.
The angle of the gradient changes based on the angle of the line.
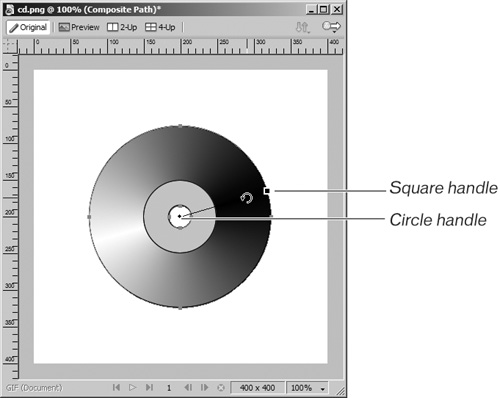 | 3. | Drag the circle handle away from the center of the circle.
The circle is the center point of the gradient, or the tip of the cone in this gradient. When you move the circle handle away from the center, you now see the tip that was hidden in the punched hole.
| 4. | Drag the square handle to change the width of the gradient.
Move the square handle close to the circle handle and then away to see what happens. With this gradient, the change is minimal. With other gradient types, such as a Linear gradient, you will see results that are more dramatic when you adjust these handles.
Note With a Linear gradient, when you move the square handle away from the object, more of the top color is visible in the gradient. When you drag the square handle closer to the circle handle, more of the bottom color is visible. | 5. | Double-click either handle of the gradient.
For this gradient, you want the circle and square handles returned to their default positions. You could move them individually, but double-clicking is quicker. The shortcut is a double-click on either handle.
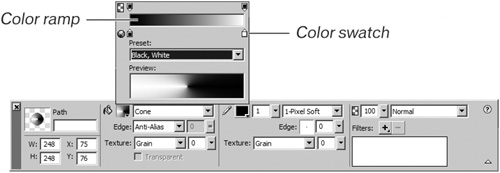
| 6. | Click the Fill color box in the Property inspector.
The Fill panel opens to the gradient editing window, displaying the color swatches, a color ramp, and a preview ramp. Here you can change the colors in your gradient or use the preset gradients.
You drag a color swatch to change the amount of a color in the gradient. The color ramp displays a preview of the final gradient. You click one of the color swatches to change the color and then choose a color from the color palette. You see this same palette in all the color boxes. You can choose one of the color chips on the palette or use the Options menu to switch to another color palette.
If you want more than two colors in your gradient, click the gray area under the first ramp. Drag to move this new color swatch or click to change its color. To delete a color swatch, drag it off the editing window.
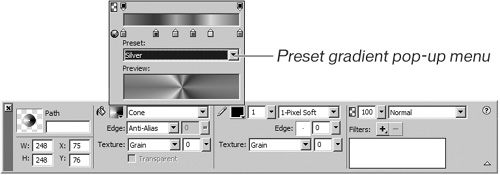
 | 7. | Choose Silver from the Preset gradients pop-up menu. When you finish editing the gradient, click outside the gradient editing window to close it.
If you made any change to the colors in the gradient, they are replaced by these new colors and color swatches. Your CD should now have that shimmering look. Look at the color swatches to see how this effect was accomplished. It looks good, but it has little color.
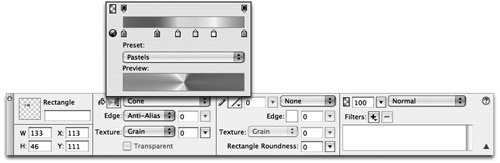
 | 8. | To add some color to the CD, choose Pastels from the Preset gradients pop-up menu. Press Enter (PC) or Return (Mac) to close the Edit Gradient window.
 | 9. | Set the stroke to None from the Stroke category pop-up menu in the Property inspector.
Now the CD is taking shape.
 |
|