Exploring the SQL Commands
|
To access Crystal Reports' SQL commands, begin creating a blank report. Select the xtreme.mdb file. Once you select your database, notice the Add Command node above the Tables node in the Database Expert, as shown in Figure 15-1.
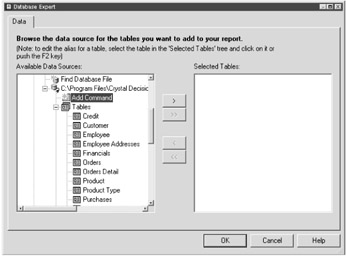
Figure 15-1: The Add Command node
Double-click this Add Command node. The Add Command To Report dialog box displays, as shown in Figure 15-2. This dialog box is where you create SQL commands.
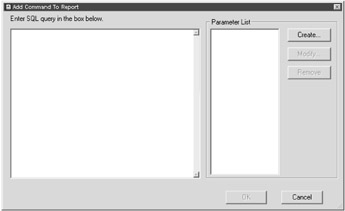
Figure 15-2: The Add Command To Report dialog box
The SELECT Statement
To get used to creating queries, let's try a simple SELECT statement. The SELECT statement allows you to obtain information from the tables within your database. The format for the basic SELECT statement is as follows:
SELECT fields FROM table [WHERE condition] [ORDER BY sort-fields]
| Note | In the above SELECT statement, the square brackets ([]) indicate that this content is optional. |
Perhaps the best way to get a feel for how SQL works is to see it in action. Say you wish to create a SELECT statement that allows you to view all records within the Product table. In the Add Command To Report dialog box, try the following:
-
In the Enter SQL query box in the Add Command To Report dialog box, type the following:
SELECT * FROM Product
Your screen should look like Figure 15-3.
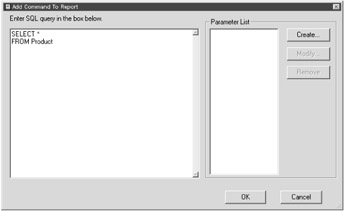
Figure 15-3: Creating a SELECT statementTip The asterisk (*) represents a wildcard character, which is a placeholder used to represent one or more characters. Using the wildcard character in this instance means that you wish to select all fields within the Product table.
You first learned about the wildcard character in Chapter 7.
-
After typing in the SQL, press the OK button.
You'll see your SQL command display in the Selected Tables list box of the Database Expert, as shown in Figure 15-4.
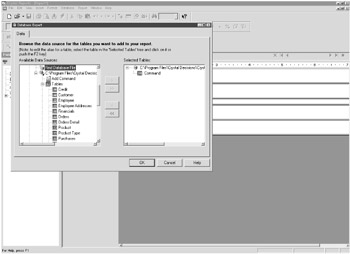
Figure 15-4: The SQL command in the Selected Tables list box
If you press the OK button in the Database Expert, the Report Design area displays. In the Field Explorer pane, expand the Command node. You'll notice the query displays all fields within the Product table, as shown in Figure 15-5 on the following page.
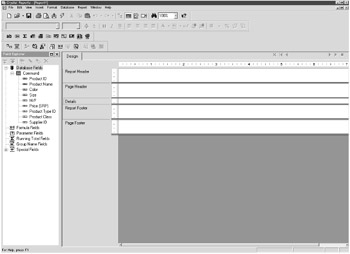
Figure 15-5: The SQL query you created returns all fields in the Product table (as shown in the Field Explorer).
The WHERE Clause
Of course, the real power of a SQL statement comes from the ability to restrict (or filter) records returned with the query. If you recall from your previous reports, the Product table contains information regarding several different products.
To limit your query to products that meet certain conditions, you can utilize a WHERE clause. The WHERE clause allows you to filter the records returned by your SELECT statement.
| Tip | Although the WHERE clause is optional, it's usually included with most SELECT statements. |
Say you wish to limit the previous SELECT statement to only include products that are classified as bicycles. Perform the following to get a feel for the WHERE clause:
-
In the report you've been working with in this chapter, select Database, Database Expert from the menu bar.
The Database Expert displays.
-
Left-click on the command that resides in the Selected Tables list box.
The command should now be highlighted.
-
Press the F2 key on your keyboard.
Notice that you can now edit the name of this command. Type the following: Product_qry. Your screen should look like Figure 15-6 on the following page.
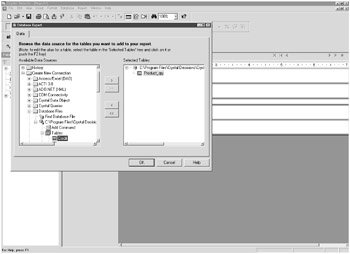
Figure 15-6: Renaming a SQL command -
Right-click on the Product_qry command.
An options menu displays.
-
Select Edit Command from the options menu.
The Modify Command dialog box displays.
-
Modify your SELECT statement as follows:
SELECT * FROM Product WHERE 'Product Class' = 'Bicycle'
Your screen should look like Figure 15-7.
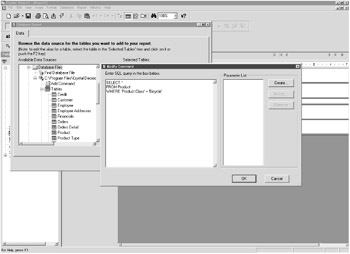
Figure 15-7: Adding a WHERE clause to your SELECT statement
| Tip | Whenever you are referring to a specific field and record within Crystal Reports SQL, you must enclose the name of the record in quotes. |
If you were to run this query, only products that are classified as bicycles would display.
A common practice with WHERE clauses is to combine conditions using the Boolean operators AND, OR, and NOT. For example:
SELECT * FROM Product WHERE 'PRODUCT CLASS' = 'Bicycle' AND 'Product Name' = 'Descend'
This SQL statement would return only Descend products from the Products table where the products are classified as bicycles.
The ORDER BY Clause
Relational databases do not use a built-in ordering of records. If a new record is added to your database and then retrieved by a report, that new record might display at the beginning of your report, at the end of the report, or anywhere in between. Basically, relational databases do not have a built-in rhyme or reason of how they'll order your records.
To order your records within a query, you can use the ORDER BY clause within your SELECT statements. For example, say in the report you're working on that you wish to display all products alphabetically by the product name. Try the following example:
-
In the report you've been working on in this chapter, select Database, Database Expert from the menu bar.
The Database Expert displays.
-
Right-click on the Product_qry command.
An options menu displays.
-
Select Edit Command from the options menu.
The Modify Command dialog box displays.
-
Modify your SELECT statement as follows:
SELECT * FROM Product WHERE 'Product Class' = 'Bicycle' ORDER BY 'Product Name'
Your screen should look like Figure 15-8.
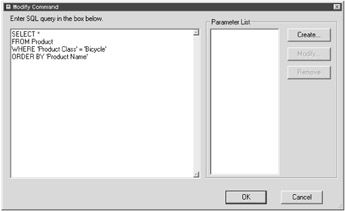
Figure 15-8: Adding an ORDER BY clause to your SELECT statement
This statement returns all products listed in ascending order (which is the default in SQL) by product name. You can define whether the ORDER BY clause lists records in ascending or descending order by using the keywords ASC (for ascending order) or DESC (for descending order). For example:
SELECT * FROM Product WHERE 'Product Class' = 'Bicycle' ORDER BY 'Product Name' DESC
This SELECT statement returns all products by product name in descending order (or Z to A). Also, only products classified as bicycles display.
| Tip | Even though the ASC keyword is the default, it's still a good idea to show either the ASC or DESC keyword whenever you use the ORDER BY clause. These keywords act as a reminder for your design decision and keep you from forgetting how the data sorts. |
The JOIN Clause
So far, you've been creating queries using only a single table. But as you've learned in this book, most reports are developed from two or more tables. In Chapter 6 you explored this concept through the Database Expert. But how do you create a SQL query that performs this same functionality? The answer is through SQL's JOIN clause. JOIN allows you to define how two tables within a database are to match up.
There are a number of syntaxes for the JOIN clause, but the easiest is to utilize an equal sign (=) within your WHERE clause:
SELECT fields FROM table1, table2 WHERE table1 table1 INNER JOIN table2 table2 ON field = table2.field
Try the following to see this in action. In this example, you'll be linking the Customer and Orders table. Instead of selecting all fields after the SELECT statement, you're defining specific fields that you wish to use.
-
In the report you've been working on in this chapter, select Database, Database Expert from the menu bar.
The Database Expert displays.
-
Right-click on the Product_qry command.
An options menu displays.
-
Select Edit Command from the options menu.
The Modify Command dialog box displays. This is the same dialog box as the Add Command to Report dialog box.
-
Modify your SELECT statement as follows:
SELECT Customer.'Customer Name', Customer.'Last Year's Sales', Customer.'Region', Customer.'Country', Orders.'Order Amount', Orders.'Order Date' FROM Customer Customer INNER JOIN Orders Orders ON Customer.'Customer ID' = Orders.'Customer ID' ORDER BY Customer.'Country' ASC, Customer.'Region' ASC
Your screen should look like Figure 15-9.
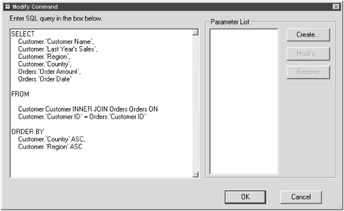
Figure 15-9: Joining multiple tables within your SQL command
|
EAN: 2147483647
Pages: 177