Exporting Reports into Different File Formats
|
So your reports are written and now you wish to make them available for those without access to Crystal Reports. Not a problem. Crystal Reports provides exporting options that allow you to convert your reports into a number of different file formats.
You can convert your finished reports into a number of spreadsheet or word processor file formats, such as those used by Microsoft Excel or Word. You can also convert your files into HTML and make your report a web page or convert your report into a PDF (Portable Document Format) file, which is a file format developed by Adobe Systems.
The following summarizes Crystal's different file exporting formats:
-
Adobe format (PDF)
-
Crystal Reports (RPT)
-
HTML 3.2
-
HTML 4.0
-
Microsoft Excel 97-2000
-
Microsoft Excel 97-2000 (data only)
-
Microsoft Word
-
ODBC
-
Record style (columns without spaces)
-
Record style (columns with spaces)
-
Report definition
-
Rich text format (RTF)
-
Comma-separated values (CSV)
-
Tab-separated text
-
Text
-
XML
| Tip | As you'll see in exporting examples in this chapter, Crystal Reports does a good job of retaining much of your report formatting when exporting reports into the different file formats. However, exporting into certain files may result in this formatting being lost. |
Defining the Exporting Destination
When you export a report into a file format, you must define the exporting location of files. You can define one of six destinations. Table 14-1 summarizes these exporting destinations.
| Exporting Destination | Description |
|---|---|
| Application | Allows you to export a report to a "temp" file. The appropriate application may then utilize this temp file. |
| Disk File | Allows you to save the report to any location you specify (either on your computer or a drive on a network). This location is the default exporting destination. |
| Exchange Folder | Allows you to export a report to a Microsoft Exchange folder. Microsoft Exchange folders can contain standard notes (mail), files, and instances of Microsoft Exchange forms. |
| Lotus Domino | Allows you to export a report to a Lotus Domino client, version 3.0 or higher (you must also have, at a minimum, depositor access). |
| Lotus Domino Mail | Allows you to export a report to a Lotus Domino Mail Server. |
| MAPI (Microsoft Mail) | Allows you to export a report to a Microsoft mail client installed (such as Outlook, Mail, or Exchange). The exported file is attached to an e-mail file. |
The procedures are nearly the same, no matter what file format you export your report into.
Whenever you're exporting a report, you want to refresh the data to make sure you're using the most recent data. Also, you can only export one Preview view of a report at a time. Thus, if you're exporting a report that contains drill-down tabs or subreports, only the current tab you're viewing is exported.
Exporting into an Excel Spreadsheet
You can practice exporting with any report that you've created so far. The examples in this chapter use the CustSalesRegion2.rpt report that you created in the last chapter.
To export this report to an Excel spreadsheet, perform the following steps:
-
Open the CustSalesRegion2.rpt.
You can also access this report from the companion files.
-
From the menu bar, select File, Export.
The Export dialog box displays. You can also access this dialog box by pressing the Export button on the Standard toolbar. Figure 14-1 displays the Export dialog box.
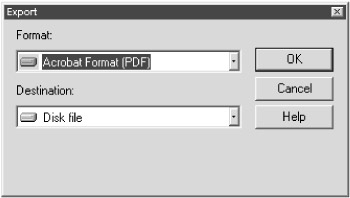
Figure 14-1: The Export dialog box -
In the Export dialog box, select MS Excel 97-2000 from the Format drop-down field.
-
In the Export dialog box, select Disk file from the Destination drop-down field.
-
Press OK.
An Excel Format Options dialog box displays, as shown in Figure 14-2.
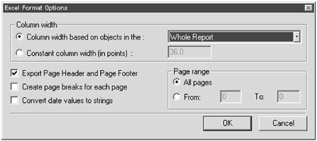
Figure 14-2: The Excel Format Options dialog box
| Tip | Depending on the file format that you choose, you may receive an additional options dialog box, asking you for additional exporting information (as is the case when exporting into Excel). Unless you wish to customize the way your report exports, it's best to leave all options as default. |
To complete your export, press OK on the Options dialog box. A Select Export File dialog box displays, asking you to define the name of your exported file, as well as the location where you wish to save it. Rename your report if you wish and define a location for your report. Then press the OK button. An Exporting Records dialog box displays, as shown in Figure 14-3. This will run for a few seconds and disappears when the exporting process is complete.
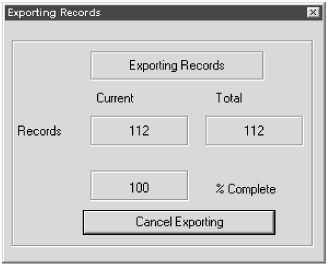
Figure 14-3: The Exporting Records dialog box
Go to the location where you saved your exported file (it will be an Excel file with the extension .XLS) and try opening it. Figure 14-4 displays an example of your exported Excel file.
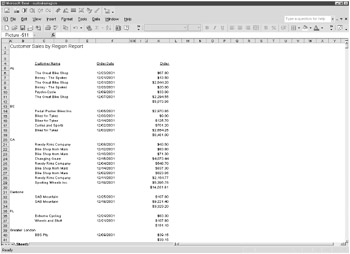
Figure 14-4: The Customer Sales by Region report, exported into an Excel spreadsheet
| Caution | To access this exported file, you will need Microsoft Excel installed on your computer. |
If you scroll down to the end of this Excel file, you'll see that Crystal Reports exports all charts (shown in Figure 14-5).
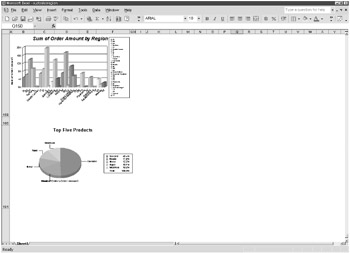
Figure 14-5: The exported file containing all report charts
Try experimenting with the different file formats to see which provides the best export for your reports. You'll find that sometimes some file formats export better than others, depending on the layout of your report.
Creating a Report Definition File
Another useful exporting technique is to export your reports into a report definition file. A report definition file acts as a blueprint for your report design, containing such information as the tables that the report uses and the formulas it utilizes. Report definition files are something you should create for all your reports. They're especially useful for other report developers who might need to work on a report you created. A report definition file will provide other developers with a summary of how your report works.
The following example describes the process of creating such a file. In this example, you continue using the CustSalesRegion2.rpt.
-
Select File, Export from the main menu.
The Export dialog box displays.
-
In the Export dialog box, select Report Definition from the Format drop-down field.
-
In the Export dialog box, select Disk file from the Destination drop-down field.
The Select Export File dialog box displays. Define the name of your report definition and the location where you wish to save the report definition.
-
Press OK.
An Exporting Records dialog box displays quickly and then disappears.
Check out the location where you saved this report definition file. It's saved in a text (.TXT) format. Open the report definition file. It should look like Figure 14-6.

Figure 14-6: A report definition file
|
EAN: 2147483647
Pages: 177