4.6 Integration via Click to Action
|
| < Day Day Up > |
|
4.6 Integration via Click to Action
This important topic is included in the current chapter since the invocation is done through JSP tags. But as we explain later in this section, Click to Action incorporates other technologies as well, including Web services, WSDL, portlet descriptors, and others. We explain these technologies as we go through the implementation of Click to Action.
4.6.1 Click to Action
Click to Action (sometimes referred as Click2Action or C2A) provides a framework for inter-portlet communication that simplifies users' interactions with portlets on a portal page. With a simple click, a user can transfer data from a source portlet to one or more target portlets, causing the target to react to the action and display a new view with the results.
The Click to Action framework includes a runtime that automatically matches sources with compatible targets (based on type information) and inserts clickable icons associated with sources on portlet pages. When the user clicks an icon next to a particular source, they are presented with a pop-up menu containing the list of targets for the action. After the user selects a specific target, the Click to Action runtime delivers the data to the target in the form of the corresponding portlet action. The portlet does not need to distinguish between an action initiated by user interaction with its own page segment and action initiated using the Click to Action route. This keeps the programming effort to a minimum, allowing Click to Action portlets to follow the normal portlet programming model.
Features of the Click to Action model
Click to Action provides an easy, menu-driven method to transfer compatible data between portlets, eliminating manual data entry from one portlet to another and avoiding the learning normally necessary to discover actions on target portlets which are compatible with sources on the current page. Click to Action includes these additional benefits:
-
Broadcast source data to all matching actions on the page.
A user can specify the target of an action or broadcast the action to all portlets on the page. This feature is available in the source portlet when the broadcast attribute is specified for the <c2a:encodeProperty/> tag.
-
Chained propagation of data transfer.
Sending data to one portlet can cause that portlet to send data to another portlet, which can in turn transmit data. This feature supports the synchronization of multiple portlet views in a single request-response cycle. For example, transferring the order ID to the Order Details portlet also triggers the transfer of the tracking ID for the order to the tracking details portlet, which in turn triggers the transfer of the customer name associated with the order to the customer details portlet, causing all three to display information pertaining to the same order.
This feature can be enabled by specifying output parameters in the target portlet's WSDL. When the target receives data from a source, this can cause the transfer of one or more output parameters declared in the WSDL file. As pictures in Figure 4-36, the propagation of information can chain a series of events leading to a complete flow of interactions.
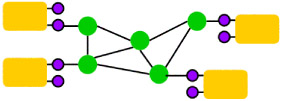
Figure 4-36: Click to Action chained propagation -
Scatter multiple related sources to targets on the page with a single click.
In addition to directing the data transfer to a particular portlet, you can broadcast the information that is sent to all the listener portlets. As a result of this broadcast, all portlets on the page display information related to the transferred information. This scatter feature, combined with the chained data transfer feature, results in the synchronization of all the information on the page through a single user click.
-
Simple enablement for portlet development.
-
For a portlet to be a source of data, programmers can use a custom JSP tag library to flag sharable data on their output pages. The tags require a data type to be specified, as well as a specific value corresponding to an instance of this type.
-
For a portlet to be a target, programmers describe a subset of their portlet actions, including type information for the action parameters. The format for the action description is WSDL, with some custom extensions.
-
Concepts and design of Click to Action
Click to Action allows end-user triggered information interchange between independently developed portlets. Each portlet needs to provide information about data objects that it could share with other portlets, either as a producer or a consumer. Each sharable data object is identified with an XML type. The Click to Action broker is a runtime entity that processes information about sharable data objects on a page and matches producers of the data with consumers using type matching. Based on the match information, the broker generates a special icon next to sources of data, which is used to display the pop-up menu of matching actions. When the end-user chooses an action from the menu, it is intercepted by the broker, which then transfers the data value to the chosen target.
Source portlets (portlets that contribute data objects that can be shared with other portlets) use a set of custom JSP tags to specify the type and value of the data being contributed. At the point where such a tag occurs, the Click to Action broker inserts the markup that can display the pop-up menu of action choices for the user. Advanced options on the tags allow the programmer to indicate whether a broadcast action is to be added to the menu, and allow the scattering of a set of data values (rather than a single data value) to all portlets.
Target portlets (portlets that accept data from other portlets) declare a set of actions which can be invoked on the portlet. The actions are implemented by the portlet as normal portlet actions. The actions are declared using WSDL, with a custom binding extension that specifies the mapping from the abstract action declaration to the actual action implementation. Associated with each action is a single input parameter described by an XML type and one or more output parameters, each described by an XML type. The input parameter's type is used for matching the action to sources, and its value is filled in when the end-user triggers the action using Click to Action. The output parameters, if specified, are used to automatically trigger other compatible actions (ones which can consume the same type) on other portlets every time the action executes (this may be used to trigger chains of related actions). The choice of WSDL for declaring the actions was influenced by two considerations:
-
The need for a standard format rather than a custom format
-
The ability in WSDL to plug in descriptions of different types of implementing entities, providing a future growth path for the Click to Action technology
Another interesting aspect of the design is the use of normal portlet actions to deliver data from other portlets. This approach allows the reuse of actions which are used to interact with the portlet directly, and in many cases allows pre-existing portlets to be made into Click to Action targets simply by declaring all or part of their actions using WSDL.
Figure 4-37 is a high-level diagram of the Click to Action sequence of events that takes place.
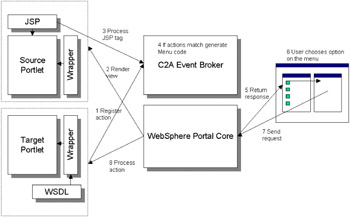
Figure 4-37: Click to Action sequence diagram
The Click to Action runtime is composed of a generic wrapper portlet, which is used to wrap each portlet enabled for Click to Action, and a broker component. These components also interface with the WebSphere Portal core runtime. The purpose of the wrapper is to intercept calls to the application portlet and interface with the broker appropriately to transparently register actions supported by the portlet, transfer data from source to target portlets, and so forth. The broker centrally maintains a repository of actions on each portlet along with the parameter type information, performs source and target matches at runtime using this information, and generates additional markup to allow users to trigger data transfers across portlets. The WebSphere Portal core runtime performs the functions of generating the portal pages, receiving browser requests, invoking callbacks on portlets, and so forth. Finally, JSPs associated with source portlets use custom tags to declare sharable sources of data, and target portlets provide a WSDL file declaring portlet actions which may be invoked by the Click to Action runtime.
The Click to Action flow is designed to account for the portlet event processing model, which is described in Portlet events. The portal programming model involves an event phase and a render phase in each request-response cycle. During the event phase, an action may be delivered on one portlet. If Click to Action is used, this may result in other actions being triggered on other portlets. The event phase is followed by the render phase, in which each portlet is asked to return markup, which is then aggregated in a single page. The markup may embed actions that can be invoked by the user. The page is then returned to the client (such as a browser).
A typical request-response flow involving Click to Action is illustrated in Figure 4-37. This comprises the following steps:
-
During portlet initialization, the wrapper processes any action WSDL file associated with the application portlet and registers the actions with the broker.
-
During the render phase of a request cycle, JSPs associated with Click to Action source portlets are processed.
-
The custom Click to Action tags result in calls to the Click to Action event broker, which determines matching actions on the page based on type information.
-
The Click to Action broker generates additional code to display the Click to Action icon used to invoke the pop-up menu.
-
After all render phase portlet callbacks have been completed, the portal assembles the response page and returns it to the client.
-
The end user can click on the Click to Action icon for a source to view a menu of compatible actions on the page and select one.
-
A new request is generated, containing the chosen source and action information, and is sent to the portal.
-
The portal core runtime delivers the action to the target portlet. This is intercepted by the wrapper, which may interact with the broker to further process the request before delivering the action to the target.
While all portlet actions are intercepted by the wrapper, actions which are invoked through direct interaction with the portlet (as opposed to interaction through Click to Action) are passed through transparently to the portlet.
4.6.2 Considerations
We can integrate portlets that expose Domino data through the WebSphere Portal Click to Action Broker.
4.6.3 Implementation of the technique
As we mentioned in the introduction to this topic, the Click to Action technology included on the WebSphere Portal enables communication between portlets. In our case, it was used to extract information from our example Sales and Customer Lotus Domino applications.
In this section we describe how to enable the portlets with Click to Action capabilities. We focus first on the Customer List portlet, which is the source portlet, and then on enabling the target portlets, which are the remaining portlets (Customer Details, Customer Contacts and Customer Sales Activities) on the page.
Preparing the portlet project
Use the following steps to prepare the portlet project before starting the enablement of the portlets.
Open the WebSphere Studio Application Developer tool and the Web perspective.
-
Open the CustomerJSPPortlet project.
-
Right-click the /WEB-INF/tld folder and select Import.
-
On the Import dialog, select File System and click Next.
-
Select the Directory button and browse to the WPS-HOME\c2a\tld directory, where WPS-HOME is the WebSphere Portal installation directory.
-
Select the c2a.tld file and click Finish.
Figure 4-38 shows the import parameters we used.
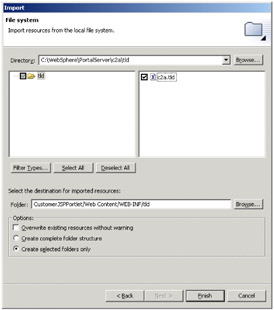
Figure 4-38: Importing the Click to Action tag library -
Right-click the /WEB-INF/lib folder and select import.
-
On the Import dialog, select File System and click Next.
-
Select the Directory button and browse to the WPS-HOME\c2a\lib directory, where WPS-HOME is the WebSphere Portal installation directory.
-
Select the pbportlet.jar file and click Finish.
The portlet project is now ready to support Click to Action functionality.
Enabling the source portlet (Customer List)
The process of enabling the source portlet is very simple.
First, you have to know what parameters are to be transmitted to the target portlets. The parameter transmitted should be the same one expected on the action of the target portlet. The target portlet parameters and actions expected are outlined in Table 4-6.
| Portlet name | Parameter | Action |
|---|---|---|
| Customer Details | uid | details |
| Customer Contacts | customerName | contacts |
| Customer Sales Activities | customerName | activities |
Use the following steps to start working on the portlet:
-
Open the /jsp/CustomerList/View.jsp file.
-
At the very beginning of the View.jsp file insert the following tag library import statement:
<%@ taglib uri="/WEB-INF/tld/c2a.tld" prefix="C2A" %>
-
Add an attribute to the existing <Domino:viewloop> tag. This attribute is named id and we give it a value "myviewloop". The tag should look like this:
<Domino:viewloop >
This is done so that you can extract information from the looping documents using the Domino Java objects API.
-
On the table row displaying the resulting loop, before the <Domino:viewitem col="1"/> tag, insert the following tags:
<!-- Note the namespace we chose is arbitrary --> <C2A:encodeProperty namespace="http://www.ibm.com/customer" type="CustomerIDType" value='<%=myviewloop.getDocument().getUniversalID()%>'/> <C2A:encodeProperty namespace="http://www.ibm.com/customer" type="CustomerNameType" broadcast=" true" value='<%=myviewloop.getDocument().getItemValueString("customerName")%>'/>There are several things to note about the two lines inserted.
First, notice that both tags are Click to Action JSP custom tags, and they have several attributes. Table 4-7 is a description of the purpose of the available Click to Action encode property attributes.
Table 4-7: Click to Action encode property JSP tag attributes Attribute
Description
type
Specifies the type of data sent by the source portlet. Required. The data type is defined in the WSDL, which will be defined when we enable the target portlets. The Click to Action runtime uses type and namespace attributes to match source data to actions on targets.
namespace
Specifies the namespace for the type. Required. This attribute is used to group related types in a single domain.
value
Specifies the data to be sent by the source portlet. Required. The Click to Action runtime sends the value of the user's selections to the target actions.
broadcast
Indicates whether the source data can be broadcast to all target portlets with matching actions. False is the default setting. Optional. If the value is true, the generated menu displays an additional item to broadcast the source to all matching targets.
generateMarkupWhen Nested
Indicates that this tag should generate markup even when nested within the <c2a:encodeProperties/> tag. This attribute is optional; the default is false. If this tag is not nested, the attribute is ignored. For our initial example this attribute was not used.
Also, notice that inside the value attribute you are inserting a Java scriptlet which will get the parameters required to feed the target portlets.
Since there are two portlets that will require the same customerName parameter, just one tag is required.
-
Save and Close the View.jsp file.
Note When you save the View.jsp file, a JspTranslate error is reported by WebSphere Studio. Ignore this message since at run time the correct classes will be available.
You are now done enabling the source portlet.
Enabling the target portlets
Create a folder to contain the WSDL descriptor files for your target portlets with these steps:
-
Right-click the Web Content folder on your CustomerJSPPortlet project.
-
Select New → Folder.
-
Name the folder wsdl and click Finish.
Target portlets requirements
There are some requirements that the target portlet class must follow:
-
Portlet actions must use the DefaultPortletAction object for action processing.
-
Portlet actions must accept a single basic parameter. This parameter appears in the PortletRequest object.
-
The action must also be invocable at any time. That is, there should not be a case where the action is not invocable when the portlet is in a certain state. This is because the set of actions associated with a target portlet is statically declared; the C2A broker assumes that the same set is available in each request cycle.
Fortunately, we developed our portlets following these restrictions. Go through them and you will find that the actions defined are appropriate, and each action requires only one parameter.
Enabling the Customer Details portlet
You do not have to modify any Java code to enable the target portlets; the task is basically a definition process that comprises the creation of a WSDL descriptor file and the modification of the deployment descriptors.
First, create the WSDL file with these steps:
-
Right-click the /wsdl folder and select New → Other.
-
Select Simple and File in the dialog, then click Next.
-
Name the file CustomerDetails.wsdl.
-
Click Finish.
-
Copy the code in Example 4-16 into the newly created file.
Example 4-16: Click to Action CustomerDetails.wsdl

<?xml version="1.0" encoding="UTF-8"?> <definitions name="CustomerDetail_Service" targetNamespace="http://www.ibm.com/customer" xmlns="http://schemas.xmlsoap.org/wsdl/" xmlns:portlet="http://www.ibm.com/wps/c2a" xmlns:soap="http://schemas.xmlsoap.org/wsdl/soap/" xmlns:tns="http://www.ibm.com/customer" xmlns:xsd="http://www.w3.org/2001/XMLSchema"> <types> <xsd:simpleType name="CustomerIDType"> <xsd:restriction base="xsd:string"> </xsd:restriction> </xsd:simpleType> </types> <message name="customerDetailsRequest"> <part name="custid" type="tns:CustomerIDType"/> </message> <portType name="CustomerDetail_Service"> <operation name="customerDetails"> <input message="tns:customerDetailsRequest"/> </operation> </portType> <binding name="CustomerBinding" type="tns:CustomerDetail_Service"> <portlet:binding/> <operation name="customerDetails"> <portlet:action name="details" caption="Customer Details" description="Get details for specified Customer"/> <input> <portlet:param name="uid" partname="custid"/> </input> </operation> </binding> </definitions>
The WSDL file describes how the target portlet exposes its services. Note that in the definitions open tag we specify the namespace we are using as http://www.ibm.com/customer, which is the same as the one defined in the source portlet click to action <C2A:encodeProperty> JSP tag.
We define a simple type called CustomerIDType, which is a simple xsd string type. Notice also that in the source portlet's first click to action<C2A:encodeProperty> JSP tag we are referencing this type.
-
Also notice in the binding area that we are referencing an action with the same name, "details" that our portlet uses. It will store the value in a parameter called "uid" that will feed the portlets actionPerformed() method.
Note When you save the CustomerDetails.wsdl file, several errors are reported by WebSphere Studio. Ignore these messages since they are corrected at run time.
Use the following steps to modify the deployment descriptors, beginning with the web.xml file.
-
Open in the /WEB-INF folder the web.xml file in Source mode.
-
Look for the <servlet-class> of the CustomerDetails servlet (portlet) and modify the class from portlet.CustomerDetails to the com.ibm.wps.pb.wrapper.PortletWrapper class.
-
Switch to the Servlet tab.
-
Select the CustomerDetails servlet, add an initialization parameter called c2a-application-portlet-class, and add a value of portlet.CustomerDetails. It should look like Figure 4-39.
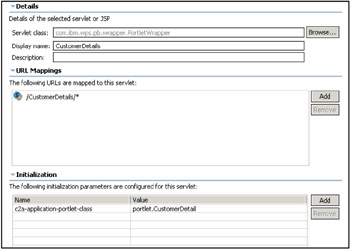
Figure 4-39: Click to Action setting up the web.xml fileYou can see that the Servlet class contains the previously modified class. This class is a wrapper that will load the class described by the c2a-application-portlet-class initialization parameter.
Next, modify the portlet.xml file:
-
Open the portlet.xml file.
-
Select the CustomerDetails concrete portlet.
-
Create a New setting parameter with a name c2a-action-descriptor and a value of /wsdl/CustomerDetails.wsdl.
-
Save and Close the portlet.xml file.
Enabling the Customer Contacts portlet
Create the WSDL file using the following steps:
-
Right-click the /wsdl folder and select New → Other.
-
Select Simple and File in the dialog, then click Next.
-
Name the file CustomerContacts.wsdl.
-
Click Finish.
-
Copy the code in Example 4-17 into the newly created file.
Example 4-17: Click to Action CustomerContacts.wsdl
<?xml version="1.0" encoding="UTF-8"?> <definitions name="CustomerContacts_Service" targetNamespace="http://www.ibm.com/customer" xmlns="http://schemas.xmlsoap.org/wsdl/" xmlns:portlet="http://www.ibm.com/wps/c2a" xmlns:soap="http://schemas.xmlsoap.org/wsdl/soap/" xmlns:tns="http://www.ibm.com/customer" xmlns:xsd="http://www.w3.org/2001/XMLSchema"> <types> <xsd:simpleType name="CustomerNameType"> <xsd:restriction base="xsd:string"> </xsd:restriction> </xsd:simpleType> </types> <message name="customerContactsRequest"> <part name="custName" type="tns:CustomerNameType"/> </message> <portType name="CustomerContacts_Service"> <operation name="customerContacts"> <input message="tns:customerContactsRequest"/> </operation> </portType> <binding name="CustomerContactsBinding" type="tns:CustomerContacts_Service"> <portlet:binding/> <operation name="customerContacts"> <portlet:action name="contacts" caption="Customer Contacts" description="Get contacts for a specified Customer"/> <input> <portlet:param name="customerName" partname="custName"/> </input> </operation> </binding> </definitions>
The WSDL file describes how the target portlet exposes its services. Note in the definitions open tag we are describing the same namespace, "http://www.ibm.com/customer" that we defined in the source portlet click to action <C2A:encodeProperty> JSP tag.
We are defining a simple type called "CustomerNameType" which is a simple xsd string type. Notice also that in the source portlet, in the second click to action <C2A:encodeProperty> JSP tag, we are referencing this type.
-
In the binding area, notice that we are referencing an action with the same name "contacts" that one our portlest uses. It will store the value in a parameter called "customerName" that will feed our CustomerContacts portlet's actionPerformed() method.
Note When you save the CustomerContacts.wsdl file, several additional errors are reported by WebSphere Studio. Ignore these messages since they will be corrected at run time.
Next, modify the deployment descriptors, starting with the web.xml file.
-
Open in the /WEB-INF folder the web.xml file in Source mode.
-
Look for the <servlet-class> of the CustomerContacts servlet (portlet) and modify the class from portlet.CustomerContacts to the com.ibm.wps.pb.wrapper.PortletWrapper class.
-
Switch to the Servlet tab.
-
Select the CustomerContacts servlet and add an initialization parameter on the left called c2a-application-portlet-class and add a value of portlet.CustomerContacts.
Now, modify the portlet.xml file:
-
Open the portlet.xml file.
-
Select the CustomerContacts concrete portlet.
-
Create a New setting parameter with a name c2a-action-descriptor and a value of /wsdl/CustomerContacts.wsdl.
-
Save and close the portlet.xml file.
Enabling the Customer Sales Activities portlet
Create the WSDL file using the following steps:
-
Right-click the /wsdl folder and select New → Other.
-
Select Simple and File in the dialog, then click Next.
-
Name the file CustomerSalesActivities.wsdl.
-
Click Finish.
-
Copy the following code into the newly created file:
Example 4-18: Click to Action CustomerContacts.wsdl
<?xml version="1.0" encoding="UTF-8"?> <definitions name="CustomerSalesActivity_Service" targetNamespace="http://www.ibm.com/customer" xmlns="http://schemas.xmlsoap.org/wsdl/" xmlns:portlet="http://www.ibm.com/wps/c2a" xmlns:soap="http://schemas.xmlsoap.org/wsdl/soap/" xmlns:tns="http://www.ibm.com/customer" xmlns:xsd="http://www.w3.org/2001/XMLSchema"> <types> <xsd:simpleType name="CustomerNameType"> <xsd:restriction base="xsd:string"> </xsd:restriction> </xsd:simpleType> </types> <message name="customerSalesActivityRequest"> <part name="custName" type="tns:CustomerNameType"/> </message> <portType name="CustomerSalesActivity_Service"> <operation name="customerSalesActivity"> <input message="tns:customerSalesActivityRequest"/> </operation> </portType> <binding name="CustomerSalesActivityBinding" type="tns:CustomerSalesActivity_Service"> <portlet:binding/> <operation name="customerSalesActivity"> <portlet:action name="activities" caption="Customer Sales Activity" description="Get sales activities for a specified Customer"/> <input> <portlet:param name="customerName" partname="custName"/> </input> </operation> </binding> </definitions>
The WSDL file describes how the target portlet exposes its services. Note in the definitions opening tag we are describing the same namespace that we defined in the source portlet click to action <C2A:encodeProperty> JSP tag, "http://www.ibm.com/customer".
We are defining the simple type "CustomerNameType" which is a simple xsd string type. Notice also that in the source portlet, in the second click to action <C2A:encodeProperty> JSP tag, we are referencing this type.
-
Also notice in the binding area that we are referencing an action with a name "activities" like the one our portlet uses. It will store the value on a parameter called "customerName" which will feed our portlet's actionPerformed() method.
Note When you save the CustomerSalesActivities.wsdl file, several additional errors are reported by WebSphere Studio. Ignore these messages since they will be corrected at run time.
Modify the deployment descriptors, beginning with the web.xml file:
-
Open in the /WEB-INF folder the web.xml file in Source mode.
-
Look for the <servlet-class> of the CustomerSalesActivities servlet (portlet) and modify the class from portlet.CustomerSalesActivities to the com.ibm.wps.pb.wrapper.PortletWrapper class.
-
Switch to the Servlet tab.
-
Select the CustomerSalesActivities servlet and add an Initialization parameter on the left called c2a-application-portlet-class and add a value of portlet.CustomerSalesActivities.
Next, modify the portlet.xml file:
-
Open the portlet.xml file.
-
Select the CustomerSalesActivities portlet.
-
Create a New setting parameter with a name c2a-action-descriptor and a value of /wsdl/CustomerSalesActivities.wsdl.
-
Save and close the portlet.xml file.
Deploy the portlet
Now that all the settings are complete for your Click to Action portlets, deploy them just as you did in the previous exercises. You should see a page like the one depicted in Figure 4-40.
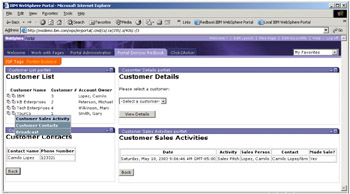
Figure 4-40: Click to Action enabled JSP tags portlets
The portlets are enabled with Click to Action, and the customers.nsf database with the sales.nsf database are integrated seamlessly at the portal interface level.
In the next section we describe how to add some finishing touches, specifically by adding people awareness to the portlets. But before we do that, let's take a look at some common pitfalls that developers run into when developing portlets that are Click to Action enabled.
Common pitfalls
-
Be aware of the Namespace definition of the WSDL file; your Namespace should be unique and match the one described on the <C2A:encodeProperty> tag. Your namespace should be inside the definitions tag of the WSDL file in the attributes targetNamespace and xmlns:tns. Do not modify any other namespace.
-
Remember that your portlets should implement the ActionListener interface to have the action called.
-
The action inside your target portlet class should be a DefaultPortletAction.
-
In WebSphere Portal 4.2, Click to Action is limited to Portlets that reside on the same page.
|
| < Day Day Up > |
|
EAN: 2147483647
Pages: 103