4.5 Integration using Domino custom JSP Tag libraries
|
| < Day Day Up > |
|
4.5 Integration using Domino custom JSP Tag libraries
We used the Domino custom JSP Tag libraries technology to create the core portlets that will integrate Domino components. The details of the implementation are in this section.
4.5.1 Overview
This integration technique introduces the Portal toolkit's ability to produce portlet projects easily and shows how, in conjunction with the Lotus Domino toolkit for WebSphere Studio, it incorporate the Domino custom JSP tags into standard JSP pages to extract Domino data.
First we review some basic required concepts on the portlet class and the abilities of the portlet to do event-based integration. Further information on the portlet class, APIs, and related objects is discussed on the following chapter.
Domino custom JSP tag libraries
One of the JSP directives mentioned previously was the taglib directive. As we explained, the JSP tag library is a collection of custom JSP tags that encapsulate Java code through the simple use of tags. The library defines declarative, modular functionality that can be reused by any JSP page. The tags are defined in an XML format file known as the Tag Library Descriptor file or TLD. This descriptor tells the JSP parser-compiler what Java classes and methods should be interpreted. Grouping these tags in libraries gives the JSP developer a simple but powerful tool to incorporate Java code in the application without getting into the details of Java. These JSP tag libraries can be used extensively on your JSP pages to include Lotus Domino elements into your J2EE/Portal applications.
This option brings to the developer who is not a Java expert, or who is not knowledgeable on handling Lotus Domino Java back-end objects, the ability to enable a Web application to incorporate complex Lotus Domino interactions by simply adding a custom Domino JSP tag to the JSP. And since the WebSphere Portal framework is based on a J2EE environment that allows the inclusion of JSP files, the developer can expose Lotus Domino applications to the portal infrastructure with the use of custom Domino JSP tags.
| Note | As explained in the following section, there are some performance considerations to take into account when using this option. |
There are two Domino JSP tag libraries. Both comply with the standard specifications of JSP 1.1 and Java Servlet 2.2 developed by Sun Microsystems, which are supported by the WebSphere Portal infrastructure. The Lotus Domino tag libraries are:
| domtags.tld | Collaboration tags for accessing standard, back-end objects in the Domino data repository |
| domutil.tld | Utility tags for performing tasks that are common to all J2EE Web containers |
Types of Domino JSP tags
The Domino JSP tags can be grouped into four types:
-
Data access tags
-
Data input tags
-
Process control tags
-
Utility tags
In this section we describe some useful Domino JSP tags. They are the most pertinent for developing portlets that extract information from Lotus Domino applications, but they are just a subset of all the tags available. Refer to the Lotus Domino Designer on-line help for comprehensive information about all the available tags.
Data access tags
The data access tags allow the user to gain access to several of the most important objects in the Lotus Domino object hierarchy. Table 4-3 gives a brief overview of the tags that were useful for our portalizing project.
| Tag name | Description | |||
|---|---|---|---|---|
| session | Defines the environment that the core collaboration tags run in. Use the session tag when multiple core tags are included on the same JavaServer page. This initializes and tears down the Domino session one time only, providing improved performance. This tag is not required if there is only one core tag on the page; the user and password attributes of the core tag implement the session for you. However, if you are using a CORBA session, this tag must be used, since the host attribute cannot be specified on the top-level tags. If one or more of the core tags reside in the same database, you can further improve the efficiency of the page by using the db tag instead of this tag to wrap them. | |||
| database | Provides a database context for all enclosed tags. If you are including several core tags that are running off the same database in a page, you can wrap them in this tag to increase scalability. This tag is not required if there is only one core tag on the page; the dbserver and dbname attributes of that core tag implement the db tag for you. Do not use this tag to wrap two core tags that reside in different databases; use the session tag instead. To loop over all the documents in a database, use the docloop tag nested inside the db tag. If you do not supply values for the user and password attributes, the database identifies the user as an Anonymous user. The database's ACL must have an "Anonymous" entry with at least Reader level privileges to the database for the tag to access the database successfully. | |||
| document | Enables an author to create or edit a document. The body of this tag is always evaluated. You can use the item, setitem, and formula tags within the body of this tag. To display the document, use the item and formula tags within the body. To edit the document, use the setitem tag within the body. If you set the value of an item using the setitem tag within the body of this tag, you must save your changes also within the body of this tag. You can save your changes by either:
| |||
| view | Displays the summary information of a subset of documents in a database. You can use the key and ftsearch attributes to further qualify the subset. | |||
| ftsearch | Performs a full text search of a database. The result is a list of documents that fit the search criteria. Use the docloop or page tags to sequence over the resulting documents and the item or formula tags to display the summary data. | |||
| item | In the context of a form, document, or docloop tag, displays the value of an item in the current document. You can set the tag's readonly format using the format attribute. The body of the item tag is not evaluated. To provide update access to an item, use the input tag in the context of a form tag. | |||
| viewitem | Displays the value of an item in the current row of a view. The body of this tag is not evaluated. | |||
| unid | Displays the unique ID of the current document. The body of this tag is not evaluated. | |||
| viewloop | Iterates over the results of a view, evaluating the body once per ViewEntry object in the result. If no results are returned, displays nothing. To create custom text to display when no objects are returned, use the novalues tag. You can access the items of an object using the viewitem tag. | |||
| docloop | Iterates through the items returned by a view, ftsearch, db, responses, or page tag as documents. The body of this command is output once per iteration, which means once per document in the result set. When a result contains no objects, the body of this tag is not evaluated. Use the novalues tag to create custom text to display when a result contains no objects. Use the item tag to access the items in a document.
|
Data input tags
Data input tags allow the input of information from a JSP file to the Lotus Domino application. There are constraints on the use of these tags because of restrictions of the WebSphere Portal on the management of URIs and JavaScript inside a portlet, so they are not covered in detail in this chapter. Let's take a look at why data input tags won't instantly work with our portlet infrastructure like the other tags do.
When you create a JSP and insert the Data Input tags, for example <Domino:form>, <Domino:input> and <Domino:savedoc> tags, you will see a lot of JavaScript code generated on the HTML page that will basically generate action URLs that process the input form. Example 4-6 shows some JavaScript code generated by the Data Input tags.
Example 4-6: JavaScript code generated by Data Input tags
function selfNavigate() { var actionURL = location.pathname; var argName; var first = true; for (argName in DominoArgs) { var argValue = DominoArgs[argName]; if (argValue != null) { if (first) { actionURL += '?'; first = false; } else { actionURL += '&'; } if (typeof argValue == 'object') { for (index = 0; index < argValue.length; index++) { if( index > 0) actionURL += '&'; actionURL += argName + '=' + argValue[index]; } } else { actionURL += argName + '=' + argValue; } } } if (DominoForm != null) { DominoForm.action = actionURL; DominoForm.performSubmit(); } else { location.replace(actionURL); } } This code appends to the portal URL the command and arguments. That is not the usual way information will be passed on the portal. Also, if there are two portlets accessing these data input tags, then you would have conflicts. Be careful when adding data input tags since they can be tricky on a portlet infrastructure. We did not use any of these tags in our examples.
Process control tags
These tags allow the JSP to query the state or properties of the Domino application, and based on the result, modify the presentation of our portlet.
| Tag name | Description | |||
|---|---|---|---|---|
| ifcategoryentry | Conditional tag. In the context of a viewloop tag, if the current ViewEntry object is a category, meaning it displays in the category column of a hierarchical or categorized view, the body of this tag is displayed. This tag can be used to edit the indentation or display properties of category entries to distinguish them from the other entry types, represented by the ifdocumententry, iftotalentry, and ifconflictentry tags. | |||
| ifdocumententry | Conditional tag. In the context of a viewloop tag, if the current ViewEntry object represents a document in a hierarchical or categorized view, the body of this tag displays. | |||
| ifdocauthor | Conditional tag. Restricts generation of the JSP page to only those users who have author access to the current document. Users have author access to a document if they have:
| |||
| nodocument | Displays an alternate message if there is no document associated with the unid attribute being passed to the form tag. If the requested document does not exist, displays the body of this tag. To localize the text that displays, use the msg tag in the tag body. | |||
| runagent | Runs a specified back-end agent on the server. You can specify agents that run on the server, such as agents that send mail or create a folder. You cannot specify an agent that displays information in the browser to the user. For example, you cannot run an agent that contains a LotusScript print statement using this tag. If you want to capture data using this tag to run an agent, you must write the agent's results to a document and access the document to recover the data. To use this tag to run an agent, set up the basics tab of the Agent Properties box for the agent as follows:
| |||
| ifdbrole | Conditional tag. In the context of a db tag, restricts generation of the JSP page to only those users included in a custom ACL role. To allow for programmatic determination of access control, the standard access level names (author, editor, and so forth) can be used as role names. |
Utility tags
The utility tags allow you to control the flow of the presentation logic on the portlet based on Domino conditions and expressions.
| Tag name | Description | ||||||
|---|---|---|---|---|---|---|---|
| if | The body of this tag conditionally executes depending on a specified condition. One condition can be specified per tag and can be passed in by including a condition tag in the body of the if tag or as one of the if tag attributes.
| ||||||
| else | Used after an if or elseif tag; this tag executes only if none of the preceding if or elseif tags were executed. | ||||||
| elseif | Conditionally executes its body if the corresponding if tag did not execute and the condition for the elseif tag is true.
| ||||||
| condition | Specifies the condition of an if or elseif tag. The body of the tag must be a string that represents a Boolean value, for example: true, false, 0, 1, yes, or no. This tag has no attributes.
| ||||||
| switch | Enables the JSP author to incorporate control flow. Each case or default tag contained in the body of this tag is processed in turn and the first match that is found is evaluated. You cannot provide more than one value for this tag. If you supply a value attribute, do not include a switchvalue tag in the tag body. | ||||||
| case | Provides processing instructions to a switch tag when a match is made. If the case tag's value attribute matches the switch tag's value attribute, the body of the case tag is evaluated. | ||||||
| format | Formats a value. You can pass in a value to format or format the tag body. You can also provide an ID name to save the formatted body or value as a variable. | ||||||
| browsertag | Identifies the capabilities associated with the current (or specified) browser. Either returns the value of the capability or conditionally evaluates the body of the tag based on whether or not the browser supports the passed capability. For capability variables consult the Lotus Domino 6 Designer documentation. |
Custom Domino JSP tag issues
There are a number of issues related to the incorporation of the JSP tag libraries from Lotus Domino into WebSphere Portal and WebSphere Application Server.
-
In the WebSphere Application Server, including a form into a page using a <jsp:include> tag renders the validatehref attribute on the form useless. This attribute can be defined by the following tags:
-
form
-
deletedoc
-
docnavimg
-
savedoc
-
saveclosedoc
-
4.5.2 Considerations
There are a few issues to consider when using Lotus Domino JSP tag libraries to expose Lotus Domino applications to the WebSphere Portal. They are:
-
Custom Domino JSP tags aren't supported on WebSphere Portal, so you should perform extensive testing on the functionality required.
-
On each request that the JSP executes with embedded custom Domino JSP tag libraries to a remote server, a different session connection through DIIOP with the Lotus Domino server is created, which can impose a significant overhead. This is especially important when the application will be accessed by a large number of users.
The experience we had in the lab is that it takes an average of one second to display a portlet with Domino JSP tags. Considering a Portal page with four embedded portlets, it would take approximately four seconds to render, and that is for only one user.
In the next chapter we review a sample Java implementation for handling Domino sessions to make our Lotus Domino applications perform well under heavy load, using a session management pool. We show that using the session pool will reduce, by more than half, the overhead imposed by the current implementation of the custom Domino JSP tags. In the next chapter we also discuss the DIIOP task in the Lotus Domino server.
-
The exposure of rich text fields on our portlets isn't straightforward. To properly address this issue we have to consider two possible scenarios:
-
If the rich text was filled from the Lotus Notes client, then we must create a reverse proxy to receive the HTML produced by the Lotus Domino server and then include it on the portal, taking care to make any link portal friendly.
We discuss this scenario further in the next chapter, where we review some methods of handling rich text fields.
-
If the rich text field will be used only from the portal, we recommend storing the information in a neutral XML format so it can be encoded and decoded with the use of XSLT stylesheets.
-
-
Some data input custom Domino JSP tags aren't portal friendly since they insert JavaScript code and URL links or actions that are absolute and not relative to the WebSphere Portal URI structure.
-
We have views with just a few documents in our examples; in real implementations we need pagination on our views. Pagination made with custom Domino JSP tags also carries URL links that are not portal friendly, so we have to implement our own Java pagination components. In the next chapter we explore a JSP-Java Hybrid alternative.
4.5.3 Implementation example
We start the implementation of this technique by creating a portlet project and creating the four basic portlets that expose the Lotus Domino application using custom Domino JSP tag libraries.
Building the portlet project with WebSphere Studio
First, we build a portlet application structure fit to handle the portlets that will communicate to our Lotus Domino application. To do this we use several of the tools introduced in previous sections. We performed the following steps to build the portlet project:
-
Open WebSphere Studio Application Developer.
-
Switch to the Portlet perspective
-
Select File → New → Portlet Application Project. A Create a Portlet Project dialog is displayed, as shown in Figure 4-14.
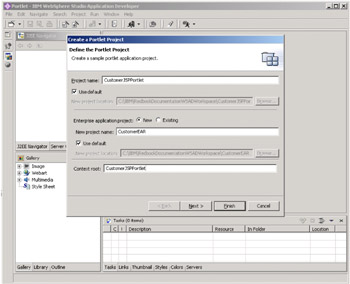
Figure 4-14: Creating the Portal project -
Name the project CustomerJSPPortlet.
-
Click Next and select the Basic portlet. The Basic portlet will build all the structure needed to hold our portlet.
-
Click Next and create the portlet application with parameters like those shown in Figure 4-15. Note that the wizard creates an initial portlet. This portlet will be the Customer List portlet.
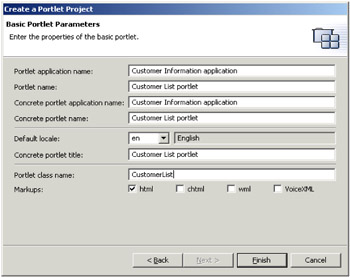
Figure 4-15: Parameters for creating the portlet project -
Click Finish.
Now let's inspect what the creation wizard built.
The newly created portlet project appears in the J2EE Navigator view in the left. Within the project are two important folders: Web Content and Java Source.
In the Web Content folder there is a JSP directory, and inside it there is a JSP created for every state the portlet can acquire (view.jsp, help.jsp, configure.jsp, and edit.jsp). Since our portlet will only be accessed in View mode, we remove all but the view.jsp file, including the HTML folder and its contents that holds the same JSPs when an HTML consumer client consults the portlet.
Now we take a look at the Java Source folder. It contains a default generated portlet package. This package contains two Java files: a CustomerList.java file,which is our portlet; and a CustomerListBean.java file, which is a helper Java Bean. Since our objective is interacting with Domino directly from our JSP pages, we remove the CustomerListBean.java file to clean up the package and make it easier to understand.
Several errors are displayed on the tasks view after the removal of the helper bean. To correct them we open the CustomerList.java file which contains our Portlet code and perform the following tasks:
-
Inside the portlet class are methods referring to each of the portlet states, like doView(), doHelp, doConfigure(), and doEdit() methods. Since we are working only with the view state, we remove the doHelp(), doConfigure, and doEdit() methods from the class.
-
Inside the doView() method there is a reference to the helper JavaBean class we deleted. We erase the code that references the helper Bean, and on the remaining line, modify it to point to the directory structure that we will create next. It should look like Example 4-7 after the modifications.
Example 4-7: CustomerList portlet redirection

getPortletConfig().getContext(). include("/jsp/CustomerList/View."+getJspExtension(request), request, response); -
Save the CustomerList.class portlet file.
The file should look like the one illustrated in Figure 4-16.
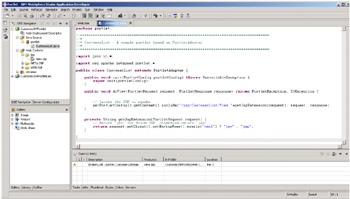
Figure 4-16: Editing the CustomerList.class portlet -
Now let's go back to the JSP folder inside the Web Content folder. There is a warning sign beside the View.jsp file, so we open the file and do the following:
-
Go to the Source tab.
-
Just leave the <%@page contentType="text/html" %> line.
-
Since we are going to have several portlets in our Web application, we create under the JSP directory the structure to hold our 4 portlets. This is done by adding the /jsp/CustomerDetails, /jsp/CustomerDetails, /jsp/CustomerContacts and /jsp/CustomerSalesActivity folders, like the ones displayed in the Figure 4-17 on page 172. Then we move the /jsp/View.jsp file to the CustomerList folder.
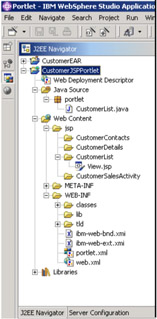
Figure 4-17: JSP directory structure
-
This completes the creation of the skeleton for our portlets. Next, we are going to add the Domino capabilities that are included in the Lotus Domino Toolkit for WebSphere Studio.
Adding Lotus Domino JSP tags to our portlets
To enable our project to include the JSP tag libraries, we performed the following steps:
-
Right-click the CustomerJSPPortlet project and select Properties.
-
In the Properties window, select the Web option; in the Available Web Project features field, select Include Domino Custom Tags Library, as shown in Figure 4-18.
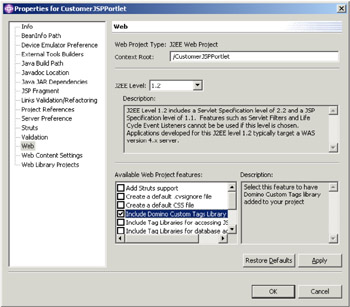
Figure 4-18: Including Domino custom JSP tags on the Web project -
Click the Apply button and then OK.
New files were added to our Web project: two Domino custom tag libraries on the WEB-INF directory, and three JAR files on the WEB-INF/lib folder. This result is shown in Figure 4-19.
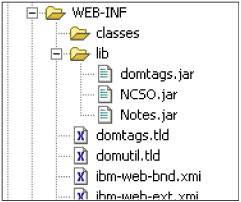
Figure 4-19: Inserting Domino custom tag libraries -
Switch to the Web perspective.
-
Select the Domino view. If you don't see the Domino view, you don't have the Lotus Domino Toolkit for WebSphere Studio installed.
-
Right-click the white canvas and select New Database connection.
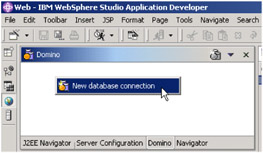
Figure 4-20: Connecting to the Domino database -
When prompted for connectivity information, fill in the appropriate values for the Domino server and point to the customer.nsf database you are using in your project. Click Finish. You will be prompted for a password. Enter it and click OK.
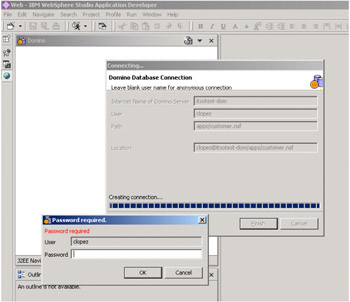
Figure 4-21: Connecting to Domino databases through Domino toolkitWhen the connection is complete, a list of all the forms and views that are on the database is displayed, as illustrated in Figure 4-22 on page 176. On this initial portlet you will be including the Customers/By Customer Name view on your JSP.
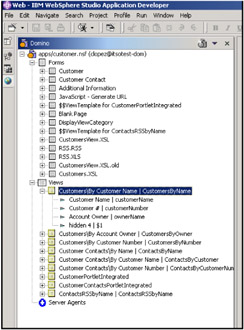
Figure 4-22: Reviewing the Customer database -
Change from the Domino view to the J2EE Navigator view and open the View.jsp file in design mode.
-
Go back to the Domino view and drag the Customers/By Customer Name view to the View.jsp.
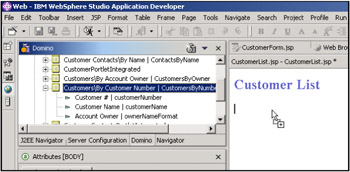
Figure 4-23: Adding the Customers/Customer By Name view to View.jsp -
Add the simple label "Customer List" with Heading 3 format.
-
Delete the hidden (fourth) column since this is a control column.
-
On the JSP file select the top row of the table to be a header row. To do so, right click the selected row and select Attributes, and in the Attributes view change from Data to Head like shown in Figure 4-24 on page 177.
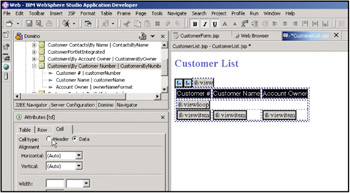
Figure 4-24: Changing the table to include headers -
Your new JSP file should look similar to Figure 4-25.
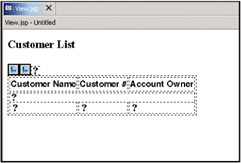
Figure 4-25: Initial portlet JSP -
Two errors are displayed on the tasks view. To resolve them, take a look at the source code for the JSP.
Change to the source tab and you will notice that there are no JSP Tag library definitions on the JSP, so add them as well as the WPS library.
-
Include at the beginning of the JSP the following lines:
<%@ taglib uri="/WEB-INF/domutil.tld" prefix="util" %> <%@ taglib uri="/WEB-INF/domtags.tld" prefix="Domino" %> <%@ taglib uri="/WEB-INF/tld/portlet.tld" prefix="portletAPI" %> <portletAPI:init/>
These includes insert the custom Domino libraries so that they can be referenced inside your code. The last line initializes the portlet tag library; there isn't any need to initialize the Domino libraries.
-
Also notice that in the source code there is a predefined <Domino:view> tag that will connect to the Domino server, establish a session, and extract the information required. Modify the user attribute in the tag to *webuser, so that rather than being hard coded, it is extracted from the single sign-on information that Domino and WebSphere Portal have. Delete the password attribute. Also, change the viewname to its alias, since spaces in the view name sometimes can have problems. It is also a best practice to use an alias instead of view name, as view names can change. The tag should look something like:
<Domino:view viewname="CustomersByName" dbserver="CN=itsotest-dom/O=itsopor tal" dbname="apps/customer.nsf" user="*webuser" host="itsotest-dom">
-
Save the /jsp/CustomerList/View.jsp file.
We have now a working portlet that displays basic information extracted from our Lotus Domino database.
| Tip | The <Domino:view> tag currently has a *webuser as the username, and no password specified. This option lets the portlet establish the connection to the Lotus Domino database with the same identity as the one used to log into the portal. Also notice that when the *webuser is used, no password is specified. As a prerequisite to use the same identity, single sign-on (SSO) must be enabled. |
Deploying our initial application
Use the following steps to deploy the application.
-
At the WebSphere Studio Application Developer tool, change to the J2EE Navigator view.
-
Right-click the CustomerJSPPortlet project and select Export. A wizard comes up. Select the WAR file export and basically export the project to your hard disk.
-
Install the portlet into WebSphere Portal
-
Log into the WebSphere Portal with an administrative user, and select the Portal Administration place.
-
It should open right away to the Install Portlets window. Select the newly created .WAR file.
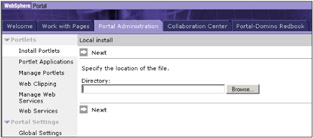
Figure 4-26: Installing the Customer List portlet -
Click Next. Once it recognizes your portlet, click Install. When the installation is finished, a "Portlets successfully installed" message is displayed.
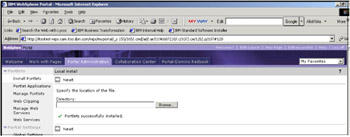
Figure 4-27: Successful installation of the portlet -
-
Grant access to the portlet.
Now that the portlet is installed to the portal, grant access to the users. Go to the Security/Access Control List in the Portal Administration place. Select the required users or groups and grant them at least View access. This is illustrated in Figure 4-28.
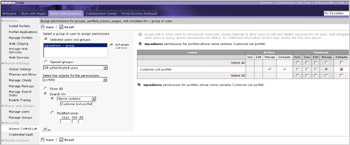
Figure 4-28: Granting access to the Customer List portlet -
Add the portlet to the page.
-
Go to the Work with Pages place and select Edit Page Composition.Select the place and page where you will install the portlets.
-
Modify the number of columns to two, and in the first column click the Add Content button. This directs you to a portlet search page.
-
Search by Customer List and your portlet should come up. Select it and click OK.
-
Finally, click Done. Figure 4-29 on page 180 shows the result of adding the portlet into a page.
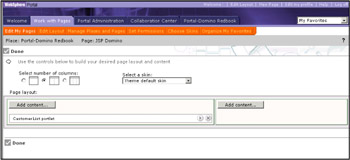
Figure 4-29: Adding the Customer List portlet to the page
-
-
Preview the portlet.
Log into the portal with a user name that has access to the Lotus Domino database and select the page where you added the portlet. You should be able to view the portlet running.
Figure 4-30 shows an example of a basic view being displayed in a portlet.
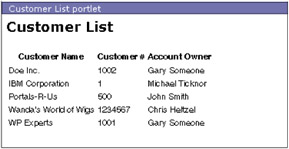
Figure 4-30: Initial portlet with Domino functionality accessed through JSP tags
The Customer Details portlet
We now describe how to construct the Customer Details portlet. This portlet initially displays a JSP with a drop-down list of the customers available. After a customer is selected, it reloads and displays the customer information details.
Customer detail portlet Java code
-
Open the Web Project from the Portlet perspective.
-
Copy the CustomerList.java file and paste it to the same package. When prompted to rename the file, rename it CustomerDetails.java.
-
Open the CustomerDetails.java file and modify its doView() method to target the CustomerDetails folder.
-
Replace the doView() method to include the code in Example 4-8.
Example 4-8: Customer Detail portlet doView() method
// We are checking if the uidDoc attribute is on the session, initially it will // be null but once a customer is selected the uidDoc will be populated. if(request.getPortletSession().getAttribute("uidDoc") != null){ // Creating a URI for the details button when a customer is selected. PortletURI detailURI = response.createURI(); // We are creating the details action DefaultPortletAction detailAction = new DefaultPortletAction("details"); detailURI.addAction(detailAction); // We are storing the URI in the request objects request.setAttribute("details", detailURI.toString()); // Now we are creating the return URI for the back button PortletURI returnURI = response.createReturnURI(); // We are storing the return URI in the request as well request.setAttribute("CD_back", returnURI.toString()); // We are redirecting to the CustomerDetails.jsp file getPortletConfig().getContext().include( "/jsp/CustomerDetails/CustomerDetails."+getJspExtension(request), request, response); } else { // If no customer is selected perform this code. PortletURI detailURI = response.createURI(); DefaultPortletAction detailAction = new DefaultPortletAction("details"); detailURI.addAction(detailAction); request.setAttribute("details", detailURI.toString()); // We are redirecting to the View.jsp file getPortletConfig().getContext().include( "/jsp/CustomerDetails/View."+getJspExtension(request), request, response); }This code selects whether you want to display the initial selection JSP or the customer details JSP, based on the uidDoc attribute stored in the session. Notice that we need a new JSP called CustomerDetail.jsp to display the customer details; we will do this later. In the code, before including the target JSP, actions are created. These will respond to users' interactions through forms and buttons.
As we saw in the introduction to this integration technique, this portlet will start with a JSP that displays a drop-down list where the user selects the customer. When the user clicks the View Details button it will activate an action called details. If you inspect the code you will find that this action URI is going to be stored as an attribute on the request object.
The inclusion of both JSP files will help make our portlet work as a standalone portlet if needed. (In the next section we describe how to enable the click to action communication between portlets, but for now they will work independently.)
-
For the Customer Details portlet we introduce a new option that is in the portlet structure, the actions. The actions let the presenting JSP send information to the portlet class to perform the required business logic. In our portlet the View.jsp will send a details action to the CustomerDetails portlet and as a result the portlet will redirect the request to the CustomerDetails.jsp page, and pass to it the UI of the document. Figure 4-31 illustrates the action's interactions in the Customer Details portlet.

Figure 4-31: Action interaction in the Customer Details portlet -
Now we will implement action listening capabilities to our portlet. To do this we will first implement an interface called ActionListener. The declaration of our portlet will look something like the following:
public class CustomerDetails extends PortletAdapter implements ActionListener { -
Import into the CustomerDetails.java portlet the org.apache.jetspeed.portlet.event.*; package by adding the following line at the beginning of the class:
import org.apache.jetspeed.portlet.event.*;
-
Now that our portlet will listen to requests made through our JSP pages, we have to implement a new method called ActionPerformed. Add the following method at the end of your portlet class:
Example 4-9: Action Performed method of the Customer Details
public void actionPerformed(ActionEvent event) throws PortletException{ DefaultPortletAction action=(DefaultPortletAction)event.getAction(); PortletRequest request=event.getRequest(); if(action!=null){ if(action.getName().equals("details")) { request.getPortletSession().setAttribute( "uidDoc",request.getParameter("uid")); } } }This code basically captures the uid parameter from the request and stores it as an attribute called uidDoc in the session object.
| Tip | Storing information on the Portlet session object will enable the user to switch between pages and places, and when the user comes back to this page the portlet will still be displaying the information previously selected. If you store the information on the Portlet request object, the result of the portlet will only be available if the user changes pages and later comes back. |
Now lets take care of the JSPs. First we copy and modify the existing View.jsp file, and after that we create the new CustomerDetail.jsp
View.jsp
-
Copy the View.jsp file from the /jsp/CustomerList folder to the /jsp/CustomerDetails folder.
-
Open the newly copied View.jsp file in Source mode.
-
Delete the code inside and including the <Domino:view> tags.
-
Modify the label from Customer List to Customer Details.
-
Insert the following code in the JSP file:
Example 4-10: Customer Detail portlet, View.jsp fragment initial contents
<!-- Text to indicate to the user that a customer selection is needed --> <P>Please select a customer: <!-- Creating a form with an encoded name for the portal, so if there --> <!-- are two forms with the same name, there won't be any conflicts. --> <!-- Also notice that the details action is extracted from the request. --> <form name="<portletAPI:encodeNamespace value='CD_form' />" action="<%=(String)request.getAttribute("details") %>" method="post"> <SELECT size="1" name="uid"> <!-- Connecting to the Domino server and extracting the view --> <!-- The *webuser is used to enable single sign on. --> <Domino:view viewname='CustomersByName' dbserver='CN=itsotest-dom/O=itsoportal' dbname='apps/customer.nsf' user='*webuser' host='itsotest-dom'> <option value="" selected>-Select a customer-</option> <!-- Now we are looping through the view creating options for the --> <!-- different customers --> <Domino:viewloop> <OPTION value="<Domino:unid/>"> <Domino:viewitem name="Customer Name"/> </OPTION> </Domino:viewloop> </Domino:view> </SELECT></P> <!-- Standard submit HTML button --> <P><INPUT type="submit" name="Details" value="View Details"></P> </form>This code will insert a text message instructing the user to select an available customer from the list. Followed by a <form> tag that will use the POST method to submit the information to WebSphere Portal, the action on this form will trigger the action event details.
Next, a custom JSP tag for a Domino view is placed. This opens a session with the Lotus Domino server, and a select HTML field will loop using the <Domino:viewloop>. /
Inside the loop we extract two pieces of information: the universal ID of the customer document using the <Domino:unid/>, and the column information corresponding to the Customer Name.
CustomerDetails.jsp
-
Right click the /jsp/CustomerDetails folder and select New → JSP File.
-
Name the new JSP file CustomerDetails.jsp, and select the checkbox to specify this JSP is a fragment. Click Next.
-
Click on the Add Tag Library button.
-
Select all three tld libraries displayed. Add prefixes to the three libraries: Domino to the domtags.tld library, util to the domutil.tld library, and portletAPI to the portlet.tld, as shown in Figure 4-32. Click OK, then Finish to create the JSP.
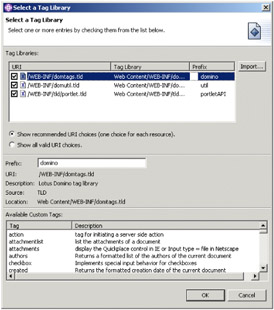
Figure 4-32: Insert Tag Libraries to the new CustomerDetails.jsp fileThe prefixes are needed so you can associate each tag with a JSP tag library.
-
In the Source view, insert the following code beneath the Tag Library definitions:
Example 4-11: CustomerDetails.jsp fragment initial code
<H3>Customer Details</H3> <P> <!-- Connecting to the Domino Server and extracting a document with the UID--> <Domino:document dbname='apps/customer.nsf' dbserver='CN=itsotest-dom/O=itsoportal' host='itsotest-dom' user='*webuser' schema='Customer' unid='<%=(String)request.getSession().getAttribute("uidDoc")%>'> <table border="1"> <tr> <TH>Customer Name</TH> <!-- Here we are extracting the customerName item from the document--> <td><Domino:item name="customerName" /></td> </tr> <tr> <TH>Customer Number</TH> <!-- Here we are extracting the customerNumber item from the document--> <td><Domino:item name="customerNumber" /></td> </tr> <TR> <TH>Customer Address</TH> <!-- Here we are extracting the customerAddress item from the document--> <TD><Domino:item name="customerAddress" /></TD> </TR> <tr> <TH>Account Owner</TH> <td> <!-- Here we are extracting the ownerName and ownerNumber--> <!-- item from the document--> <Domino:item name="ownerName"/> (<Domino:item name="ownerNumber" />) </td> </tr> <TR> <TH>Date Created</TH> <!-- Here we are extracting the DateCreated item and formating it--> <TD><Domino:item name="DateCreated" format="DATE=SHORT"/></TD> </TR> <tr> <TH>Comments</TH> <!-- Here we are extracting the Comments item. It is a rich text field.--> <td><Domino:item name="Comments" /></td> </tr></table> </Domino:document> </P> <P> <!-- We are inserting a back button with the returnURI created in the portlet--> <INPUT type="submit" name="Back" value="Back" onClick="window.location.href=' <%= (String)request.getAttribute("CD_back")%>'"> </P>This code opens a connection with the Lotus Domino server and extracts the document that has the UID corresponding to the uidDoc attribute we stored on the session object.
To extract the field information from the Domino document, we use the <Domino:item> tag.
-
Save the file.
Update the deployment descriptors
-
Open the web.xml file located in the /WEB-INF folder.
-
Go to the Servlets tab.
-
Click the Add button.
-
Select the CustomerDetails class.
-
Add a URL mapping; set it to /CustomerDetails/*.
-
Save and close the web.xml file.
-
Open the portlet.xml file located in the same folder.
-
Click the Add portlet button.
-
Select the CustomerDetails servlet, which is not used, and click OK.
-
Change the display name to Customer Details portlet and its ID to CustomerDetails.
-
Click the Concrete Portlet Application folder.
-
Click the Add Concrete Portlet button.
-
Click the CustomerDetails portlet, which is not used, and click OK.
-
Change its Display Name and Title to Customer Details portlet.
-
Add a description if needed.
-
Save the portlet.xml file.
Deploy the portlet
-
Export the project from the J2EE Navigator view by right-clicking over the project and selecting Export.
-
Now we can test the new portlet we have just created. We follow the same steps as the deployment of the previous portlet, except instead of using the install wizard we go to the Portlet Applications page and perform an update to the existing .WAR file.
The resulting portlet will look similar to Figure 4-33.

Figure 4-33: Customer Detail initial portlet
Customer Contacts portlet
Now we describe how to build the third portlet, which is the Customer Contacts portlet. This portlet displays an initial page with a drop-down list where the user selects the customer to query. After a customer is selected, the portlet performs a full text search on the Contacts By Customer view in the customer.nsf database. Finally, it displays the result of the search in the portlet. Since the behavior of this portlet is similar to that of the Customer Detail, we will reuse some of the functionality already created.
CustomerContacts.java file
-
Copy the CustomerDetails.java portlet class and paste it in the same portlet package, but with a name of CustomerContacts.java.
-
Open the newly copied CustomerContacts.java file.
-
From the doView() and actionPerformed() methods, since the lookup will be by customer name, change the attribute from uidDoc to customerNameAttr.
-
Change the name of the action from details to contacts; this will be done in the doView() and actionPerformed() methods.
-
In the actionPerformed() method, modify the request.getParameter() parameter from uid to customerName.
-
Look for the returnURI object created and change the name of the URI stored as an attribute on the request to CC_back.
-
Finally, modify the redirection directory on the doView() methods to point to the /jsp/CustomerContacts folder and CustomerContacts JSP file.
The doView() and actionPerformed() methods should look like Example 4-12.
Example 4-12: Customer Contacts portlet initial doView() and actionPerformed() methods
public void doView(PortletRequest request, PortletResponse response) throws PortletException, IOException { if(request.getPortletSession().getAttribute("customerNameAttr") != null){ PortletURI detailURI = response.createURI(); DefaultPortletAction detailAction = new DefaultPortletAction("contacts"); detailURI.addAction(detailAction); request.setAttribute("contacts", detailURI.toString()); PortletURI returnURI = response.createReturnURI(); request.setAttribute("CC_back", returnURI.toString()); getPortletConfig().getContext().include( "/jsp/CustomerContacts/CustomerContacts."+getJspExtension(request), request, response); } else { PortletURI detailURI = response.createURI(); DefaultPortletAction detailAction =new DefaultPortletAction("contacts"); detailURI.addAction(detailAction); request.setAttribute("contacts", detailURI.toString()); getPortletConfig().getContext().include( "/jsp/CustomerContacts/View."+getJspExtension(request), request, response); } } public void actionPerformed(ActionEvent event) throws PortletException { DefaultPortletAction action=(DefaultPortletAction)event.getAction(); PortletRequest request=event.getRequest(); if(action!=null){ if(action.getName().equals("contacts")) { request.getPortletSession().setAttribute( "customerNameAttr",request.getParameter("customerName")); } } }Note Modify just the doView() and actionPerformed() methods; leave the getJspExtension() unmodified.
The changes to the CustomerContacts.java file are highlighted in bold in Example 4-12 on page 190. Now that the CustomerContacts.java file is set, we will continue with the JSP files.
View.jsp file
-
Copy the CustomerDetails.jsp and View.jsp files from the/jsp/CustomerDetails folder and paste them on the /jsp/CustomerContacts folder.
-
Rename the newly pasted CustomerDetails.jsp file to CustomerContacts.jsp.
-
Open the just pasted View.jsp file.
-
Modify the page header from Customer Details to Customer Contacts.
-
Modify the form tag, action attribute from details to contacts, which is the name of the action we created on our CustomerContacts portlet.
-
Modify the Select HTML field name from uid to customerName.
-
Modify the <Domino:viewitem> tag, name attribute so that it extracts the Employer instead of the Customer Name.
-
Change the Select HTML field value from <Domino:unid/> to <Domino:viewitem name="Employer"/>.
-
On the <Domino:view> tag, modify the attribute viewname to point to the view ContactsByCustomer.
-
Just after the <Domino:viewloop> insert a <Domino:ifcategoryentry> and close the </Domino:ifcategoryentry> tag just before the </Domino:viewloop> tag.
This will filter the view and present only the category entries.
-
Modify the View Details button at the end so that it displays View Contacts.
-
Save and Close the View.jsp file.
CustomerContacts.jsp file
-
Open the /jsp/CustomerContacts/CustomerContacts.jsp file.
-
Modify the label from Customer Details to Customer Contacts.
-
Erase the code in between and including the <Domino:document> tag, since we are going to display a view instead of a document.
-
Insert the JSP code shown in Example 4-13 where the <Domino:document> tag resided.
Example 4-13: CustomerContacts.jsp fragment initial contents
<%! String SearchString="";%> <% SearchString="FIELD customerName contains " +request.getSession().getAttribute("customerNameAttr");%> <Domino:view viewname='ContactsByCustomer' dbserver='CN=itsotest-dom/O=itsoportal' dbname='apps/customer.nsf' user='*webuser' host='itsotest-dom' ftsearch='<%=SearchString%>'> <table border="1"> <tr> <TH>Contact Name</TH> <TH>Phone Number</TH> </tr> <Domino:viewloop > <tr> <Domino:ifdocumententry> <% if(myviewloop.getDocument().getItemValueString("customerName").equals(request.g etSession().getAttribute("customerNameAttr"))) {%> <td> <Domino:viewitem col="2"/> </td> <td> <Domino:viewitem col="3"/> </td> <% } %> </Domino:ifdocumententry> </tr> </Domino:viewloop> </table> </Domino:view>You will find that the <Domino:view> tag has a new attribute: ftsearch. This attribute lets us do a full text search based on a field as displayed in the example, where we will search based on a field called CustomerName.
Note Use of the ftsearch attribute of the <Domino:view> tag requires that the referenced view be full text indexed prior to the search request.
Also you will find that the <Domino:viewloop> tag has an attribute called name. This allows us to define a Domino Java object and use it inside ourJSP code. In this JSP we query each of the returned elements to make sure the full text search returned the exact documents that we were looking for. Other tags can have the ID attribute that will convert a JSP tag into a Domino Java object that can be referenced in the code. Information on the construction of portlets with these Domino Java objects is in the next chapter.
Also note that the <Domino:viewitem> tag is extracting information by the column number attribute; you can also use the name attribute to extract the column value by referencing the column name, like in the previous portlet's View.jsp file.
Finally, we introduced another JSP tag called <Domino:ifdocumententry>, which basically filters out the categorization entries from the view.
-
Modify at the end of the JSP file the Back button so that it references theCC_back URI created on the CustomerContacts.java portlet.
Update the deployment descriptors
-
Open the web.xml file located on the /WEB-INF folder.
-
Go to the Servlets tab.
-
Click the Add button.
-
Select the CustomerContacts class.
-
Add a URL mapping; set it to /CustomerContacts/*.
-
Save and close the web.xml file.
-
Open the portlet.xml file located on the same folder.
-
Select the Add portlet.
-
Select the CustomerContacts servlet, which is not used, and clickt OK.
-
Change the display name to Customer Contacts portlet and its ID to CustomerContacts.
-
Select the Concrete Portlet Application folder.
-
Click the Add Concrete Portlet button.
-
Select the CustomerContacts portlet, which is not used, and click OK.
-
Change its Display Name and Title to Customer Contacts portlet.
-
Add a description if needed.
-
Save the portlet.xml file.
Deploy the portlet
Now we are all set with our third portlet, just deploy it as we did with our previous portlet and you should see something like shown in Example 4-34 on page 193.
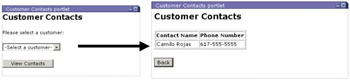
Figure 4-34: Customer Contacts initial portlet
Customer Sales Activities portlet
The Customer Sales Activities portlet displays information just like the two portlets already described, with a JSP file containing a drop-down list of the customers, but this time with sales activities. A difference from previous portlets is that it will access an independent sales database. After a customer is selected, the portlet loads a Domino view that will filter and display the documents and not the category entries.
CustomerSalesActivities.java
-
Create the portlet class by copying the CustomerContacts.java class that resides on the portlet package.
-
Paste the file in the same package and rename it CustomerSalesActivities.java.
-
Open the newly pasted CustomerSalesActivities.java file.
-
In the doView() method, rename the DefaultPortletAction from contacts to activities.
-
On the same method, rename the key that is used to store the action URI on the request object from contacts to activities.
-
Continuing on the same method, modify the folder for the include sentences from /jsp/CustomerContacts to /jsp/CustomerSalesActivity. Also modify the reference to the file /jsp/CustomerContacts/CustomerContacts.jsp to /jsp/CustomerSalesActivity/CustomerSalesActivities.jsp.
-
Now on the actionPerformed() method modify the action name comparison from contacts to activities.
-
Both the doView() and actionPerformed() methods should look like Example 4-14.
Example 4-14: Customer Sales Activities portlet initial doView() and actionPerformed() methods
public void doView(PortletRequest request, PortletResponse response) throws PortletException, IOException { if(request.getPortletSession().getAttribute("customerNameAttr") != null){ PortletURI detailURI = response.createURI(); DefaultPortletAction detailAction = new DefaultPortletAction("activities"); detailURI.addAction(detailAction); request.setAttribute("activities", detailURI.toString()); PortletURI returnURI = response.createReturnURI(); request.setAttribute("CSA_back", returnURI.toString()); getPortletConfig().getContext().include( "/jsp/CustomerSalesActivity/CustomerSalesActivities."+ getJspExtension(request), request, response); } else { PortletURI detailURI = response.createURI(); DefaultPortletAction detailAction = new DefaultPortletAction("activities"); detailURI.addAction(detailAction); request.setAttribute("activities", detailURI.toString()); getPortletConfig().getContext().include( "/jsp/CustomerSalesActivity/View."+ getJspExtension(request), request, response); } } public void actionPerformed(ActionEvent event) throws PortletException { DefaultPortletAction action=(DefaultPortletAction)event.getAction(); PortletRequest request=event.getRequest(); if(action!=null){ if(action.getName().equals("activities")) { request.getPortletSession().setAttribute( "customerNameAttr",request.getParameter("customerName")); } } }
You can see the changes in bold in Example 4-14. Also notice that there is no change on the customerName parameter and customerNameAttr. This is because our search on the view will be done by the customer name. In addition, this will help the Click to Action broker to associate both actions as similar; this is explained in detail later in this chapter.
View.jsp file
-
Copy the View.jsp file from the /jsp/CustomerContacts folder and paste it in the /jsp/CustomerSalesActivity folder.
-
Open the file and inspect it in the source view.
-
Modify the page header from Customer Contacts to Customer Sales Activities.
-
In the form tag, modify the action attribute to reference from contacts to activities.
-
In the <Domino:view> tag, modify the attribute viewname to saByCustomer and the database to apps/sales.nsf.
-
In the option HTML tag, modify the value and name so that the <Domino:viewitem> name attribute is Customer.
-
Finally, on the button at the bottom of the JSP, change the value to View Sales Activities.
CustomerSalesActivities.jsp file
-
Copy the CustomerContacts.jsp file in the /jsp/CustomerContacts folder to the /jsp/CustomerSalesActivity folder and rename it CustomerSalesActivities.jsp.
-
Modify the file so that it has code similar to that shown in Example 4-15.
Example 4-15: CustomerSalesActivities.jsp initial contents
<%@ taglib uri="/WEB-INF/domtags.tld" prefix="Domino" %> <%@ taglib uri="/WEB-INF/domutil.tld" prefix="util" %> <%@ taglib uri="/WEB-INF/tld/portlet.tld" prefix="portletAPI" %> <portletAPI:init/> <H3>Customer Sales Activities</H3> <P> <%! String SearchString="";%> <% SearchString="FIELD CustomerName contains "+request.getSession().getAttribute("customerNameAttr");%> <Domino:view viewname='saByCustomer' dbserver='CN=itsotest-dom/O=itsoportal' dbname='apps/sales.nsf' user='*webuser' host='itsotest-dom' ftsearch='<%=SearchString%>'> <table border="1"> <tr> <TH>Date</TH> <TH>Activity</TH> <TH>Sales Person</TH> <TH>Contact</TH> <TH>Made Sale?</TH> </tr> <Domino:viewloop > <tr> <Domino:ifdocumententry> <% if(myviewloop.getDocument().getItemValueString("CustomerName").equals(request.g etSession().getAttribute("customerNameAttr"))) {%> <td> <Domino:viewitem col="2"/> </td> <td> <Domino:viewitem col="3"/> </td> <td> <Domino:viewitem col="4"/> </td> <td> <Domino:viewitem col="5"/> </td> <td> <Domino:viewitem col="6"/> </td> <% } %> </Domino:ifdocumententry> </tr> </Domino:viewloop> </table> </Domino:view> </P> <P> <INPUT type="submit" name="Back" value="Back" onClick="window.location.href=' <%=(String)portletRequest.getAttribute("CSA_back")%>'"> </P> <P></P>
This is a very interesting JSP since first it points to and extracts information from the Sales database, which could be unrelated to the Customers database. But as we discuss in the Click to Action topic later in this chapter, we will connect these two applications at the portal level.
Also, if you inspect the <Domino:viewloop> tag, you will see that there is a name attribute again. This name attribute represents a Domino Java object and is later used in the same JSP file in a scriptlet code to filter out activities not related to our customer.
Update the deployment descriptors
-
Open the web.xml file located on the /WEB-INF folder.
-
Go to the Servlets tab.
-
Click the Add button.
-
Select the CustomerSalesActivities class.
-
Add a URL mapping and set it to /CustomerSalesActivities/*.
-
Save and close the web.xml file.
-
Open the portlet.xml file located in the same folder.
-
Click Add portlet.
-
Select the CustomerSalesActivities servlet, which is not used, and click OK.
-
Change the display name to Customer Sales Activities portlet and its ID to CustomerSalesActivities.
-
Select on the Concrete Portlet Application folder.
-
Click the Add Concrete Portlet button.
-
Select the CustomerSalesActivities portlet, which is not used, and click OK.
-
Change its Display Name and Title to Customer Sales Activities portlet.
-
Add a description if needed.
-
Save the portlet.xml file.
Deploy the portlet
Deploy the portlet in the same manner that you used for the previous ones. The new portlet should appear something like Figure 4-35.
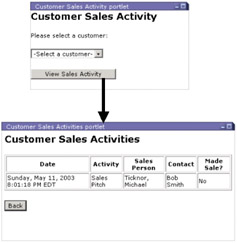
Figure 4-35: Customer Sales Activities initial portlet
We have now finished the first phase of our portlet building. We constructed four portlets from different Domino databases that extract information based on the user input.
Next we explore techniques to enhance this initial transformation. In 4.6, "Integration via Click to Action" on page 199 we describe a technique to enable our portlets to communicate between each other, even between heterogeneous Domino databases.
4.5.4 Conclusions to the custom Domino tags integration technique
The inclusion of JSP tags from different services lets us add value to our portlets. We showed how to include custom Domino JSP tags. Some of the benefits of this option are:
-
The developer doesn't have to know Java programming in depth to build portlets that extract information from Domino.
-
The developer doesn't have to know Domino object model in depth to access data in Domino.
-
JavaServer Pages (JSP) are a J2EE technology that can offer simplicity as a programming model and the robust characteristics of Java.
-
IBM has the tools necessary to develop portlets that integrate Domino applications, including collaboration features.
|
| < Day Day Up > |
|
EAN: 2147483647
Pages: 103
- Chapter IV How Consumers Think About Interactive Aspects of Web Advertising
- Chapter IX Extrinsic Plus Intrinsic Human Factors Influencing the Web Usage
- Chapter XI User Satisfaction with Web Portals: An Empirical Study
- Chapter XV Customer Trust in Online Commerce
- Chapter XVI Turning Web Surfers into Loyal Customers: Cognitive Lock-In Through Interface Design and Web Site Usability