3.7 Integrate using multiple portlets
|
| < Day Day Up > |
|
3.7 Integrate using multiple portlets
One of the advantages of using WebSphere Portal is the single point of access of the portal page. Activities in portlets on the page may or may not be associated with one another. This section deals with using two types of portlets to access and display Domino data on the same portal page. Choosing an item on one portlet triggers events on other portlets.
By combining the Web Clipping and Web Page portlets with some custom JavaScript and Domino development, it is possible to create a basic portal application which implements the integrated portlet pattern without custom Java or JSP development.
3.7.1 Considerations
The main advantage of this integration technique is that it is relatively quick and easy to implement. Its main limitation that the developer is tied to the features provided by the Web Clipping and Web Page portlets being used.
| Applicable portlet patterns | Integrated |
| Development time | Moderate |
| Developer skill set | WebSphere Portal administration skills are needed. Domino developer skills, with experience with JavaScript, XML, and XSLT are needed. |
| Range of applications | Moderate |
| Handle rich text | No |
| Performance | Limited |
| Session Management | No |
| Clustering | No |
| Scalability | No |
| Requires single sign-on | The Web Clipping portlet has extensive firewall, security, and authentication configurations. Web Page portlets can be configured to use single sign-on. |
| Required software versions | Standard HTML browsers with JavaScript support are required. Netscape 5 and above and Internet Explorer 4 and above are supported. |
Implementation details
We describe how to use this technique to generate a portlet page with a "Web clipped" Domino view and display corresponding related information in three Web page portlets located on the same page. We discuss the Domino enhancements that are made, followed by the WebSphere Portal configurations that have to be generated. Ultimately, we show you the results of our integration. To fully explain this implementation, we provide complete details concerning:
-
Domino enhancements
-
Portal configuration options
-
Results
Domino enhancements
We didn't have the necessary elements in our databases, so we had to create them. In this section, we do not discuss in detail how to create these elements in Domino, just their implementation.
First we create a Subform to generate the URL for us. This Subform, shown in Figure 3-46, will be added to other forms.
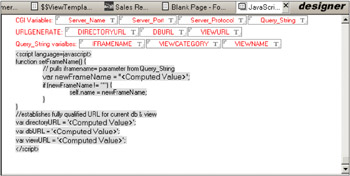
Figure 3-46: JavaScript Subform in the customer database
This Subform uses the iframename, viewcategory, and viewname to generate the URL. We will be clipping a view, so we will generate this view element and the accompanying view template form. Figure 3-47 shows the view.
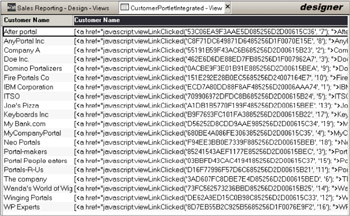
Figure 3-47: CustomerPortletIntegrated view in the Customers database
The Customer Name view column has a JavaScript link included.
Next we generate the Web view template form for this view. Figure 3-48 shows this view template.

Figure 3-48: $$ViewTemplate for CustomerPortletIntegrated view
This view template embeds the view CustomerPortletIntegrated, and also incorporates the JavaScript Subform. The viewLinkClicked JavaScript function performs the placement and opening of the Web page portlets. We will display a blank form when the Web page portlets on the portlet page are assessed initially. We create the blank form in the Customer database. Figure 3-49 shows the blank form.
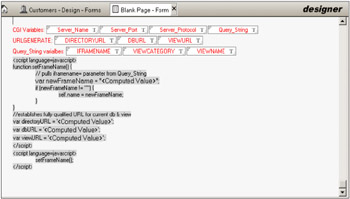
Figure 3-49: Initial blank form
This form includes the JavaScript Subform. This form will be shown in each of the three Web Page portlets when we access the portal page initially. We need to generate the views and forms to provide content for these portlets. The portlets will show the customer profile, the customer contact, and any relevant sales activities associated with this customer. We generate the view CustomerContactsPortletIntegrated. This view is shown in Figure 3-50.
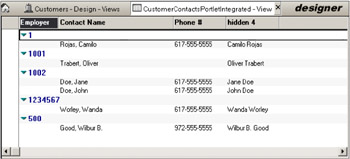
Figure 3-50: Customer Contacts portlet integrated view
Next, we generate the view template form for this view. We build a form to display the view called DisplayViewCategory. Figure 3-51 on page 126 shows this form.
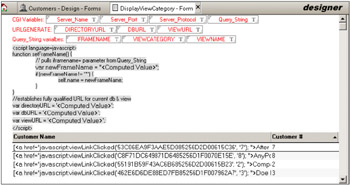
Figure 3-51: DisplayViewCategory form for the Customers database
The JavaScript Subform has been placed in this form, along with an embedded view that is passed with the viewname. For the Sales database, we generate a similar DisplayViewCategory form. This is shown in Figure 3-52.
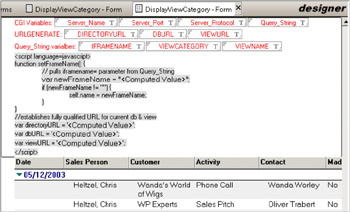
Figure 3-52: DisplayViewCategory form for the Sales database
The JavaScript Subform has been placed in this database as well as the form. We do not have to generate any special views in this database.
Configuration options
We now have to construct our portlets. We start with the Web Clipper portlet. In the portal environment, we click Portal Administration → Web Clipping. This page is shown in Figure 3-53.
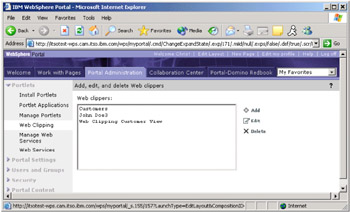
Figure 3-53: Web clipping through Portal Administration
Following the same format as in 3.4, "Integrate using the Web Clipping portlet" on page 79, we click the Add icon and proceed with clipping the customerportletintegrated view in the customer database. Table 3-13 shows the configuration values for this example.
| Field | Inserted value |
|---|---|
| Name and default local title | Customers |
| Description | (none) |
| URL to clip | http://itsotest-dom.cam.itso.ibm.com:8088/apps/CUSTOMER.NSF/CustomerPortletIntegrated?OpenView |
| Connection timeout (seconds) | 5 |
| All other fields | default |
Since our view has JavaScript embedded in a column, we click the Modify security options icon and uncheck the checkbox next to Remove JavaScript from clipped content. We click Done on this page and Next on the main configuration page. We now have to select the elements from the URL that we want to keep, as shown in Figure 3-54.
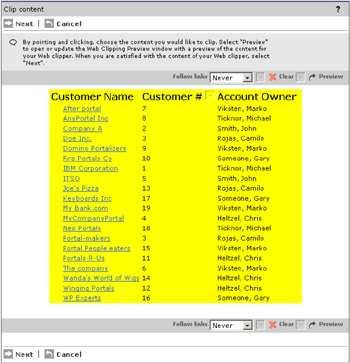
Figure 3-54: "Clipping" from the URL
We highlight our "clip" and click Next. A preview is shown, and we click Done to save it. We have created the portlet. We put this portlet on a page and also add three Web Page portlets. We will place the "clipped" portlet and one Web page portlet in one row and the other two portlets on the second row. Figure 3-55 on page 129 shows a close-up of this portlet page.
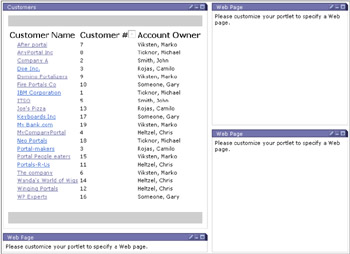
Figure 3-55: Web Page portlets need to be configured
We now configure the three Web Page portlets. We followed the steps described in 3.3, "Integrate using the Web Page portlet" on page 74 to do this. The configuration values for the Web Page portlet in row one, Customer Profile, are listed in Table 3-14.
| Field | Inserted value |
|---|---|
| Portlet title | Customer Profile |
| URL (This URL opens the blank form in the customer database. It also names this iframename as profiledisplay.) | http://itsotest-dom:8088/apps/customer.nsf/Blank%20Page?OpenForm&iframename=profiledisplay |
| Portlet width | Fit to column |
| Portlet height | 200 |
The configuration values for the first Web Page portlet in row two, Customer Contacts, are listed in Table 3-15.
| Field | Inserted value |
|---|---|
| Portlet title | Customer Contacts |
| URL (This URL opens the blank form in the customer database. It also names this iframename as contactdisplay.) | http://itsotest-dom:8088/apps/customer.nsf/Blank%20Page?OpenForm&iframename=contactdisplay |
| Portlet width | Fit to column |
| Portlet height | 200 |
And finally, the configuration values for the second Web Page portlet in row two, Customer Sales Activities, are listed in Table 3-16.
| Field | Inserted value |
|---|---|
| Portlet title | Customer Sales Activities |
| URL (This URL opens the blank form in the customer database. It also names this iframename as salesactivities.) | http://itsotest-dom:8088/apps/customer.nsf/Blank%20Page?OpenForm&iframename=salesactivities |
| Portlet width | Fit to column |
| Portlet height | 200 |
Results
After configuring the portlets, we created a page and placed and configured the four portlets, and we have activated them. Figure 3-56 on page 131 shows the resulting portal page.
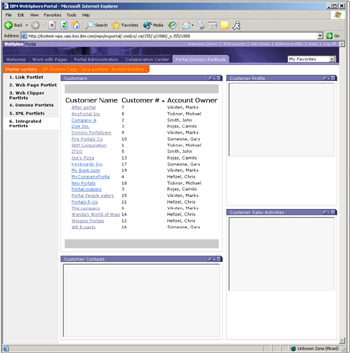
Figure 3-56: The integrated portlets page
The portal page has three portlets that are blank because there is not any information to show yet. In reality, the three portlets are displaying what we want, a blank view from the Domino database. If we click the first highlighted link in the Customers portlet (upper left portlet in Figure 3-56), the resulting screen is shown in Figure 3-57.
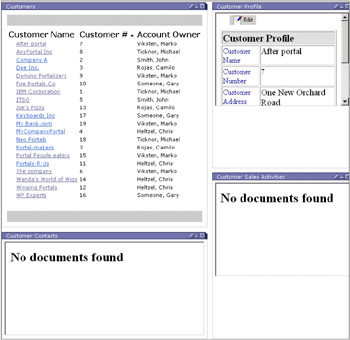
Figure 3-57: Clicking on After Portal link
Notice that two of the remaining three portlets show "No documents found." This is because there are, in fact, no documents for this entry. A customer profile does exist, as noted in the Customer Profile portlet (upper right portlet in Figure 3-57). Also note that there is a scroll bar even though we have room in that portlet to display more of the document. This is due to our setting of the length in the configuration settings for that portlet. If we click the Fire Portals Co name in the Customers portlet, the screen that results is shown in Figure 3-58. Now the remaining three portlets show relative information. These three remaining portlets are iFrame portlets. All other portlets remain the same even though the document in the Customer Profile portlet is now editable.
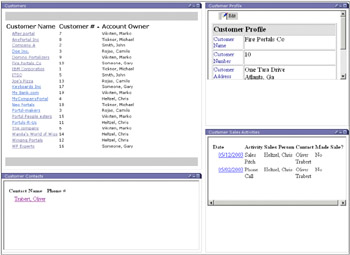
Figure 3-58: Clicking Fire Portals Co in Customers portlet launches content in other portlets.
| Note | You must have the appropriate access to edit the document (at least Author access). |
If we click the first highlighted document link in the Customer Contacts portlet (lower left portlet), with the portal context and all other portlet contexts remaining the same, the resulting screen displays the contact information, as shown in Figure 3-59.
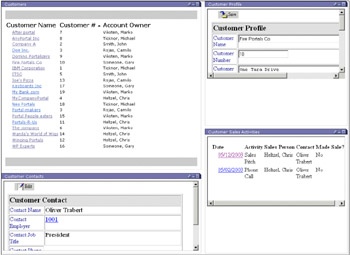
Figure 3-59: Result of clicking on link in the Customer Contact portlet
Finally, if we click the first highlighted document link in the Customer Sales Activities portlet (lower right portlet), the resulting screen is shown in Figure 3-60.
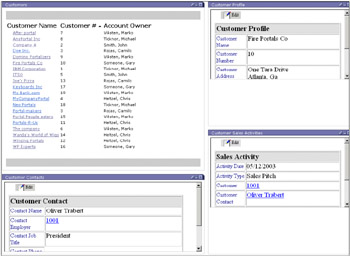
Figure 3-60: Result of clicking on the first highlighted document link in the Customer Sales Activity portlet
Again, this demonstrates that all portlet contexts stay intact and the document is displayed in the Customer Sales Activities portlet context. Finally, we can click the Edit button in the three remaining portlets. This is shown in Figure 3-61 on page 136.
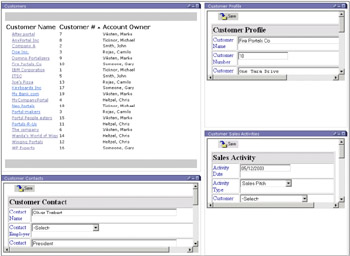
Figure 3-61: Three documents in "edit" mode on the same portlet page
The main advantage of using this technique is that all three documents have been put into "Edit" mode inside their respective portlet contexts.
|
| < Day Day Up > |
|
EAN: 2147483647
Pages: 103