2.4 Deploying the case study portlets
|
| < Day Day Up > |
|
2.4 Deploying the case study portlets
Instructions for downloading case study Domino databases and many of the portlets used throughout this book can be found be found in Appendix B, "Additional material" on page 421.
The Domino databases should be added to the /apps/ subdirectory of your Domino server. Verify that you have set Anonoymous & Default access to at least editor, or that you have granted known user IDs with at least editor access.
Complete the following tasks to deploy the portlets:
-
Install the portlet WAR file.
-
Create a place for the demo portlets.
-
Create pages in this place to hold the various demo portlets.
-
Add the pages to this place.
-
If needed, configure the portlets.
The remainder of this section presents the detailed steps for performing each of these tasks.
2.4.1 Install portlets
A portlet application is installed through a Web Archive (WAR) file, or you can install remote portlets via UDDI directory (Web Services portlet). The WAR file used to install the portlet application can contain multiple portlets. The install process uploads the WAR file to the server, installs portlets, adds them to the list of available portlets and activates the portlets. Once you install a portlet, it is automatically activated, but with no permissions. Use the Access Control portlet to specify which users and groups can view, edit, or manage the new portlet.
Perform the following steps:
-
From the Portal Administration tab, select Portlets→ Install Portlets. Browse for the WAR file, as shown in Figure 2-4. Click Next.
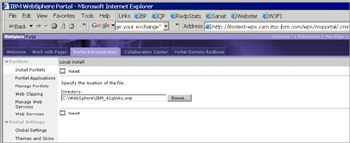
Figure 2-4: Browse for the WAR file -
Check for the list of the Portlets included in the WAR file, as shown in Figure 2-5. In our example, QuickLinks is selected for installation. Click Install to begin the installation. You can click Cancel at any time to stop the installation process.
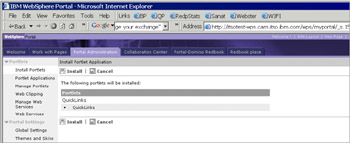
Figure 2-5: Check for the portlets that will be installed -
When installation is complete, if successful, you should get the message Portlets Successfully Installed, as shown in Figure 2-6. Click Next if you want to install more portlets.
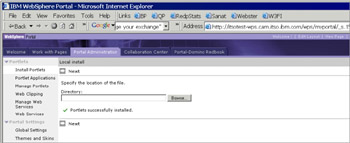
Figure 2-6: Portlet successfully installedTip If portlet installation fails, check for the portal server logs directory and check the latest log file located under \WebSphere\PortalServer\logs\. The name of the log file can be determined with the append of the latest time and date stamp on it (for example, wps_2003.06.24-11.00.47.log).
You have now successfully installed the portlet WAR. Portlets in this WAR are available for deployment on pages on this WebSphere Portal.
2.4.2 Creating a place
From the Portal Administration tab, you can use the Create place option to name and create a new place. To be able to use this option, you must have Create permission.
By default, any user in WebSphere Portal will have Create permission for Places and Pages.
Use the following steps to create a place:
-
Click the Create place icon in the Manage places and pages portlet. The screen shown in Figure 2-7 is displayed.
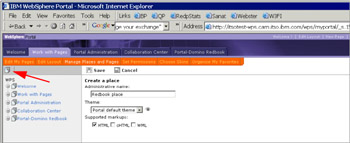
Figure 2-7: Creating a new place -
Specify the new place name.
-
Select a theme for your place from the drop-down menu. The selected theme will appear in the theme preview on the right-hand side of the page. You can select from among various themes and, based on the preview, finalize the theme.
Note You should not apply the Admin theme to a place. This theme is intended for administrative portlets and renders portlets without a title bar.
-
Make sure HTML is checked as a supported markup.
-
Click Save to create a place or Cancel to return.
-
The new place will be added to the list of places you can manage if you selected Save.
2.4.3 Creating a page
This section describes how to create a new page in an existing place. You must have Create permission to create a page in a place. Using this option, you can also reference an existing page, apply a layout, select supported markups, define a list of associated portlets, and specify locale-specific titles.
If you reference an existing page, the page name, layout, supported markups, locks, skins, and portlet list are predetermined by the referenced page. If you choose to reference an existing page, you must have Manage and Delegate permissions for the page that is referenced.
-
On the Work with Pages tab, click the Create page icon (third icon from the left).
-
The window shown in Figure 2-8 is displayed.
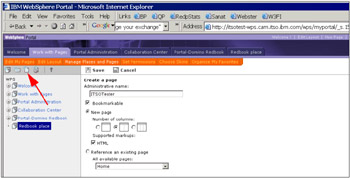
Figure 2-8: Create page options -
Specify the administrative name. For this example, we specified the page name as ITSOTester.
-
Select a page layout you would like the page to use. The column layout can be changed later using the Edit layout and content portlet.
-
Specify the supported markup. In our example, we have only HTML as an option since we selected HTML as the only markup for our place.
-
Click Save to create a page or Cancel to return.
-
The page ITSOTESTER is added to the list of pages you can manage if you selected Save.
2.4.4 Adding portlets to a page
Open the page you want to add portlets to in edit mode using the following steps:
-
Click the Edit Layout page on the Work with pages tab.
-
Expand the place containing your page, Redbook place in our example.
-
Select the page you want to add portlets to, ITSOTester in our example.
-
Click the Add portlets icon to add the portlet to the page (Figure 2-9).
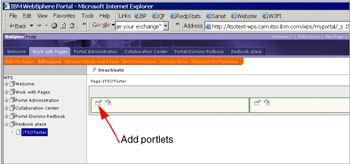
Figure 2-9: Adding portlets -
Specify a search criteria and search for the portlets you want to add. You can search for all portlets, for a specific portlet by name, or for portlets modified on a particular date.
-
Click the Go button.
-
A list of portlets is displayed.
Note If specific portlets are already associated with the selected page, the portlet list will be locked. Only portlets available in the portlet list can be placed on the selected page.
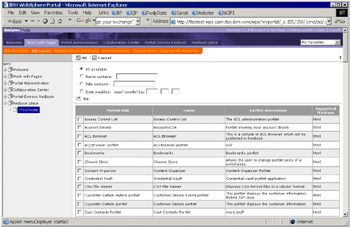
Figure 2-10: List of portlets -
Specify each portlet you wish to add to your page by selecting the check box next to the portlet name. Click OK to confirm your selection or Cancel to cancel the selection list. The portlets are added to your page if you clicked OK.
In our example, we added Welcome Portlet to the left side of the page (left column container) and World Clock to the right side (right column container), as shown in Figure 2-11.
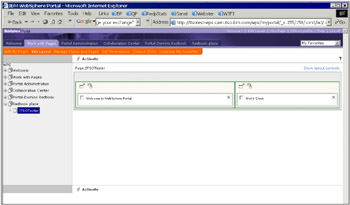
Figure 2-11: Portlets added to the ITSOTester pageWhen you select a page to modify, the page is deactivated to prevent users from seeing the page as you work on it. The tasks that you can perform on the page depend on the access permission.
-
Click the Activate icon to activate the page when you have finished, so that users can access it. You will notice that the page status button at the bottom of the screen will turn to Deactivate.
To test how the portlets are laid out on your page:
-
Select your place. In our example, we selected Redbook Place.
-
You will see a page, ITSOTester. This is the available page in our Redbook Place place.
-
Select the ITSOTester tab and you should see a window like that shown in Figure 2-12.
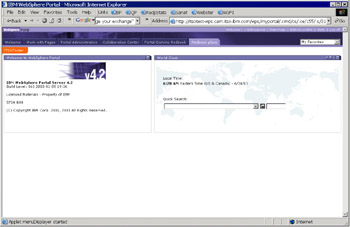
Figure 2-12: Portlets displayed on your pageThe Welcome Portlet is displayed on the left side of the page and the World Clock portlet is on the right side.
Tip If you open your page and do not see any portlet, make sure that you have activated the page. Any time you make changes on the page, you need to click Activate.
|
| < Day Day Up > |
|
EAN: 2147483647
Pages: 103