How to Record a Macro
|
| < Day Day Up > |
|
How to Record a Macro
Recording macros in Word, Excel and PowerPoint becomes easy once you know how. Access and Outlook do not allow recording macros. They must be programmed.
The following is step-by-step instructions to record a macro, make the macro available for use in any single file or for use in any file you open, and assign a toolbar button to run the macro.
One of the best reasons for creating a macro could be that you must convert WordPerfect documents into Word documents. If you are fairly accomplished in Word, you know that there are several steps you must take to accomplish this task.
The next time you need to perform this or a similar task, record the tasks as a macro and you will only have to press a button to perform them again.
Step 1: Prepare to Record
If you would like the macro to be available in a specific file, open that file. If you would like the macro to be available in all files, create a new, blank document.
-
From the menu, hit Tools → Macro → Record New Macro. The dialog box in Figure 21-5 appears:
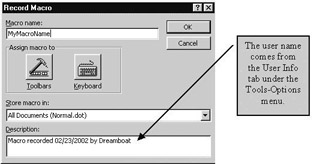
Figure 21-5: Record Macro Dialog Box -
In the Macro name box, enter the name you would like to use for your macro. It must not have any spaces and should not contain special characters.
-
Decide where to store the macro. If you would like it available in the current document only, hit the Store Macro in dropdown box and select your active document's name. If you would like the macro to be available for use with any file, select All Documents (normal.dot).
-
Give the macro any description you like in the Description box. By default, the description states the date the macro was recorded and the user name, which automatically comes from the information under Word's Tools → Options, User Info tab.
Step 2: Assign the Macro to a Toolbar Button
-
Click on the Toolbar icon to assign the macro to a toolbar button. If the macro name is invalid, you receive an error message and must rename the macro before you can continue. Figure 21-6 shows the dialog box that appears.
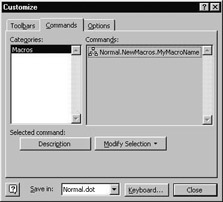
Figure 21-6: Customize Dialog Box -
The Commands tab is selected by default. In the right column, there is an icon with a title similar to your macro's name. Click on the icon and drag it up to any location you choose on any toolbar you choose. Your mouse pointer must have a + hanging on it before you lift your finger from the mouse or the icon will not be placed. While dragging, you see an x hanging on your mouse pointer.
Figure 21-7 shows the different mouse pointers.

Figure 21-7: Customize Mouse Pointers -
Once your icon is placed on a toolbar, click the Modify Selection button; various options appear. Refer to page 3-9 for further information on how to customize your toolbars.
-
When the button appears exactly as you would like it to appear on the toolbar, hit the close button on the Customize dialog box. The Stop Recording toolbar appears. There are two buttons on the Stop Recording toolbar. The square is used to STOP recording and the lines and circle are used to PAUSE recording.
If you accidentally close the Stop Recording toolbar, instead of choosing the Stop Record button—as many of us do when we begin learning to record macros—just go to Tools Macro and hit Stop Recording. The toolbar reappears when you begin recording another macro.
Step 3: Record the Macro
-
Perform the tasks you would like your new macro to perform for you.
-
If you need to interrupt the macro recording to perform some non-related work, press the Pause button on the Stop Recording toolbar.
-
Press the Pause button again to continue recording.
-
Hit the Stop button to Stop recording when you have finished recording your tasks.
Step 4: Test the Macro
Always test a macro, particularly if you have created it to run for someone else. To test the macro, click on the toolbar button you've created, or hit Tools → Macro → Macros and double-click the macro name.
|
| < Day Day Up > |
|
EAN: 2147483647
Pages: 130