Using the Visual C COM Compiler Directives
|
| < Free Open Study > |
|
Using the Visual C++ COM Compiler Directives
Traditionally, C++ client-side COM code begins with CoInitialize() and ends with CoUninitialize(). Between these COM library functions are numerous calls to create coclasses, obtain interfaces, and go to town. This approach to COM client-side logic can place extra burdens on the C++ developer, especially with regard to managing the object's reference count. Since the release of Visual C++ 5.0, client-side COM programming has been simplified quite a bit using smart pointer technology. Although you are completely free to always do raw COM programming using the COM library directly, you can now make use of type information in your C++ client code as well.
| Note | Complete documentation of the Visual C++ COM extensions can be found on MSDN. Look up "compiler COM support classes." |
The #import directive, introduced in Visual C++ 5.0, is used to generate "smart pointer" wrappers based on a server's type information (i.e., the *.tlb file). This functionality is provided by the <comip.h> and <comdef.h> system files which define a number of new templates, data types, and magic macros to help the #import generated code perform its magic. You have no need to directly include these into your client projects, as they are already included within the #import generated files. We will see exactly what a "smart pointer" is soon enough. But first, let's get to know the #import statement.
#importing Type Information
Assume you have a new Win32 Console project (or an MFC project for that matter) and wish to access CoHexagon using the Visual C++ COM compiler directives. First, you would import the type information as so:
// To use the VC++ smart pointer technology in your C++ client side code, // begin by importing the server's type information. #import "E:\ShapesServer\Debug\shapes.tlb" no_namespace named_guid
The behavior of the #import directive can be modified using a handful of optional attributes such as no_namespace. This flag will place the server's COM definitions into the current namespace. The named_guid flag instructs the compiler to define the GUIDs contained in the *.tlb file using the CLSID_, LIBID_, and IID_ prefixes.
There are a total of 17 different #import attributes that may be used to control how a server's type information is included into your project. Look up "The #import Directive" from MSDN for a description of each option. For our purposes, no_namespace and named_guid will do just fine.
Now, when the VC compiler encounters the #import command, it will generate two new C++ files and place them into your project's Debug folder. Here is a breakdown of each generated file (note that the file extensions will be the same between projects; however, the name of the files will depend on the name of the imported file).
-
shapes.tlh: The type library header file contains smart pointer definitions of the IDL interface definitions. Also included in this file are the raw C++ equivalents of the generated smart pointers.
-
shapes.tli: The type library implementation file contains implementation code for the smart pointers defined by the related *.tlh file.
Understanding Smart Pointers
So then, what is a smart pointer? C++ COM folks have often looked for a way to minimize the AddRef(), QueryInterface(), and Release() calls necessary to work with COM objects. Some of these same folks have written custom wrapper classes around a given COM interface which automatically AddRefs and Releases itself through the wrapper's constructor set, various overloaded operators, and destructor. A smart pointer is not really a pointer at all, but an intelligent C++ class wrapped around a COM interface. If you examine a given *.tlh file you will see smart pointer definitions based on the *.tlb file. Each is established with the _COM_SMARTPTR_TYPEDEF macro:
// Shapes.tlh contains the smart pointer definitions for the interfaces defined in the // shapes type library. _COM_SMARTPTR_TYPEDEF(IDraw, __uuidof(IDraw)); _COM_SMARTPTR_TYPEDEF(IShapeEdit, __uuidof(IShapeEdit));
The _COM_SMARTPTR_TYPEDEF macro expands into a typedef for a new variable named XXXXPtr, where "XXXX" is the name of your interface (i.e., IDrawPtr, IShapeEditPtr, and so on). You make use of these types in your C++ COM client code to help ease the burden of raw COM development. The _COM_SMARTPTR_TYPEDEF macro is defined in <comdef.h> as the following:
// <comdef.h> defines the _COM_SMARTPTR_TYPEDEF macro. #define _COM_SMARTPTR_TYPEDEF(Interface, IID) \ typedef _COM_SMARTPTR<_COM_SMARTPTR_LEVEL2<Interface, &IID> > \ Interface ## Ptr
The _com_ptr_t<> Template
The _COM_SMARTPTR_TYPEDEF macro eventually expands into a _com_ptr_t<> template, which is defined in <comip.h> as the following:
// _COM_SMARTPTR_TYPEDEF(IDraw, __uuidof(IDraw)); // Eventually ends up as: template<typename _IIID> class _com_ptr_t { // Lots of cool methods to help you }; This template defines a number of methods having nothing to do with your custom interfaces directly, but provides numerous COM-like behaviors for the smart pointer. For example, _com_ptr_t<> supports a templatized version of QueryInterface() which creates a new smart pointer given an existing smart pointer.
The CreateInstance() method of _com_ptr_t<> makes the necessary COM library calls to find and activate a coclass on your behalf. Even better, the _com_ptr_t<> template defines a number of overloaded operators which you may use when working with smart pointer technology. Collectively, the methods of _com_ptr_t<> that are not specific to the interface being wrapped are called the intrinsic methods. Any of these intrinsic methods are accessed using the C++ dot operator.
| Note | Check out com_ptr_t<> in online help to discover all the intrinsic methods of the Visual C++ smart pointer. |
Client-Side COM Using Smart Pointers
When you wish to create a brand new COM object using smart pointers, you have a number of choices. You may elect to define a smart pointer variable and call the intrinsic CreateInstance() method of _com_ptr_t<>, passing in the CLSID of the object you wish to wrap (which we received by using the named_guids attribute):
// Creating CoHexagon using the CreateInstance() method of // _com_ptr_t<> IDrawPtr spDraw; // Make a smart pointer to IDraw spDraw.CreateInstance(CLSID_CoHexagon); // Create the CoHexagon.
You may also choose to send in the CLSID of the coclass to the constructor of your smart pointer using the __uuidof() extension. The following code is simply another version of the preceding code:
// Another way to construct a CoHexagon with VC smart pointers. IDrawPtr spDraw(__uuidof(CoHexagon));
Using Your New Smart Pointer
Once you have a smart pointer created (using either of the above techniques) you make use of the arrow operator to access the methods of the underlying smart pointer interface methods:
// When spDraw falls out of scope, Release is called. spDraw->Draw();
Let's say you now want to access the IShapeEdit interface of CoHexagon from your current IDraw smart pointer. To call QueryInterface() from a valid smart pointer, use the overloaded assignment operator:
// QI for IID_IShapeEdit. IShapeEditPtr spSEdit = spDraw; spSEdit -> Invert(90);
The real bonus of using a smart pointer is that Release() will be called automatically when it drops out of scope; just be sure to set your smart pointers to NULL when finished. To pull this all together, here is a sample COM client using smart pointers to access the functionality of CoHexagon:
// A C++ COM client using a server's type information. #import "E:\ShapesServer\Debug\shapes.tlb" no_namespace named_guid void main(void) { CoInitialize(NULL); // Create a smart pointer for IDraw. IDrawPtr spDraw(__uuidof(CoHexagon)); spDraw->Draw(); // Query for IShapeEdit. IShapeEditPtr spSEdit = spDraw; spSEdit -> Invert(); spSEdit -> Release(); // Clean up. spSEdit = NULL; spDraw = NULL; CoUninitialize(); } Now that is quite a cleanup from traditional COM C++ client programming! As you spend more time with the _com_ptr_t<> template, you will see there are many ways to manipulate templates.
| Note | The ATL framework defines an alternative set of smart pointers (CComPtr<> and CComPtrQI<>) that are also used to help minimize client coding efforts. We will see some of these ATL smart pointers in use later in the book; however, a vast majority of the sample code will make use of straight COM library calls and IUnknown logic. |
Additional Visual C++ COM Extensions
To finish up our investigation of the Visual C++ COM compiler support, let's examine how COM compiler support can also simplify our BSTR string manipulations. The _bstr_t data type may be used in place of the native BSTR. This shields you from the direct use of system string functions and provides a number of overloaded operators to manipulate the COM string of champions. For example, here is a code snippet using _bstr_t to access our CoCar's IStats functionality (note the overloaded << operator automatically converts the underlying BSTR to a char*):
// BSTR development as it should be. _bstr_t bstrName; bstrName = spStats->GetPetName(); // [out, retval] also supported! cout << bstrName << " has blown up! Lead Foot!" << endl << endl;
The COM compiler directives also provide the _variant_t data type which wraps up the VARIANT data type and the various associated API functions. The VARIANT data type is a core aspect of IDispatch programming. If you plan to make heavy use of C++ IDispatch programming, be sure to check _variant_t.
You are also provided with the _com_error type that maps standard COM HRESULTs to C++ exceptions. As methods you call from a valid smart pointer can throw exceptions, the _com_error type provides detailed information concerning the nature of the error. Assume we called the Draw method from an IDraw smart pointer and wish to forward any COM error into a system MessageBox:
// The VC COM extensions support try/catch blocks to // intercept COM HRESULTs. try { IDrawPtr spDraw( __uuidof(CoHexagon)); spDraw -> Draw(); } catch( _com_error e) { // Extract error message from the _com_error object. MessageBox(NULL, e.ErrorMessage, "Oops!", MB_OK | MB_SETFOREGROUND); } Now that we have seen not only how to add type information to our COM servers but how various COM language mappings may use them, it is time for some serious lab work. After you complete this lab, it is off to location transparency and the world of Distributed COM (DCOM) computing.
Lab 4-1: Providing Type Information for CoCar
This lab will give you the chance to experiment with the language-independent nature of COM. Here, you will be extending the CarInProcServer.dll developed in Chapter 3 to support type information and make use of the MIDL-generated files. Once we retrofit the CoCar server, you will have the chance to build Visual Basic and Java clients, as well as a C++ client using the COM compiler directives.
On the CD The solution for this lab can be found on your CD-ROM under:
Labs\Chapter 04\CarServerTypeInfo
Labs\Chapter 04\CarServerTypeInfo\VB Client
Labs\Chapter 04\ CarServerTypeInfo\VJ Client
Labs\Chapter 04\ CarServerTypeInfo\CPP Import Client
Step One: Create the Type Information
In this lab you will be extending your previous CarInProcServer.dll lab by supplying type information. To begin, open the CarInProcServer workspace you developed in Chapter 3 (or make a copy of this project) and insert a new file (using File | New...) named CarServerTypeInfo.idl into the project. This single file will hold all interface, coclass, and library definitions for the server.
| Note | The sample solution on your CD-ROM for this step of the lab is an entirely new server named CarServerTypeInfo. The CoCar class and DLL export logic have been ported over; however, the GUIDs have been changed to prevent clashes from the Chapter 3 lab solution. |
In your new IDL file, import oaidl.idl. This file contains all the core COM data types and interface definitions. Begin by defining the IStats, IEngine, and ICreateCar interfaces in IDL syntax. When assigning IIDs for the [uuid()] attribute, simply copy the existing IIDs from your iid.h file.
Be sure to mark your method parameters with [in] and [out, retval] attributes and, to be kind, include a [helpstring] for each interface. Here is the IDL definition of the CoCar interfaces:
// Bring in core IDL files. import "oaidl.idl"; // IStats [object, uuid(A533DA31-D372-11d2-B8CF-0020781238D4), helpstring("Get info about this car")] interface IStats : IUnknown { HRESULT DisplayStats(); HRESULT GetPetName([out, retval] BSTR* petName); }; // IEngine [object, uuid(A533DA30-D372-11d2-B8CF-0020781238D4), helpstring("Rev your car & slow it down")] interface IEngine : IUnknown { HRESULT SpeedUp(); HRESULT GetMaxSpeed ([out, retval] int* maxSpeed); HRESULT GetCurSpeed ([out, retval] int* curSpeed); }; // ICreateCar [object, uuid(A533DA32-D372-11d2-B8CF-0020781238D4), helpstring("This lets you create a car")] interface ICreateCar : IUnknown { HRESULT SetPetName([in]BSTR petName); HRESULT SetMaxSpeed([in]int maxSp); }; Next define a library statement marked with the [version] and [uuid] attribute. You will need to use guidgen.exe to obtain a new LIBID which uniquely identifies the *.tlb file. Be sure to add a [helpstring] for the library, as this will identify your type information in various IDE tools (such as the VB References dialog box). As well, be sure your library makes a call to:
importlib("stdole32.tlb"); In your library statement, define the CoCar class using your existing CLSID, which will also be found in your iid.h file. CoCar needs to support each custom interface. Pick one as the [default] interface for the coclass (for the purposes of this lab, assume ICreateCar to be the [default]). Here is the IDL:
// The library statement. [uuid(82BA20D1-F07D-11d2-B8E0-0020781238D4), version(1.0), helpstring("CoCar server with TypeLib")] library CarServer { importlib("stdole32.tlb"); [uuid(82BA20D2-F07D-11d2-B8E0-0020781238D4)] coclass CoCar { [default] interface ICreateCar; interface IStats; interface IEngine; }; }; Recall that the MIDL compiler will generate a number of C++ files used in your project, so we need to get rid of existing files we used for the same purpose. Before you proceed, remove the following files from your project workspace (using FileView):
-
iid.h/iid.cpp: You do not need these files any more, as the MIDL-generated CarServerTypeInfo_i.c file will now contain your GUID definitions.
-
interfaces.h: You do not need this file any more, as the C++ interface bindings will now be defined automatically by MIDL and stored in the CarServerTypeInfo.h file.
Next, be sure you update your existing source code files throughout your project by removing #includes to iid.h and interfaces.h and replacing them with the MIDL-generated *.h and *_i.c files. Knowing where to include the correct MIDL files can be a bit of a black art, so feel free to use the following guide (or examine the supplemental CD lab solution):
| Project Source File | MIDL-Generated File to Include |
|---|---|
| CoCar.h | #include "carservertypeinfo.h" |
| CoCar.cpp | #include "carservertypeinfo_i.c" |
| CoCarClassFactory.h | No need to include MIDL-generated files. |
| CoCarClassFactory.cpp | No need to include MIDL-generated files. |
| CarInProcServer.cpp | #include "carservertypeinfo_i.c" |
Now, recompile your project to allow the MIDL compiler to do its work. If you get any errors, you may have forgotten to turn off the MkTypLib Compatible option from the Project | Settings dialog.
This should convert your previous C++ specific CoCar to the language-independent variety. Be sure to check out the MIDL-generated files. Now that we have some type information, let's rework the REG file to enter the correct information into the system registry.
Step Two: Register Your Type Information
Technically this step is optional, as both the VB and J++ IDEs provide a way to manually navigate to a *.tlb file via the Browse button. However, to solidify your COM lifestyle, add the correct type library entries now. Here is what the full REG file should look like (just add your GUIDs and paths accordingly):
REGEDIT HKEY_CLASSES_ROOT\CarServerTypeInfo.CoCar\CLSID = {82BA20D2-F07D-11d2-B8E0-0020781238D4} HKEY_CLASSES_ROOT\CLSID\{82BA20D2-F07D-11d2-B8E0-0020781238D4} = CarServerTypeInfo.CoCar HKEY_CLASSES_ROOT\CLSID\{82BA20D2-F07D-11d2-B8E0-0020781238D4} \InprocServer32 = C:\ATL\Labs\Chapter 04\CarServerTypeInfo \Debug\CarServerTypeInfo.dll HKEY_CLASSES_ROOT\CLSID\{82BA20D2-F07D-11d2-B8E0-0020781238D4}\TypeLib = {82BA20D1-F07D-11d2-B8E0-0020781238D4} HKEY_CLASSES_ROOT\TypeLib\{82BA20D1-F07D-11d2-B8E0-0020781238D4} = Car Server Type Lib HKEY_CLASSES_ROOT\TypeLib\{82BA20D1-F07D-11d2-B8E0-0020781238D4}\1.0\0\Win32 = C:\ATL\Labs\Chapter 04\CarServerTypeInfo\Debug\CarServerTypeInfo.tlb HKEY_CLASSES_ROOT\TypeLib\{82BA20D1-F07D-11d2-B8E0-0020781238D4}\1.0\FLAGS = 0 HKEY_CLASSES_ROOT\TypeLib\{82BA20D1-F07D-11d2-B8E0-0020781238D4}\1.0\HELPDIR When you have updated your REG file, be sure to remerge it into the registry, and confirm each update.
Step Three: A Visual Basic Client
Here, we will be building a Visual Basic COM client. Start up VB and select a new Standard EXE project workspace from the initial New Project dialog. The very first thing you should do is add a reference to your CoCar type information. If you updated and merged the REG file, you should find your server listed automatically from the scrolling list box (look for the [helpstring] you added for your library statement). Otherwise use the Browse... button to navigate to the *.tlb file under your server's Debug folder.
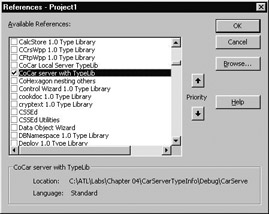
Figure 4-13: Bringing our type informa- tion into VB.
Standard EXE projects will always provide you with one main Form object. This will serve as the main window of your VB application. Double-click anywhere on the Form to pull up the code window. Notice how you have landed in a Form_Load() event handler. Click above this stub code to enter the [General][Declaration] section.
Any variable defined in this namespace is available for use by the rest of the Form class. Create some global variables in your Form's [General][Declaration] section representing a CoCar, as well as IStats and IEngine interface variables:
' The [General][Declaration] section allows you to create some Form level variables. ' Option Explicit ' The coclass exposing the [default] ICreateCar Private mCar As CarServer.CoCar ' Extra interfaces on the coclass Private itfEngine As CarServer.IEngine Private itfStats As CarServer.IStats
Next, create a functional GUI to exercise your CoCar. Designing a VB form is much like creating a dialog using the Visual C++ dialog editor. Select a GUI widget from the VB toolbox, and draw the object onto the form. Here is a possible GUI implementation containing three CommandButtons, two TextBox objects, a single ListBox, and a few labels:
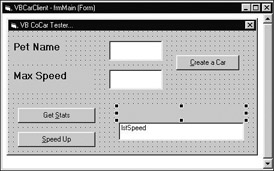
Figure 4-14: The GUI design of our VB client.
Give each widget a reasonable name using the Properties window (the Name property will be the very first item; the value you enter here will be used to refer to a given item in your code). The end user may enter a pet name and max speed using the TextBox objects. By clicking the Create a Car button, we will exercise the [default] ICreateCar interface. The following VB code creates the Form level CoCar and sends in some state data:
' When the user clicks the 'Create A Car' button, make the CoCar ' and use the information in the text boxes to set the pet name and max speed. ' Private Sub btnCreate_Click() ' Create a car. Set mCar = New CoCar ' Set car via ICreateCar mCar.SetMaxSpeed CLng(txtMaxSpeed) mCar.SetPetName txtName ' Get IStats and set the label. Set itfStats = mCar lblCarName.Caption = "Speed of: " & itfStats.GetPetName Set itfStats = Nothing End Sub
The Get Stats button accesses the IStats interface and calls each method (you should see two message boxes pop up from the server):
' Show the state of this car. ' Private Sub btnStats_Click() Set itfStats = mCar itfStats.DisplayStats Set itfStats = Nothing End Sub
When the Speed Up button is clicked, we simulate the C++ client almost exactly: increase the current speed until we are 10 miles over the max speed. When the car blows up, use the VB MsgBox function to alert the user:
' Speed up the car, and place the current speed into the list box. ' Private Sub btnSpeed_Click() Set itfEngine = mCar Set itfStats = mCar ' Rev that engine! Do While itfEngine.GetCurSpeed <= itfEngine.GetMaxSpeed itfEngine.SpeedUp lstSpeed.AddItem itfEngine.GetCurSpeed Loop ' Tell user car is dead. MsgBox itfStats.GetPetName & " has blown up! Lead foot!" End Sub ' VB will release all references to CoCar as they fall out of scope...
You have now created a VB client, which is making use of the C++ COM server you created with your own blood, sweat, and tears. Feel free to extend and play with this VB client. Also, don't forget to open the VB Object Browser (F2) to examine the imported type information.
Step Four: A Java COM Client
Open up Visual J++ 6.0 and select a new Windows Application from the New Project dialog box:

Figure 4-15: J++ New Project workspace.
You will be given a new Java class named Form1, extending from the Windows Foundation Classes Form class (notice the imports to numerous com.ms.wfc packages which contain the Java Windows GUI classes). The J++ IDE is very similar to that of VB, so begin by creating a GUI to drive the CoCar server using the WFC Controls provided from the J++ Tool Box. For this lab, we will assemble the same sort of GUI layout as the previous VB client:
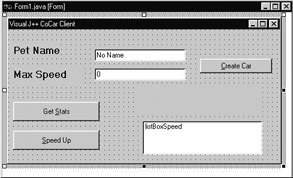
Figure 4-16: J++ Form layout for CoCar client.
Now, add a COM wrapper for your CoCar type information. You will see that jactivex.exe has added a number of new *.java files to your current project. Open them up and get a feel for the generated code (especially the @com directives which are used to map Java code into the MS JVM). Also open the J++ Object Browser (F2) and check out your CoCar's type information.
Now we need to tie the WFC controls on the form to Java code exercising our CoCar. If you are unfamiliar with the syntax of Java, just type along and look up specifics as you go. Begin by declaring some private data members in your Form1 class (double-click on the form to open the code window):
// Form1 will be making use of your CoCar. import carservertypeinfo.*; // Must have this! public class Form1 extends Form { // The coclass. private carservertypeinfo.CoCar m_Car; // All the interfaces of CoCar. private carservertypeinfo.ICreateCar itfCreate; private carservertypeinfo.IEngine itfEngine; private carservertypeinfo.IStats itfStats; ... } When the Create Car button is clicked, create a CoCar and access the ICreateCar interface to set the state of your COM object. Like the previous VB client, you will be reading the values of the edit boxes to grab the pet name and max speed:
// Create the CoCar and query for ICreateCar. private void m_btnCreate_click(Object source, Event e) { // Create a new CoCar. m_Car = new CoCar(); // Query for ICreateCar by using a Java cast. itfCreate = (ICreateCar)m_Car; // Set the pet name by asking the text box for the pet name. itfCreate.SetPetName( m_txtName.getText() ); // Ask for the max speed, and transform the text into an Integer. int sp = Integer.parseInt(m_txtMaxSpeed.getText()); itfCreate.SetMaxSpeed(sp); // Now, ask for IStats, and set the label with the max speed. itfStats = (IStats)m_Car; m_lblSpeed.setText( "Speed of: " + itfStats.GetPetName() ); } When Get Stats is selected, simply call DisplayStats() from an IStats interface:
// Show the state of the car. private void m_btnStats_click(Object source, Event e) { // Display everything. itfStats = (IStats)m_Car; itfStats.DisplayStats(); } And finally, when Speed Up is clicked, rev the engine, send the current speed to the WFC ListBox object, and present a message box when the engine cracks in two:
// Speed things up! private void m_btnSpeedUp_click(Object source, Event e) { int curSp = 0; int maxSp = 0; itfEngine = (IEngine)m_Car; maxSp = itfEngine.GetMaxSpeed(); do // Zoom! { itfEngine.SpeedUp(); curSp =itfEngine.GetCurSpeed(); // Add cur speed to list box. String s; s = Integer.toString(itfEngine.GetCurSpeed()); listBoxSpeed.addItem(s); }while(curSp <= maxSp); // Need to get IStats itfStats = (IStats)m_Car; // Tell user car blew up... MessageBox.show(itfStats.GetPetName() + " Blew Up!", "Lead Foot!", MessageBox.ICONEXCLAMATION); } Go ahead and run the application to see your Java client in action:
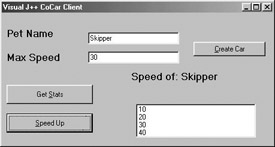
Figure 4-17: Java client using our C++ COM server.
In the final step of this lab, we will take the Visual C++ COM compiler extensions out for a test drive.
Step Five: A C++ Type Library Client
Create a new Win32 Console Application (a simple project will be fine). Add a new file called main.cpp and bring in your *.tlb file using the import directive. Compile the project. Here is some COM client code making use of smart pointers. Notice that we have no calls to QueryInterface(), AddRef(), or Release() (although we do set the smart pointers to NULL when finished to trigger the cleanup). Notice that we are making use of _bstr_t, which has an overloaded << operator to insert the buffer into the cout stream. Finally, be aware that the COM compiler support does honor the [retval] attribute:
// A C++ COM client using smart pointers. #import "E:\ATL\Labs\Chapter 04\CarServerTypeInfo\Debug\CarServerTypeInfo.tlb" no_namespace named_guids int main(int argc, char* argv[]) { CoInitialize(NULL); cout << "*********************************" << endl; cout << "The Amazing CoCar Import Client" << endl; cout << "*********************************" << endl; ICreateCarPtr iCCar(CLSID_CoCar); IEnginePtr iEng(iCCar); IStatsPtr iStats(iCCar); _bstr_t name = "Greased Lighting!"; spCCar->SetPetName(name); iCCar->SetMaxSpeed(50); // Show our state. iStats->DisplayStats(); int curSp = 0; int maxSp = 0; maxSp = iEng->GetMaxSpeed(); do // Zoom! { iEng->SpeedUp(); curSp = iEng->GetCurSpeed(); // [out, retval] cout << "Speed is: " << curSp << endl; }while(curSp <= maxSp); // Blown up! _bstr_t bstrName; // No conversions! bstrName = iStats->GetPetName(); // [out, retval] cout << bstrName << " has blown up! Lead Foot!" << endl << endl; iCCar = NULL; iStats= NULL; iEng = NULL; CoUninitialize(); return 0; } At this point we have injected type information into an existing COM server. As you have seen, IDL and the MIDL-generated type library are the keys to COM's language independence.
|
| < Free Open Study > |
|
EAN: 2147483647
Pages: 171