Strings in COM
|
| < Free Open Study > |
|
This might seem like a slightly out of place topic at this point in the book. However, in our next lab, we will begin porting the CarInCPP application from Chapter 1 into a COM server, and given that CCar uses text data, we need to examine the standard COM string data types: OLECHARs and the Basic String (BSTR).
Let me forewarn you: COM string manipulation can be tricky. Because COM is a language-independent programming discipline, we must contend with the following reality: Not all languages represent strings as NULL-terminated character arrays. Period. For example, VB considers a string to be a byte length prefixed, NULL-terminated set of characters. While COM syntactically allows you to pass around traditional C character arrays as interface method parameters, VB, VBScript, and Java clients will have little clue what to do with them.
Furthermore, given that COM is gaining ground as a platform-neutral protocol, realize that different platforms represent strings on different levels as well. WinNT is completely Unicode under the hood. Win9x is not. Furthermore, since the release of 32-bit OLE, all strings in the COM universe are considered 100% Unicode. This means all strings you pass into COM library functions and as textual interface parameters should be 100% Unicode.
What these points suggest is that COM strings should somehow be defined such that all languages and all platforms can understand. This universal string type is the BSTR. However, before we examine this de facto COM string type, we will begin with the OLECHAR primitive.
Understanding the OLECHAR Data Type
The OLECHAR data type (defined in <wtypes.h>) is the standard C++ centric COM character type. A good majority of COM library functions that take text parameters expect to be sent an array of OLECHAR types. OLECHAR will expand to either a char (ANSI) or wchar_t (Unicode) character, depending on your target platform:
// OLECHAR expands to wchar_t or char. // Below, WCHAR is a simple typedef to wchar_t. #if defined(_WIN32) && !defined(OLE2ANSI) typedef WCHAR OLECHAR; #else typedef char OLECHAR; #endif
The OLECHAR data type is used to hold a single COM character (e.g., the letter "H"). When you need an array of these types (e.g., "Hello World!") you will typically declare a variable of type LPOLESTR (an OLECHAR pointer), or if the string should remain constant, an LPCOLESTR (a const OLECHAR pointer). These typedefs resolve to char* or wchar_t* (either with or without the const keyword):
// An array of OLECHARs can be defined with the LPOLESTR or LPCOLESTR // typedefs. #if defined(_WIN32) && !defined(OLE2ANSI) typedef OLECHAR* LPOLESTR; typedef const OLECHAR* LPCOLESTR; #else typedef LPSTR LPOLESTR; typedef LPCSTR LPCOLESTR; #endif
Before we learn how to create a COM string with these new types, we have one further item to consider: the OLESTR macro. So, what is the OLESTR macro all about? Well, recall that some platforms use Unicode under the hood and some don't. When we prefix a text literal with L we force the creation of a Unicode string, and thus we could create a Unicode character array as so:
// This will only work on Unicode savvy platforms. OLECHAR* pOLEStr; // Could use LPOLESTR or LPCOLESTR as well. pOLEStr = L"Fred Flintstone";
If we did this, however, we could have problems on non-Unicode environments such as Win9x. The other option is to create an array of OLECHARs without the "L" prefix to force an array of char types. This would work on all platforms, but would also force NT to perform an internal conversion (which can slow things down). To account for these differences, OLESTR prefixes "L" if compiled under a Unicode build, and omits it otherwise:
// OLESTR will conditionally expand to a Unicode or char* string. #if defined(_WIN32) && !defined(OLE2ANSI) #define OLESTR(str) L##str else #define OLESTR(str) str #endif
Always initialize OLECHAR arrays with the OLESTR macro and everybody is happy. Well, almost everyone. Always remember that if you create custom interface methods that define OLECHAR arrays, you have limited the use of your COM object to C and C++ clients only.
Understanding the BSTR Data Type
Most COM language mappings do not work with simple NULL-terminated character arrays (Unicode or not). Visual Basic, Java, VBScript, and JScript all expect strings to be byte length prefixed as well. The BSTR data type is a Unicode, byte length prefixed, NULL-terminated string that all COM-compatible languages understand. Although all COM mappings understand the BSTR, each language has its own unique way to manipulate it. VB developers create BSTRs whenever they write code such as:
' VB developer made a BSTR. ' Dim name as String name = "Fred Flintstone"
As C++ developers, we create BSTR data types and manipulate them with a small set of COM library functions. Each BSTR method has a "Sys-" prefix to help identify it as a BSTR specific function (system string). It is interesting to note that the BSTR data type is defined as a typedef of OLECHAR*, again being an array of OLECHAR characters:
// Behold the BSTR (<wtypes.h>). typedef OLECHAR* BSTR;
It is through the use of the system string functions where the real difference (prefixing the byte length) is made. The following is a rundown of the most common system string functions and when to use them.
Creating a Brand New BSTR in C++
When you need to create a brand new BSTR in C++, you must make use of SysAllocString(). This API function automatically calculates the length of the string and sets the underlying buffer. For example, here we send in a Unicode text literal, and cache the returned BSTR in a variable named bstrName:
// SysAllocString() creates a BSTR. BSTR bstrName; bstrName = SysAllocString(L"Fred Flintstone");
Of course, many times you may not wish to initialize a BSTR using a hard-coded text literal, but would rather work with some variable data. Thus, you can allocate a BSTR with an existing OLECHAR* variable (using the OLESTR macro to ensure the correct underlying data type):
// Create a BSTR using an array of OLECHAR types (could be char or wchar_t). OLECHAR* pOLEStr; pOLEStr = OLESTR("Fred Flinstone"); BSTR bstrName; bstrName = SysAllocString(pOLEStr);
Manipulating an Existing BSTR
Once you have created a BSTR, the chances are good you will need to reassign it to another value during the life of your program. If you have a current BSTR that you wish to modify, use SysReAllocString(), which frees the existing memory, recalculates the length, and resets the buffer:
// Change existing bstrName to 'Mr. Slate' SysReAllocString(&bstrName, L"Mr. Slate");
The system string functions also provide a way to obtain the current length of a given BSTR buffer, using SysStringLen():
// Mr. Slate == 9 int length = SysStringLen(bstrName);
Most importantly, any BSTR directly created by SysAllocString() must be destroyed with a corresponding call to SysFreeString(). Any BSTR you receive back from an interface method must also be freed using SysFreeString():
// All done with the string. SysFreeString(bstrName);
| Note | Forgetting to free a BSTR with SysFreeString() will lead to hard-to-find memory leaks! This is just as important as calling delete on memory acquired via new in C++. |
Additional BSTR API Functions
While SysAllocString(), SysStringLen(), and SysFreeString() are a good start for most BSTR manipulations, the system string API does define a number of other methods. Here is the complete set of BSTR manipulation functions as found in <oleauto.h>, each of which are further documented in online help:
| BSTR Function | Meaning in Life |
|---|---|
| SysAllocString() | Creates a new BSTR. |
| SysReAllocString() | Reallocates an existing BSTR. |
| SysStringLen() | Returns the character length of a BSTR. |
| SysFreeString() | Destroys an existing BSTR. |
| SysReAllocStringLen() | Used to create a BSTR based on some length of characters. |
| SysStringByteLen() | Returns the length (in bytes) of a BSTR. Win32 only. |
| SysAllocStringByteLen() | This function is provided to create BSTRs that contain binary data. You can use this type of BSTR only in situations where it will not be translated from ANSI to Unicode, or vice versa. Win32 only. |
Unicode to ANSI Conversions
Even if we can all agree on the use of the BSTR type (in order to gain the greatest level of language independence), we still have one remaining problem. Win32 API functions that take textual parameters typically seem to require ANSI strings. For example, the MessageBox() method we all know and love is typically understood to look like the following:
// This is the MessageBox() method we think we know... MessageBox (HWND hWnd , LPCSTR lpText, LPCSTR lpCaption, UINT uType);
Given the prototype above, it looks as though we need to supply two constant char arrays (LPCSTR = long pointer to a constant string). Reality can often be a strange thing, however. Truth be told, there is no MessageBox() function in the Win32 API(!). Actually, this method (or any Win32 method that takes textual parameters) is defined to be one of two possibilities:
// Every Win32 function which takes text strings has an ANSI (A) or Unicode(W) // variation. #ifdef UNICODE #define MessageBox MessageBoxW #else #define MessageBox MessageBoxA #endif // !UNICODE
Under WinNT, the UNICODE preprocessor symbol is defined when you configure a Unicode build of your current project (this may be done from the Project | Settings menu selection). In this case, each and every API function will automatically expand to the "wide" version. For MessageBox(), this breaks down as:
// Under Unicode builds, all strings come through as an array of constant wchar_t. MessageBoxW( HWND hWnd, LPCWSTR lpText, LPCWSTR lpCaption, UINT uType);
Under non-Unicode builds, MessageBox() expands to the following ANSI version:
// ANSI builds use const char arrays. MessageBoxA (HWND hWnd , LPCSTR lpText, LPCSTR lpCaption, UINT uType);
The dilemma is, if we configure Unicode-only builds, our project will only run correctly under WinNT. If we do not configure a Unicode build, we will run under all platforms, although Unicode platforms (such as NT) will need to internally convert the ANSI strings to Unicode (which as mentioned can slow things down).
Conversion Functions
Win32 defines two rather hefty functions that allow you to translate ANSI strings into Unicode, and Unicode strings into ANSI. While these Win32 API functions provide you with maximum flexibility, they can often be seen as overkill given their parameter set (as you may agree when we see them in use in the next lab):
-
MultiByteToWideChar(): Converts an ANSI string to a Unicode equivalent.
-
WideCharToMultiByte(): Converts a Unicode string to an ANSI equivalent.
As an alternative, the C run-time (CRT) library provides simpler, streamlined, and platform-independent conversion functions. If you have a Unicode string (such as a BSTR) and want the ANSI equivalent, make a call to wcstombs() (Wide Character String to Multibyte String):
// wcstombs( char *ANSIString, wchar_t *UNICODEString, size_t count ); char buff[MAX_LENGTH]; BSTR bstr = SysAllocString(L"How did strings get so ugly?"); wcstombs(buff, bstr, MAX_LENGTH); // P3 = size of target buffer. cout << buff << endl; // Pump to console. SysFreeString(bstr);
If you want to take an existing ANSI string and convert it into Unicode, call mbstowcs() (Multi Byte String to Wide Character String), prototyped below:
// Transform an existing char* (ANSI) into a wchar_t* (Unicode) mbstowcs( wchar_t *UNICODEString , char *ANSIString, size_t count );
When we move our COM efforts into ATL, we are given a whole slew of conversion macros that streamline the process of translating between Unicode and ANSI strings, allowing us to more or less forget about these four conversion functions. As well, the CComBSTR class of ATL shields you from many of the ugly details of the system string functions. For now, we will take the long road and use the system string and various conversion functions.
A COM Text Example: COM Interface Methods Using BSTRs
To pull together all the information concerning COM string manipulation thus far, let's implement a very simple interface called IText. To ensure all COM language mappings can make use of this interface, we will stick to the preferred BSTR data type:
// IText contains methods which work with the COM string of choice. DECLARE_INTERFACE_(IText, IUnknown) { STDMETHOD(Speak) (BSTR bstrMessage) PURE; STDMETHOD(GiveMeABSTR) (BSTR* bstr) PURE; }; On the CD The companion CD-ROM contains the CoTextServer project and a C++ client application (CoTextClient). Although these projects are making use of some material not yet covered (class factories, registry entries, and so forth), feel free to examine the source code.
The Speak() method receives a BSTR created by the client and makes use of it internally. Given that the BSTR is a Unicode string, we will need to convert it into a char* in order to send it into any text savvy Win32 API function (unless we configure a 100% Unicode build, which binds us to NT). GiveMeABSTR() is called by a client to receive a new BSTR created by the coclass. As the client will receive a Unicode string, it will also need to convert the string to ANSI if it intends to use any text savvy API function (again, unless it is a 100% Unicode build).
Assume we have implemented IText within a coclass named CoText. This coclass maintains a private BSTR data member, which is created and destroyed in the constructor and destructor of the coclass using the correct system string function:
// CoText maintains a private BSTR, which is manipulated by the IText interface. class CoText : public IText { // Private underlying BSTR. BSTR m_bstr; ULONG m_refCount; public: CoText() { m_refCount = 0; m_bstr = SysAllocString(L""); } ~CoText() { if (m_bstr) SysFreeString(m_bstr); } // Assume standard IUnknown implementation... // IText methods. STDMETHODIMP Speak (BSTR bstrMessage); STDMETHODIMP GiveMeABSTR (BSTR* bstr); }; The implementation of Speak() will take an incoming client-supplied BSTR (which is Unicode), and convert it into an ANSI string:
// Because we are not in a Unicode build, we need to flip between string types. STDMETHODIMP CoText::Speak(BSTR bstrMessage) { char buff[80]; // Transform the Unicode BSTR into an ANSI char* WideCharToMultiByte(CP_ACP, NULL, bstrMessage, -1, buff, 80, NULL, NULL); // Now put ANSI string (buff) into a message box. MessageBox(NULL, buff, "The BSTR is...", MB_OK | MB_SETFOREGROUND); return S_OK; } GiveMeABSTR() will simply return the internal buffer to the client. To do so requires that we make a copy of the buffer, as the client is responsible for destroying the BSTR when finished. We don't want to give the client direct access to our buffer; that's our business, and we will destroy it when we are released!
// GiveMeABSTR() creates a copy of the internal underlying BSTR. STDMETHODIMP CoText::GiveMeABSTR(BSTR *bstrMessage) { *bstrMessage = SysAllocString(m_bstr); // Client frees the memory. return S_OK; } Now assume that a client has obtained a valid IText interface. It may exercise the methods as follows. Remember that any BSTR we allocate, or is allocated for us, must be freed using SysFreeString():
// First, create a BSTR and send it into the object. BSTR bstr; bstr = SysAllocString(L"Is anybody out there?!"); pText-> Speak (bstr); // Server pops up a message box. SysFreeString(bstr); // I made it, I free it. // Now, we are asking the object for a new BSTR, which is allocated for us. BSTR bstr2; pText -> GiveMeABSTR(&bstr2); // As the BSTR is Unicode, we can convert to ANSI using wcstombs(). char buff[80]; wcstombs(buff, bstr2, 80); // Convert to ANSI for cout. cout << "\'" << buff << "\' " << " is what the server said!" << endl; SysFreeString(bstr2); // It was made for me, I free it. pText->Release(); // Done with interface.
So then, remember the following: When you create your COM interface methods, always use the BSTR data type in order to ensure that every COM savvy language can make use of your objects. If you choose to use OLECHAR types as interface method parameters, you have limited yourself to C++ only solutions. To work with the BSTR, you must make use of the set of system string functions to correctly manage the underlying memory. Most importantly, remember that COM clients are always responsible for freeing BSTRs returned by COM objects (as well as BSTRs they create themselves).
Debugging Unicode Strings
As a final note concerning COM text programming, you need to know that Visual C++ has an odd default IDE option, which prevents you from seeing the actual text a given Unicode string holds. You may change this option from the Tools | Options menu. Be sure to select the Display Unicode Strings option from the Debug tab, and you will be able to examine the real text in a Unicode string (and that means BSTRs too):
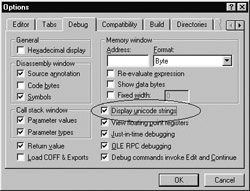
Figure 3-11: Configuration to view Unicode strings.
Once this configuration is set, you may examine the underlying buffer of the Unicode string during debugging sessions. Here is a look inside our BSTR data types using the Variables window in the VC IDE:
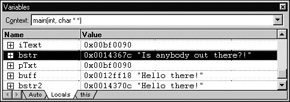
Figure 3-12: The result of enabling Unicode string debugging.
A Summary of Developing COM Interfaces and COM Classes in C++
To summarize the information covered so far in this chapter, when you are creating COM interfaces and coclasses using C++, follow the steps below:
-
Create any custom interfaces using the STDMETHOD macro family, and be sure to derive each interface from IUnknown (directly or indirectly). If you wish, you may use the DECLARE_INTERFACE macros when writing your interface definitions.
-
Using guidgen.exe, assign a new GUID for your interface using the DEFINE_GUID format. Substitute a human readable constant in place of the <<name>> marker.
-
Create the coclass, deriving from all standard or custom interfaces using C++ multiple inheritance.
-
Use the STDMETHODIMP/STDMETHODIMP_ macros in the coclass method implementation.
-
Implement the three methods of IUnknown (AddRef(), QueryInterface(), and Release()) as well as any additional interface methods.
-
When creating COM interface methods manipulating text data, stick to the BSTR data type to allow maximum usage of your coclass. Remember: OLECHAR data types are only usable by C and C++ clients.
Got all that? Let's move onto the next lab and put together what we have learned.
Lab 3-1: COM as a Better C++
In order to get you comfortable with GUIDs, HRESULTs, reference counting, COM strings, and IUnknown logic, we will develop CoCarApp.exe. This application is not an official COM client/server yet. Rather the COM object will be created and manipulated directly inside a single executable (consider this lab "COM as a better C++").
The CoCar coclass we build here will be reused in the next lab, where we place the COM class into a binary DLL home, which is then accessed by a COM client. As well, the global activation function created in this lab will mimic the behavior of a COM class factory almost exactly. As we will see after this lab, the IClassFactory interface is a standard COM mechanism, which allows COM clients to create COM objects in a language-independent and location-neutral manner.
On the CD The solution for this lab can be found on your CD-ROM under:
Labs\Chapter 03\CoCarApp
Step One: Interface Design
Begin by creating a brand new Win32 Console Application project workspace, selecting empty application. We will be creating a coclass that supports three custom interfaces. Recall from Chapter 1 that the CCar class exported all functionality of the automobile through the single default public interface. If you looked carefully, you might have noticed that this single interface could have been partitioned into logical groupings (interfaces). Create a new header file named interfaces.h and define three new interfaces to model the behaviors of an automobile:
// IStats is used to retrieve the pet name of the automobile, as well as display // all of the stats of the implementing object. DECLARE_INTERFACE_(IStats, IUnknown) { STDMETHOD(DisplayStats)() PURE; STDMETHOD(GetPetName)(BSTR* petName) PURE; }; // IEngine models the behavior of an engine. We can speed it up, grab the // maximum speed as well as get the current speed. DECLARE_INTERFACE_(IEngine, IUnknown) { STDMETHOD(SpeedUp)() PURE; STDMETHOD(GetMaxSpeed)(int* maxSpeed) PURE; STDMETHOD(GetCurSpeed)(int* curSpeed) PURE; }; // ICreateCar is used to set the pet name and the maximum speed of the // implementing object. DECLARE_INTERFACE_(ICreateCar, IUnknown) { STDMETHOD(SetPetName)(BSTR petName) PURE; STDMETHOD(SetMaxSpeed)(int maxSp) PURE; }; Recall that all custom COM interfaces must derive from IUnknown, so be sure to #include <windows.h> in the interfaces.h file. As well, you should wrap up the interface definition with preprocessor #ifndef/#define/#endif calls, to prevent multiple redefinition errors.
Next up, we need to assign GUIDs to each custom interface. Create another new header file named iid.h which will hold all DEFINE_GUID macro listings. Using guidgen.exe, create three new GUIDs with corresponding constants (using the IID_ prefix). Here are possible GUIDs for each interface (yours will be different of course):
// {A533DA30-D372-11d2-B8CF-0020781238D4} DEFINE_GUID(IID_IEngine, 0xa533da30, 0xd372, 0x11d2, 0xb8, 0xcf, 0x0, 0x20, 0x78, 0x12, 0x38, 0xd4); // {A533DA31-D372-11d2-B8CF-0020781238D4} DEFINE_GUID(IID_IStats, 0xa533da31, 0xd372, 0x11d2, 0xb8, 0xcf, 0x0, 0x20, 0x78, 0x12, 0x38, 0xd4); // {A533DA32-D372-11d2-B8CF-0020781238D4} DEFINE_GUID(IID_ICreateCar, 0xa533da32, 0xd372, 0x11d2, 0xb8, 0xcf, 0x0, 0x20, 0x78, 0x12, 0x38, 0xd4); Now, create another new file named iid.cpp. All this file needs to do is make the following #includes. Be sure to insert this file into the project workspace (just like any implementation file, use the Project | Add To Project | Files... menu selection):
// IID.cpp #include <windows.h> // For the good COM stuff. #include <initguid.h> // For definition of DEFINE_GUID. #include "iid.h" // The IIDs.
Having a centralized header file for your application's GUIDs can be very helpful down the road when you need to include the definitions into other projects. The benefit of having a corresponding *.cpp file for your interface IDs is to ensure that <initguid.h> is called automatically before your header file (a necessary step!) rather than relying on the end user of your IIDs to do so.
Step Two: Implement IUnknown
Insert a new C++ class named CoCar, which derives from the IEngine, IStats, and ICreateCar interfaces. As every COM interface derives from IUnknown, you will need to be sure to implement not only the methods of each custom interface, but also the three methods of IUnknown. Here is the initial header file of CoCar:
// CoCar implements four COM interfaces. #include "interfaces.h" class CoCar : public IEngine, public ICreateCar, public IStats { public: CoCar(); virtual ~CoCar(); // IUnknown STDMETHODIMP QueryInterface(REFIID riid, void** pIFace); STDMETHODIMP_(ULONG)AddRef(); STDMETHODIMP_(ULONG)Release(); // IEngine STDMETHODIMP SpeedUp(); STDMETHODIMP GetMaxSpeed(int* maxSpeed); STDMETHODIMP GetCurSpeed(int* curSpeed); // IStats STDMETHODIMP DisplayStats(); STDMETHODIMP GetPetName(BSTR* petName); // ICreateCar STDMETHODIMP SetPetName(BSTR petName); STDMETHODIMP SetMaxSpeed(int maxSp); }; Unlike the previous C++ version of Car, we will not be using cout to implement the interface methods. This time we make use of a simple Win32 API MessageBox() call. By doing so now, we will be able to port this CoCar class into a binary DLL in the next lab without being tied to a Win32 Console client!
Let's implement reference counting first. Add a private reference counter named m_refCount (of type ULONG) to CoCar, and set it to zero in the constructor. AddRef() will bump this counter by one, while Release() will decrement this counter by one and check for the final release, at which time the object deallocates itself from memory using "delete this" syntax:
// Establishing your object's reference counting schema. STDMETHODIMP_(ULONG) CoCar::AddRef() { return ++m_refCount; } STDMETHODIMP_(ULONG) CoCar::Release() { if(--m_refCount == 0) { delete this; return 0; } else return m_refCount; } Next, implement QueryInterface() to return interface pointers for IUnknown, IStats, ICreateCar, and IEngine. Don't forget to call AddRef() if you hand out an interface pointer, and return E_NOINTERFACE to indicate no such support:
// QueryInterface() is responsible for scoping the 'this' pointer for a given client. STDMETHODIMP CoCar::QueryInterface(REFIID riid, void** pIFace) { // Which aspect of me do they want? if(riid == IID_IUnknown) { *pIFace = (IUnknown*)(IEngine*)this; } else if(riid == IID_IEngine) { *pIFace = (IEngine*)this; } else if(riid == IID_IStats) { *pIFace = (IStats*)this; } else if(riid == IID_ICreateCar) { *pIFace = (ICreateCar*)this; } else { *pIFace = NULL; return E_NOINTERFACE; } ((IUnknown*)(*pIFace))->AddRef(); return S_OK; }
Step Three: Implement the Custom Interface Methods
With IUnknown complete, we now need to implement the custom interfaces of CoCar. Add the following data members to the private sector, and initialize each item to a default value in the constructor. Be sure to use the correct system string functions when working with your BSTR:
// Private data of CoCar. BSTR m_petName; // Initialize via SysAllocString(), kill with SysFreeString(). int m_maxSpeed; // The max speed of the CoCar. int m_currSpeed; // The CoCar's current speed. // CoCar's constructor and destructor. CoCar::CoCar() : m_refCount(0), m_currSpeed(0), m_maxSpeed(0) { m_petName = SysAllocString(L"Default Pet Name"); } CoCar::~CoCar() { if(m_petName) SysFreeString(m_petName); } The implementation of IEngine is trivial. SpeedUp() will increment the m_currSpeed data point by 10, and return S_OK. GetMaxSpeed() is a simple accessor for the m_maxSpeed variable, where GetCurSpeed() accesses m_currSpeed:
// IEngine implementation STDMETHODIMP CoCar::SpeedUp() { m_currSpeed += 10; return S_OK; } STDMETHODIMP CoCar::GetMaxSpeed(int* maxSpeed) { *maxSpeed = m_maxSpeed; return S_OK; } STDMETHODIMP CoCar::GetCurSpeed(int* curSpeed) { *curSpeed = m_currSpeed; return S_OK; } ICreateCar has two methods. SetPetName() takes a client-allocated BSTR, and sets it to the internal BSTR buffer using SysReAllocString(). SetMaxSpeed() does what it has always done: sets the maximum speed as long as the value is less than or equal to the MAX_SPEED constant (which you should define in the coclass header file):
// ICreateCar implementation. STDMETHODIMP CoCar::SetPetName(BSTR petName) { SysReAllocString(&m_petName, petName); return S_OK; } STDMETHODIMP CoCar::SetMaxSpeed(int maxSp) { if(maxSp < MAX_SPEED) m_maxSpeed = maxSp; return S_OK; } Finally, we have IStats. GetPetName() returns a copy of our internal buffer to the client. You will want to use SysAllocString() for this purpose:
// Return to the client a copy of your internal BSTR buffer. STDMETHODIMP CoCar::GetPetName(BSTR* petName) { *petName = SysAllocString(m_petName); return S_OK; } DisplayStats() will simply pop up two message boxes to show the current speed and pet name. The only trick here is the Unicode to ANSI conversion:
// Place the state of the CoCar into a couple message boxes. STDMETHODIMP CoCar::DisplayStats() { // Need to transfer a BSTR to a char array. char buff[MAX_LENGTH]; // Another program defined const. WideCharToMultiByte(CP_ACP, NULL, m_petName, -1, buff, MAX_LENGTH, NULL, NULL); MessageBox(NULL, buff, "Pet Name", MB_OK | MB_SETFOREGROUND); memset(buff, 0, sizeof(buff)); sprintf(buff, "%d", m_maxSpeed); MessageBox(NULL, buff, "Max Speed", MB_OK| MB_SETFOREGROUND); return S_OK; } That wraps up the implementation of CoCar. Over the course of this book, we will add more and more functionality to this COM object (including a more efficient set of interfaces). Go ahead and compile at this point to be sure your project is stable.
Step Four: Create a Bootstrapping Function
In real COM, objects are created with COM library calls. A standard COM interface, IClassFactory, can be extracted from a server, and from it, a client can create a related coclass. We will examine COM's creation mechanism after this lab wraps up. Be aware that the code you are writing for the following global function will mimic the functionality of IClassFactory::CreateInstance() almost exactly.
For the time being, however, we will create a special function that knows how to make CoCars and returns an IUnknown reference. Create a global function in your CoCarApp.cpp file called CarFactory():
// This is a global function which knows how to create CoCars. HRESULT CarFactory(void** pIFace);
This function is a more generic version of the Rect API function set. Recall from Chapter 2 that we had two distinct steps to create a C3DRect: call a creation method, and ask for an interface pointer with another. Here, we always get back IUnknown to help the client get up and running:
// The CarFactory() function is a global function, and not part of the CoCar. // If we scoped this method to CoCar, we would have a 'dog chasing its tail' // situation: We would have to create a car to create a car... HRESULT CarFactory(void** pIFace) { HRESULT hr; LPUNKNOWN pUnk = NULL; // System typedef for IUnknown*. // Dynamically allocate a new CoCar. CoCar *pCar = new CoCar(); // Fetch IUnknown pointer from CoCar. hr = pCar->QueryInterface(IID_IUnknown, (void**)&pUnk); if(SUCCEEDED(hr)) { *pIFace = pUnk; return S_OK; } else { delete pCar; return E_FAIL; } } What also makes this function unique from the Rect API is that we can now create any number of CoCars dynamically. The Rect API operated on only a single global object at a time. With this function complete, we now have one final step: creating the client-side code.
Step Five: Program the Client-Side Code
Finally, we need to add code to your main() function to perform the following:
-
Create a CoCar by making a call to CarFactory(). You will need to define an IUnknown* variable to send on in for this purpose:
// Go get IUnknown from a new CoCar. IUnknown* pUnk; HRESULT hr; hr = CarFactory((void**) &pUnk);
-
From the resulting IUnknown pointer, attempt to obtain IID_ICreateCar, and if successful, exercise the interface methods:
// Create a CoCar ICreateCar *pICreateCar; pUnk->QueryInterface(IID_ICreateCar, (void**)&pICreateCar); pICreateCar->SetMaxSpeed(30); BSTR name = SysAllocString(OLESTR("Bertha")); pICreateCar->SetPetName(name); SysFreeString(name); -
Obtain the IStats interface from the CoCar, and call DisplayStats(). You should see the CoCar's messages pop up when you run the program.
-
Now ask for IEngine. Given the laws of IUnknown, you may ask for IEngine from any valid pointer; thus, you may call QueryInterface() from your IUnknown or ICreateCar pointer. As before, rev the car until the engine block cracks. Use IStats::GetPetName() to return the pet name of the coclass, which we can format into an ANSI string using WideCharToMultiByte() or wcstombs() to inform the user of the car's demise:
// Rev it! int curSp = 0; int maxSp = 0; pUnk->QueryInterface(IID_IEngine, (void**)&pIEngine); pIEngine->GetMaxSpeed(&maxSp); do { pIEngine->SpeedUp(); pIEngine->GetCurSpeed(&curSp); cout << "Speed is: " << curSp << endl; }while(curSp <= maxSp); // Convert to char array. char buff[MAX_NAME_LENGTH]; BSTR bstr; pStats->GetPetName(&bstr); wcstombs(buff, bstr, MAX_NAME_LENGTH); cout << buff << " has blown up! Lead Foot!" << endl << endl; SysFreeString(bstr);
Be sure to Release() all interface pointers you have acquired to destroy the CoCar:
// Release any acquired interfaces to destroy the CoCar // currently in memory. if(pUnk) pUnk->Release(); if(pIEngine) pIEngine->Release(); if(pStats) pStats->Release(); if(pICreateCar) pICreateCar->Release();
When contrasting this lab with the Rect API, here we have bound together the lifetime management and interface retrieval into a single class (given the utility of IUnknown), rather than three global functions. So far so good! We have taken a C++ class, and factored it out into a number of COM interfaces, and implemented them in a coclass. However, CoCar is not a reusable binary object yet. We need to get our hands around class factories and component housing to reach that goal.
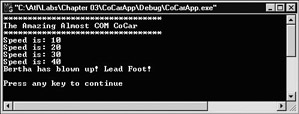
Figure 3-13: The “almost real COM” application.
|
| < Free Open Study > |
|
EAN: 2147483647
Pages: 171