The Principle of Polymorphism
|
| < Free Open Study > |
|
We clearly have some problems with our existing Is-A employee relationship. When we send the DisplayClassType() message to either a CEmployee or CSalesEmployee instance, we get back the same response. A similar problem exists with GetPay(). The principle of polymorphism allows related classes to respond uniquely to the same message. As with inheritance, we have two possible forms of polymorphism: classical and ad hoc.
Classical polymorphism is only supported by OOLs that also support classical (Is-A) inheritance. The two intimately rely on each other. If we have the luxury of classical inheritance in our OOL, we may allow each child class to interpret what a given message means to itself by overriding a default implementation defined in the base class. This allows class designers to access the default behavior supplied in a base class "as is" or to redefine how a subclass responds to the same message using "virtual" functions.
Defining Virtual Functions
In C++, we may specify which methods (also known as functions) can be overridden in a derived class using the virtual keyword. Let's begin to rectify the current problems with our employee hierarchy using virtual methods. As we will be making the DisplayClass- Type() and GetPay() methods virtual, any subclass of CEmployee can print out its own custom message and calculate pay its own way. Here is the reworked definition:
// CEmployee with virtual functions. class CEmployee { public: ... // Although we define a default implementation for these functions, we also // allow sub classes to override these methods. virtual void DisplayClassType() { cout << "I am a CEmployee object." << endl; } virtual float GetPay(); // Implementation in CPP file. protected: ... }; CSalesEmployee may now override the base class version of DisplayClassType() and provide a more appropriate message:
// Overriding the inherited DisplayClassType() to work with a sales employee. class CSalesEmployee : public CEmployee { public: // Let's redefine the inherited method. virtual void DisplayClassType() // virtual keyword optional in subclass. { cout << "I am a CSalesEmployee object" << endl; } ... // Other functions and state data for sales employee. }; This time, each object responds to the DisplayClassType() message in a much more intelligent manner through polymorphism:
// Create some objects and exercise the virtual functions. CSalesEmployee slickRyan; CEmployee ragingVirgil; ragingVirgil.DisplayClassType(); // I am a CEmployee object. slickRyan.DisplayClassType(); // I am a CSalesEmployee object.
We have also specified GetPay() as a virtual function of CEmployee. In this way, each object can determine how to calculate the correct pay. For example, CEmployee types get a fixed salary, and may thus implement GetPay() as the following:
// Pay each week for an employee. float CEmployee::GetPay() { return m_currPay/52; // No taxes! } A CSalesEmployee needs to factor in commission based on number of sales. Rather than recoding the logic provided by the base class implementation of GetPay() in our subclass, we can explicitly call the base class version of this method (using the scope resolution operator) to help calculate the weekly pay:
// Pay each week for a sales employee. float CSalesEmployee::GetPay() { // Scope resolution operator calls base class implementation. return CEmployee::GetPay() + (m_numberOfSales * 5); // 5 bucks a sale! } So then, classical polymorphism allows us to have classes related by inheritance rework how they respond to the same message. When we declare virtual base class functions, we give our subclasses a choice. The superclass says in effect, "I have a default implementation of this method for you. Use it if you wish, or redefine the behavior to suit your own needs" (we all should have such understanding parents). Keep in mind, however, that a subclass is never required to redefine a superclass behavior.
Enforcing Subclass Behavior with Pure Virtual Functions
Sometimes it is useful for a base class to define methods having no default implementation at all. In this case, we say the base class defines "pure virtual functions." Any class that specifies pure virtual functions is termed an abstract base class. Object users may never create object instances of abstract classes (as the object's implementation is not fully fleshed out) but can freely declare a pointer to one. The question is why would we bother to define methods that have no implementations?
Consider a simple class library that models a number of geometric shapes. We need to allow circles, triangles, and squares to render themselves to the screen based on a Draw() method. Using classical polymorphism, we know that we could create a base class called CShape, and in that class we could simply declare a virtual Draw() method. Subclasses are free to override Draw() to render themselves appropriately when asked to do so, as suggested by Figure 1-14:
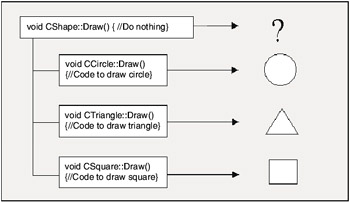
Figure 1-14: Shape class with a virtual Draw() method.
The trick to understanding the usefulness of pure virtual functions is to realize that you probably never intend an object user to make a CShape object directly. After all, how exactly would you draw a generic shape? This class exists simply to hold attributes and methods common to all descendents. Also recall that a subclass is not required to override a virtual member. It is completely possible that the CShape descendents (triangles, circles, and squares) could make use of the base class implementation-which is nothing. Clearly this is not a very useful shape library.
A better solution is to define the "form" of the Draw() method (meaning the parameters, return type, and method name) and declare it as pure virtual in CShape. In this way, each and every subclass must provide an implementation of Draw(), or else it will also be an abstract class as well. In C++, we declare pure virtual functions like so:
// To create a pure virtual function, use a 'virtual' prefix and '=0' suffix. virtual void Draw () = 0;
Pure virtual functions allow a base class to enforce a desired form on subclasses. Here the parent class says, "If you want to live in my house, you must implement these methods yourself."
An Employee Hierarchy
To illustrate pure virtual functions, let's go back to the drawing board and rework CEmployee yet again into an abstract base class. This class exists simply to hold all data and functionality relative to any descendent, and cannot be directly created. Thus, we will also have to create another subclass to represent a standard full-time employee (we were using CEmployee for that purpose before, but as this new iteration contains pure virtual methods, we cannot create objects of this type). Our Employee hierarchy will have the following classes:
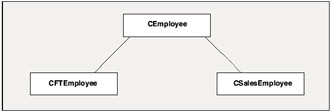
Figure 1-15: The employee class hierarchy.
Here is the class definition of the revitalized CEmployee abstract base class, this time supplying two pure virtual functions:
// An abstract base class, which holds attributes and methods for all descendents. class CEmployee { public: CEmployee(); CEmployee (int ID, char* name, float startingSalary); virtual ~CEmployee(); // Pure virtual functions. No default implementation. virtual void DisplayClassType() = 0; virtual float GetPay() = 0; protected: float m_currPay; int m_ID; char m_name[MAX_LENGTH]; }; As the current version of CSalesEmployee already implements what the pure virtual DisplayClassType() means to itself, we can leave this method unaltered. However, GetPay() is now declared as pure virtual, and must provide an implementation without any help from the base class implementation. As you can imagine, this method will return the weekly pay with commissions leveraging the inherited state data:
// This time we cannot leverage base class implementations... float CSalesEmployee::GetPay() { // The pay is a result of current pay + number of sales. return (m_currPay/52) + (m_numberOfSales * 5); } As for our new class, CFTEmployee can implement the pure virtual DisplayClassType() as so:
// Full time employee implementation of DisplayClassType. void CFTEmployee::DisplayClassType () { cout << "Hello from CFTEmployee" << endl; } CFTEmployee's version of GetPay() is as you would expect. Simply return the weekly pay without commission:
// Full time employee implementation of GetPay. float CFTEmployee::GetPay() { // Calculate the pay. return m_currPay/52; }
Polymorphism in Action: Using Base Class Pointers
We now have three classes in our employee hierarchy: CEmployee, the abstract base class used to hold all common employee information; CFTEmployee, the class representing a traditional full-time worker; and CSalesEmployee to model a worker paid with commissions. To see polymorphism in action, recall what was mentioned earlier: While you cannot make objects instances of an abstract base class, you can make pointers to them.
A base class pointer can be assigned to any subclass in the inheritance chain, and by casting the pointer to the object in question, we gain access to its public sector. Examine the following code, noting the special syntax used to deallocate each member in the base class pointer array:
// The base class pointer trick. void main(void) { CEmployee* theStaff[3]; // An array of base class pointers. theStaff[0] = new CFTEmployee(12, "Cindy", 50000); theStaff[1] = new CSalesEmployee(30, "Maxine", 9000, 40); theStaff[2] = new CFTEmployee(7, "Amanda", 90000); for(int i = 0; i < 3; i++) // Late binding through polymorphism. { theStaff[i] -> DisplayClassType(); theStaff[i] -> GetPay(); } delete[] *theStaff; // Insures all items in the array are destroyed. } I'm sure you can imagine what the output of this would look like (you'll see for yourself in the next lab). Using base class pointers, we achieve polymorphic behavior. It is at run time, not compile time, where the determined behavior is understood and the correct method is invoked. This allows OOLs to work with the late binding of the object, in order to determine which version of a virtual function to call by consulting the "virtual function table."
Understanding Virtual Function Tables
This bit of late binding magic is given automatically by the C++ compiler. Whenever you define a class containing virtual functions, the compiler silently adds a hidden member to your class, named the vPtr (virtual pointer). The vPtr in turn points to the class's vTable (virtual function table). This table is an array of addresses to function entry points. There is an entry in the vTable for each and every virtual function defined in the class. If the object user is sending messages to a CFTEmployee variable, the vTable is consulted, which points to the memory address of the implementation code (Figure 1-16):
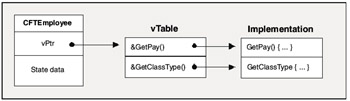
Figure 1-16: vPtr/vTable relationship for CFTEmployee.
CSalesEmployee also has a vTable specifying the memory locations of its virtual function set. During run time, the class's this pointer is dereferenced to point to the correct vTable in the hierarchy, which in turn points to the correct implementation code. The usefulness of vPtrs and vTables is critical in COM development, and we will revisit this issue in Chapter 2. To whet your appetite, suffice it to say when a COM client calls interface methods on a COM object, it does so through the vPtr.
Understanding Ad Hoc Polymorphism
Before we finish our investigation of polymorphism, we need to consider ad hoc polymorphism. Some object-based languages do not support classical inheritance, and therefore we cannot establish base/derived class relationships. Ad hoc polymorphism allows objects not related by classical inheritance to respond uniquely to the same message. From the object user's perspective, if these methods have the same signature, we can send them the same messages. Figure 1-17 illustrates three class modules (CSquare, CCircle, and CTriangle) each supporting a Draw() method. Note that these classes have no common CShape base class to define a pure virtual (or even virtual) Draw() method. It is by slightly devious ways that these objects are related.
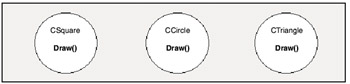
Figure 1-17: Ad hoc polymorphism.
Visual Basic and Ad Hoc Polymorphism
Visual Basic is an OOL (object-oriented language) that only supports ad hoc polymorphism. Assume you have created a new Standard EXE project workspace in VB, and inserted three new *.cls files to define the CSquare, CCircle, and CTriangle classes (a *.cls file is used to define a class in VB; there is no "class" keyword).
Each class supports a method named Draw(), which in the real world might use VB graphic functions to render a shape, but for our purposes simply prints out some debug information. Here is the Draw() method for CSquare (the other drawing routines are similar-they just print out unique debug information):
' CSquare drawing routine. ' Public Sub Draw() Debug.Print "Drawing a square" End Sub
If we place a single command button on the main Form object (Figure 1-18) we may then add code to the button's Click event.
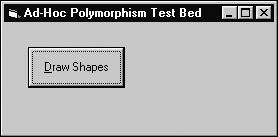
Figure 1-18: A VB form object serves as the main window.
By creating an array of Object data types, we can set each index in the array to a new instance of one of our classes (the intrinsic Object type provides late binding behavior in VB):
' Create an array of Object data types, setting each index to a custom class instance.' Private Sub btnDraw_Click() ' Create an array of Object variables. Dim shapes(3) As Object ' Must use Set keyword when assigning values to objects! Set shapes(0) = New CCircle Set shapes(1) = New CSquare Set shapes(2) = New CTriangle Set shapes(3) = New CCircle Dim i As Integer For i = 0 To 3 ' Loop through each item in the object array. shapes(i).Draw Next i End Sub
If you run this program, you will see the following pumped out to the Immediate window (visible from the View | Immediate Window menu selection):
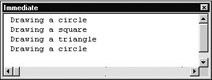
Figure 1-19: VB program output.
Thus, we are able to simulate classical polymorphism in languages such as VB, which do not support classical inheritance. The key difference is that we do not have a common Shape class providing default behaviors. Now that you have been refreshed with the basics of encapsulation, inheritance, and polymorphism, the next lab will pull everything together and allow you to construct the employee hierarchy we have been examining so far.
Lab 1-3: An Employee Hierarchy in C++
In this lab, you will create a small hierarchy of C++ objects. This will solidify (or refresh) your understanding of the foundation of OO development: encapsulation, inheritance, and polymorphism. As well, you will be designing an abstract base class that enforces a given form on all descendents using pure virtual functions.
Most importantly, this lab will give you a chance to develop your own custom run-time type information (RTTI) functionality which will provide a perfect stepping-stone to the interface-based programming techniques introduced in the next chapter.
On the CD The solution for this lab can be found on your CD-ROM under:
Labs\Chapter 01\Employees
Step One: Create the Project Workspace and Initial Class Definitions
To begin this lab, create a new Win32 Console workspace (an empty project type will be fine) named Employees. As usual, insert a new text file named main.cpp and define an empty main loop. Now, using the New Class Wizard (Figure 1-20), insert the CEmployee base class and the following subclasses:
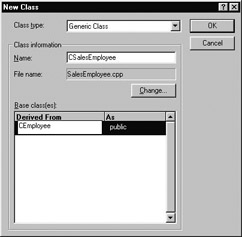
Figure 1-20: Using the New Class Wizard to derive a new class.
-
CFTEmployee: Derive this class from CEmployee.
-
CSalesEmployee: Also derive from CEmployee.
This will give you skeleton definitions for three new C++ classes. As you have seen in the reading, CEmployee will serve as an abstract base class for CFTEmployee and CSalesEmployee. Go ahead and compile to get a clean build.
Step Two: Implement the CEmployee Abstract Base Class
Define CEmployee to support the following protected data members and a custom constructor. Recall that any protected data will be visible to your subclasses, but not to the object user:
// The abstract base class in the employee hierarchy. class CEmployee { public: CEmployee(); CEmployee(int ID, char* name, float startingPay); virtual ~CEmployee(); protected: float m_currPay; int m_ID; char m_name[MAX_LENGTH]; // Program defined const, set to 100. }; Implement the overloaded constructor to set the internal state data:
// CEmployee's overloaded constructor. CEmployee::CEmployee(int ID, char* name, float startingPay) { m_ID = ID; strcpy(m_name, name); // Don't forget to include <string.h>. m_currPay = startingPay; } Next, add the following methods to CEmployee's public interface:
// Custom RTTI method. virtual char* DisplayClassType(EMP_TYPE* eType) = 0; // enum defined below. // Accessors (we don't need mutators for this lab, but feel free to add them) virtual float GetPay() = 0; char* GetName() { return m_name;} int GetID() { return m_ID;} Notice how our DisplayClassType() method has changed a bit from the last time we saw it. We will now return a string, which may be used to print out the class name and set the incoming EMP_TYPE enum to one of two values. This will be used in the calling logic to test which messages may be sent to a particular class. Define the EMP_TYPE enumeration in the header file of CEmployee (outside the class definition) as so:
// Full time (FT) or sales person (SP). enum EMP_TYPE{FT = 0, SP = 1}; // The CEmployee base class. class CEmployee { public: ... protected: ... }; Assuming all is well, let's begin to flesh out the CFTEmployee class next.
Step Three: Implement CFTEmployee
Define the following overloaded constructor for this class and set the inherited state data using the member initialization list:
// Use the member initialization list to set the inherited state data. // (Don't forget to add this constructor to the class definition!) CFTEmployee::CFTEmployee(int ID, char* name, float startingPay) : CEmployee(ID, name, startingPay) { } CFTEmployee will not need to define any additional data, as it automatically receives the protected data defined in CEmployee.
As we are derived from an abstract base class, we now are under obligation to implement each pure virtual function defined in CEmployee. First, let's assume a full-time employee's weekly pay is just current salary/52 (hey, it's our model-who says we need taxes?):
// Don't forget to list the inherited functions in the class definition! // be sure you remove the '=0' suffix, as this method is no longer pure virtual. float CFTEmployee::GetPay() { // Figure out the pay for a full time worker. return m_currPay/52; } A full-time employee will identify itself in the system using the GetClassType() method. Return a simple string such as "I am a full-time worker," and set the EMP_TYPE pointer to FT:
// We return a string specifying we are a full time worker. char* CFTEmployee::DisplayClassType(EMP_TYPE* eType) { *eType = FT; return "I am a Full-Time worker"; } As we have implemented both pure virtual functions of CEmployee, this class is complete.
Step Four: Implement CSalesEmployee
Define the following overloaded constructor for this class. Next, add a private data member (of type int) named m_numberOfSales with an accessor and mutator. Set all state data in this constructor:
// Overloaded constructor for sales person. CSalesEmployee::CSalesEmployee(int ID, char* name, float startingPay, int sales) { // Could also use member initialization syntax. // Here we are making simple assignments. m_ID = ID; strcpy(m_name, name); m_currPay = startingPay; m_numberOfSales = sales; } // Prototypes of sales specific functions (inlined). int GetNumberOfSales() { return m_numberOfSales;} void SetNumberOfSales(int numb) { m_numberOfSales = numb;} The GetPay() method will be calculated by taking the weekly pay plus five bucks for each sale made:
// Remember GetPay() is pure virtual... float CSalesEmployee::GetPay() { // Can't leverage base class functionality! There is none! return (m_currPay/52) + (m_numberOfSales * 5); } Finally, implement GetClassType() to return a unique string identifier, and set the EMP_TYPE pointer to SP:
// Our custom RTTI. char* CSalesEmployee::DisplayClassType(EMP_TYPE* eType) { *eType = SP; return "I am a Sales Person"; } Compile your application (you should come through clean). Now we must add code to our main loop to create and manipulate these new object types, using our custom RTTI function and the "base class pointer trick" to exercise polymorphic activity.
Step Five: Polymorphism with Base Class Pointers
We will be creating an array of base class pointers for use in our main loop. For test purposes, create the array with an upper limit of 4, as defined by the MAX_EMPS constant. Set each index in the base class pointer array to a new instance of a given subclass:
// Using our hierarchy. const int MAX_EMPS = 4; void main(void) { CEmployee* theStaff[MAX_EMPS]; theStaff[0] = new CFTEmployee(30, "Fred", 30000); theStaff[1] = new CSalesEmployee(40, "Mary", 40000, 120); theStaff[2] = new CFTEmployee(15, "JoJo", 11000); theStaff[3] = new CSalesEmployee(1, "Jimmy Jones", 100000, 19); ... } To exercise the staff, implement a for loop to perform the following:
-
Loop through the CEmployee* array. Send in (by reference) an EMP_TYPE variable to DisplayClassType()and print out the returned string:
// Display the type of object we are working with. EMP_TYPE e; cout << theStaff[i]->DisplayClassType(&e) << endl;
-
Print out the name, ID, and pay for each member in the array:
// Get name. cout << "Name is: " << theStaff[i]->GetName() << endl; // Get ID. cout << "ID is: " << theStaff[i]->GetID() << endl; // Get pay. cout << "Pay is: " << theStaff[i]->GetPay() << " a paycheck before taxes." << endl;
-
If the current member in the array is a salesperson (we determine this by examining the EMP_TYPE variable), print out the current number of sales. You will have to explicitly cast the array member to a CSalesEmployee pointer:
// Let's see if we have a salesperson. if(e == SP) { cout << "->My Sales are " << ((CSalesEmployee*)theStaff[i])->GetNumberOfSales() << endl << flush; }
When the array has been iterated over completely, don't forget to delete the array of pointers! When you run the completed program, you will be able to interrogate each item (Figure 1-21):
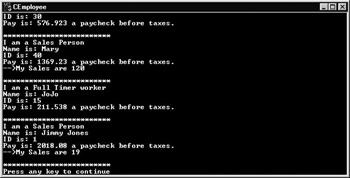
Figure 1-21: The completed employee application.
Here is the complete code behind main():
// The main() loop. const int MAX_EMPS = 4; void main(void) { // A cookie to see if we have a salesperson. EMP_TYPE e; // Make an array of Employee pointers. CEmployee* theStaff[MAX_EMPS]; theStaff[0] = new CFTEmployee(30, "Fred", 30000); theStaff[1] = new CSalesEmployee(40, "Mary", 40000, 120); theStaff[2] = new CFTEmployee(15, "JoJo", 11000); theStaff[3] = new CSalesEmployee(1, "Jimmy Jones", 100000, 19); // Now go through each member in the array and // pull out the stats. for(int i = 0; i < MAX_EMPS; i++) { // Which class is here? cout << theStaff[i]->DisplayClassType(&e) << endl; // Get name. cout << "Name is: " << theStaff[i]->GetName() << endl; // Get ID. cout << "ID is: " << theStaff[i]->GetID() << endl; // Get pay. cout << "Pay is: " << theStaff[i]->GetPay() << " a paycheck before taxes." << endl; // Let's see if we have a salesperson (using our custom RTTI). if(e == SP) { cout << "->My Sales are " << ((CSalesEmployee*)theStaff[i])->GetNumberOfSales() << endl << flush; } // Just to make it look nice. cout << endl; cout << "*************************" << endl; } // clean up. delete [] *theStaff; } Now that we have the core elements of C++ class construction firm in our mind, we will finish up this chapter by reviewing template-based programming. As I am sure you are aware, the Active Template Library makes substantial use of C++ templates in order to provide a number of core COM services. Our exploration of ATL begins in Chapter 6, but what would a C++ review be without a mention of generic template-based programming?
|
| < Free Open Study > |
|
EAN: 2147483647
Pages: 171