Interface Design
|
Design a good interface, and everything else is negotiable. If your first pass at the implementation is flawed, no big deal; you improve it, and your users get a painless upgrade. Design a bad interface, and your module is doomed to uselessness. It doesn't matter how fantastic your implementation is-no one can figure out how to use it and no one will. This property of a module, that the internals may change without affecting users of the module, is known as encapsulation. Encapsulation is often associated with object-oriented programming, but any well-designed module can benefit from it. A module's interface is the barrier between users and the module's internals that allows for encapsulation.
Functions or Objects?You might not have to think about this question-you might be an OO true believer. My introduction to the Church of Pure Objects came on my first day as a computer science student. The guy sitting next to me in CS201 greeted me with "Do you uphold the object model?" I thought for a moment and said "Ah, sometimes." His eyes narrowed. I was clearly the enemy. Aside from fulfilling religious obligations, object-oriented modules do provide some benefits. If your module will need to maintain state between calls to the interface, then using objects might be a good idea. This was the case with the BOA::Logger example in the last chapter. Object-oriented modules are also easier to extend through the magic of inheritance, which sometimes allows OO modules to be reused in situations where a functional[5] module would be rewritten. On the other hand, object-oriented code is usually more complicated than an equivalent functional implementation. Doing OO means dealing with references and occasionally thinking about difficult topics like garbage collection and inheritance. Sometimes a module is more naturally expressed as a set of functions that can be exported into the caller's namespace. One easy test for this is to ask yourself if more than one object will ever be created by this module in a typical usage. If the answer is no, then chances are you don't really need to go the OO route. Regardless of which way you choose to go, you should read through both of following sections. The dividing line between a functional interface and an objectoriented one is exceptionally blurry in Perl. Topics in functional programming like parameter passing and subroutine naming have parallels in object-oriented programming. Conversely, object-oriented programming techniques like inheritance can be useful in functional programming. Ultimately Perl makes little distinction between functional and object-oriented modules; both are built on the same underlying technology-packages and subroutines.
Functional InterfacesA functional interface is defined by the subroutines it provides and the ways in which users can access them. Designing a functional interface is similar to designing a small programming language. The subroutines you provide form a grammar that is used to write programs in your module's domain. If you design a powerful and flexible grammar, then your users will be able to write powerful and flexible programs.
Subroutine NamingIn general, subroutines should be named with an action verb and, optionally, a noun[6]-for example, print_form(), connect(), find_cities(), and complain(). This allows the arguments to be treated as subjects and direct objects of the activity expressed by the subroutine. For example, connect($server_address) is much easier to understand than socket($server_address). Avoid ambiguous verbs like "process" and "handle." An exception to the this rule are functions whose sole purpose is to return a particular value. In this case, dispensing with the superfluous "get" or "return" verbs is preferable. That is, next_id() is better than get_next_id(). Try to use full words and avoid abbreviation. Some developers are under the impression that removing vowels from their subroutine (and module) names-for example snd_cmd() rather than send_command()-will enhance their usability. The time you spend typing the full name will be more than repaid by the time your users save remembering the name! Capitalization is certainly a fruitful subject for flame wars, but there seems to be a rough consensus in the Perl community. Normal subroutines are all lowercase and multiple words are joined with underscores (for example, encode_html()). Constants and package variables are in all caps (such as FORBIDDEN and $DEBUG). Private subroutines are preceded by an underscore (such as _parse()). Consider carefully before violating these expectations. Above all, be consistent. If you're determined to use innerCaps,[7] then at least do so consistently. It's far too easy to forget something like printData_filter() and instead type print_data_filter() or printDataFilter(). Take advantage of conventions wherever you can-they reduce the time it takes a new user to learn to use your module. For example, if a subroutine prints to a file, consider using "print" or "write" in the name rather than inventing your own terms. You might also be able to follow the example of an existing module. If you're writing a CGI module that handles parameters, you might consider implementing a param() function that works like the CGI module's param().
Subroutine DocumentationAs you plan your interface, you should document each subroutine you plan to write. The documentation for a subroutine should specify possible arguments and return values. If the subroutine will make assumptions about its arguments, then these should be stated. Just like the module description, a subroutine description should focus on what and not how. Here's a good example of a well-documented subroutine:
=over =item &@msgs = check_mail($imap_server, $username, $password) =item &@msgs = check_mail($imap_server, $username, $password, $mailbox) This routine checks for new mail on a IMAP server. It takes three required arguments the server address (name or IP), the user name and the password. The fourth, optional, argument is the mailbox name, which will default to "INBOX" if not set. If an error is encountered -1 is returned and an error message is printed to STDERR. If successful, a list of new message IDs is returned that can be used with retrieve_mail(). An empty list indicates no new messages. =back Notice that an example is given for each possible call to the function-both with the optional $mailbox argument and without. This is a common convention that is worth following. Another possibility is to place the optional argument in square brackets (for example, [$mailbox]), but that risks confusion with a reference to an array containing the argument. One common problem with subroutine documentation is ambiguous language. For example, "the subroutine may return undef on failure." The reader is left wondering what else it might do on failure. There are two crucial pieces of information that a user needs-how to check for an error and how to determine what the error was. Certainly there's more than one way to do it-just make sure you document which one you choose!
Parameter PassingSimple subroutines are best served by simple interfaces. If you have only a couple parameters, then there's no good reason to do anything more complicated than take them directly from @_. However, when designing a subroutine that will take more parameters, you should consider using a named-parameter style. Here's a call to the check_mail() subroutine described earlier, redesigned to use a namedparameter style: check_mail(imap_server => $imap_server, username => $username, password => $password); Implementing a named-parameter subroutine is easy. Here's one way to do it:
sub check_mail { croak("Odd number of parameters to check_mail!") if @_ % 2; my %params = @_; # ... rest of sub uses %params to access parameters } The first line checks to make sure you have an even number of parameters. If you omit this test, then the next line will cause a confusing error if a user calls the routine with an odd number of parameters. An alternate way to implement a named-parameter style subroutine is to require the calling code to pass a reference to a hash as a single parameter. If this were done with check_mail(), then the call would look like this: check_mail({imap_sever => $imap_server, username => $username, password => $password}); As a result, the implementation of the subroutine changes a bit:
sub check_mail { croak("Bad call to check_mail - expected a single hash ref!") unless @_ == 1 and ref $_[0] eq "HASH"; my $params = shift; # ... rest of sub uses %$params to access parameters } Which method you choose is largely a matter of taste. One of the main benefits of using a named-parameter style, aside from the ease of use, is in extensibility. For example, let's imagine you need to add a couple new optional parameters to the previously documented check_mail()-$timeout and $retries. Since they're optional, they'll have some reasonable default if not specified. That makes a call using positional parameters look like the following:
check_mail($imap_server, $username, $password, $mailbox, $timeout, $retries); The problem is that if you only want to specify one of the optional parameters, then you'll need to pad the preceding parameters with undefs. For example, to specify a number of retries but leave the other optional parameters alone, an ugly call is required:
check_mail($imap_server, $username, $password, undef, undef, $retries); Add a few more optional parameters, and pretty soon the average call is using more undefs than values! Contrast this to the call with named parameters: check_mail(imap_sever => $imap_server, username => $username, password => $password, retries => 3); Named-parameter subroutines will automatically treat missing keys as undef so there's no need to put them in just for padding.
Return ValuesIf you need to return multiple values, return a list or a reference to an array. Avoid the tendency to slip into C mode and make your users pass in output parameters by reference. For example, the hobnob() subroutine sends a message to the BOA satellite and retrieves a response. It has two values to return-a status flag indicating success or failure and the received message. In C mode, it might look like the following: sub hobnob { my ($message, $reply_ref) = @_; my $status = _send_message($message); $$reply_ref = _get_message(); return $status; } It would be called like this: $reply = ""; $status = hobnob("Hello out there!", \$reply); The $reply variable is passed by reference and the retrieved message is filled in. A simpler and more Perl-ish way to do the same thing is to simply return a list of two values: sub hobnob { my ($message) = @_; my $status = _send_message($message); my $reply = _get_message(); return ($status, $reply); } Now the subroutine can be called like this: ($status, $reply) = hobnob("Hello out there!"); This style makes it obvious that both$status and $reply are values returned by the subroutine. Consider allowing your routines to behave differently in list and scalar context using the wantarray() built-in. It's much easier to use a subroutine that knows to return a count of its results in scalar context than to have to assign the results to an array and take its length. This also allows you to mimic the way many Perl built-ins use context to determine their behavior (such as localtime and split). Here's a subroutine that returns all the values currently in a message queue in list context and the number of messages in scalar context:
sub get_messages { if (wantarray) { return @MESSAGES; # return all the messages in list context } else { return $MESSAGE_COUNT; # return the message count in scalar context } }
Using the ExporterMany functional modules will use the Exporter to make their subroutines available in the user's package. This is very convenient, but doing it in the simplistic way presented in the last chapter has some drawbacks. To refresh your memory, the simplest way to use the Exporter is to export everything by default: package BOA::Network; require Exporter; @ISA = qw(Exporter); @EXPORT = qw(open_socket send_message receive_message close_socket start_server stop_server); With this setup it's possible to selectively import just the symbols you need: use BOA::Network qw(open_socket send_message close_socket); But most users of the module will take the path of least resistance and import everything:
use BOA::Network; # imports everything in @BOA::Network::EXPORT The practice of exporting everything by default is known as namespace pollution and it has a justifiably bad name for a number of reasons. If a group of modules are all exporting symbols by default, there's a good chance some of the symbols will conflict. Even worse, upgrading a module that exports everything by default can suddenly cause client code to fail by exporting a new symbol that causes a conflict. Exporting everything by default also makes deciphering code more difficult. For example, imagine you've been given the task of debugging this code: use Some::Module; use Some::Other::Module; use Yet::Another::Module; some_call('...'); If you're trying to figure out why some_call() is failing, you'll first have to search through each used module to determine where some_call() is being imported from. Contrast that to this case: use Some::Module qw(some_call some_other_call); use Some::Other::Module qw(foo bar); use Yet::Another::Module qw(BIF BAZ); some_call('...'); Now it's immediately obvious that some_call() is being imported from Some::Module. Fortunately the Exporter comes equipped with an alternative to @EXPORT that can be used to enforce the preferred explicit importing. Just change @EXPORT to @EXPORT_OK and modules will have to declare their imports explicitly. For example, if BOA::Network is changed to use @EXPORT_OK as follows: package BOA::Network; require Exporter; @ISA = qw(Exporter); @EXPORT_OK = qw(open_socket send_message receive_message close_socket start_server stop_server); then client code will have to list their imports explicitly. Using a module that exports with @EXPORT_OK won't trigger any unwanted namespace pollution. The Exporter also supports a more advanced mechanism for managing your exported symbols: tags. By setting up export tags, you create shortcuts to importing a group of symbols. This is particularly helpful for large modules with many symbols to export. For example, here's a version of BOA::Network that sets up three tags- all, client, and server: package BOA::Network; require Exporter; @ISA = qw(Exporter); @EXPORT_OK = qw(open_socket send_message receive_message close_socket start_server stop_server); %EXPORT_TAGS = ( all => [ @EXPORT_OK ], client => [ qw(open_socket send_message close_socket) ], server => [ qw(start_server receive_message stop_server) ], ); Now a user of the module can use a tag when they use BOA::Network and automatically pull in a set of symbols: use BOA::Network qw(:client); It's worth noting that using %EXPORT_TAGS has many of the same problems that using @EXPORT does. Debugging is just as difficult without an obvious source for each symbol, and an upgrade that adds a symbol to an existing tag can cause unexpected collisions. As a general rule, you should use @EXPORT_OK whenever you can and only resort to %EXPORT_TAGS for truly large modules.
Object-Oriented InterfacesObject-oriented design is a large topic with many encyclopedic tomes dedicated to it. This section will give you an introduction to some of the more useful techniques that you can use to improve your OO module design.
Inheritance or CompositionDetermining when and how to use inheritance is perhaps the hardest job in object-oriented interface design. Inheritance is a powerful tool-it can open up new avenues of extensibility for your users and allow you to reduce code size by exploiting polymorphism. On the other hand, inheritance can serve to greatly increase the complexity of otherwise simple designs. The classic rule is deceptively simple-inheritance relationships should be used when classes exhibit an "is a" relationship. This is easy to demonstrate using real-world classes, Shape and Square being the usual examples. Since an object of the Square class "is a" Shape, inheritance is the right choice. Shape will naturally provide an area() method, and Square can inherit from Shape and provide an implementation of area() that uses Square's height and width attributes. However, in the real world things tend to be a less clear-cut. Often there's no independent standard to judge whether an "is a" relationship applies. Does your brand new CGI::MailForm class enjoy an "is a" relationship with the CGI module? That's hard to know-it could or maybe it just "has a" CGI object. The latter possibility is known as composition, and the classic rule is that the classes in question should share a "has a" relationship. The principal difference between inheritance and composition is the degree of coupling between the classes involved. Using inheritance, the objects are the same-they share the same underlying data structure. As a practical matter, this means that the child class needs to know intimate details about the implementation of the parent class: Does it use a hash underneath, what convention can be used to stake out a private namespace within the object, and so on. If the parent class changes its implementation, it could break child classes. Composition, on the other hand, is a loose coupling. The two classes remain distinct, and their objects do not share the same underlying data structure. This loose coupling can also be exposed to the user by allowing the user to initialize the contained object directly. This is a powerful technique since it lets users access methods in the contained object without requiring an inheritance relationship. That said, composition usually requires more code to implement. Classes using composition can approximate some of the advantages of inheritance by proxying calls to contained objects. This means that the class sets up a method that passes calls through to an equivalent method of a contained object. In this example, the CGI::MailForm class proxies calls to the param() method in the contained CGI object: package CGI::MailForm; use CGI; # basic constructor sub new { my $pkg = shift; my $self = { query => CGI->new() }; bless($self, $pkg); } # the proxying param method sub param { my $self = shift; return $self->{query}->param(@_); } 1; Contrast this with an implementation using inheritance: package CGI::MailForm; use CGI; @ISA = qw(CGI); In both cases users of the module can use the param() method: my $mailForm = CGI::MailForm->new(); $mailForm->param(foo => 'bar'); Composition also has the advantage of scaling better than inheritance. An object that contains five other objects of various types is no harder to write than one that contains one object. In contrast, doing five-way multiple inheritance is probably grounds for commission to a mental facility. If you are going to use inheritance, keep it simple. Having worked on a Perl project with an inheritance hierarchy over six levels deep, I can safely state that here be dragons . Deep inheritance hierarchies make understanding the behavior of a particular class very difficult-either documentation is repeated at each level, or readers must perform a tedious search process up the inheritance tree to find the method they're looking for. Even if you don't use inheritance in your module, you should be ready for it. You should design your module with the expectation that some users will use it as a parent class for their creations. At the very least, this means using the two-argument form of bless() and using isa() to check the type of objects rather than ref(). Better yet, document your private methods and object layout so that subclasses can avoid breaking the rules.
Designing a MethodMethods in Perl are subroutines, so all the advice about subroutine design and construction in the section on functional modules applies here. Of course, methods aren't just subroutines; depending on your outlook, they might be messages passed to the object, actions performed by the object, or actions performed on the object. Nailing your metaphors is the key to designing powerful methods. Be consistent and be explicit about your choices in your documentation. Consider, as an example, an object-oriented implementation of the check_mail() function presented previously. To refresh your memory, this function is called as follows: check_mail(imap_sever => $imap_server, username => $username, password => $password, retries => 3); One possible object-oriented approach to this functionality would encapsulate the parameters in attributes of a mail-checking object. For example:
my $checker = MailChecker->new(); # create a new MailChecker object $checker->imap_server($imap_server); # set up attributes $checker->username($username); $checker->password($password); $checker->retries(3); $checker->check(); # check mail This design has a few problems. First, what happens if you call check() before calling imap_server()? Second, this system is considerably more verbose than the functional example. To solve these problems, the constructor should be written to take attributes as parameters: my $checker = MailChecker->new(imap_sever => $imap_server, username => $username, password => $password); $checker->check(); Now new() can be written to require the parameters that don't have sensible defaults. This demonstrates an important goal of OO design-your classes should make it impossible to put an object in an "illegal" state that can only cause problems later.
Method DocumentationMethods need much the same documentation as normal subroutines-return values, parameters, and error handling all need coverage. However, method documentation also needs to cover how the method affects the object it is called on. If a method has side effects on the object, then these need to be spelled out. For example, BOA::Network's send() method keeps statistics about how many bytes have been written and network speed. The documentation for this method would look like this:
=over 4 =item $success = $net->send($msg) The send() method sends $msg along the network connection. Returns true if the send succeeded, false if the send failed. Error details can be retrieved using the error() method after a failure occurs. This method updates the read_bytes and kps attributes. =back If a method has no effect on the object, then this should be documented too. Methods that do not effect the state of the object are called constant methods in the OO texts. Perl doesn't have any syntax for enforcing constant methods, but documenting them can give your users valuable information.
Accessor-MutatorsAccessor-mutators are the bread and butter of object-oriented programming. The ability to examine and change the state of an object is the most basic service that a class can provide. In the last chapter I demonstrated how to provide accessormutators by writing a method for each attribute. When the method has no parameters, it returns the value of the attribute; with one parameter, it sets the value of the attribute. It doesn't take long before writing accessor-mutator methods gets old. Every one is essentially the same. Fortunately, there are a number of better ways to choose from!
Auto-Rolling Your OwnThe basic problem is simple-you have a number of subroutines to generate, and they all do the same thing on different data. Fortunately, Perl is a highly dynamic language, and it's easy to generate new subroutines at runtime. Here's an example that creates a simple accessor-mutator for a set of attributes stored in the package variable @ATTRIBUTES: package BOA::Logger; # initialize array of attribute names @ATTRIBUTES = qw(filename level format); # create a subroutine for each attribute foreach my $attribute (@ATTRIBUTES) { *$attribute = sub { my $self = shift; $self->{$attribute} = shift if @_; return $self->{$attribute}; } } This block of code works by assigning a closure to a symbol-table entry with the same name as the attribute. After this code runs, there will be three new methods available in the BOA::Logger package-filename(), level(), and format(). If you needed to add a new attribute to the package, it would be a simple matter of adding it to @ATTRIBUTES. Another way to accomplish the same effect is to use AUTOLOAD(). When you call a method on an object that doesn't exist in the object's class or any parent classes, Perl looks to see if the class has a method in it called AUTOLOAD(). If not, Perl will traverse the inheritance hierarchy the same way it does when looking for normal methods. When Perl finds a suitable AUTOLOAD() method, the package global $AUTOLOAD is set to the full name of the method being called, and AUTOLOAD() is called. Here's an example of creating accessor-mutators on demand using AUTOLOAD():
package BOA::Logger; use Carp; # initialize hash of attribute names %ATTRIBUTES = map { $_ => 1 } qw(filename level format); sub AUTOLOAD { return if $AUTOLOAD =~ /DESTROY$/; # skip calls to DESTROY() my ($name) = $AUTOLOAD =~ /([^:]+)$/; # extract method name # check that this is a valid accessor call croak("Unknown method '$AUTOLOAD' called ") unless $ATTRIBUTES{$name}; # create the accessor-mutator and install it as &$name *$name = sub { my $self = shift; $self->{$name} = shift if @_; return $self->{$name}; }; goto &$name; # jump to the new method with the magic goto(&) call } This code is more complicated than just creating all the accessors upfront, but if you have many attributes that are rarely called, it might be more efficient. Notice that AUTOLOAD() will only be called on the first call to each accessor; after that the newly created subroutine is installed and will be called directly. You might be tempted to skip this step and simply do the access directly in the AUTOLOAD() method, but this will slow your module significantly since Perl will spend time checking for the missing method every time the accessor is called. Either of the preceding options is a clean way of auto-generating methods.[8] However, they require you to do some unnecessary work, which no doubt offends your instincts as a Perl programmer. It's unnecessary because there are two excellent modules-Class::Struct and Class::MethodMaker-that use similar techniques but provide a much more convenient interface. As a bonus, they also handle writing those repetitive constructors too!
Using Class::StructClass::Struct[9] exports a single subroutine, struct(), that allows you to build a class skeleton with a single subroutine call. You pass the struct() routine information about your attributes, and it generates and compiles the code for your new class, including a constructor called new() and an accessor-mutator for each attribute. For example, say you're building a class to manage the scientific probes aboard the BOA spacecraft. The BOA::Probe class has a number of attributes that describe an individual probe. Here's what the class file looks like using Class::Struct: package BOA::Probe; use Class::Struct; # create accessors and constructor struct(id => '$', model => '$', contents => '$', heading => '$', status => '$'); The struct() call takes a list of key-value pairs that describe the names of attributes and their types. The preceding class uses the "$" type, which indicates it is scalar. This provides the interface you're familiar with-the accessor-mutator created takes zero or one argument and gets or sets its value. After calling struct(), six new methods are created-one for each of the attributes and a new() method. This new() takes a list of key-value pairs to initialize the contents of the object. Here's an example of how to use the new class:
# create a new probe my $probe = BOA::Probe->new(id => 10503, model => "BOA Mark 10"); # modify heading and status $probe->heading([10, 20, 100, 50]); # heading at (10,20,100) with at 50 kph $probe->status("moving"); Class::Struct supports more than just scalar attributes. You can specify that an attribute will hold an array, a hash, or an object of a specific class. This may seem unnecessary-the scalar attributes can already hold a reference to any of these types-but declaring these type allows Class::Struct to generate more powerful accessors. For example, the preceding code uses the heading attribute to hold a reference to an array. Declaring it as an array creates a more powerful accessor: package BOA::Probe; use Class::Struct; # create accessors and constructor struct(id => '$', model => '$', contents => '$', heading => '@', status => '$'); Now the accessor can accept zero, one, or two parameters. With no parameters, it still returns a reference to the array. One parameter is treated as an index into the array, and the value is returned. With two parameters, the first is an index and the second is the value to be set. So, to reproduce the usage example shown previously, the code would now be as follows: # heading at (10,20,100) at 50 kph $probe->heading(0, 10); $probe->heading(1, 20); $probe->heading(2, 100); $probe->heading(3, 50); The result is that loading an array attribute with values becomes more verbose, but accessing a single index is simpler. For example, compare these two expressions to access the fourth element in the array-the speed of the probe:
${$probe->heading()}[3]; # access when heading is a scalar attribute $probe->heading(3); # access when heading is an array attribute The difference is even more pronounced if you changeheading to be a hash attribute with the keys "x", "y", "z", and "speed". Here's the call to struct: struct(id => '$', model => '$', contents => '$', heading => '%', status => '$'); Now to set values in the hash, a two-argument form of the accessor is used: # heading at (10,20,100) at 50 kph $probe->heading(x => 10); $probe->heading(y => 20); $probe->heading(z => 100); $probe->heading(speed => 50); There are some limitations to using Class::Struct. First, it can't be used to create child classes. Class::Struct goes to some truly amazing lengths to prevent this.[10] Second, if you need to do anything interesting when the constructor gets called, you'll need to write your own new().
Using Class::MethodMakerWhen Class::Struct isn't enough, Class::MethodMaker[11] comes to the rescue. Class::MethodMaker supports all the same functionality as Class::Struct and a whole lot more. Class::MethodMaker can generate a wide variety of accessors that cover not only object methods, but also useful class methods. I'll cover the basic functionality, but you'll need to read the module documentation to discover the more esoteric bits. There's a lot in there! Class::MethodMaker differs from Class::Struct in that you don't just tell it what kind of data you'll be storing in your attributes; you also get to pick what kind of accessor to provide. This also applies to the constructor, which Class::Struct doesn't even let you name! Here's an example of using Class::MethodMaker to generate some simple scalar accessor-mutators and a constructor called new(): package BOA::Probe; use Class::MethodMaker new => 'new', get_set => [ qw(id model contents heading status) ]; Class::MethodMaker works by taking arguments to the use statement in key-value pairs. The key is a method in the Class::MethodMaker module, and the value is either a single string or a reference to an array of strings. These strings are the names of the methods to be created. After the preceding call, the eleven methods are created-two for each of the five attributes given for the get_set key and new(). The two methods created for each get_set attribute are a normal accessormutator for the attribute and a method to clear the attribute called clear_id(), clear_model(), and so on. This extra method is unnecessary, since you can always call $obj->id(undef) to clear the value of an attribute. Fortunately, Class::MethodMaker is highly configurable. Here's a few variations on the default get_set:
package BOA::Probe; use Class::MethodMaker new => 'new', get_set => 'id', # creates id() and clear_id() get_set => [ -noclear => 'model' ], # creates just model() ala Class::Struct get_set => [ -java =>[("Contents", # creates getContents() and setContents() "Heading")] # creates getHeading() and setHeading() ]; You can also design your own get_set method templates, but I won't go into the syntax here. Suffice it to say that if you have an accessor-mutator scheme in mind, Class::MethodMaker can save you the trouble of coding it. Similar flexibility is available for the generated constructor. When using Class::Struct, doing anything at all during object creation requires you to replace the generated new() method. Class::MethodMaker has a more elegant solution:
package BOA::Probe; use Class::MethodMaker new_with_init => 'new', get_set => [ qw(id model contents heading status) ]; # called from the generated new() sub init { my $self = shift; croak("Required id parameter missing!") unless @_; $self->id(shift); return $self; } Using new_with_init creates a constructor that calls init() in your module. You receive as arguments the arguments passed to new(). One thing you might want to do with init() is take a list of key-value pairs and assign their values to the named attributes. With Class::MethodMaker you can actually auto-generate a constructor that does this too:
package BOA::Probe; use Class::MethodMaker new_hash_init => 'new', get_set => [ qw(id model contents heading status) ]; Or if you need a call to your own init() and want to accept an initializer hash, you could implement the following:
package BOA::Probe; use Class::MethodMaker new_with_init => 'new', new_hash_init => 'hash_init', get_set => [ qw(id model contents heading status) ]; # called from the generated new() sub init { my $self = shift; $self->hash_init(@_); # do other initialization stuff... } The method generated by new_hash_init is specially designed to be called as both a class method and an object method. Isn't that cool? Class::MethodMaker sports some truly comprehensive support for list and hash attributes, generating common class methods as well as many useful variations on the normal accessor-mutators. To top it all off, Class::MethodMaker can itself be extended using inheritance. For this and more, see the Class::MethodMaker documentation.
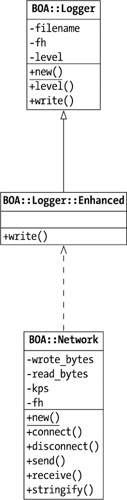
Visual ModelingComplex object-oriented systems are often easier to design visually than textually. The Unified Modeling Language (UML)[12] specifies a popular notation for doing visual design of object-oriented systems. There are numerous tools available to aid in the task from simple drawing applications to complex software design tools that generate code (although they rarely support Perl). However, in my experience, these tools are usually unnecessary. Visual modeling done on a whiteboard or on paper is just as valuable as that done on a computer. Seeing your design laid out visually can help clarify your thinking and reveal dangerous complexity problems that aren't apparent from your documentation. The key to using visual modeling successfully is to keep it simple; don't get caught up in trying to represent the entirety of a working system in a diagram. Figure 3-2 shows a simple UML class diagram of a few of the BOA classes I've used as examples earlier. The diagram shows three classes-BOA::Logger, BOA::Logger::Enhanced, and BOA::Network. The items in the top half of the class boxes are the attributes of the class. Under that are the methods, with the class methods underlined. The diagram uses the open arrow to show inheritance between BOA::Logger::Enhanced and BOA::Logger. The dashed arrow from BOA::Network to BOA::Logger::Enhanced says that BOA::Network uses BOA::Logger::Enhanced. If this small introduction piques your interest, I suggest you invest in a good book on the UML[13] and give it a try on your next project.
[5]No need to send me angry e-mail-I know this isn't the best usage of "functional." I'm actually a big fan of LISP, so I know about the real functional programming. See Inline::Guile on CPAN for proof. Here I'm using the word as the opposite of object-oriented in terms of Perl module design.
[6]For object-oriented methods, the noun is usually unnecessary-a well-named object does the trick. For example, $logger->print_log() has no advantages over $logger->print().
[7]aka StudlyCaps
[8]And efficient too-all the generated closures share the same compiled code.
[9]Written by Jim Miner, based on Class::Template by Dean Roehrich. The module is included with Perl.
[10]Class::Struct ties your @ISA to a private class that croaks on STORE()! How rude.
[11]Available on CPAN. Class::MethodMaker was written by Peter Seibel and is being refurbished and maintained by Martyn J. Pierce.
[12]See http://www.uml.org for details.
[13]There are many to choose from, but I've found The Unified Modeling Language User Guide by Booch, Rumbaugh, and Jacobson (Addison-Wesley) to be readable and engaging. | |||||||||||||||||||||||||||||||||
EAN: 2147483647
Pages: 110