The While Loop Case Structure Combination
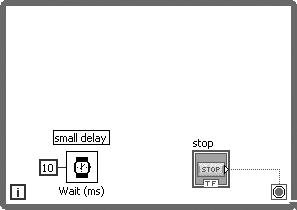
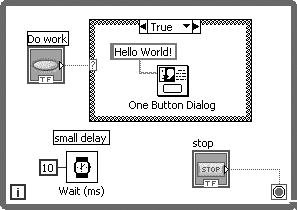
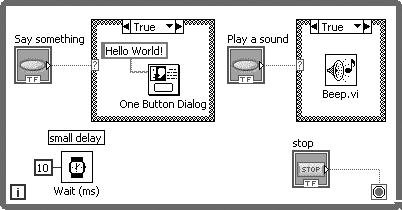
The While Loop + Case Structure CombinationLike most tools, you need a combination of them to build something non-trivial. You can't really build anything with just a hammer or just a saw. But, if you combine the capabilities of these two, you can do some amazing things. Throw in a tape measure and you're unstoppable! LabVIEW structures (our tools, in this case) are the same way. We rarely use them independently. We start with a single While Loop, our high-powered circular saw that keeps spinning until the job is done. Then we drop in a Case Structure (or Event Structure, as we will learn in Chapter 13, "Advanced LabVIEW Structures and Functions"), our high-powered pneumatic nail gun, for nailing down all the cases that our software must handle. Analogies aside, the While Loop + Case Structure combination is a very powerful combination, from which you can build upon to create just about any software application that your mind can imagine. The Main LoopNearly all applications written in LabVIEW will have at least one main loop that will keep looping until the program terminates, due to a stop button press, error, or other exit condition. Figure 6.74 shows an example of a While Loop, along with a standard wait timer (to avoid hogging the CPU) and a stop button. Figure 6.74. Wait (ms) timer used in a While Loop to avoid hogging the CPU To this loop, we add a Case Structure and connect a button called Do work. In the TRUE case of the Case Structure, we place our workfunctions or subVIs that do something useful. Figure 6.75 shows an example of this, which opens a "Hello World" dialog each time the Do work button is pressed. (Note that Do work is configured for Mechanical Action>>Latch When Released, so that it will rebound to FALSE after its terminal is read on the block diagram. This ensures that the dialog only appears once, for every button push.) Figure 6.75. Case Structure inside a While Loop, used to execute work when the user presses a button Spend a minute and let this concept really sink in. This While Loop + Case Structure combination is the key to building software applications in LabVIEW. Handling Multiple Work Items in a While LoopOK, you're ready for the next step. How do you handle multiple buttons? The easy way is to just add more Case Structures (well, it starts out easy, but gets tricky as you add more and more Case Structures), as shown in Figure 6.76. Figure 6.76. Two "work handling" Case Structures inside a While Loop Now we know how to handle multiple work items in our While Loop + Case Structure combinationhandling N work items means that we will need N Case Structures. But what happens when we run out of room on our block diagram? It is easy to see that this "just add another Case Structure" pattern does not scale up past a handful of work items (although we have seen some block diagrams where people have tried to see how far this pattern scales and, believe us, it's not pretty). So, how do we solve this scalability problem? The answer is simple. We need to use a single Case Structure with multiple cases: one case for handling each work item. In order to achieve this, we will need to build a Boolean array of button values and search for the index of the element that is TRUE, as shown in Figure 6.77. (You will learn about arrays in Chapter 7.) In simple terms, we will figure out which button number was pressed and wire this button number into the case selector terminal of the Case Structure. Figure 6.77. One Case Structure with multiple cases handling multiple tasks inside a While Loop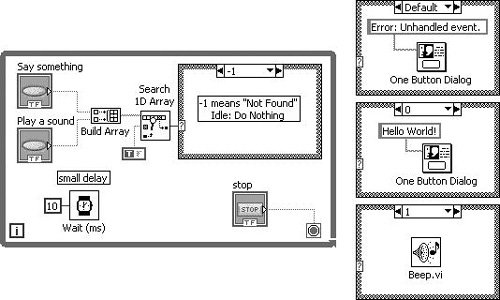
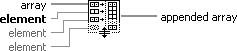
Don't feel the need to understand the array manipulation happening in Figure 6.77. This will make a lot more sense after you learn about arrays in Chapter 7. In this example, Build Array (found on the Programming>>Array palette) converts two Booleans into a 1D array of Booleans (see Figure 6.78). Figure 6.78. Build Array In this example, Search 1D Array (found on the Programming>>Array palette) tells us which button number was pressed (see Figure 6.79):
Figure 6.79. Search 1D Array Now, if we ever want to expand our code, we simply add another button, expand the build array node (add another terminal to the bottom) and wire our button to it, and then add another case for handling the button press. Incidentally, you can run this example if you like. It's in the EVERYONE\CH06 directory on the CD, called While Loop with Case Structure Example.vi.
Note that we put an error message dialog in the Default frame of the Case Structure. This will alert us if we should ever add another button, but forget to add a case to handle it. It is a common practice to use an enum datatype, wired to the case selector terminal, instead of a "plain" I32 numeric. The example is shown in Figure 6.80. Figure 6.80. "Enumerating" Case Structure cases for handling multiple work items in a While Loop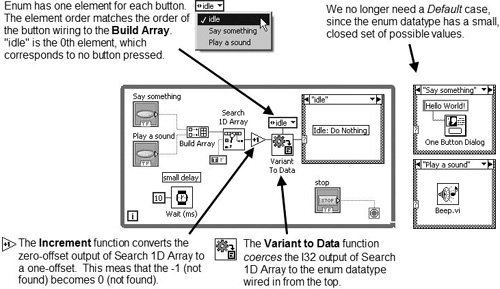
Note that this is using some advanced functions and techniques. Don't feel the need to understand everything shown here. Just make a mental note and then come back once you are ready to review it again.
When adding more work items to a While Loop + Case Structure combination that uses an enum type (as shown in Figure 6.80), you will need to remember to add additional elements to the enum constant before you can add the additional case to the Case Structure. Adding Efficiency: Wait on Front Panel Activity
Wait For Front Panel Activity function Let's take a slight detour away from the Event Structure, for just one moment, to discuss a very simple option for improving the efficiency of a While Loop that polls front panel controls. We can use the Wait For Front Panel Activity function (found on the Programming>>Dialog & User Interface palette) to wait until front panel activity is detected, instead of using the Wait Until Next ms Multiple function to poll the user interface at a periodic interval. Figure 6.81 shows how this simple drop-in replacement significantly improves the performance. With three button presses, the While Loop executes only 13 times (this number will vary, depending on how long you hold down the Do some work? button). Figure 6.81. Wait For Front Panel Activity used in a While Loop to improve efficiency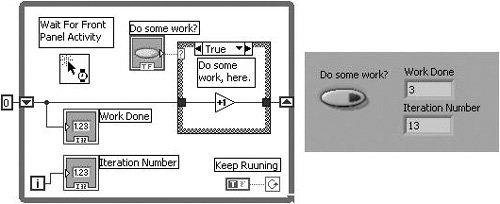 |


EAN: 2147483647
Pages: 294