Pop-Up Menus
| As if pull-down menus didn't give you enough to learn about, we will now discuss the other type of LabVIEW menu: the pop-up menu. You will probably use pop-up menus more often than any other LabVIEW menu. To pop up, position the cursor over the object whose menu you desire; then click the right mouse button on Windows and Linux machines, or hold down the <control> key and click on the Mac. You can also click on the object with the Pop-up tool. A pop-up menu will appear (see Figure 3.64). Figure 3.64. A pop-up menu Virtually every LabVIEW object has a pop-up menu of options and commands. Options available in this pop-up menu depend on the kind of object, and they are different when the VI is in edit mode or run mode. For example, a numeric control will have a very different pop-up menu than a graph indicator. If you pop up on empty space in a front panel or block diagram, you will get the Controls or Functions palette, respectively. You will find that instructions throughout this book guide you to select a command or option from an object pop-up menu, so try popping up now!
How to Pop UpWindows and Linux: right mouse click on the object. Mac: <command>-click on the object. All Platforms: Click on the object with the Pop-up tool. Pop-up menus are ever-present in LabVIEW. They contain most configuration options for an object. So remember, when in doubt about how to do something, try popping up!
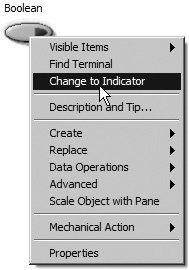
If the Color tool is active, you will see a color palette when you pop up instead of the pop-up menu that appears when other tools are active. Pop-Up Menu Features to Keep in MindMany pop-up menu items expand into submenus called hierarchical menus, denoted by a right arrowhead (see Figure 3.65). Figure 3.65. A pop-up submenu Hierarchical menus sometimes have a selection of mutually exclusive options. The currently selected option is denoted by a check mark for text-displayed options, or surrounded by a box for graphical options. Some menu items pop up dialog boxes containing options for you to configure. Menu items leading to dialog boxes are denoted by ellipses (. . .). Menu items without right arrowheads or ellipses are usually commands that execute immediately upon selection. A command usually appears in verb form, such as Change to Indicator. When selected, some commands are replaced in the menu by their inverse commands. For example, after you choose Change to Indicator, the menu selection becomes Change to Control.
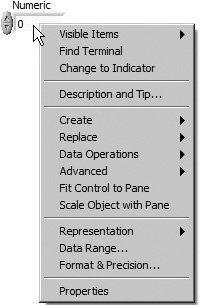
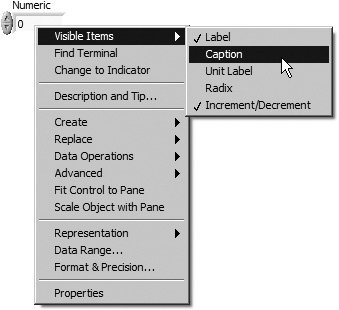
Sometimes different parts of an object have different pop-up menus. For example, if you pop up on an object's label, the menu contains only a Size to Text option. Popping up elsewhere on the object gives you a full menu of options. So if you pop up and don't see the menu you want, try popping up elsewhere on the object. Pop-Up Features DescribedPop-up menus allow you to specify many traits of an object. The following options appear in numerous pop-up menus (for example, the one shown in Figure 3.66), and we thought they were important enough to describe them individually. We'll let you figure out the other options, since we would put you to sleep detailing them all. Feel free to skim over this section and refer back when necessary. Figure 3.66. Pop-up menu of a front panel control Visible ItemsMany items have Visible Items menus with which you can show or hide certain cosmetic features like labels, captions, scrollbars, or wiring terminals. If you select Visible Items, you will get another menu off to the side, listing options of what can be shown (this list varies depending on the object). If an option has a check next to it, that option is currently visible; if it has no check, it is hidden. Release the mouse on an option to toggle its status. Find Terminal and Find Control/IndicatorIf you select Find Terminal from a front panel pop-up menu, LabVIEW will locate and highlight its corresponding block diagram terminal. If you select Find Control/Indicator from a block diagram pop-up menu, LabVIEW will show you its corresponding front panel object. As a short-cut, you can simply double-click a control, indicator, or terminal to obtain the same effecthighlighting its block diagram or front panel counterpart. (But be aware that LabVIEW can be reconfigured to open a control or indicator in the Control Editor when double-clickedyou'll learn more about the Control Editor in Chapter 4.) Change to Control and Change to IndicatorBy selecting Change to Control, you can turn an existing control (an input object) into an indicator (an output object), or vice versa if you select Change to Indicator. When an object is a control, its pop-up menu contains the option to Change to Indicator. When it is an indicator, the pop-up menu reads Change to Control.
Because Change to Control/Indicator is an option in the pop-up menu, it is easy to accidentally select it without realizing what you've done. Controls and indicators are not functionally interchangeable in a block diagram, so the resulting errors may befuddle you. A control terminal in the block diagram has a thicker border than an indicator terminal. Always pay attention to whether your objects are controls or indicators to avoid confusion! Description and TipSelecting this option will allow you to enter a description and a "tip." The description will appear in the Help window for that control, and the tip will show up when you place the mouse cursor over this control (this type of help is sometimes called tool-tip or hesitation help). CreateThe Create option is an easy way for you to create a property node, local variable, or reference for a given object (these advanced topics will be covered in detail in Chapter 13). ReplaceThe Replace option is extremely useful. It gives you access to the Controls or Functions palette (depending on whether you're in the front panel or block diagram) and allows you to replace the object you popped up on with one of your choice. Where possible, wires will remain intact. Data OperationsThe Data Operations pop-up menu has several handy options to let you manipulate the data in a control or indicator:
AdvancedThe Advanced pop-up option gives you access to less-frequently used features that let you fine-tune the appearance and behavior of the control or indicator:
There are some other pop-up options that are specific to different types of controls (numeric, Boolean, etc.), but we'll leave them for later. Don't worry about memorizing all of these features right nowyou'll come across them as you work with LabVIEW, and they'll make a lot more sense!
The same object will have a different pop-up menu in run mode than it will in edit mode. If you cannot find a certain pop-up option, it is either not present for that object, you need to switch modes, or you should pop up elsewhere on the object. PropertiesThe Properties pop-up menu opens a dialog that allows editing of all the properties that are applicable for the object. Sometimes, other pop-up menu options will cause the Properties dialog to open at a specific tab of the Properties dialog. For example, the Format and Precision menu option of a numeric object will open the Format and Precision tab of the Numeric Properties dialog. |


EAN: 2147483647
Pages: 294