| You will build a VI to measure temperature and display it on the waveform chart. This VI will measure the temperature using the Thermometer VI you built as a subVI in a previous lesson. | | 1. | Open a new front panel. You will recreate the panel shown in Figure 8.10 (but feel free not to type in the commentsthey're for your benefit).
Figure 8.10. Front panel of the VI you will create during this activity 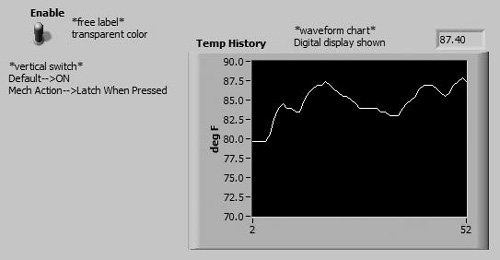
| 2. | Place a vertical switch (Modern>>Boolean palette) in the front panel window. Label the switch Enable. You will use the switch to stop the temperature acquisition.
| | | 3. | Place a waveform chart (Modern>>Graph palette) in the panel window. Label the waveform chart Temp History. The waveform chart will display the temperature in real time.
| 4. | The waveform chart has a digital display that shows the latest value. Pop up on the waveform chart and choose Visible Items>>Digital Display from the pop-up menu.
| 5. | Because the temperature sensor measures room temperature, rescale the waveform chart so you can see the temperature (otherwise, it will be "off the chart"). Using the Labeling tool, double-click on "10" in the waveform chart scale, type 90, and click outside the text area. The click enters the value. You also can press <enter> to input your change to the scale. Change "10" to 70 in the same way.
| | | 6. | Open the block diagram window and build the diagram shown in Figure 8.11.
Figure 8.11. Block diagram of the VI you will create during this activity 
| 7. | Place the While Loop (Programming>>Structures palette) in the block diagram window and size it appropriately. Pop up on the While Loop's Conditional Terminal and select "Continue if True" (by default, it is set to "Stop if True").

Stop if True

Continue if True
| 8. | Place the two terminals inside the While Loop if they aren't ready there.
| | | 9. | Import the Thermometer subVI.

Thermometer.vi
Thermometer.vi. This VI returns one temperature measurement from a temperature sensor (or a simulation, depending on your setup). You should have written it in Chapter 4, "LabVIEW Foundations," and modified it in Chapter 5, "Yet More Foundations." Load it using the Select A VI . . . button on the Functions palette. It should probably be in your MYWORK directory. If you don't have it, you can use Thermometer.vi in the EVERYONE\CH05 directory or Digital Thermometer.vi, located in the <LabVIEW>\Activity folder.
| 10. | Wire the block diagram, as shown in Figure 8.11.
| 11. | Return to the front panel and turn on the vertical switch by clicking on it with the Operating tool. Run the VI.
Remember, the While Loop is an indefinite looping structure. The subdiagram within its border will execute as long as the specified condition is TRUE, because the conditional terminal is set to Continue if True. In this example, as long as the switch is on (TRUE), the Thermometer subVI will return a new measurement and display it on the waveform chart.
| 12. | To stop the acquisition, click on the vertical switch. This action gives the loop conditional terminal a FALSE value and the loop ends.
| | | 13. | The waveform chart has a display buffer that retains a number of points after they have scrolled off the display You can show this scrollbar by popping up on the waveform chart and selecting Visible Items>>Scrollbar from the pop-up menu. You can use the Positioning tool to adjust the scrollbar's size and position.
To scroll through the waveform chart, click on either arrow in the scrollbar.
To clear the display buffer and reset the waveform chart, pop up on the waveform chart and choose Data Operations>>Clear Chart from the pop-up menu. If you want to clear the chart while you're in run mode, select Clear Chart from the runtime pop-up menu.
| 14. | Make sure the switch is TRUE and run the VI again. This time, try changing the update mode of the chart. Pop up and choose Update Mode>>Scope Chart from the chart's runtime menu. Notice the difference in chart display behavior. Now choose Sweep Chart and see what happens.
|
 | Using Mechanical Action of Boolean Switches |
Take a step out of this activity for a second. You've certainly noticed by now that each time you run this VI, you first must turn on the vertical Enable switch before clicking the run button, or the loop will only execute once. You can modify the mechanical action of a Boolean control to change its behavior and circumvent this inconvenience. LabVIEW offers six possible choices for the mechanical action of a Boolean control. 
Switch When Pressed Switch When Pressed action changes the control's value each time you click on the control with the Operating tool. This action is the default for Booleans and is similar to that of a ceiling light switch. It is not affected by how often the VI reads the control. 
Switch When Released Switch When Released action changes the control's value only when you release the mouse button during a mouse click within the graphical boundary of the control. The action is not affected by how often the VI reads the control. This mode is similar to what happens when you click on a check mark in a dialog box; it becomes highlighted but does not change until you release the mouse button. 
Switch Until Released Switch Until Released action changes the control's value when you click on the control. It retains the new value until you release the mouse button, at which time the control reverts to its original value. The action is similar to that of a door buzzer and is not affected by how often the VI reads the control. 
Latch When Pressed Latch When Pressed action changes the control's value when you click on the control. It retains the new value until the VI reads it once, at which point the control reverts to its default value. This action happens whether or not you continue to press the mouse button. Latch When Pressed is similar in functionality to a circuit breaker and is useful when you want the VI to do something only once for each time you set the control, such as to stop a While Loop when you press a STOP button. 
Latch When Released Latch When Released action changes the control's value only after you release the mouse button. When your VI reads the value once, the control reverts to the old value. This action guarantees at least one new value. As with Switch When Released, this mode is similar to the behavior of buttons in a dialog box; the button becomes highlighted when you click on it, and latches a reading when you release the mouse button. 
Latch Until Released Latch Until Released changes the control's value when you click on the control. It retains the value until your VI reads the value once or until you release the mouse button, whichever occurs last. For example, consider a vertical switchits default value is off (FALSE). 15. | Modify the vertical switch in your VI so that you do not need to turn the switch to TRUE each time you run the VI.
Turn the vertical switch to on (TRUE). Pop up on the switch and choose Data Operations>>Make Current Value Default from the pop-up menu to make the on position the default value. Pop up on the switch and choose Mechanical Action>>Latch When Pressed from the pop-up menu.
| 16. | Run the VI. Click on the vertical switch to stop the acquisition. The switch will move to the off position briefly, and then automatically change back to on after the While Loop conditional terminal reads one FALSE value.
|

You cannot use mechanical action on a Boolean object if you will be modifying the object's value using local variables. We'll tell you why when we talk about locals in Chapter 12, "Instrument Control in LabVIEW."
Adding Timing When you run the VI in this activity, the While Loop executes as quickly as possible. You may want to take data at certain intervals, however, such as once per second or once per minute. You can control loop timing using the Wait Until Next ms Multiple function (Programming>>Timing menu). | | 17. | Modify the VI to take a temperature measurement about once every half-second by placing the code segment shown here into the While Loop (see Figure 8.12).
Figure 8.12. Wait Until Next ms Multiple 

Wait Until Next ms Multiple Function
Wait Until Next ms Multiple function (Programming>>Timing menu) ensures that each iteration's start of execution is synchronized to a half-second (500 milliseconds). This function will wait until the millisecond timer's tick count reaches a multiple of the value specified. Note that this behavior is different from the Wait (ms) function, which waits for a specified duration of time to elapse.
| 18. | Run the VI. Run it several more times, trying different values for the number of milliseconds.
| 19. | Save and close the VI. Name it Temperature Monitor.vi and place it in your MYWORK directory or VI library. Excellent job!
|
|