| Test Objective Covered: 6. Install and configure NetStorage. As with iFolder and Samba, the CLE exam objectives specify that you be able to install and configure NetStorage. Just as we've done before, we're only going to touch the installation of NetStorage lightly because most of Chapter 5 was spent discussing NNLS installation procedures. Installing NetStorage The only critical item you need to keep in mind about NetStorage is the fact that it can't be installed alone. If you perform a Custom NNLS installation, you'll notice that there's no option for NetStorage in the component-selection screen. To install NetStorage, you have to install the NNLS Virtual Office component. When NNLS was in its early beta phase, this was not the case. NetStorage could be installed alone. During the mid-beta phase of the product, this was changed, and NetStorage was rolled into the Virtual Office product. I had the opportunity to speak with the NetStorage programmers at the time and asked them why this was done. They explained that it simply was such an integral part of Virtual Office that it made sense for them to merge the two products into a single install. When we cover Virtual Office later in this book, I think you'll agree that this decision makes sense. As with iFolder, if you performed an Express install, NetStorage was installed on your system. If you performed a Custom install, you had the opportunity to select the Virtual Office component for installation. If you didn't select Virtual Office (and hence, NetStorage) during the initial installation of NNLS, you can perform a post-installation by completing the following steps: -
Mount your NNLS ISO image.
-
Run the install.sh script.
-
When prompted, specify a Custom installation.
-
When prompted to select the products to be installed, deselect all products.
-
Select Virtual Office .
-
Finish the installation according to the instructions presented in Chapter 5.
Let's spend the rest of this chapter discussing how to configure NetStorage. Refer back to Figure 8.43 and notice that the only storage available through NetStorage is the user 's iFolder directory and the common shared directory. This is because NetStorage hasn't been configured with Storage Location objects in the eDirectory tree. Configuring Storage To create a Storage Location object, complete the following steps: -
Create the directory in the Linux file system you want NetStorage users to be able to access.
-
Edit your smb.conf file to create a Samba share for the directory created in step 1.
-
Restart your novell-smb service.
-
Open a web browser and navigate to https :// your_server_IP_address /nps/iManager.html.
-
Authenticate as your admin user.
-
Scroll down to the File Access (NetStorage) role and select the Storage Location: Create task. The Storage Locations: Create Object screen appears, as shown in Figure 8.46. Figure 8.46. Creating a Storage Location object. 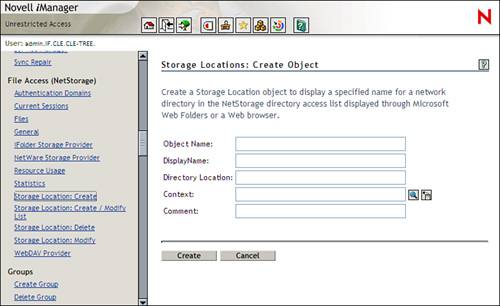 -
In the Object Name field, enter a name for the Storage Location object.
-
In the Display Name field, enter the name for the Storage Location object that you want users to see in NetStorage.
-
In the Directory Location field, enter the location of the directory in the Linux file system. This step trips up a lot of folks the first time they configure a Storage Location object (at least, it tripped me up the first time I tried to create a Storage Location object). The field name makes it sound like you can enter a simple directory path , but nothing is further from the truth. Instead of a path such as /tmp , you have to enter a URL in this field. If you're pointing to a directory on a Linux server, the format for the URL is as follows : cifs:// server_IP_address / Samba_share For example, if your share name is tmp (such as the one we created earlier in this chapter) and your server's IP address is 192.168.1.36, you would enter the following: cifs://192.168.1.36/tmp Tip If you happen to be pointing to a NetWare server, you enter the URL as ncp:// server_IP_address/volume_name/path . -
In the Context field, enter the context where the Storage Location object will reside in the eDirectory tree.
-
Click Create .
-
When prompted that the object was created, click OK .
After you have created all your Storage Location objects, you next need to create Storage Location Lists , which are used to associate Storage Location objects with eDirectory user, group , or container objects. Users associated through such lists will see the storage locations in the list displayed when they authenticate to NetStorage. To create a Storage Location List, complete the following steps: -
In iManager, select the Storage Location: Create/Modify List task under File Access (NetStorage) . The screen shown in Figure 8.47 is displayed. Figure 8.47. Creating a Storage Location List. 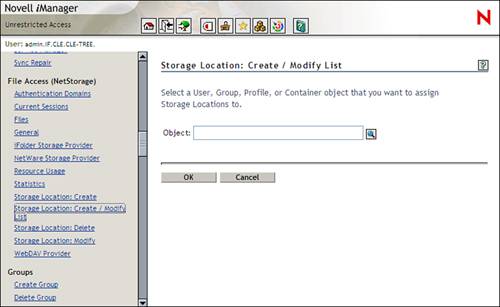 -
In the Object field, browse to and select a user, group, or container object you want to associate with the Storage Location object.
If you select a user object, only that user will have access to the storage location. If you select a group object, all users who are members of the group will have access. If you select a container, all users who reside within the container will have access.
-
Click OK . The screen in Figure 8.48 appears. Figure 8.48. Associating a storage location with a Storage Location List. 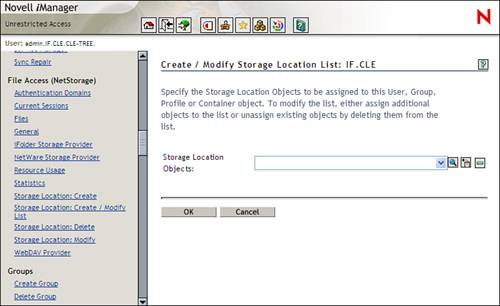 -
In the Storage Location Objects field, browse to and select the Storage Location object(s) you want to associate with the list. You can select multiple objects.
-
Click OK .
-
When prompted that the list has been created, click OK .
At this point, the Samba share is available to NetStorage users who have been associated with the Storage Location List and who are LUM/Samba enabled. Tip A common mistake made on the CLE exam is that candidates forget to LUM/Samba-enable the users who are associated with the Storage Location List.
To access the share through NetStorage, complete the following steps: -
Open a web browser and navigate to https:// your_server_IP_address /NetStorage. The screen in Figure 8.49 appears. Figure 8.49. Authenticating to NetStorage.  -
Authenticate as a user associated with the Storage Location List you created previously. You must use the distinguished name of the user, such as CGrayson.IF.CLE.
-
Click OK .
-
The NetStorage interface appears.
In Figure 8.50, a Storage Location object named Test has been created. This Storage Location object points to the [tmp] share we created in Lab Exercise 8.2. Figure 8.50. Samba share in NetStorage. 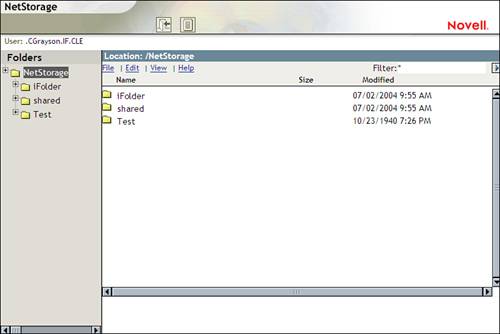
A Storage Location List was created and associated with the Test Storage Location object and with the IF.CLE container in the eDirectory tree. Because CGrayson exists in the IF.CLE container, he has access to the Test Storage Location. Once in NetStorage, you can use the File menu to create a new folder, delete a file or folder, rename a file or folder, upload a file to your NetStorage server, download files, e-mail a file, purge deleted files, undelete a file, archive files, and set file properties. This is shown in Figure 8.51. Figure 8.51. Managing files in NetStorage. 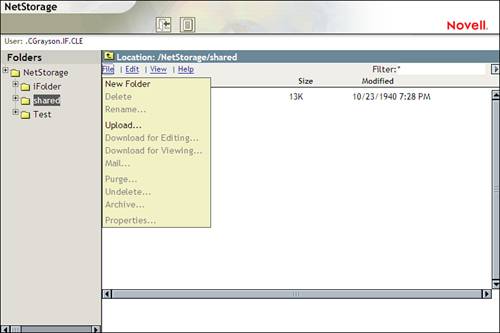
Using the Edit menu, you can move and copy files. This is shown in Figure 8.52. Figure 8.52. Using the Edit menu in NetStorage. 
Using the View menu, you can refresh the NetStorage display and show files that you have deleted. This is shown in Figure 8.53. Figure 8.53. Using the View menu in NetStorage. 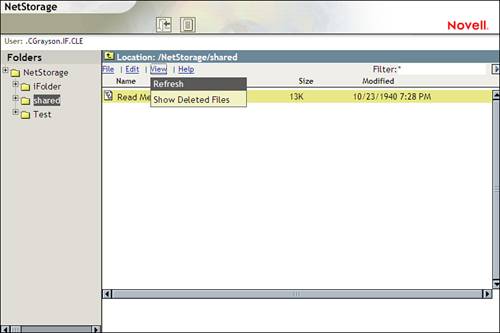
Let's now turn to a discussion of how to configure the NetStorage server itself. Configuring the NetStorage Server Out of the box, the default NetStorage server configuration works perfectly for most implementations . It is unlikely that you will need to actually change any settings. If you do, however, the NetStorage server settings are configured using iManager. To configure NetStorage parameters, do the following: -
Open a web browser and navigate to https:// your_server_IP_address /nps/iManager.html.
-
Authenticate as your admin user.
-
Scroll down to the File Access (NetStorage) role.
-
Choose from the following configuration tasks : -
Authentication Domains ” This task allows you to add eDirectory servers used by NetStorage to authenticate users. By clicking Add Domain , you can add multiple eDirectory servers. This task also allows you to configure the eDirectory contexts serviced by NetStorage. This is shown in Figure 8.54. Figure 8.54. Configuring Authentication Domains. 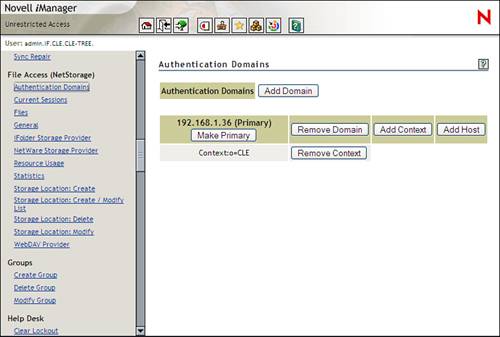
-
Current Sessions ” This task displays a list of users who are currently using NetStorage. A sample report is shown in Figure 8.55. Figure 8.55. Viewing Current Sessions. 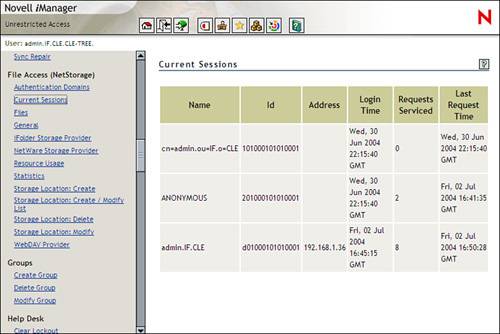
-
General ” This task allows you to configure the NetStorage proxy user, location, security certificate, timeout value, and LDAP port. This screen is shown in Figure 8.56. Figure 8.56. Configuring NetStorage General settings. 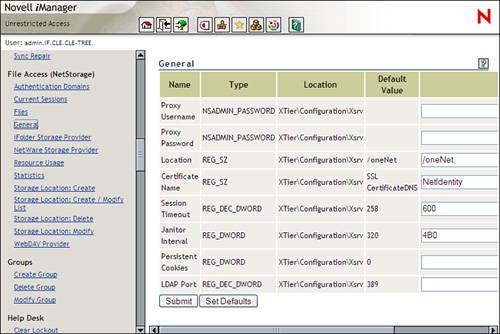
-
iFolder Storage Provider ” This task allows you to configure NetStorage with the IP address of your iFolder server, as shown in Figure 8.57. Figure 8.57. Configuring NetStorage iFolder Provider settings. 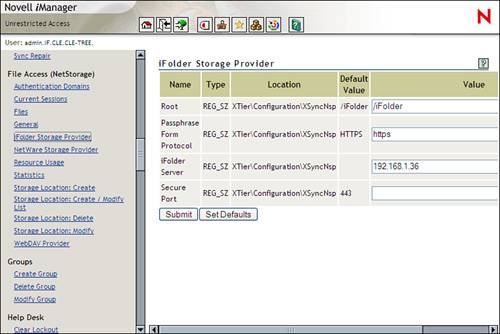
-
Resource Usage ” This task displays a detailed report of resource utilization for the NetStorage server, as shown in Figure 8.58. Figure 8.58. NetStorage Resource Usage. 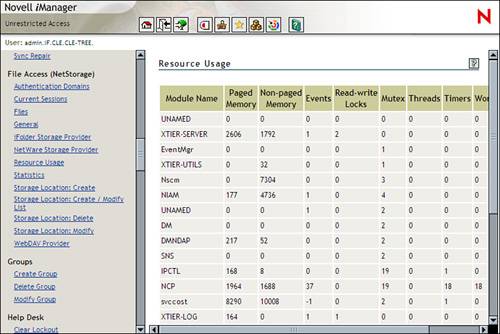
-
Statistics ” This task displays a detailed report of various NetStorage server statistics, as shown in Figure 8.59. Figure 8.59. NetStorage Statistics. 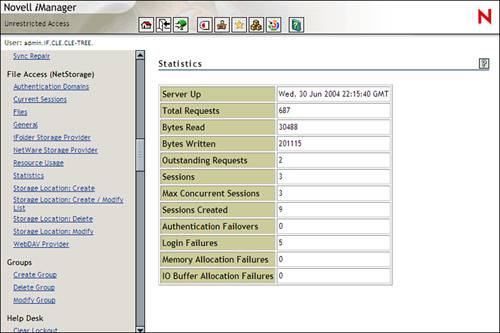
-
If you make any changes, you will need to restart the NNLS Apache web server after saving them. This is done by opening a terminal session and entering /etc/init.d/novell-httpd stop and then entering /etc/init.d/novell-httpd start .
With that, let's spend some hands-on time working with NetStorage. |