Installing and Configuring Samba
| < Day Day Up > |
| Test Objective Covered:
As with preceding NNLS components , the CLE exam objectives specify that you be able to install and configure Samba. Just as we've done before, we're only going to touch the installation of Samba lightly because we spent a great deal of Chapter 5 discussing NNLS installation procedures. Installing SambaAs with iFolder, if you performed an Express install, Samba was installed on your system. If you performed a Custom install, you had the opportunity to select the Samba component for installation. If you didn't select Samba during the initial installation of NNLS, you can perform a post-installation by completing the following steps:
Let's spend the rest of this section discussing how to configure Samba. Configuring SambaIf you've implemented the Open Source version of Samba before, you may be tempted to skip this section and configure this service the same old way you always have. Be aware that the NNLS version of Samba is a little bit different. Because of its eDirectory/LUM integration, the steps for configuring this version are a little bit different. To configure the NNLS version of Samba, you need to do the following:
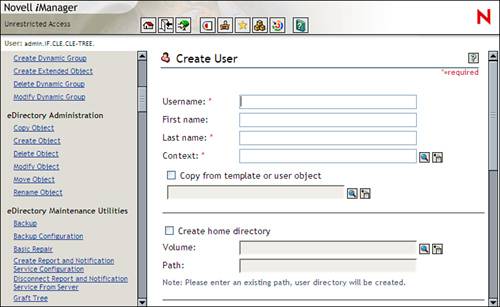
Let's look at each of these tasks . Enabling Samba UsersUnlike the traditional version of Samba, you have to enable the user objects in your eDirectory tree to use Samba. To do this, you must first implement Linux User Management (LUM). We covered LUM in Chapter 6, "Managing User Accounts with eGuide and Linux User Management." Once LUM has been configured, you can LUM-enable and Samba-enable a new user when you create his or her object in the tree. To do this, complete the following steps:
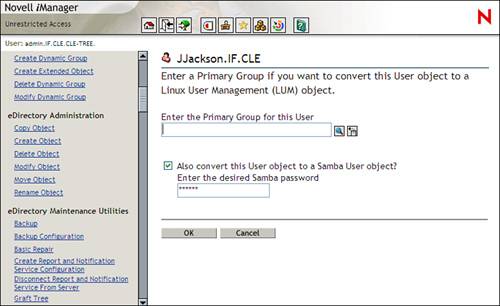
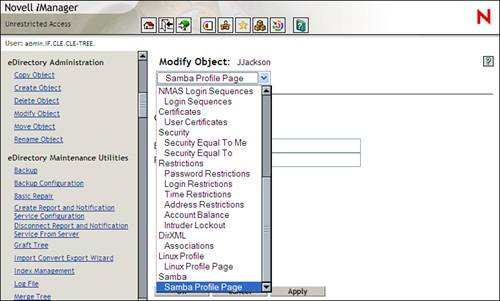
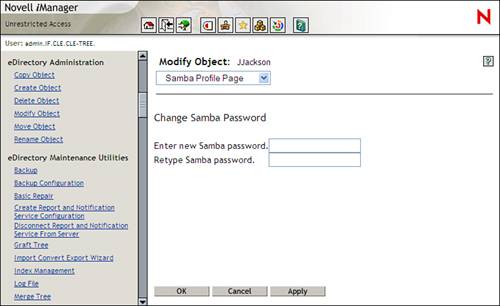
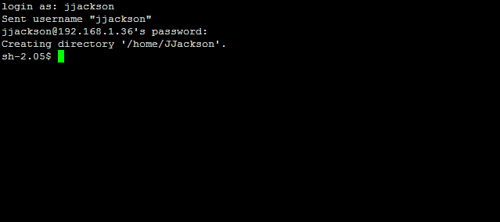
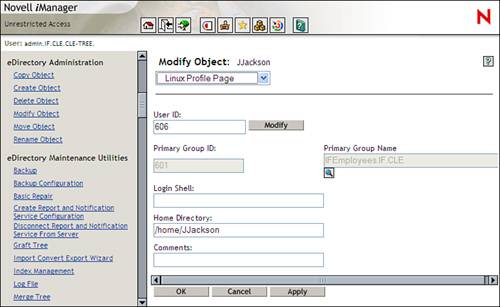
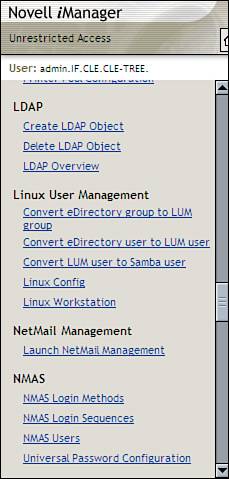
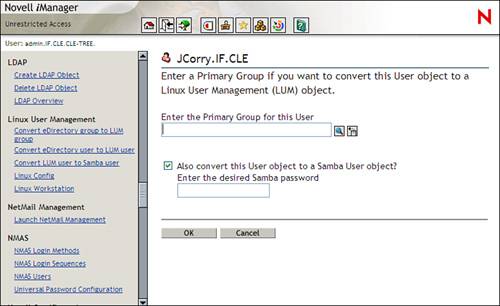
After the object is created, the user has two extra property pages: the Linux Profile Page and the Samba Profile Page. This is shown in Figure 8.34. Figure 8.34. Additional user object property pages. The Samba Profile Page allows you to change the user's Samba password, as shown in Figure 8.35. Figure 8.35. Samba Profile Property Page. Before the user can use Samba, he or she needs to have a home directory created in the Linux server's file system. The easiest way to do this is to simply have the user log in. Recall from Chapter 6 that when a LUM user authenticates to the system, a home directory is created and associated with the user object in the eDirectory tree. In Figure 8.36, the JJackson eDirectory user has used an ssh utility to log in to the Linux server. During authentication, notice that a home directory for the JJackson user object was automatically created in the /home directory. Figure 8.36. Automatic home directory creation. If you check the Linux Profile Page for the user object in iManager after the user has logged in, you will see that the Home Directory attribute has been populated. This is shown in Figure 8.37. Figure 8.37. Home Directory attribute in the Linux Profile Page. You may be asking, "What if I already have users in the eDirectory tree who I want to make Samba users? Do I have to manually re-create each one to Samba-enable them?" Never fear! As with LUM, NNLS includes iManager tasks under the Linux User Management role that will allow you to convert existing users to Samba users. These roles are shown in Figure 8.38. Figure 8.38. Tasks for converting existing users to Samba users. If you have users who aren't currently LUM users, you can use the Convert eDirectory User to LUM User task in iManager to convert a user object to both a LUM user and a Samba user at the same time. If you have users who are currently LUM users but not Samba users, you can use the Convert LUM User to Samba User task. For the purposes of this book, we're going to focus on the former option, converting users to both LUM and Samba users at the same time. To convert existing eDirectory users to LUM and Samba users, complete the following steps:
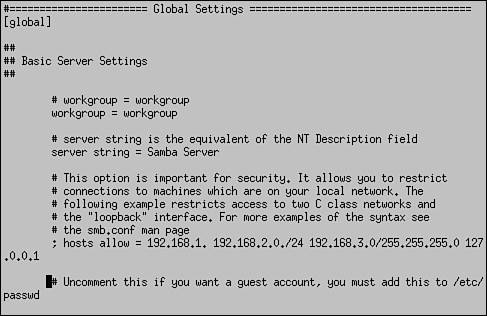
NNLS also includes a version of the smbpasswd utility that you may be familiar with if you've implemented the non-NNLS version of Samba. You can use this utility to set the Samba password for a user object. However, it doesn't convert the user to a LUM/Samba user, nor does it configure LUM attributes. Novell recommends that you use iManager to configure your Samba users instead. Now that your user objects have been converted to Samba users, the next thing we need to do is configure your Samba server. Configuring the Samba Configuration FileAs with most components, the NNLS Samba server is configured with a text file. In this case, the file is the smb.conf file located in /etc/opt/novell/samba . This file is shown in Figure 8.40. Figure 8.40. The smb.conf file If you're familiar with the non-NNLS version of Samba, you know that it is a very powerful product with many advanced configuration options. Entire books have been devoted to this product. For the purposes of the CLE, however, you only need to know how to perform a basic configuration. In essence, you just need to get it up and running. In accordance, we're going to implement a basic configuration in this book. Table 8.1 references the required elements in the smb.conf file that you should become familiar with. Table 8.1. smb.conf Directives
Once your smb.conf file has been edited, you can start the Samba service on your server. Starting the Samba ServiceThe Samba service is started using the novell-smb init script located in /etc/init.d/ (or /etc/rc.d/init.d/ on a Red Hat server). By default, the NNLS installation script configures the Samba server to automatically start at runlevels 3, 4, and 5. Therefore, after editing your smb.conf file, you will actually need to stop the Samba server and then restart it. After doing so, you can open My Network Places (Windows 2000 and XP) or Network Neighborhood (Windows 9x and Me) and browse to your Samba server. Within the server, you should see all the shares you configured in your smb.conf file and be able to map network drives to them. Your workstation thinks it's accessing shared directories on a Windows server. Little does it know that it's actually talking to a Linux server! Let's practice implementing the Samba component of NNLS. |
| < Day Day Up > |
EAN: 2147483647
Pages: 128