Administering eDirectory on Linux
| < Day Day Up > |
| Test Objectives Covered:
There are three main tools you will use to administer eDirectory on Linux:
In this section, we will discuss the basics of each. We will also relate how to perform an eDirectory health check. Command-line UtilitiesOn the Linux platform, eDirectory includes several utilities that can be used from the command line to manage your eDirectory database. A detailed discussion of each utility is beyond the scope of this book. We will use iManager and iMonitor as the primary administration tools, wherever possible. The command-line eDirectory utilities included in NNLS are listed in Table 5.3. Table 5.3. eDirectory Command-Line Utilities
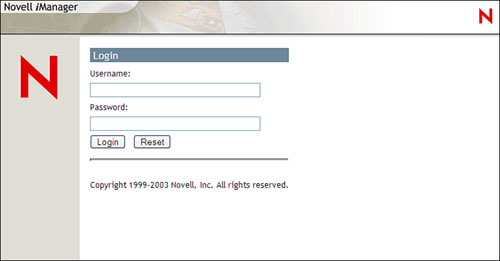
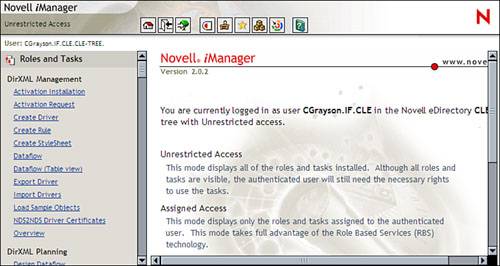
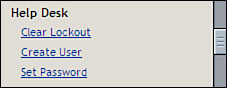
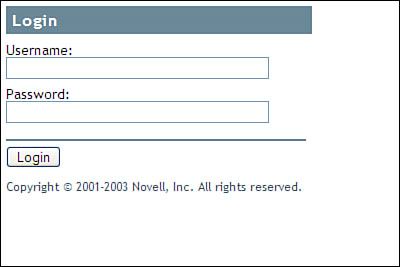
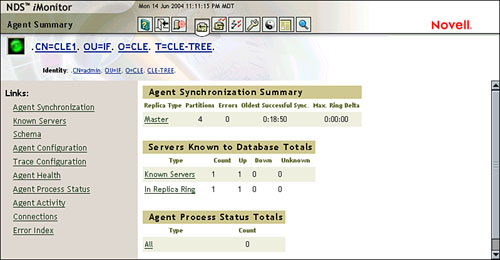
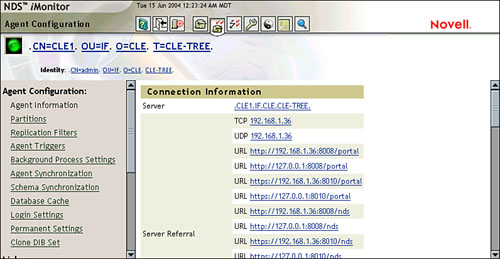
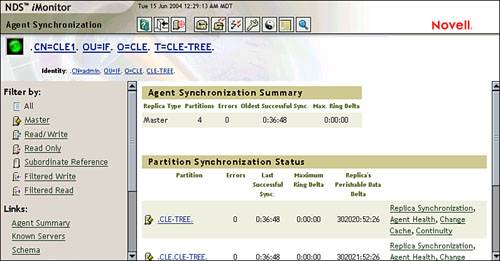
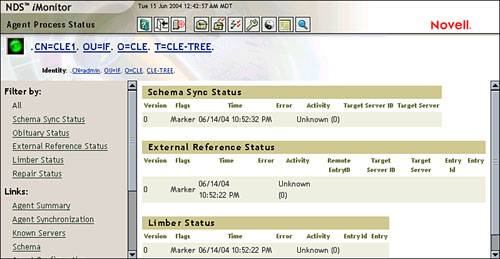
One thing you need to keep in mind when using these utilities is that they are server centric . That is, they only configure the eDirectory service on the local server. If your eDirectory tree is large and has many servers, this may prove to be cumbersome. In this case, you should use iManager and iMonitor. In fact, on your CLE exam, you should do everything you can with iMonitor and iManager first. Only if you can't perform a task with these two utilities should you consider using the command-line utilities. Using iManagerNovell's iManager is a web-based utility that is used to manage your eDirectory tree. We've already used iManager several times in the exercises in this book. iManager is accessed by opening a web browser and accessing http:// your_server_address /nps/iManager.html. When you do, the iManager authentication page is displayed, as shown in Figure 5.38. Figure 5.38. The iManager authentication page. iManager uses eDirectory to control access. The tasks you can perform in iManager are dependent upon the credentials you supply in this page. You should be aware that the iManager uses LDAP to authenticate. If the user you are authenticating as exists in the same context as your server object and your LDAP Server and LDAP group objects, you can simply provide the typeless username. In the preceding exercises, you simply entered admin and were able to authenticate. If you want to use a different user, you must supply the typeful distinguished name of the user using LDAP syntax. For example, if I were Christopher Grayson and wanted to authenticate to the CLE-TREE we just installed, I would enter cn=cgrayson,ou=IF,o=CLE in the Username field. After authenticating, the iManager home page appears, shown in Figure 5.39. Figure 5.39. The iManager home page. Notice that a frame labeled Roles and Tasks is displayed on the left side of the screen. By default, iManager displays all the roles and tasks it has been configured with. The roles are superordinate headings displayed in black text. These are groupings of individual tasks. The tasks are specific jobs you can perform with iManager. They are displayed as links beneath the role headings. If your credentials have insufficient rights in the eDirectory tree to perform a task, a message will be displayed in the right frame when you try to complete it. If you do have the appropriate level of rights, the interface required to complete the task you selected is displayed in the right frame. One of the cool features of iManager is the ability to configure Role-Based Services (RBS). By default, RBS is not configured, hence the reason iManager displays all roles and tasks for all users. If you configure RBS, you can associate specific roles and tasks with specific users. When you do this, the users automatically receive all the rights they will need to accomplish the associated tasks in the eDirectory tree. For example, you can associate a user with the Help Desk role, shown in Figure 5.40. Figure 5.40. The Help Desk role. When the user authenticates to iManager, he or she only sees the Help Desk role in the left frame. The user automatically receives the rights needed to clear intruder lockouts, create users, and set user passwords within the area of the tree you specify. Let's now turn our attention to the last eDirectory management tool we're going to cover in this chapter: iMonitor. Using iMonitoriMonitor has a different purpose than iManager. iManager is primarily designed to manage the tree ”performing day-to-day tasks such as adding users, creating groups, and assigning rights. iMonitor, on the other hand, is designed specifically to monitor and troubleshoot the eDirectory database on the servers in your tree. You can view current eDirectory operations based on servers, partitions, or replicas. iMonitor operates in two different modes: direct mode and proxy mode . Simply speaking, iMonitor is running in direct mode when you are using it to work on the eDirectory database and service on the same server where you are accessing iMonitor. In proxy mode, you access iMonitor on one server in the eDirectory tree and then use it to manage the eDirectory database and service on a different server in the tree. This is a really useful feature of iMonitor. If you were to install your NNLS server into an existing eDirectory tree where servers are installed running older versions of eDirectory or NDS, you can use proxy mode to manage them as well as your NNLS server. To access iMonitor, run a web browser and open https :// your_server_IP_address :8010/nds. When you do, iMonitor displays an authentication screen, as shown in Figure 5.41. Figure 5.41. Authenticating to iMonitor. Unlike in iManager, you authenticate to iMonitor using standard eDirectory naming conventions. For example, if you want to authenticate as the admin user in the tree you installed previously, enter admin.IF.CLE in the Username field. As with iManager, the tasks you can perform within iMonitor are controlled by the rights assigned to the user object you used to authenticate to the tree. Most tasks in iMonitor require that the user object you use have the Supervisor right to the server object. This can be either your tree admin user or another user whom you have granted rights to the server object. After authentication, the iMonitor home page is displayed, as shown in Figure 5.42. Figure 5.42. The iMonitor home page. The iMonitor home page displays a summary of the eDirectory agents on your server. You can quickly view the synchronization status of the replicas in the replica ring as well as the status of the various eDirectory processes running on the server. One of the key roles of iMonitor is to check the health of your eDirectory tree. Let's talk now about how this is done. Performing an eDirectory Health Check with iMonitorAs mentioned earlier, eDirectory uses a distributed, replicated database. The service, as well as the database data, is distributed among the various servers in the tree. For the most part, eDirectory functions flawlessly. Directory information is synchronized around the various replica rings, and eDirectory processes occur on schedule. Certain situations can arise, however, that interfere with the proper functioning of the directory. Any of the following can cause errors to appear in the eDirectory database:
This is only a partial list of the network issues that can cause errors to be introduced into the tree. Fortunately, Novell provides several tools that can be used to fix these errors, with iMonitor being key among them. In this section, we're going to talk about how to use iMonitor to perform an eDirectory health check. You need to understand just how important these health checks are ”a majority of eDirectory problems actually fix themselves if left alone long enough. Experienced eDirectory administrators call this "letting the tree settle down." The phrase "time heals all wounds" is very applicable . Over the years , I've observed many eDirectory administrators jump right in and start trying to manually repair problems in their tree. However, the majority of these problems will fix themselves over time. There are times, however, when manual intervention is necessary. If left alone too long, some eDirectory issues will propagate throughout the tree, causing horrendous problems. What should you do? Run regular eDirectory health checks to make sure everything is functioning as it should. If you have a relatively static eDirectory tree (meaning changes occur in the tree only rarely), you should run a full health check about once or twice a month. If you have a very dynamic tree where changes are made on a frequent basis, you should run health checks much more often ”as much as once or twice a week. You should also run a health check before you perform any major tree operations, such as creating partitions, adding replicas, or adding servers to the tree. Using iMonitor, you do the following to perform a basic eDirectory health check:
You can also perform an advanced eDirectory health check. We're not going to cover this process here because it isn't required to pass the CLE exam and because it requires more eDirectory knowledge and experience than you have at this time. In summary, an advanced health check includes the preceding items and adds the following processes:
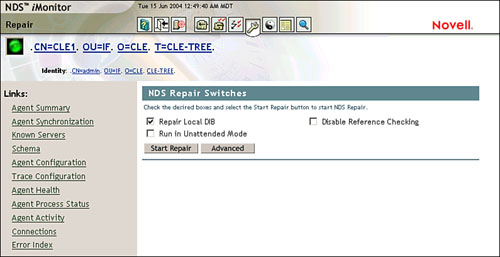
To run a basic health check with iMonitor, complete the following steps:
That's it! If you perform this procedure on a regular basis with your eDirectory tree, you can help ensure that it continues to operate properly. |
| < Day Day Up > |
EAN: 2147483647
Pages: 128