| When you consider the possibilities of data you can share within Flash new business models, technology and user experiences will develop quickly. Consider affecting MovieClip properties on the Flash stage. Every object placed on the Flash stage has an x and y property. The value of these two properties describes the position of the MovieClip registration mark. Storing the values of the x , y properties in a SharedObject would allow you to share that data to every Flash player. You could write ActionScript to have that MovieClip respond to any changes in that data. You would end up with a MovieClip that shares its x,y position with the world. When Computer A moves the object, every Flash player connected would see the object move. Consider sharing text data. The most obvious execution of this is live chat. Let's break down how a chat works. Within a single SharedObject, there might be a property called chatData , which contains the chat's log. Each time a user adds a message, the new message is appended to the chatData property. This will invoke the onSync handler on each client connected to the SharedObject. The Flash Communication Server is really a framework at your command. You can develop any functionality you want. You can have many different versions of a Flash movie interact within the same instance of a Flash Communication Server application. The Flash UI components give you a starting point; you conceive the idea and implement it. Let's step it up a notch by adding a database to this. Let's say you are writing a business application that allows multiple accountants to interact with data through some sort of spreadsheet-type solution. This next exercise will explore the implementation of a custom SharedObject. Using a MovieClip, you will share four properties of that MovieClip among everyone connected. You will also add the Chat UI component, just because you can and it's easy. Exercise 8.2: Implementing the Remote SharedObject In this exercise, you will connect a remote SharedObject to your application. This is your first coding of the SharedObject, so this exercise starts out easy with simple data attributes. This movie will allow multiple people to log in, chat, and collectively modify the properties of a MovieClip on the Flash stage. It is an excellent example to demonstrate the use of the remote SharedObject. Use Figure 8.2 as your layout guide for this exercise. The Maple Leaf is available from the book's web site. Figure 8.2. The final output of this exercise shows three UI components in use with custom scripted SharedObjects. 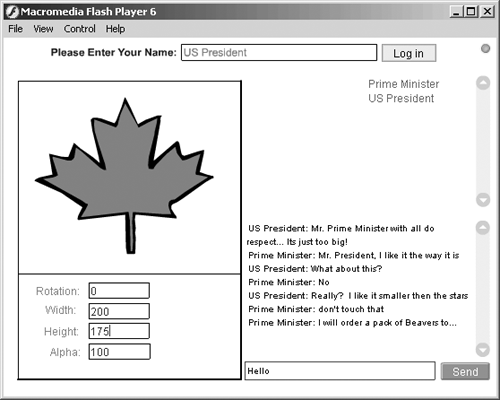 This sample will be built on top of Exercise 8.1 within the mySharedApp application folder. If you did not complete Exercise 8.1, please review it first. -
Open the previous example, WhiteCursor.fla, in Flash MX. -
Save the file as ShareClip.fla in a folder accessible by multiple computers. -
Place a Chat UI component on the Flash stage. With the component selected, give it the instance name of chat_mc. -
Open the ActionScript panel (F9). -
Confirm your ActionScript with Listing 8.2. Listing 8.2 The Existing ActionScript for ShareClip.fla // create a new instance of the NetConnection object myConnection_nc = new NetConnection(); connectionLight_mc.connect(myConnection_nc); // handle any status changes and responses from the server myConnection_nc.onStatus = function(info) { trace("LEVEL: "+info.level+" CODE: "+info.code); }; // connect the application when the Login button is pressed appLogin = function () { // Make the connection to the server myConnection_nc.connect("rtmp://192.168.0.112/mySharedApp/ myInstance", login_txt.  text); // Connect the UI components to the new connection peopleList_mc.connect(myConnection_nc); myChat_mc.connect(myConnection_nc); }; text); // Connect the UI components to the new connection peopleList_mc.connect(myConnection_nc); myChat_mc.connect(myConnection_nc); }; -
Connect the Chat UI component chat_mc below the peopleConnect_mc connection within the appLogin function. -
Test your code using the ActionScript Code Tester (Ctrl+T) or click the checkmark at the top of the panel. If your script has formatting errors, review the output panel (F10) for details. Before continuing, ensure there are no errors reported . When no errors are returned, a dialog box appears as shown in Figure 8.3. Figure 8.3. Using the Test ActionScript feature in Flash MX is a handy way to ensure your code is correct before adding increased functionality.  Step 1: Build the Flash Interface These next steps will build the Flash interface for the exercise. You should already have the three login elements (prompt, input box, and PushButton): the PeopleList, the ConnectionLight, and the Chat UI component on your Flash stage. Use Figure 8.4 as a visual guide to lay out your Flash stage. Here's how to create your interface: Figure 8.4. Lay your Flash stage out in a similar fashion to this figure. 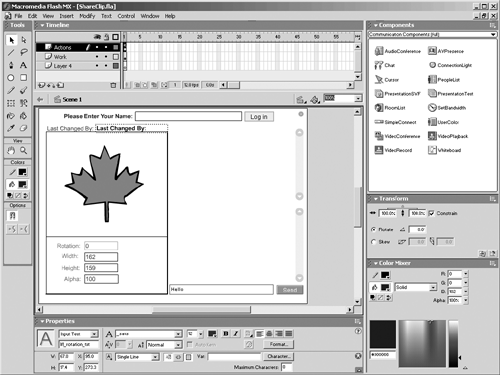 Let's start by first arranging your Flash stage similar to the example in Figure 8.4. -
Create or import a graphic to the Flash stage. This is seen in the figure as a big maple leaf. You can also use the drawing tools to create an object on the stage. Try to size the object similar to the size of the leaf on this stage. -
Select the object and convert it to a MovieClip by pressing F8 or selecting Insert, Convert to Symbol. This allows you to control the object using ActionScript. -
Name the instance of the object leaf1_mc in the Properties panel. Remember, you must have the object selected before you can change its properties. -
Create four static text labels using the Text tool to prompt the user. The labels should read as follows : Rotation: Width: Height: Alpha: -
Create four input text fields using the Text tool. These will be used to allow the user to change the properties of the MovieClip. -
Name the instance of the input fields in the Properties panel as follows: lf1_rotation_mc lf1_width_mc lf1_height_mc lf1_alpha_mc -
Add a border around the MovieClip and the text fields similar to what you see in Figure 8.4. This is not required, but it helps visually separate the screen. Your interface is now complete. Step 2: Set Up the Remote SharedObject Now set up the remote SharedObject. There is a certain sequence of events that you must follow when using SharedObjects. That minimum sequence is as described here: -
Instantiate the NetConnection. -
Connect the NetConnection. -
Instantiate the remote SharedObject. -
Set the name, client, and persistence. -
Connect the SharedObject instance. (This is very important.) -
Overwrite the onSync handler. If you have problems connecting with the remote SharedObject, always return to the preceding list to compare your sequence with this sequence. A common omission is connecting the SharedObject to the NetConnection. This is just like connecting a NetStream with the NetConnection. You must tell the SharedObject where it is coming from. In the preceding sequence, there are no onStatus handlers. I recommend that you include the onStatus handlers after instantiating the NetConnection and the SharedObject objects; however, it is not a required step. The SharedObject in this exercise is instantiated and connected within a new function called initSharedObject . The onSync function also is overwritten within this function. The reason a function is used is because the NetConnection cannot be established until the user logs in. Having these commands within a function allows ActionScript to set up the object after the connection has been made. Let's build the ActionScript to construct the process: -
Create a new function that contains the SharedObject connection and onSync event. Insert the following code after the appLogin function: initSharedObjects = function () { // Place all code in the next steps within this function }; -
Instantiate the remote SharedObject to a local variable using the SharedObject.getRemote() function. This function takes three parameters. The object name as the server and all connected clients will see it. The URI containing the server and application information is where the object will be stored. This is easily captured using the NetConnection property nc.uri(); . The last parameter defines a Boolean value (true or false) for the persistence of the object. If this parameter is not included, its default is set to false. This means the object is a non-persistent or "temporary" object. // // Setup the Remote SharedObject // this.so = SharedObject.getRemote("canShare", myConnection_nc.uri, false); Use the this . reference to ensure it is set to the caller (in this case, the _root ). You could also use a _global setting for the SharedObject variable. -
Connect the SharedObject to the pre-established NetConnection: // Connect the new Remote SharedObject to the NetConnection this.so.connect(myConnection_nc); -
Overwrite the onSync handler. This is exactly the same as overwriting the onStatus handler. This function is called when the server announces a change to any data attributes within this SharedObject. The information object containing the array of objects that need to be synchronized is stored in the info variable: // Setup the Synchronization handler this.so.onSync = function(info) { // place your handler code here // Begin Syncing trace("updated"); }; We are going to stop there and leave the development of the onSync function until we develop the code to write the changed values to the SharedObject. Step 3: Write the Changed Values to SharedObject These next steps will construct the ActionScript required to change the data properties of the SharedObject: -
Add the following code listing below the initSharedObjects() function. This ActionScript is actually one script duplicated four times. You could write a function that would automatically develop these functions, but you will do that in another exercise. Using the text.onChanged event, these functions will respond each time the text input box is modified. This means that the user does not have to press Enter to submit the changed information. When you are finished, you will notice that the MovieClip changes size, rotation, and alpha each time you enter a number. For example, typing the number 100 in the rotation box changes the rotation of the MovieClip to 1, then to 10, then to 100. Each function in the following code is calling a custom function, changeClip() , that hasn't been built yet. The function changeClip takes two parameters: the property to change and the value to change it to: // Rotation Text Input lf1_rotation_txt.onChanged = function() { changeClip("_rotation", lf1_rotation_txt.text); }; // Width Text Input lf1_width_txt.onChanged = function() { changeClip("_width", lf1_width_txt.text); }; // Height Text Input lf1_height_txt.onChanged = function() { changeClip("_height", lf1_height_txt.text); }; // Opacity Text Input lf1_alpha_txt.onChanged = function() { changeClip("_alpha", lf1_alpha_txt.text); }; -
Create the changeClip function. This function has two roles. First, it writes the updated MovieClip properties to the remote SharedObject, and then it updates the MovieClip on the Flash stage: // This method will handle the onChanged events and will dynamically // set the property of the object locally. It will then update the SharedObject // changeClip = function (property, new_value) { this.so.data[property] = new_value; leaf1_mc[property] = new_value; trace("property: "+property+" value: "+leaf1_mc[property]); }; What's leaf1_mc[property]? The ActionScript leaf1_mc[property] may be an unfamiliar style of setting a MovieClip property. You look at this and ask yourself, "Why didn't we use Flash's setProperty method?" as in the following line of code: setProperty(myMovieClip,_rotation,50); The immediate answer is that Macromedia will be deprecating the setProperty and getProperty functions. They still work, but are left over from previous versions of ActionScript. The real reason they are used is that setProperty() wouldn't work. In our situation, the property value must be dynamic, and the setProperty() method does not support dynamic property names . This alternative accomplishes the exact same thing, but allows us to pass the property as a variable. setProperty is included in Flash MX primarily for backwards compatibility when it was introduced in Flash 4. This line of code achieves the same thing as the getProperty method; however, here we can substitute the property with a dynamic variable: myMovieClip["_rotation"] = 50; Most people are familiar with the dot syntax. The same command could be given like this, but this format also does not support dynamic assignment of the property: myMovieClip._rotation = 50; In modern Flash applications, you should resist using the getProperty or setProperty methods and go with either the dot syntax or the bracketed, "key" syntax. Any function will add additional CPU cycles, plus these alternatives offer more flexibility. For example, with the bracket syntax, you can make the property a variable by replacing the string value with an ActionScript variable type. This is a clever little helper that saves you a lot of ActionScript coding. It receives two parameters from the onChange handler you coded in the previous step for each text box. The first parameter is the name of the property to change, the second is the value to change it to. Writing to the remote SharedObject is pretty straight forward. In this case, we are using the name of the MovieClip property ( _rotation , _height , _width , and _alpha ) as new attributes of the data property. You can say that our SharedObject has four attributes; each attribute is of type number. Simply writing to the SharedObject invokes the server to announce the changes to all connected clients, invoking their onSync handlers. There will be more discussed about this after the exercise. Step 4: Finish the onSync Handler Let's build the onSync handler for this SharedObject. The following code ultimately is placed within an array loop to handle multiple attributes being synchronized. This code also is placed within a challenge (IF statement) of the code parameter, but for now, you do not place that in and only synchronize the first object in the array: -
Access the name parameter of the code object in the first array position. The array of objects was passed into the info variable. To access the first position of the array, use info[0] . Access the parameter of the object by name, in this case name . This value provides the name of the attribute that was changed: // transfer the name of the changed attribute to the var "property" var property = info[0].name; -
Access the data element stored in the property variable set in the previous step: // transfer the value of the changed property to the var "newValue" var newValue = this.data[property]; -
Change the property of the MovieClip, leaf1_mc , to the synchronized value. Notice how we use the name of the attribute as the property name. Doing this saves a couple lines of code, plus it will save some bandwidth: // Sync the MovieClip property(_rotate, _width, _height or _alpha) leaf1_mc[ property ] = newValue; -
Set the value of the input box to the new synchronized value. Again, this must be done a special way so that one line of code could set any one of four possible text input boxes. This was strategic planning in the earlier decision to name these text boxes relevant to the properties they are changing: // Update the input boxes with the sync value _root[""lf1""+property+""_txt""].text = newValue; Step 5: Call the initSharedObject() Function This section will call the initSharedObject() function when the user logs in: -
Move the cursor into the appLogin() function. -
Add the following line to call the SharedObject just before the closing curly bracket at the end of the function: initSharedObjects(); At this point, your code is ready to be tested . It is not yet complete; however, to keep the exercise simple, go ahead and test it now to demonstrate how it is working. You can test this application on a single computer running multiple windows of the same application. You might find it fun, however, to open the application on multiple computers. Give a friend a call, and if possible, have him access the application from outside your network. In preparing this example, our testing environment included five people from all over the planet. Each participant was able to test manipulating the leaf at the same time. Step 6: Refine the Synchronization Process The final step to this whole process is refining the synchronizing process. Right now, only the attribute mentioned in the first object will be synchronized. You must develop a loop to run through each object in the array. It was mentioned earlier that you need to handle the code parameter for each object in the array. So, inside the array loop challenge the code property using a simple IF statement, or in Listing 8.3, using the Switch/Case method. The entire block of code currently in the onSync handler is code that should only be executed when the code value equals "change" . Listing 8.3 is a great prototype for you to handle all of your onSync events in any of your applications. Using the Switch/Case condition is a developer-friendly way (easier to read) to handle a long IF/ELSE method. Replace the entire onSync function you wrote with this one. Take note that the actual code you wrote hasn't been altered , it has only been placed within the case when the value of code is "change" . Having this code in place allows your applications to disconnect and become synchronized when they reconnect . It also handles bandwidth more efficiently and does not update the stage where the changes originated. Listing 8.3 Handling the onSync Event this.so.onSync = function(info) { trace("Syncronizing Data"); // // Use this structure as a prototype for your onSync Handlers. // Loop through the Array of Objects using the IN operator // for (name in info) { trace("[sync] Reading Array Object #"+name+" code ("+info[name].code+", "+info[name].name+")"); // // ::: The following switch handles the code values returned by the object // Place Code Here switch (info[name].code) { case " change " : trace("::Synchronize data changed from outside the Flash Player"); var property = info[0].name; var newValue = this.data[property]; leaf1_mc[property] = newValue; _root[""lf1""+property+""_txt""].text = newValue; break; case " success " : trace("::Handle a successful change of server data from this player"); // Place Code Here break; case " reject " : trace("::Handle a rejected SharedObject write operation"); // Place Code Here break; case " clear " : trace("::Handle an initialization of the SharedObject"); // Place Code Here break; case " delete " : trace("::Handle deleted Attributes"); // Place Code Here } // ::: End the Switch, continue Looping through the Information Object } // ::: Complete the onSync Handler }; Note A listing of the full ActionScript is available on the web site mentioned at the beginning of this book.
Testing your movie within the Flash MX environment lets you see any trace activity in the output window. In Figure 8.5, the output window is showing a reconnect to the application. You can see the player looping through the array handling three objects. Two objects describe the change in the _width and _rotation attributes, and one object has sent a clear command. Figure 8.5. The Flash MX output window displays your trace output. This is a handy tool for debugging, but it's not the only one. Flash MX ships with an interactive Debugger. Chapter 12, "Client-Side (Flash) ActionScript," will review the use of that debugger. 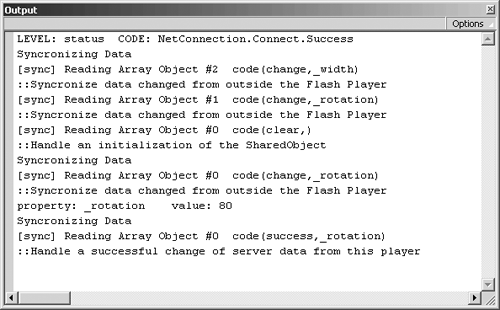 This output window is also showing that a remote player has made a change to the _rotation attribute, and this player has reset its _rotation property to the new value of 80. You can also see that this player has made a successful change to the _rotation attribute, and it was broadcast to every connected player. This is a great exercise to help you understand how the Flash Communication Server handles synchronization. Because this framework is so open, you can build very powerful communication applications that can share extremely complex and confidential information. For some advanced implementations of this technique, be sure to read some of the tutorials at the end of this book. In particular, review Chapter 17, "Making Faces: The Living Emoticon." The next section will describe the idea behind a slot as it relates to the SharedObject.data attributes. |