| When it comes right down to it, the easiest way to build a Photo Album page is directly from iPhoto. You can simply select the photos you want to publish from an iPhoto library and click one button to start the process. You can, of course, use the Photo Album style from the .Mac HomePage styles, but you'll first need to upload all of the photos to your iDisk's Pictures folder. However, when you create your Photo Albums with iPhoto, iPhoto does all the work for you, so why go through all the extra trouble? One thing to keep in mind when uploading a Photo Album from iPhoto is that the maximum number of photos you can load on a page is 48. If there are too many photos in the iPhoto Library you want to post, you should look for a way to split them up into separate pages and then group those pages together from the .Mac HomePage page. To create a Photo Album page from iPhoto, follow these steps: -
Launch iPhoto by clicking on its icon in the Dock, or by double-clicking its icon in the Finder ( /Applications ). -
If you want to use all of the images in one of the Photo Albums you've created in iPhoto, simply select the name of the Photo Album in the left column and proceed to the next step. However, if you want only to use a few of the photos in the Photo Album, select the name of the Photo Album and then  -click on the images you want to use. You'll know that a photo has been selected when it has a light blue border around it. In the left column, select the iPhoto Library that contains the photos you want to publish on your .Mac HomePage, as shown in Figure 7-21. -click on the images you want to use. You'll know that a photo has been selected when it has a light blue border around it. In the left column, select the iPhoto Library that contains the photos you want to publish on your .Mac HomePage, as shown in Figure 7-21. Figure 7-21. Select the iPhoto library that contains the photos you want to use for your Photo Album page. 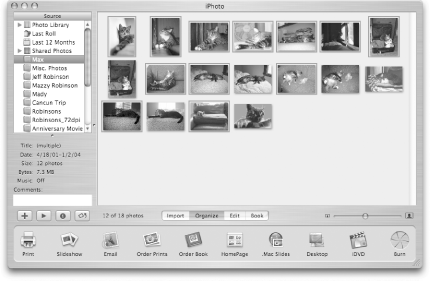
-
When you've selected the photos you want to use in your Photo Album, click on the HomePage button at the bottom of iPhoto's window. After clicking the HomePage button, iPhoto connects to your iDisk to prepare for storing the Photo Album page there, and then opens the window, shown in Figure 7-22. Figure 7-22. Building the Photo Album page in iPhoto. 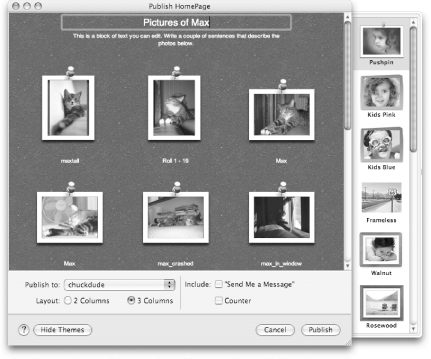
-
As you can see from Figure 7-22, you can click and edit any of the text fields that will appear on the page, select a theme from the drawer on the right of the window, select layout options (two or three columns ), and opt to include an email link and page counter. By default, the captions beneath the photos use the text from the image's filename; just double-click on the filename to select all of its text, and then type in something new. When you're done editing everything, your page should look similar to that shown in Figure 7-23. Figure 7-23. Your near-finished Photo Album page. 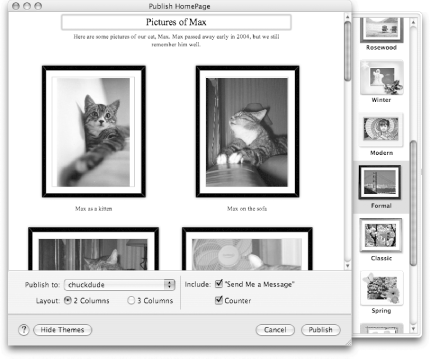
-
Click on the Publish button to publish your photos to your iDisk's Pictures folder and to create the Photo Album page. When iPhoto is finished building the Photo Album page, it displays the message shown in Figure 7-24, which conveniently includes a link to take you to the page you just created. Figure 7-24. iPhoto's work is done; now all you need to do is visit the page. 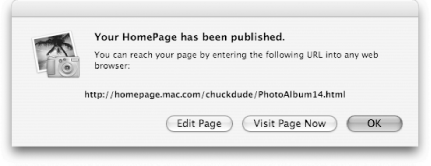
If you click on either the View Page Now or OK buttons (shown in Figure 7-24), the page-building window shown in Figure 7-23 closes . At the basic level, you're done, but there's more you can do with your Photo Album page, if you so choose. For example, you can go to the .Mac HomePage site and edit the Site Menu page to rearrange the placement of the Photo Album, or you can edit the page itself to change its theme or to add or remove photos. First let's add the new Photo Album to the Site Menu: -
Go to the .Mac HomePage site (http://www.mac.com/homepage). -
In the Pages column, select the name of your Site Menu page (with me, it's named Home). -
Click on the Edit button beneath the Pages column. -
Review the page, and if everything looks as it should, click on the Preview icon. -
Click on the Publish button to republish your .Mac site's Site Menu page. Now let's run through the process of changing the theme for your Photo Album. You don't have to if you don't want to, but keep in mind that the HomePage tool offers a few more themes, so you have lots more options to choose from. Just follow these steps to change the theme for a Photo Album page: -
Go to the .Mac HomePage site (http://www.mac.com/homepage). -
In the Pages column, select the name of the Photo Album page that you want to change the theme of (in this case, it's Pictures of Max). -
Click on the Edit button beneath the Pages column. -
When the Photo Album page opens, you'll notice some changes in the toolbar near the top of the window (shown in Figure 7-25). Figure 7-25. When editing a Photo Album, you have more options to choose from in the toolbar. 
As you can see from Figure 7-25, you can opt to change the layout from two- to three-columns, in addition to changing themes. For now, though, just click on the Themes icon; when you do, you'll be presented with the complete list of Photo Album themes that the HomePage tools offer, as shown in Figure 7-26. Figure 7-26. Now you can select from one of 23 different themes. 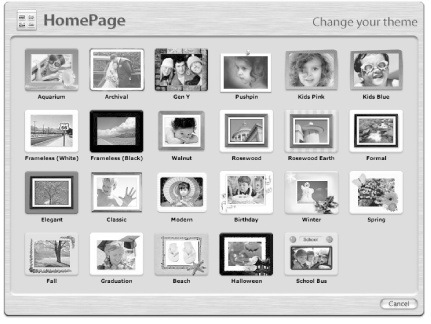
-
When you select the theme you'd like to use (I've chosen Frameless (Black) for this example), the page refreshes, and the new theme is applied to your Photo Album, as shown in Figure 7-27. Figure 7-27. Max's page, with the Black theme applied. 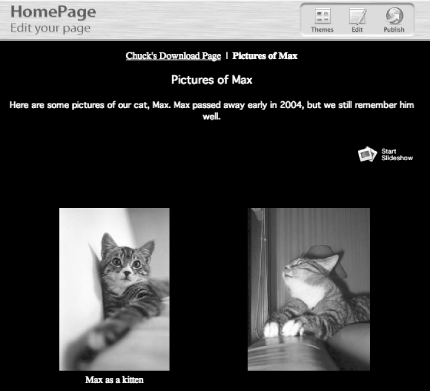
-
Now click on the Publish icon to make the circle complete. You'll be greeted with another screen, similar to the one shown in Figure 7-17, with a link to the Photo Album page, and options to either announce the page or return to the HomePage tools page. For now, click on the link to the page and bask in the glory of your newly themed Photo Album. |