3.5 Mounting an iDisk on a Mac OS 9 System

 < Day Day Up > 

Not everyone has access to a Mac OS X system. Lots of people are still waiting for critical software to be carbonized to run on Mac OS X, while others are holding on to their legacy machines because they still function quite nicely . However, as time goes by, legacy Macs running Mac OS 9 are being left in the dust; meanwhile, the .Mac services are moving ahead full- steam .

Fortunately, if you're still clinging on to Mac OS 9, you can use an application called Goliath (http://www.webdav.org/goliath) to access iDisks via WebDAV. Goliath can not only be used to access your own iDisk, but to access the Public folders on other .Mac members ' iDisks as well.

There is a version of Goliath for Mac OS X, but it hasn't been updated recently for Panther. If you decide to download and use the Mac OS X version on Panther, do so at your own risk.


3.5.1 Using Goliath to Connect to an iDisk

To use Goliath to mount your own iDisk on a Mac OS 9 system, follow these steps:

  1. Launch Goliath.

  2. Go to File Open iDisk Connection from the menu bar.


  3. Click on the OK button to mount your iDisk. When Goliath connects to your iDisk, you won't see a disk icon on your Desktop. Instead, you'll only see a window open up, revealing the contents of your iDisk, as shown in Figure 3-17.

Figure 3-17. Goliath, connected to an iDisk.
figs/idm_0317.gif

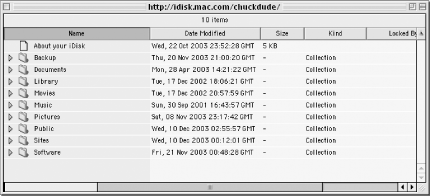
Once connected to your iDisk, you can double-click on folders to open windows , or click on the disclosure triangles to the left of a folder name to reveal its contents. You can drag and drop files and folders into the various iDisk folders as well, just as you could before.

To disconnect from your iDisk, just close the window with figs/command.gif -W.

3.5.2 Using Goliath to Connect to an iDisk Public Folder

To use Goliath to connect to another .Mac member's Public folder, follow these steps:

  1. Select File New Connection ( -N) from the menu bar.

  2. In the window that appears, enter the following information (also shown in Figure 3-18):

    1. In the URL field, type in the address of for the .Mac member's iDisk that you'd like to connect to, using the form of:

      http://idisk.mac.com/ membername -Public

      where membername is the .Mac member name; for example, mine would be http://idisk.mac.com/chuckdude-Public .

    2. Tab down to the User Name field and type in the word public in lowercase letters .

    3. Tab to the Password field. If the .Mac member's iDisk Public folder is password-protected, you should enter the password in this field. If the iDisk Public folder is not password-protected, leave this field blank.

    4. Click on the OK button to make the connection.

Figure 3-18. Connecting to an iDisk Public folder.
figs/idm_0318.gif

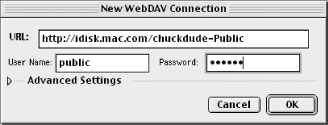
Once Goliath connects, a window pops up showing you the contents of the .Mac member's Public folder, as shown in Figure 3-19.

Figure 3-19. The view of my iDisk's Public folder.
figs/idm_0319.gif

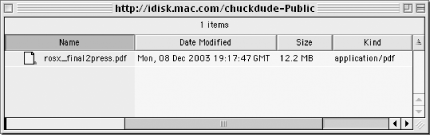
Depending on how the .Mac member has configured their settings, the Public folder will either be read-only or read-write. If the Public folder is read-only, you can download files from the iDisk by dragging them to your Desktop or to another Finder window, but you cannot upload files to the member's iDisk. If the member's Public folder has read-write privileges, you can download and upload files to their iDisk.

By default, all iDisk Public folders are read-only; the .Mac member must enable read-write access in the iDisk preference pane (System Preferences .Mac iDisk) or with the iDisk Utility.

Unfortunately, there is no way for you to find out whether a Public folder is read-only or read-write; you'll have to obtain this information from the .Mac member before you connect.

To unmount an iDisk Public folder from Goliath, simply close the window with figs/command.gif -W.

But What if I'm on a Windows System?

If you're using a PC running Windows XP and need to connect to an iDisk, Apple has ported the iDisk Utility to run on your system. For information on how to obtain, install, and use the iDisk Utility for Windows XP, see Appendix C.

If you are using Windows 98 or Windows 2000, there isn't a separate iDisk Utility for your system; however, Apple provides the following instructions for mounting an iDisk on these systems:

  • If you're using Windows 2000, open My Computer, select Map Network Drive from the Tools menu, and then click "Web folder or FTP site." Enter the following as the location to add: http://idisk.mac.com/ membername (where membername is your .Mac member name). Use your .Mac member name and password for authentication.

  • If you're using Windows 98, open My Computer, double-click the Web Folders icon, and then double-click Add Web Folder. Enter the following as the location to add: http://idisk.mac.com/ membername (where membername is your .Mac member name). Use your .Mac member name and password for authentication.

Unfortunately, if you are using Windows 95 or Windows ME, you cannot mount an iDisk on your computer.


 < Day Day Up > 


Inside .Mac
Inside .Mac
ISBN: 0596005016
EAN: 2147483647
Year: 2004
Pages: 132
Authors: Chuck Toporek

flylib.com © 2008-2017.
If you may any questions please contact us: flylib@qtcs.net