1.3 Configuring Mail
| < Day Day Up > |
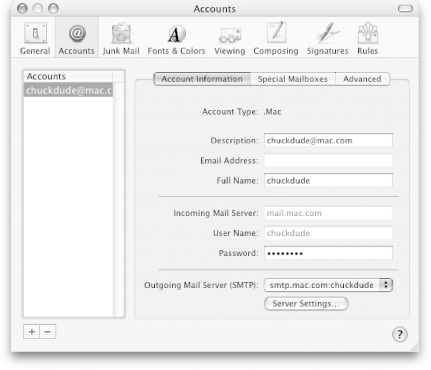
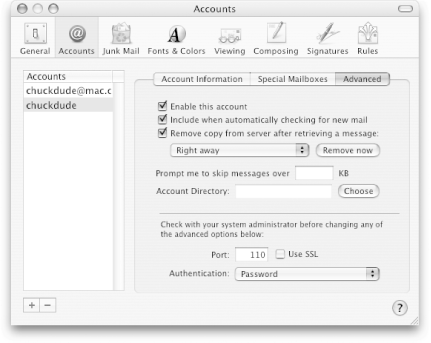
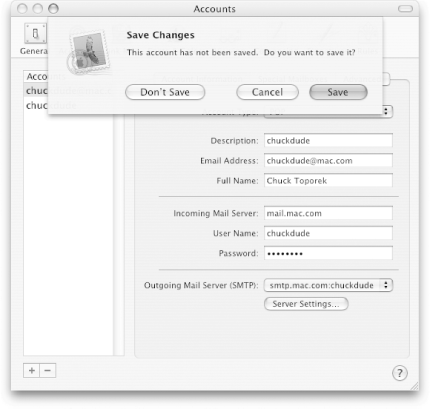
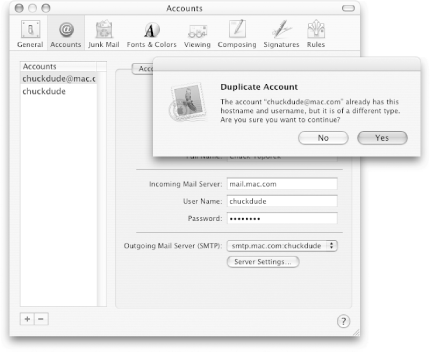
| The information you enter for your .Mac account in the .Mac preference panel (see Figure 1-1) is automatically used by your email client, which by default is set to use Apple's Mail application. This makes it really easy for you to start using your Mac.com email account quickly. To check Mail's settings, launch the Mail application ( /Applications ) and select Mail Figure 1-3. Mail's preference pane.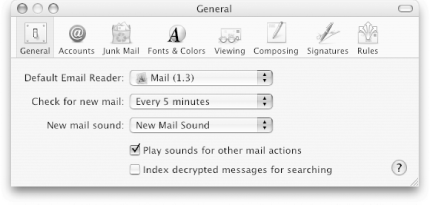 To choose a different email client, click on the pop-up menu next to the heading, Default Email Reader, and choose the Select option. A sheet will slide down from the preference window's titlebar, placing you in the Applications folder, from which you can select another email application. By default, your .Mac email account is configured to use the Internet Mail Access Protocol, or IMAP, for managing your mail on Apple's email server. The use of IMAP means that your email will be stored on Apple's email servers, making it always available to you, either via the Mail application on your Mac or by using an online version of Mail from the Mac.com web site (more on that in Chapter 4). If you use IMAP, you should keep in mind that although you're checking email on your computer, your mail is stored Apple's servers, not on your computer. The advantage to this is that your email won't take up a lot of space on your hard drive. The downside is that you need to be diligent about managing the mail stored online, otherwise , you could lose any incoming mail until you either purchase additional email storage (see later) or delete any unwanted messages. If you decide that you'd rather use POP (Post Office Protocol) to permanently download your .Mac mail to your Mac, there is a way to trick Mail into doing this. Just follow these steps:
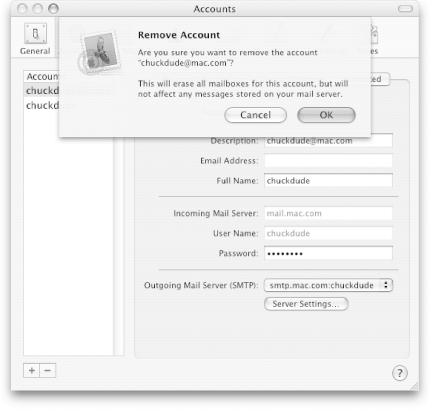
Okay, we're almost there. Now that you've created the POP account in Mail's preferences, it's time to go back and delete the original .Mac email account, which uses IMAP. Remember, the difference between POP and IMAP is that POP will download the mail to your Mac and remove the mail from the server. IMAP downloads a copy of the mail to your Mac, but leaves the messages on the server, where you can view them online using a web browser from any computer anywhere . We'll cover the web-based email in Chapter 4. Now let's get rid of that IMAP account in Mail:
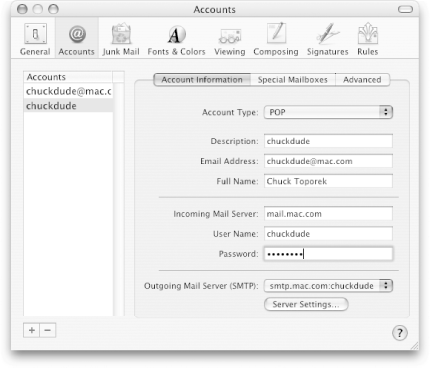
Congratulations, you've just learned how to set up Mail to use POP to access to your .Mac email. After you've deleted the IMAP account, Mail's Accounts preference panel should look similar to Figure 1-10. Figure 1-10. Your new POP account settings for your .Mac email account.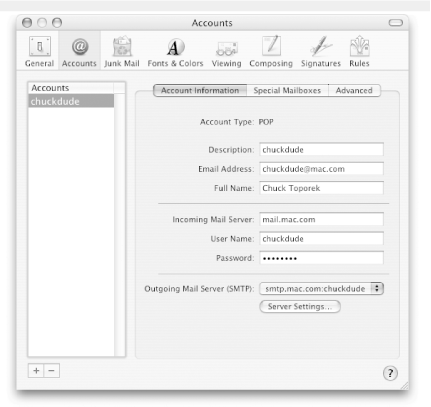 Notice that the Account Type says POP next to it. The advantage to having Mail configured to use POP for your .Mac email is that when you check mail on your Mac, the email will download off the server and will be stored on your Mac's hard drive (stored in ~/Library/Mail ). By downloading the mail from the server, you don't have to worry as much about running over your 15 MB email storage limit on the .Mac server. Another advantage to keeping a local copy of your email is that you can use the Backup application to back up your mail. Also, setting up Mail to use POP for getting at your .Mac email doesn't mean you still can't use IMAP. You can, but just over the Web. If you point Safari (or some other web browser) at http://www.mac.com/webmail, you can log in using your .Mac member name and password and use the web-based Mail service. You can read, send, and manage your email online, and the next time you download mail on your Mac using Mail and the POP account, all of your online email will download to your computer. This makes it possible for you to keep a local copy of your email on your Mac, and still be able to read your email when you're away on business or vacation by most modern web browsers, including Safari, Mozilla, and Internet Explorer. 1.3.1 Purchasing email-only accountsBy default, every .Mac member receives one Mac.com email account. However, if you wish to purchase additional Mac.com email addresses, you can purchase up to 10 additional email accounts for $10 each per year. The email-only accounts you create are assigned 10 MB of email storage space; this is separate from the 15 MB of storage allotted to your main .Mac email address.
To purchase an additional Mac.com email account, go to System Preferences At the top of this page, you will see a section titled Email Accounts, with a drop-down menu that's set to "zero" additional email-only account(s). To purchase an additional email account, click on the drop-down menu and select the number of additional Mac.com email accounts you'd like to purchase, scroll down on the web page ( After verifying or changing your credit card information on the second page, click on the Continue button. After your account information has been verified , you will be taken to a third page, which lets you know how much your credit card will be charged for the additional email account(s). The amount you will be charged for the additional account is prorated for the number of days remaining until your .Mac account is up for renewal. Click on the Buy Now button to complete the transaction. Once the order has been processed , you will see a page that says "Print your information" at the upper right. This page is your "receipt" for the charge to your credit card for the new email account(s) you've purchased. After you print this page (use Next, you'll be taken to a page that says "Your .Mac membership has been successfully upgraded." On that page, you'll see a button labeled Email Account Setup; click on that button to set up the additional email-only accounts. The next page you will see is shown in Figure 1-11. Figure 1-11. Creating a new email-only account.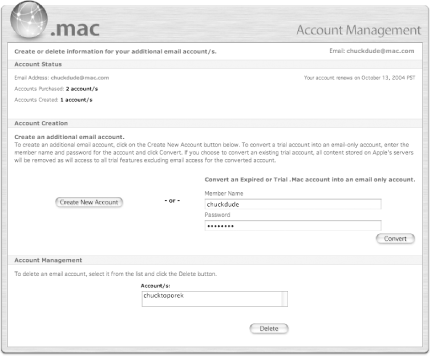 Click on the Create New Account button to be taken to the "Create a new email account" page, shown in Figure 1-12. Figure 1-12. Create an extra email account by filling in the blanks.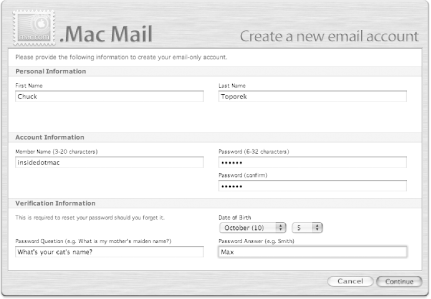 Enter your first and last name in the Personal Information section, and then enter the Account Information in the spaces provided. Enter the Member Name you'd like to use for your alternate Mac.com email account in the space provided. The name you choose here should be different from your main .Mac member name. After entering the desired Member Name, assign a password for the account and confirm it in the space below. Don't forget what we've said about password security. You should choose a password that's both different from your computer's password and from your main .Mac membership. When you've completed entering the information, click on the Continue button.
If the Account Name you've chosen has already been taken (which is highly likely), you will be taken to another page so you can try again. If the Account Name you've chosen is accepted, you will see a page similar to the one shown in Figure 1-13. Figure 1-13. Confirm the new member name for the extra email account.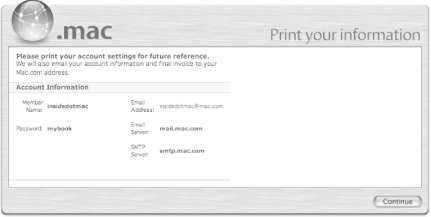 You should print this page and file it in a safe place, since it contains both your .Mac Member Name and Password. (Note, the screen you see shows your password in its entirety. The Password in Figure 1-13 has been replaced with bullets to protect the security of this account.) If you click on the Continue button, you will be taken to the Account management page shown in Figure 1-14. Figure 1-14. The Account management page, showing the primary and any additional email accounts.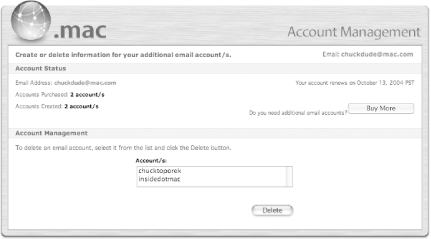 After the new email account has been set up, you will receive an email at your primary .Mac email address, confirming that you've added another email account to your .Mac membership. This email also provides you with the details you need to configure Mail, including:
1.3.1.1 Deleting an extra email accountIf you decide at a later time that you want to delete one of your additional email accounts (you can't delete your primary Mac.com email account without canceling your membership), you can go to the Mac.com site and follow these steps:
Likewise, if you want to change the password for the additional email account, follow the steps detailed here, except click on the Edit button instead of the Delete button. 1.3.1.2 Buying more email storage spaceIf you continue to receive messages from Mac.com telling you that you're running out of email space, you have two options: clean up your online email storage (discussed in Chapter 4), or purchase additional space. To purchase additional email storage space, go to System Preferences After logging in, you will be taken to the "Upgrade storage" page where you can purchase more storage space for your Mac.com email account(s). The cost of additional Email space is detailed in Table 1-2. Table 1-2. Rate chart for additional Email storage space
As with purchasing additional iDisk space, when you purchase additional space for your Mac.com email, you will be charged a prorated amount for the remainder of the current year of your membership. After the current year of your .Mac membership is up, you will incur the full annual charge for the additional space. To purchase additional email storage space, select the desired amount and click on the Upgrade Now button at the bottom of the page. You will be taken to the Billing Information page where you can enter your credit card and contact information. If you decide that you don't want to upgrade your email space, simply click on your browser's Back button and deselect the upgrade option, or close the browser window. To complete the transaction, click on the Buy Now button. |
| < Day Day Up > |
 Preferences (or use its keyboard shortcut,

 ) key to move to the beginning of the filename.