Documents with Attributes If you refer to the class hierarchy shown in Figure 1-1, you'll see that there are two controls, JEditorPane and JTextPane, which we didn't say much about in the previous chapter. JEditorPane is, in fact, a powerful editor that can be fitted with an arbitrary editor kit and a corresponding document class to enable you to view or edit documents that are represented in well-known or proprietary external formats, and that also contains colored text, text in multiple fonts, embedded images, and much more. The other control, JTextPane, is a subclass of JEditorPane that can be used to create multifont and multicolored areas of text under direct program control. Chapter 4 is devoted almost entirely to looking at the facilities provided by JEditorPane and at how you can use it to display Web documents encoded in HTML. JEditorPane and JTextPane rely on the same infrastructure of classes that represent the organization of text and the associated font and color changes that cannot be handled by the simpler text components. In this section, you'll see how the text attributes are specified, using JTextPane as the host component. Attributes, Styles, and Style Contexts The simple PlainDocument class that you saw in the previous chapter is only capable of managing plain text. The more complex text components use a more sophisticated model that implements the styledDocument interface. StyledDocument is a subinterface of Document that contains methods for manipulating attributes that control the way in which the text in the document is displayed. The Swing text package contains a concrete implementation of StyledDocument called DefaultStyledDocument that is used as the model for JTextPane and is also the base class from which more specific models, such as the HTMLDocument class that handles input in HTML format, can be created. To make full use of DefaultStyledDocument and JTextPane, you need to understand how Swing represents and uses attributes. Attributes, Attribute Sets, and Styles In Swing, an attribute is simply a key with an associated value. Usually, the key is an object that contains a String that acts as a human-readable name for the attribute. The value can be an object of any type, but it is typically an object of a type that matches the aspect of the text component that the attribute relates to. For example, an attribute that controls color would naturally have a value of type java.awt.Color. Although in theory the name of an attribute and its value can both be of any type, there is a standard set of attributes that are all recognized by the Swing text components. These attributes, together with the type and meaning of their associated values, are listed in Table 2-1. Attributes that apply at the paragraph level are denoted P and character attributes C. Table 2-1. Standard Text Component Attributes | Name | Value Type | P/C | Meaning | | Alignment | Integer | P | Specifies the text alignment. The value is an Integer derived from one of the following int constants: ALIGN_LEFT, ALIGN_RIGHT, ALIGN_CENTER, ALIGN_JUSTIFED | | Background | Color | C | The background color. | | BidiLevel | Integer | C | Specifies the direction of bidirectional text. | | Bold | Boolean | C | Specifies whether text is to be rendered in bold (value true). | | ComponentAttribute | Component | C | A Component to be rendered inline with the text flow. | | ComposedTextAttribute | AttributedString | C | Includes composed text in the text flow. | | FirstLineIndent | Integer | P | The extra indent to be used for the first line of a paragraph, specified in points. | | FontFamily | String | C | The name of a font family. | | FontSize | Integer | C | The font size, in points. | | Foreground | Color | C | The foreground color. | | IconAttribute | Icon | C | An Icon to be included in the text flow. | | Italic | Boolean | C | Specifies whether text is to be rendered in italics (value true). | | LeftIndent | Integer | P | The size of the left paragraph indent, in points. | | LineSpacing | Integer | P | The amount of extra vertical space to allocate between text lines. | | RightIndent | Integer | P | The size of the right paragraph indent, in points. | | SpaceAbove | Integer | P | The space to leave above a paragraph, in points. | | SpaceBelow | Integer | P | The space to leave below a paragraph, in points. | | StrikeThrough | Boolean | C | Causes a line to be drawn through the text, when true. | | Subscript | Boolean | C | When true, tags the associated text as a subscript, rendering it in a smaller font and in subscript position. | | Superscript | Boolean | C | When true, marks the text as a superscript, rendering it in a smaller font and in superscript position. | | TabSet | TabSet | P | Specifies the tab positions for a range of text. | | Underline | Boolean | C | When true, causes the text to be underlined. | Attribute Sets Although there is a set of standard attributes, there is no single Swing class or interface that represents an attribute. Instead, attributes exist only as members of a collection in a class that implements the AttributeSet interface, which is defined as follows: public interface AttributeSet { public int getAttributeCount(); public Object getAttribute(Object key); public boolean isDefined(Object attrName); public boolean isEqual(AttributeSet attr); public AttributeSet copyAttributes(); public Enumeration getAttributeNames(); public boolean containsAttribute(Object name, Object value); public boolean containsAttributes(AttributeSet attributes); public AttributeSet getResolveParent(); public interface FontAttribute {} public interface ColorAttribute {} public interface CharacterAttribute {} public interface ParagraphAttribute {} public static final Object NameAttribute; public static final Object ResolveAttribute; } Attribute sets, like keymaps, are hierarchical that is, every attribute set can have a resolving parent that can be searched for attributes if they are not found in the original set. This allows attribute sets to be built by taking an existing one and then applying local changes to it by creating a new set and assigning the original one as its resolving parent. The new attribute set would contain only the attributes whose values need to differ from those in the existing set (or which do not exist in the existing set) and does not replicate the complete attribute set. The AttributeSet getResolveParent method returns the resolving parent of a set of attributes. You can get the value of an individual attribute using the getAttribute method. As you can see, this method takes the attribute's name as its argument and returns its value as an Object. To interpret the value, you have to cast it to an object of the correct type. For example, if attrSet is a reference to an AttributeSet, the following code gets the value of the foreground color attribute: Color fgColor = (Color) attrSet.getAttribute(StyleConstants.Foreground); If the attribute set does not contain the foreground color attribute, null is returned. This method looks first in the attribute set itself; if the attribute is not defined there, it looks next in the set's resolving parent. This process continues until the attribute is found or until an attribute set without a resolving parent is reached. Note, however, that not all the methods in the AttributeSet interface look in both the attribute set and its resolving ancestors. Specifically, the following methods look only in the attribute set itself: getAttributeCount getAttributeNames isDefined isEqual The getAttributeCount method counts only the locally defined attributes, while getAttributeNames returns an Enumeration of the names of those same attributes. The isDefined method returns true if the given attribute is defined in the attribute set itself (that is, it would not be necessary to search the resolving parent to find a value for the attribute). Because this does not involve the resolving parent, it is possible for isDefined to return false and getAttribute to return a non-null value for the same attribute. Finally, isEqual returns true if the number of attributes in the set being addressed is the same as the number in the set given as the argument and the attributes in both sets have the same names and the same values. The copyAttributes method returns another attribute set that has the same values as the target set, but whose values will not change. In fact, it is possible for copyAttributes to return the same attribute set as it was given, if that attribute set is immutable you'll see shortly what constitutes a mutable attribute set. The containsAttribute method returns true if the attribute set (or any of its resolving parents) contains the named attribute and the attribute has the given value. Similarly, containsAttributes returns true if all the attributes in the AttributeSet given as its argument are present in the target attribute set and have the same values. An important point to note about this is that the list of attributes to be checked is obtained by invoking getAttributeNames on the set given as the argument, so the attributes in the resolving parent of that set are not considered. The resolving parent of the attribute set to which containsAttributes is applied is used, however, to retrieve values for comparison. The AttributeSet interface defines two attributes of its own, which are used internally. NameAttribute is the name of an attribute, the value of which is considered to be the name of the set of attributes. You'll see how this feature is used in the discussion of styles later in this chapter. ResolveAttribute stores the resolving parent of the attribute set. The fact that these attributes exist should, however, be treated as an implementation detail because there are more portable ways to obtain the same information. For example, the resolving parent of an attribute set can be obtained using the getResolveParent method; that is, both (AttributeSet)attr.getAttribute( AttributeSet.ResolveAttribute) and the preferred alternative attr.getResolveParent() return the same value. AttributeSets with names are usually Styles, which have an explicit method to retrieve the name, as you'll see shortly. AttributeSet also defines four nested interfaces that have no methods. These interfaces are markers that are used to tag the names of attributes that can be used in specific ways. For example, classes that represent the names of attributes that operate at the character level all implement the CharacterAttribute interface. You'll see more about this in the discussion of the StyleConstants class later in this chapter. Mutable Attribute Sets The AttributeSet interface presents a read-only view of a set of attributes because there are no methods that allow you to create new attributes, remove attributes, or change the value of an existing attribute. The MutableAttributeSet interface is an extension of AttributeSet that allows you to change the content of the set or the values of individual attributes. Here is how it is defined: public interface MutableAttributeSet extends AttributeSet { public void addAttribute(Object name, Object value); public void addAttributes(AttributeSet attributes); public void removeAttribute(Object name); public void removeAttributes(Enumeration names); public void removeAttributes (AttributeSet attributes); public void setResolveParent (AttributeSet parent); } The addAttribute method adds a single attribute to a MutableAttributeSet with the special case that if the named attribute is already defined in the target set, its value is just changed to the new supplied value. Similarly, addAttributes adds all the attributes from the AttributeSet given as the argument to the MutableAttributeSet to which it is applied. The removeAttributes methods allow you to remove a collection of attributes that can be specified in three different ways. Finally, the setResolveParent method changes the resolving parent of a MutableAttributeSet. This operation is not present in the AttributeSet interface because it can have the effect of changing which attributes are defined, as well as possibly modifying the apparent values of attributes not defined locally in the attribute set itself. Styles and StyleContexts Although there is a complete implementation of the MutableAttributeSet interface in the SimpleAttributeSet class in the Swing text package, often you won't directly create objects that implement MutableAttributeSet. The most common way to get such an object is to use the StyleContext class to create a Style object. Style is yet another interface, derived from MutableAttributeSet, that adds a couple of extra features of its own. The only implementation of Style in the text package is provided by the class NamedStyle, which is an inner class of StyleContext. Here is the definition of the Style interface: public interface Style extends MutableAttributeSet { public String getName (); public void addChangeListener(ChangeListener l); public void removeChangeListener(ChangeListener l); } Style adds to MutableAttributeSet the ability to associate a name with a set of attributes and to listen for changes to the attributes or their values. The addition of the getName method is really only a cosmetic touch, however, because SimpleAttributeSet defines the name of the attribute that holds the name and MutableAttributeSet allows you to set or read the name via the addAttribute and getAttribute methods; getName is just a convenience method that hides the underlying implementation. The useful thing about a Style is that you can easily obtain a Style from an instance of the StyleContext class, and once you have one you can use it to control the way in which a text component's contents are rendered. Here are the public methods of the StyleContext class: public StyleContext(); public AttributeSet addAttribute(AttributeSet old, name, value); public AttributeSet addAttributes(AttributeSet old, AttributeSet attr); public void addChangeListener(ChangeListener l); public Style addStyle(String name, Style parent); public Color getBackground(AttributeSet attr); public static StyleContext getDefaultStyleContext(); public AttributeSet getEmptySet(); public Font getFont(AttributeSet attr); public Font getFont(String family, int style, int size); public FontMetrics getFontMetrics(Font f); public Color getForeground(AttributeSet attr); public static Object getStaticAttribute(Object key); public static Object getStaticAttributeKey(Object key); public Style getStyle(String nm); public Enumeration getStyleNames(); public void readAttributes(ObjectInputStream in, MutableAttributeSet a); public static void readAttributeSet(ObjectInputStream in, MutableAttributeSet a); public void reclaim(AttributeSet a); public static void registerStaticAttributeKey(Object key); public AttributeSet removeAttribute(AttributeSet old, Object name); public AttributeSet removeAttributes(AttributeSet old, AttributeSet attrs); public AttributeSet removeAttributes(AttributeSet old, Enumeration names); public void removeChangeListener(ChangeListener l); public void removeStyle(String nm); public String toString(); public void writeAttributes(ObjectOutputStream out, AttributeSet a); public static void writeAttributeSet(ObjectOutputStream out, AttributeSet a); StyleContext is essentially a repository for Styles. Let's look at the StyleContext methods that you'll use most often. The other methods are mainly for internal use and won't be discussed here. You can create a new Style using the StyleContext addStyle method, passing a name to be associated with the Style and a resolving parent, either of which can be null. If you pass a null name, then the returned Style is anonymous and can't be found using the getStyle method. If you supply a null resolving parent, the new attribute set will not have a resolving parent from which to fetch attributes that it does not define itself. The name should be unique within the StyleContext that was used to create the Style; if you use the same name a second time, the new Style replaces the original. When a Style is created, it has its name and resolving parent attributes set from the parameters passed to addStyle. If either (or both) of these parameters was null, the corresponding attribute will not be set. As a result, a newly created Style will have zero, one, or two initial attributes in addition, of course, to the attributes that it inherits from its resolving parent, if it has one. Given a name, you can find the corresponding Style using the getStyle method (which returns null if there is no Style with the given name in the StyleContext) and you can list the names of all the Styles in the context that have non-null names using getStyleNames. Finally, you can delete a Style, by name, using removeStyle. The getBackground, getForeground, and the two getFont methods are useful for translating attributes into Abstract Window Toolkit (AWT) resources without having to understand how the attributes are implemented. These methods can also be overridden to change the way in which these same attributes are interpreted. As an example, consider this variant of the getFont method: public Font getFont(AttributeSet attr); The default implementation of this method looks for font characteristics (that is, the font family name, the font size, and the font type) in the given AttributeSet and returns a Font that has these characteristics. By overriding this method, you can arrange for certain changes to be made to the returned Font to suit the style of the particular type of document with which your StyleContext is associated. You might use this, for example, to provide a rough-and-ready way to view a document that doesn't show bold or italic font or reflect changes to the font size, by arranging for the getFont method to always return the same plain font with a fixed font size. This is not, however, the only reason for providing these methods in the StyleContext. Both variants of the getFont method provide a potential performance improvement by caching Fonts, allowing a speedy lookup based on the font's attributes. Inserting Text into a JTextPane Up to this point, the discussion of attributes and Styles has been a little abstract. In this section, you'll see how Styles can be used to change the way in which a text component renders its content. The first example that you'll see demonstrates how to apply a Style to create a heading that stands out from its associated text. To keep things simple, the code in this example will be good enough to create the desired effect, but it won't show you the most effective solution to this particular problem. In the second example, we'll make several improvements and introduce some new concepts that help when you need to create more structured documents or use the same Styles in more than one text component within an application. Creating StyleContexts As you know, to create a Style, you need a StyleContext. There are two ways to create a StyleContext that can be used with a JTextPane. The simplest way to achieve this is just to create a JTextPane: JTextPane pane = new JTextPane (); When you create a JTextPane, it is initialized with a DefaultStyledDocument, which has its own StyleContext. Note that there is no way to get a reference to the StyleContext from a DefaultStyledDocument, so when you directly create the JTextPane, you cannot use the StyleContext addStyle method to add Styles to it. However, JTextPane has a convenience method that allows you to indirectly manipulate the underlying StyleContext without having an explicit reference to it, as does DefaultStyledDocument. Hence, you can create a Style called MyStyle using either the JTextPane addStyle method: Style myStyle = pane.addStyle("MyStyle", null); or the addStyle method of DefaultStyledDocument: DefaultStyledDocument doc = pane.getStyledDocument (); Style myStyle = doc.addStyle("MyStyle", null); If you need a reference to the StyleContext, you will need to explicitly create it, associate it with a DefaultStyledDocument, and then create a JTextPane that uses the DefaultStyledDocument: StyleContext sc = new StyleContext(); DefaultStyledDocument doc = new DefaultStyledDocument(sc); JTextPane pane = new JTextPane(doc); When you use this approach, you can, if you want, arrange to share the same StyleContext between several DefaultStyledDocuments: StyleContext sc = new StyleContext(); JTextPane pane1 = new JTextPane( new DefaultStyledDocument(sc)); JTextPane pane2 = new JTextPane( new DefaultStyledDocument(sc)); The context in this case is shared between the two text panes, so that Styles added to it are available in both DefaultStyledDocuments and in both text panes. If you simply create a JTextPane using its default constructor, however, the DefaultStyledDocument that comes with it has its own, private StyleContext that is not shared. Adding Styles to a StyleContext Having created a StyleContext, your next step is to add some Styles to it. In the first example in this section, the intention is to make a heading stand out from its associated text. To do this, we'll use a Style that produces red text in a bold, 16-point Serif font. Creating the Style is a simple matter. Here's the code: Style heading2Style = sc.addStyle("Heading2", null); This line creates a new Style with the name "Heading2" with no resolving parent. At this point, the new Style does not contain any attributes that would affect any text that it might later be applied to. In fact, all it contains is an attribute recording its name. To achieve the font and color changes needed to produce the desired effects, the following attributes must be added (refer to Table 2-1 for a complete list of the standard attributes): | Foreground color: | Red | | Font Size: | 16 | | Font Family: | Serif | | Bold: | True | Style inherits the addAttribute method from its super-interface MutableAttributeSet. This method can be used to install the required attributes, as follows: heading2Style.addAttribute (StyleConstants.Foreground, Color.red); heading2Style.addAttribute (StyleConstants.FontSize, new Integer (16)); heading2Style.addAttribute (StyleConstants.FontFamily, "serif"); heading2Style.addAttribute (StyleConstants.Bold, new Boolean (true)); At this point, the text pane has a document without any content. The last step is to add the text to the model and then apply the Style to the heading. As you'll see in the next section, there are several ways to add text and attributes to a JTextPane. For now, we'll take the simplest possible approach and add the text and attributes separately. The easiest way to install the text is to use the insertString method of the underlying DefaultStyledDocument, as you saw in the previous chapter: doc.insertstring(0, text, null); The attributes are also added directly to the model, this time using the setParagraphAttributes method of DefaultStyledDocument, which is defined as follows: public void setParagraphAttributes(int offset, int length, AttributeSet attr, boolean replace); Here's the code that applies the Style to the heading: doc.setParagraphAttributes(0, 1, heading2Style, false); You'll see exactly what the arguments to this method mean in the next section. The complete listing of this example is shown in Listing 2-1 and produces the result shown in Figure 2-1. You can try this example by typing the command: Figure 2-1. Using a style to highlight a text heading. java AdvancedSwing.Chapter2.StylesExample1 Listing 2-1 Using a Style package AdvancedSwing.Chapter2; import javax.swing.*; import javax.swing.text.*; import java.awt.*; public class StylesExample1 { public static void main(String[] args) { JFrame f = new JFrame("Styles Example 1"); // Create the StyleContext, the document and the pane StyleContext sc = new StyleContext(); final DefaultStyledDocument doc = new DefaultStyledDocument(sc); JTextPane pane = new JTextPane(doc); // Create and add the style final Style heading2Style = sc.addStyle("Heading2", null); heading2Style.addAttribute(StyleConstants.Foreground, Color.red); heading2Style.addAttribute(StyleConstants.Fontsize, new Integer(16)); heading2Style.addAttribute(StyleConstants.FontFamily, "serif"); heading2Style.addAttribute(StyleConstants.Bold, new Boolean(true)); try { SwingUtilities.invokeAndWait(new Runnable() { public void run() { try { // Add the text to the document doc.insertString(0, text, null); // Finally, apply the style to the heading doc.setParagraphAttributes(0, 1, heading2Style, false); } catch (BadLocationException e) { } } }); } catch (Exception e) { System.out.println("Exception when constructing document:" + e); System.exit(1); } f.getContentPane().add(new JScrollPane(pane)); f.setSize(400, 300); f.setvisible(true); } public static final String text = "Attributes, Styles and Style Contexts\n" + "The simple PlainDocument class that you saw in the previous " + "chapter is only capable of holding text. The more complex text " + "components use a more sophisticated model that implements the " + "StyledDocument interface. StyledDocument is a sub-interface of " + "Document that contains methods for manipulating attributes that " + "control the way in which the text in the document is displayed. " + "The Swing text package contains a concrete implementation of " + "StyledDocument called DefaultStyledDocument that is used as the " + "default model for JTextPane and is also the base class from which " + "more specific models, such as the HTMLDocument class that handles " + "input in HTML format, can be created. In order to make use of " + "DefaultStyledDocument and JTextPane, you need to understand how " + "Swing represents and uses attributes.\n"; } Notice that the code that installs the text and the attributes is not executed directly by the main method; instead, it is run on the event thread. Swing components are not thread-safe and, as a result, you should update them only from the AWT event thread, by arranging for all code that accesses them to be run as the result of an event from the user interface or, as here, using the SwingUtilities invokeAndWait method. However, if you look at the javadoc pages for AbstractDocument and DefaultStyledDocument, you'll see that they say that both insertString and setParagraphAttributes are thread-safe. So why use invokeAndWait here? Strictly speaking, you don't need to go to all that trouble in this simple case. However, it is as well to be careful when updating the text components outside the event thread, because even though some methods are marked as thread-safe, they don't always do what you might expect unless you invoke them from the event thread. In particular, operations that implicitly move the caret don't always work unless you call them from the event thread. For example, if you are using the replaceSelection method of JTextComponent to add several pieces of text one after the other, you only get the correct effect if you invoke it from the event thread, because only then does it move the insertion point to the end of the text you last inserted, which is where it would need to be to add the next chunk. If the caret were not moved, the text would be inserted into the document in the wrong order. To avoid unexpected problems of this kind, it is good practice to use the event thread at all times and the appearance of the extra code in Listing 2-1 is intended to remind you of this. Type-Safe Attribute Handling with StyleConstants When the attributes were added to the heading style in Listing 2-1, a set of name-value pairs were passed to the addAttribute method, which simply installed them in the Style. Because the addAttribute method views both the attribute name and its value as Objects, no checks are performed to verify that the value type matches that of the attribute. For example, the foreground color was set as follows: heading2Style.addAttribute (StyleConstants.Foreground, Color.red); However, we could have incorrectly written the following: heading2Style.addAttribute (StyleConstants.Foreground, new Integer(6)); Although this looks nonsensical, the compiler won't detect any problem with this statement and it won't fail when it is executed either. If you do this, however, you will encounter an exception, but not until the text component is made visible. At this point, the view objects are created and the one that will render the heading will try to get its foreground color from its associated attributes, using the StyleContext getForeground method. This method looks for the StyleConstants.Foreground attribute in the attribute set that it is given and casts the Object that it gets back to a Color. Of course, because the actual value stored was of type Integer, this results in a Class-CastException. To remove the possibility of errors like this, you can make use of a set of static convenience methods defined by the StyleConstants class that make it possible to apply type-checking to the code that sets the predefined attributes at compilation time. StyleConstants also has a similar collection of methods that retrieve the same attributes. The complete set of these methods is shown in Table 2-2. Table 2-2. Convenience Methods to Set and Retrieve Attributes public static int getBidiLevel(AttributeSet a); public static void setBidiLevel(MutableAttributeSet a, int o) public static Component getComponent(AttributeSet a) public static void setComponent(MutableAttributeSet a, Component c ) public static Icon getIcon(AttributeSet a) public static void setIcon(MutableAttributeSet a, Icon c) public static String getFontFamily(AttributeSet a) public static void setFontFamily (MutableAttributeSet a, String family) public static int getFontSize(AttributeSet a) public static void setFontSize(MutableAttributeSet a, int s) public static boolean isBold(AttributeSet a) public static void setBold(MutableAttributeSet a, boolean b) public static boolean isItalic (AttributeSet a) public static void setItalic(MutableAttributeSet a, boolean b) public static boolean isUnderline(AttributeSet a) public static void setUnderline(MutableAttributeSet a, boolean b) public static boolean isStrikeThrough(AttributeSet a) public static void setStrikeThrough(MutableAttributeSet a, boolean b) public static boolean isSuperscript(AttributeSet a) public static void setSuperscript(MutableAttributeSet a, boolean b) public static boolean isSubscript(AttributeSet a) public static void setSubscript(MutableAttributeSet a, boolean b) public static Color getForeground(AttributeSet a) public static void setForeground(MutableAttributeSet a, Color fg) public static Color getBackground(AttributeSet a) public static void setBackground(MutableAttributeSet a, Color fg) public static float getFirstLineIndent(AttributeSet a) public static void setFirstLineIndent(MutableAttributeSet a, float i) public static float getRightIndent(AttributeSet a) public static void setRightIndent(MutableAttributeSet a, float i) public static float getLeftIndent(AttributeSet a) public static void setLeftIndent(MutableAttributeSet a, float i) public static float getLineSpacing(AttributeSet a) public static void setLineSpacing(MutableAttributeSet a, float i) public static float getSpaceAbove(AttributeSet a) public static void setSpaceAbove(MutableAttributeSet a, float i) public static float getSpaceBelow(AttributeSet a) public static void setSpaceBelow(MutableAttributeSet a, float i) public static int getAlignment(AttributeSet a) public static void setAlignment(MutableAttributeSet a, int align) public static TabSet getTabSet(AttributeSet a) public static void setTabSet(MutableAttributeSet a, TabSet tabs) | As well as enforcing compile-time type checking, these methods also make it simpler to set and retrieve attributes whose values can be expressed using primitive types by allowing you to supply the value as a primitive rather than by creating a wrapper object. For example, the FontSize attribute requires an attribute of type Integer, as was shown in Listing 2-1: heading2Style.addAttribute(StyleConstants.FontSize, new Integer(16)); However, the corresponding StyleConstants method allows you to use an int instead: public static void setFontSize(MutableAttributeSet a, int s) and, similarly, the getFontSize method returns an int instead of an Integer. Finally, the example that we saw at the start of this section, namely, heading2Style.addAttribute(StyleConstants.Foreground, Color.red); could be more safely written like this: StyleConstants.setForeground(heading2Style, Color.red); Another advantage you get by using these methods is that the accessors all return a default value if the attribute is not actually defined in the attribute set. The defaults are shown in Table 2-3. If you used the AttributeSet getAttribute method instead, you would have to check whether the return value is null and supply your own default when it is. Instead of directly setting the attributes in the heading style used in Listing 2-1, it is better to use the StyleConstants convenience methods from Table 2-2. Here is how the heading style would be created using these methods: final Style heading2Style = sc.addStyle ("Heading2", null); StyleConstants.setForeground(heading2Style, Color.red); StyleConstants.setFontSize(heading2Style, 16); StyleConstants.setFontFamily(heading2Style, "serif"); StyleConstants.setBold(heading2Style, true); If you look at the source code for the StyleConstants class, you'll see another feature of this class that could be used to provide compile-time and run-time type safety when using attributes. The constant value StyleConstants. Foreground, which represents the name of the foreground color attribute, (see Table 2-1) is defined as follows: public static final Object Foreground = CharacterConstants.Foreground; Table 2-3. Default Attribute Values | Bidi Level | 0 | | Component | null | | Icon | null | | FontFamily | "monospaced" | | FontSize | 12 | | Bold | false | | Italic | false | | Underline | false | | StrikeThrough | false | | Superscript | false | | Subscript | false | | Foreground | Color.black | | Background | Color.black | | FirstLineIndent | 0 | | RightIndent | 0 | | LeftIndent | 0 | | LineSpacing | 0 | | SpaceAbove | 0 | | SpaceBelow | 0 | | Alignment | ALIGN_LEFT | | TabSet | null | The value on the right side of this expression is another constant, declared by CharacterConstants, an inner class of StyleConstants. Here is how this constant is defined: public static class ColorConstants implements AttributeSet.ColorAttribute, AttributeSet.CharacterAttribute { public static final Object Foreground = new ColorConstants("foreground"); // Definitions of other values omitted } From this code extract, you can see that ColorConstants.Foreground is an instance of the ColorConstants class and, therefore, implements the AttributeSet.ColorAttribute interface. Because StyleConstants.Foreground is initialized with this value, it also implements that interface. The same is true of the value StyleConstants.Background. Because of this, it is possible to check at runtime whether a proposed attribute name is valid in a context that expects a color attribute using code like this: Object attributeName = StyleConstants.Foreground; // Initialize if (attributeName instanceof AttributeSet.ColorAttribute) { // It is valid else { // Not a color attribute } If you examine the source code for the StyleConstants class, you'll find that all the attributes listed in Table 2-1 are declared using similar constructions, so they all implement one or more of the four marker interfaces in the AttributeSet interface that you saw earlier in this chapter. Paragraph Attributes, Character Attributes, and Logical Styles In the example you have just seen, attributes were applied to the header text using the setParagraphAttributes method of DefaultStyledDocument. This is one of three methods in the StyledDocument interface that allow you to apply attributes: public void setLogicalStyle(int offset, AttributeSet attrs); public void setParagraphAttributes(int offset, int length, AttributeSet attrs, boolean replace); public void setCharacterAttributes(int offset, int length, AttributeSet attrs, boolean replace); Each of these methods supplies a start offset and a new set of attributes. The last two also have a length argument and a replace flag. The interpretation of the offset and length arguments depend on the method being used. Both setLogicalStyle and setParagraphAttributes work at the paragraph level, where a paragraph is defined as a range of text terminated by a newline character. In the example shown in Listing 2-1, the heading represents one paragraph and the rest of the text is another. When you invoke setLogicalStyle, the operation applies to the whole of the paragraph that contains the specified offset. In the case of setParagraphAttributes, the new attributes are applied to the paragraph that contains the initial offset, the paragraph at offset (offset + length - l) and to every paragraph in between. To apply the Heading2 style to the heading alone, the setParagraphAttributes call in Listing 2-1 specifies a start offset of 0 and a length of 1. Even though the length is given as 1 character, the Heading2 style is applied to the whole paragraph, not just its first character. By contrast, setCharacterAttributes affects only the exact range of offsets specified by its arguments. In the case of Listing 2-1, had the setParagraphAttributes call been replaced by setCharacterAttributes with the same arguments, only the first character of the heading would have been affected. The replace flag indicates whether the supplied attributes should be merged with any existing attributes(when false) or should completely replace them(when true). If, for example, a paragraph already has attributes that specify, say yellow foreground and underlining on, and setParagraphAttributes is invoked with a Style that specifies a red foreground and with replace set to false, the paragraph attributes will change to underlining on and red foreground. If, on the other hand, replace were true, the underlining and foreground attributes would be removed and then the new foreground attributes applied, resulting in red text with no underlining. Attribute Hierarchy The attribute applied by setLogicalStyle, setParagraphAttributes, and setCharacterAttributes form a resolving hierarchy. A logical style is intended to be a broad-brush set of attributes that might apply to an entire document. For example, you might want every paragraph to have the same left and right margins and the same default font. To achieve this, you would set a logical style on the document before adding any text to it. As text is added, new paragraphs inherit the logical style of the preceding paragraph, so these attributes would be propagated through the entire document. Having set the logical style, you can use setParagraphAttributes to add extra attributes to a particular paragraph or to a group of paragraphs, to augment or override the logical style settings for these paragraphs. Finally, you can change the formatting for character ranges within a paragraph(or even across paragraph boundaries)using the setCharacterAttributes method. The hierarchical nature of styles is illustrated by the next example, which improves upon the one shown in Listing 2-1. Here, we're going to use a logical style to set global attributes, a paragraph style to change the way in which the heading is rendered, and character attributes to affect the formatting of individual words. If you look back at Figure 2-1, you'll see that the text starts at the left side of the control and ends at the right edge (at least when word wrapping doesn't force it to end earlier). In this example, a left and right margin are going to be added to introduce some space between the text and the sides of the control. Also, the first line of the paragraph will have extra indentation. These attributes can be thought of as a style that applies to the whole document, not just to the first non-heading paragraph, so it will be applied as a logical style. We'll also take the opportunity to set the font size, style, and family for the whole document in the logical style. Core Note You'll see later that there is more than one way to control the default font and the foreground color for those parts of a document that don't have attributes that explicitly specify them. For now, we'll set them in the logical style.
The heading, as in the first example, will be in a larger, bold font and will be drawn in red. In this example, it will also be arranged so that it starts a little to the left of the text, but not quite up against the left side of the control. This entails overriding the logical style, which would move the heading to the right by the amount of the left margin plus the extra first-line indent, because the heading is a paragraph to which the document's logical style applies. This change will, however, be effective only for the heading. Finally, the text font in Listing 2-1 was a 12-point monospaced font that was selected by default, because no explicit attributes were applied to the text. In this example, we're going to use a 12-point proportional font as the default throughout the document (except in the heading), but we're also going to highlight the words that correspond to Swing class names by using the original monospaced font for those words. To make them stand out even more, they'll also be drawn in green. Because this extra formatting applies to very specific ranges of text, it will be applied as character attributes. The details can be found in Listing 2-2 and the result you can see for yourself using the command java AdvancedSwing.Chapter2.StylesExample2 is shown in Figure 2-2. Figure 2-2. Using logical styles, paragraph, and character attributes. Listing 2-2 A Style Hierarchy package AdvancedSwing.Chapter2; import javax.swing.*; import javax.swing.text.*; import java.awt.*; public class StylesExample2 { public static void main(String[] args) { JFrame f = new JFrame("Styles Example 2"); // Create the StyleContext, the document and the pane StyleContext sc = new StyleContext(); final DefaultStyledDocument doc = new DefaultStyledDocument(sc); JTextPane pane = new JTextPane(doc); // Create and add the main document style Style defaultStyle = sc.getStyle(StyleContext.DEFAULT_STYLE); final Style mainStyle = sc.addStyle("MainStyle", defaultStyle); StyleConstants.setLeftlndent(mainStyle, 16); StyleConstants.setRightlndent(mainStyle, 16); StyleConstants.setFirstLinelndent(mainStyle, 16); StyleConstants.setFontFamily(mainStyle, "serif"); StyleConstants.setFontSize(mainStyle, 12); // Create and add the constant width style final Style cwStyle = sc.addStyle("ConstantWidth", null); StyleConstants.setFontFamily(cwStyle, "monospaced"); StyleConstants.setForeground(cwStyle, Color.green); // Create and add the heading style final Style heading2Style = sc.addStyle("Heading2", null); StyleConstants.setForeground(heading2Style, Color.red); StyleConstants.setFontSize(heading2Style, 16); StyleConstants.setFontFamily(heading2Style, "serif"); StyleConstants.setBold(heading2Style, true); StyleConstants.setLeftIndent(heading2Style, 8); StyleConstants.setFirstLineIndent(heading2Style, 0); try { SwingUtilities.invokeAndWait(new Runnable() { public void run() { try { // Set the logical style doc.setLogicalStyle(0, mainStyle); // Add the text to the document doc.insertString(0, text, null); // Apply the character attributes doc.setCharacterAttributes(49, 13, cwStyle, false); doc.setCharacterAttributes(223, 14, cwStyle, false); doc.setCharacterAttributes(249, 14, cwStyle, false); doc.setCharacterAttributes(286, 8, cwStyle, false); doc.setCharacterAttributes(475, 14, cwStyle, false); doc.setCharacterAttributes(497, 21, cwStyle, false); doc.setCharacterAttributes(557, 9, cwStyle, false); doc.setCharacterAttributes(639, 12, cwStyle, false); doc.setCharacterAttributes(733, 21, cwStyle, false); doc.setCharacterAttributes(759, 9, cwStyle, false); // Finally, apply the style to the heading doc.setParagraphAttributes(0, 1, heading2Style, false); } catch (BadLocationException e) { } } }); } catch (Exception e) { System.out.println("Exception when constructing document: " + e); System.exit(1); } f.getContentPane().add(new JScrollPane(pane)); f.setSize(400, 300); f.setVisible(true); } public static final String text = "Attributes, Styles and Style Contexts\n" + "The simple PlainDocument class that you saw in the previous " + "chapter is only capable of holding text. The more complex text " + "components use a more sophisticated model that implements the " + "StyledDocument interface. StyledDocument is a subinterface of " + "Document that contains methods for manipulating attributes that " + "control the way in which the text in the document is displayed. " + "The Swing text package contains a concrete implementation of " + "StyledDocument called DefaultStyledDocument that is used as the " + "default model for JTextPane and is also the base class from which " + "more specific models, such as the HTMLDocument class that handles " + "input in HTML format, can be created. In order to make use of " + "DefaultStyledDocument and JTextPane, you need to understand how " + "Swing represents and uses attributes.\n"; } The first style to be created is the logical style that will apply to the whole document, which contains global settings for the font, the left and right paragraph margins, and the extra indentation for the first line of each paragraph. Notice how this style is actually created: Style defaultStyle = sc.getStyle(StyleContext.DEFAULT_STYLE); final Style mainStyle = sc.addStyle("MainStyle", defaultStyle); Every StyleContext is initially created with a single empty Style called the default style installed in it. If you need only one style and you don't want to create your own, you can simply apply the attributes you want to the default style. As you'll see in "The Default Style", the default style has special significance for documents that don't apply their own logical style. The global logical style that will be applied to this document has the default style of its resolving parent. Because this example doesn't add any attributes to the default style, it won't affect the way in which the text in this example is rendered; you'll see the benefit of using the default style as the resolving parent of a global logical style in "The Default Style". Because the logical style is applied before any text is added, it will be propagated to every paragraph in the document, even though logical styles apply only at the paragraph level. This would not happen if you added the text and then set the logical style for the first paragraph, however. Such a change would apply the logical style only to the first paragraph. Next, the character style that will be applied to Swing class names in the main text is created. We want these words to be green and to be drawn in the same font size as the other words in the text, but with a monospaced type face, so this Style has explicit settings for the foreground color and font family. Notice that it does not specify values for the font size or the bold and italic attributes that also have an effect on font selection. These attributes would be inherited from the paragraph style that this style will override. Finally, the heading style is created. The code here is very similar to that shown in Listing 2-1, except that it now uses the StyleConstants convenience methods for type safety (and improved readability) and sets two extra attributes that control the left margin and the first-line indentation. Having created the attributes, the next step is to apply them to the text. The logical style is applied first, so that it affects all of the text, as noted earlier. After adding the text, paragraph attributes are applied to the heading and finally character attributes are added to specific ranges of the main text. Notice that applying character attributes in this way is very inconvenient. Because the DefaultStyledDocument methods require the offset and length of the area to be affected by an attribute change, it is necessary to manually work out the correct offset and length values when writing the code. This is, of course, also true for paragraph attributes. In "A Simpler Way to Apply Attributes", you'll see a much more usable way to apply attributes that doesn't require you to hard-code offsets and lengths. With the attributes in place, let's now look at exactly how they control the way in which the text is rendered. Attributes are interpreted by the view objects that draw the text onto the screen, about which we'll say much more in the next chapter. An attribute is used only if the view is coded to use it; the standard views look for font and color information and other attributes such as underline, subscript, superscript, and strikethrough. Attributes are handled hierarchically, in the following order of precedence, with highest precedence first: -
Character attributes -
Paragraph attributes -
Logical style Core Note This is the conventional order. As you'll see in "More on Attribute Hierarchy" it is possible to create a slightly different attribute resolution hierarchy. Unless you explicitly change it, however, the order of precedence shown above applies.
Let's first look at the header. In this case, there are no character attributes to consider, so only the paragraph attributes and the logical style can affect the way in which it is drawn. Consider how the following attributes are obtained: Font Foreground color Left indent Right indent First-line indent The font and foreground colors are explicitly specified in the paragraph attributes for the heading, so they are taken from there. This also applies to the left indent and the first-line indent; the values for these attributes override the ones in the logical style. The right indent, however, is not specified in the Heading2 style, but there is a value for it in the document's logical style. Therefore, the heading will have the same right indent as the rest of the document, but a different font, foreground color, left indent, and first-line indent. What about attributes like underline? This attribute is not specified in any of the styles applied to the document. When a specific value for an attribute does not appear anywhere in the attribute hierarchy, the default value shown in Table 2-3 applies. In this case, the text will not be underlined because the default for the underline attribute is false. Now let's look at the second paragraph, which contains the main body of the document. This paragraph is covered by the same logical style as the heading, which means that it will have the document-wide left and right indents of 16 points and an extra first-line indent of 16 points (for a total indent of 32 points on the first line of the paragraph). The font is also determined by the logical style. The foreground color is, however, not specified at all in the logical style. Because there are no paragraph attributes applied to this text, you might be wondering how the foreground color for this paragraph is determined. In the last paragraph, we said that attributes for which there is no value specified take their value from the default specified in Table 2-3, so the foreground color should be black. This does, in fact, match what you see. However, for the foreground color (and, in fact, the font), the story is a little more involved than this. We'll postpone further discussion of this topic for now to avoid complicating this example too much you'll find the complete truth in "More on Attribute Hierarchy". Finally, some regions of the second paragraph have specific character attributes applied. Where this is the case, the character attributes take precedence over both the paragraph attributes and the logical style. As a result, for the words affected by these attributes, the foreground color will always be green and the font family will be monospaced. The actual font is, however, determined by the combination of the following attributes: In this example, the first of these is determined by the character attributes. The font size is obtained from the logical style. The bold and italic attributes are not specified anywhere, so they take the default values (both false) shown in Table 2-3. As a result, applying the character attributes changes only the font face, as you would expect from the definition of the style. Before leaving this example, you can see for yourself proof that the logical style is propagated from paragraph to paragraph even when it is not explicitly applied to a new paragraph. To see this, with the example in Listing 2-2 running, click with the mouse somewhere in the second paragraph, for example, before the words "The Swing text package." Now press RETURN. This splits the text where the caret was positioned, creating a new paragraph, as shown in Figure 2-3. Figure 2-3. Propagation of the logical style.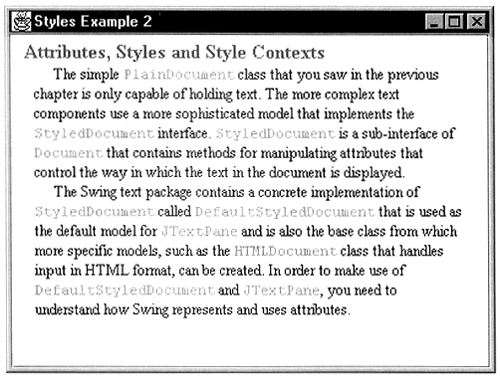 Notice that the new paragraph has all the same attributes as the original paragraph the same left and right indent and the first line also has the additional first-line indent. Because these attributes were specified in the logical style, this demonstrates that the logical style applied to the original first paragraph also applies to the second paragraph. How about adding text that wasn't originally in the control? You can try this by clicking at the end of the text and creating another new paragraph by pressing RETURN, and then typing some text of your own. Again, the logical style will be applied to this completely new paragraph. This, of course, mimics exactly what happens when the original text was added in Listing 2-2. In fact, propagation of attributes in this way is not restricted to the logical style; Paragraph attributes and character attributes in effect at the text insertion point are also inherited by the new text. More on Attribute Hierarchy Now that you've seen how character and paragraph attributes and logical styles can be used, it's time to look a bit more closely at how they actually work. Some of what has been said so far in this chapter is, in fact, the truth, while not being the whole truth. To avoid complicating things too quickly, some details have been passed over. In this section, you'll find out the whole truth about attributes and logical styles. First, let's look more closely at the relationship between paragraph attributes and logical styles. We've said that you would want to use a logical style to apply document-wide characteristics such as margin spacing and font that should apply everywhere, except where there should be exceptions. We also said that you can apply paragraph attributes to create entire paragraphs in which the styles are partially or completely different, but should be confined entirely to the individual paragraphs that they are explicitly applied to. From this simple and logical description, you might think that a document has one logical style that is used everywhere to look up attributes that are not supplied at the paragraph (or character) level and that each paragraph has its own separate set of attributes. This impression would apparently be borne out by the examples you have seen so far, in which the logical style was applied once by calling setLogicalStyle and then seemed to take effect everywhere. In fact, though, this is not the case. The logical style is actually a paragraph-level concept: When you apply a logical style, it takes effect only for the paragraph whose offset is given in the setLogicalStyle call. Why, then, do the earlier examples work? Why do all the paragraphs in those documents seem to have the same logical style applied to them? The reason that this happens has already been mentioned at the end of the last section when you add new text to a document, certain attributes get propagated. Let's see why this is. When you create a DefaultStyledDocument, it is not completely empty; It actually has a single newline character in it. In Listing 2-1, immediately after creating the document we applied a logical style. In reality, this applied the logical style to the single paragraph consisting of the initial newline. At this point, the newline occupies offset 0 of the document. Next, we inserted the document's text at offset 0. When we did this, the text was actually being inserted before the original newline and therefore into the (empty) first paragraph of the document. Because of this, it picked up the logical style that was assigned to the paragraph that it was being inserted into. To see exactly what happens, type the following command: java AdvancedSwing.Chapter2.StylesExample3 This example is a cut-down version of Listing 2-1, in which the logical style is applied and then the text added. No paragraph or character attributes are overlaid on the text. When this has been done, the AbstractDocument method dump is called to print a representation of the model in the window in which you started this example. Here is what you should see: <section> <paragraph resolver=NamedStyle:MainStyle { family=serif,Rightlndent=16.0, name=MainStyle,Leftlndent=16.0, resolver=AttributeSet, size=12,FirstLineIndent=16.0,nrefs=l } > <content> [0,38][Attributes, Styles and Style Contexts ] <paragraph resolver=NamedStyle:MainStyle {family=serif, RightIndent=16.0, name=MainStyle,LeftIndent=16.0, resolver=AttributeSet, size=12,FirstLineIndent=16.0,nrefs=l} > <content> [38,835] [The simple PlainDocument class that you ...] <paragraph resolver=NamedStyle:MainStyle {family=serif, RightIndent=16.0, name=MainStyle,LeftIndent=16.0, resolver=AttributeSet, size=12,FirstLineIndent=16.0,nrefs=l} > <content> [835,836] [ ] Core Note The order in which the attributes within the styles are displayed by the dump method is not the same in JDK 1.1 and Java 2. You should, however, see the same attributes as those shown above with whichever version you are using, even if the order does not match.
The words section, paragraph, and content in angle brackets refer to different levels of document storage. In a DefaultStyledDocument, everything is held within a single section; each paragraph is encapsulated at the paragraph level and actual text is held at the content level. These levels are nested, so the paragraphs are all contained within the single section and the content items are nested within their respective paragraphs. Core Note The structures that are shown above are referred to as elements. You'll see more about elements in Chapter 3.
You can see that this document has three paragraph elements, even though we actually only added two paragraphs corresponding to the header and the main body text. The last of these three paragraphs was created because there are two adjacent newline characters the one at the end of the String that was used to initialize the document (refer to Listing 2-1) and the one that was initially present in the model. In fact, we could have left off the last newline when creating the model, which would have avoided creating this redundant paragraph (and saved a trailing blank line on the screen). The important thing about these three paragraphs is that they all have the same attributes. The attributes arc shown after the word paragraph inside the angle brackets. This demonstrates that the attributes applied to the empty paragraph that was initially present are propagated to content added inside that paragraph, even if this content consists of more than one paragraph. In this case, you can see that the logical style has been applied to each paragraph in the document. The result would have been very different, however, had we reversed the order of operations and added the text before applying the logical style, like this: // Add the text to the document doc.insertString(0, text, null); // Set the logical style doc.setLogicalStyle(0, mainStyle); The result of this change can be seen by typing the command: java AdvancedSwing.Chapter2.StylesExample4 This time, the content of the model is slightly different: <section> <paragraph resolver=NamedStyle:MainStyle {FirstLineIndent=16.0,family=serif, RightIndent=16.0, name=MainStyle, resolver=AttributeSet, LeftIndent=16.0, size=12, nrefs=1} } > <content> [0,38][Attributes, Styles and Style Contexts ] <paragraph resolver=NamedStyle:default {name=default, nrefs=1} > <content> [38, 835] [The simple PlainDocument class that you...] <paragraph resolver=NamedStyle:default {name=default,nrefs=l} > <content> [835,836][ ] As you can see, there are still three paragraphs, but now only the first has the logical style with the extra left and right indentations applied to it. The other two have a default set of attributes that is actually empty. This makes it clear that the propagation of logical style took place as the new text was added the logical style applied to the first paragraph has not been applied to the other two paragraphs. The second thing to be aware of is the relationship between logical style and paragraph attributes. You know that both of these attribute sets are applied at the paragraph level, so what is the difference? Actually, the logical style of a paragraph is just the resolving parent of its paragraph attributes. This, of course, explains why both sets of attributes apply at the paragraph level and why the logical style has lower precedence than the paragraph attributes themselves. This has three consequences: -
If you create a set of attributes with another set as its resolving parent, then assign them as paragraph attributes; any logical style that had been applied to that paragraph will be lost and replaced by the attributes in the resolving parent. -
If you create a set of attributes without a resolving parent and apply them to a paragraph using setParagraphAttributes with the replace argument true, the logical style assigned to that paragraph, if any, will be lost. -
If you assign a set of attributes to a paragraph and then call setLogicalStyle on the same paragraph, the attributes passed with the setLogicalStyle call will replace any attributes that might have been in the original resolving parent of the paragraph attributes, if there was one. All these consequences are obvious once you realize that the logical style is just a formal way of thinking of the resolving parent of the paragraph attributes. In fact, you can see that this is the case by looking at the last piece of program output. Here, the first paragraph has an attribute called resolver, which points to the style named MainStyle, which was assigned as the logical style for this paragraph. Also of interest is the fact that the resolver for the other two paragraphs is a style called default. In fact, when you first create a DefaultStyledDocument, a Style called the default style is created and assigned as the logical style for the first paragraph. In "The Default Style", you'll see that this has some interesting consequences. Let's clarify the relationship between paragraph attributes and the logical style by looking at some code extracts that illustrate some of the points listed earlier. First, let's create three styles: Style defaultStyle = sc.getStyle(StyleContext.DEFAULT_STYLE); final Style mainStyle = sc.addStyle("MainStyle", defaultStyle); StyleConstants.setLeftIndent(mainStyle, 16); StyleConstants.setRightIndent(mainStyle, 16); StyleConstants.setFirstLineIndent(mainStyle, 16); StyleConstants.setFontFamily(mainStyle, "serif"); StyleConstants.setFontSize(mainStyle, 12); Style para1Style = sc.addStyle("Para1Style", null); StyleConstants.setBold(paralStyle, true); Style para2Style = sc.addStyle("Para2Style", paralStyle); StyleConstants.setItalic(para2Style, true); The MainStyle style is the same one that we've used before. The style Para1Style has the bold attribute set to true. The style Para2Style has Para1Style as its resolving parent (because the Para1Style style is passed as the second argument of the addStyle call that creates it) and also has the italic attribute set to true. Now suppose that you create a document with one paragraph of text already added and do the following: doc.setLogicalStyle(0, mainStyle); doc.setParagraphAttributes (0, 1, para2Style, false); After the setLogicalStyle call, the paragraph attributes for the document's only paragraph has MainStyle as its resolving parent, so the attributes in this style would now apply to that paragraph. Now, when the setParagraphAttributes call completes, the attributes from Para2style are applied to the paragraph. Because this contains its own resolving parent attribute, the resolver for this paragraph will now be Para1Style. In other words, text in this paragraph will be rendered in italics (from ParalStyle) and bold (from Para2style), but the left and right indentation and the other attributes from Mainstyle will no longer apply. Now let's reverse the order of the two statements above: doc.setParagraphAttributes(0, 1, para2Style, false); doc.setLogicalStyle(0, mainStyle); Now, after the first line has been executed, the paragraph will have bold and italics applied because its paragraph attributes are Para2style, which produces italics, and its resolving parent, Paralstyle, provides the bold attribute. In effect, ParalStyle is the logical style for this paragraph. However, after the setLogicalStyle call completes, MainStyle becomes the resolving parent for the first paragraph, so the bold attribute is lost and is replaced by the left and right indent (and other attributes) from MainStyle. The italic attribute will remain. Now consider this sequence: doc.setLogicalStyle(0, mainStyle); doc.setParagraphAttributes(0, 1, paralStyle, false); After the setLogicalStyle call, the first paragraph has MainStyle as its logical style. The second line applies ParalStyle as the first paragraph's attributes. Because ParalStyle was created like this: final Style paralStyle = sc.addStyle("ParalStyle", null); StyleConstants.setBold(paralStyle, true); it has no resolving parent attribute, so the logical style MainStyle is not replaced when ParalStyle is applied. This is the usual way of applying paragraph attributes. Now look at this variation: doc.setLogicalStyle (0, mainStyle); doc.setParagraphAttributes (0, 1, paralStyle, true); In this case, setParagraphAttributes is called with the replace argument set to true. When this happens, the existing attributes for the paragraph are cleared before the new ones are added. The clearing operation includes the resolving parent attribute. As a result, when these two lines of code have been executed, the paragraph has only the ParalStyle attributes applied to it the text is rendered in bold, but does not have the indents from MainStyle. The moral of this is clear: do not use setParagraphAttributes with replace set to true if you want to preserve the existing logical style. The Default Style As you saw earlier, every StyleContext contains the default style. This style is initially assigned as the logical style for a DefaultStyledDocument when it is created, so that if you don't explicitly set a logical style for the document, or override it by setting a paragraph style that has its own resolving parent, the default style will be the logical style for the whole document. This can be very useful, because the default style is treated differently from all the other styles in a document's StyleContext when the DefaultStyledDocument is plugged into a JTextPane. Specifically, the foreground color and font attributes in the default style are automatically changed whenever setForeground or setFont are invoked on the JTextPane itself. Note, however, that the default style does not initially contain a foreground color or any font settings, so it will use the default attributes implied by Table 2-3, that is: | Foreground | black | | Font Family | Monospaced | | Font Size | 12 | | Bold | False | | Italic | False | These attributes are changed only when setFont or setForeground is invoked. As an example, refer to Listing 2-1. Here, no specific logical style was set, so the default style is the logical style for every paragraph in the document shown in that example. Therefore, the attributes for the text in the second paragraph can be changed by invoking setFont and setForeground. You can see this by typing the command java AdvancedSwing.Chapter2.StylesExample5 This program is the same as the one shown in Listing 2-1, except that the font and foreground color have been changed as follows (the changes are shown in bold): // Add the text to the document doc.insertString(0, text, null); // Finally, apply the style to the heading doc.setParagraphAttributes (0, 1, heading2Style, false); // Set the foreground and font pane.setForeground(Color.blue); pane.setFont(new Font("serif", Font.PLAIN, 12)); The result of running this example is shown in Figure 2-4. If you compare this with Figure 2-1, you'll notice that the text is now rendered in a proportional font instead of the original monospaced font that was used in Figure 2-1. The text color has also changed from black to blue, but it is not possible to see that in the gray-scale figure shown in Figure 2-4. Figure 2-4. Effect of font and foreground changes on the default style.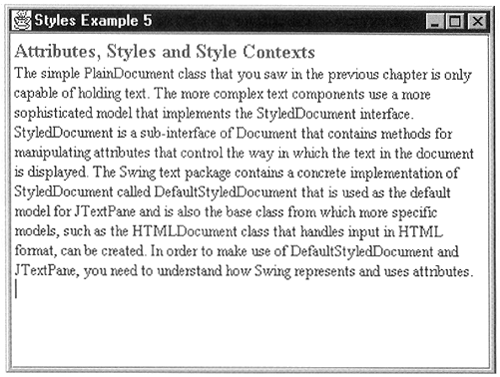 This automatic updating of the default style doesn't necessarily produce any benefit if you assign your own logical style to the document, as we did in Listing 2-2. However, the logical style assigned in that example was carefully constructed so that its resolving parent was the StyleContext's default style: // Create and add the main document style Style defaultStyle = sc.getStyle(StyleContext.DEFAULT_STYLE); final Style mainStyle = sc.addStyle ("MainStyle", defaultStyle); The reason for this may not have been obvious to you at the time. Now, however, you should be able to see that, by constructing the document's logical style in this way, the foreground color and any font attributes that are not overridden in the MainStyle itself will come from the default style and will be updated when the JTextPane setForeground and setFont methods are called. Suppose we took the example code from Listing 2-2 and added the following two lines: // Set the foreground color and change the font pane.setForeground (Color.pink); pane.setFont (new Font ("Monospaced", Font.ITALIC, 24)); You can see the results of this change using the command java AdvancedSwing.Chapter2.StylesExample6 The JTextPane that this example produces is shown in Figure 2-5. Figure 2-5. Inheriting from the default style. The code change would imply that the text should now be rendered in a pink, 24-point, monospaced, italic font. The text is, in fact, pink but you can see from Figure 2-5 that it is not in a monospaced font and not 24-point. It is, however, in italics. The explanation for this is simple. The setFont and set-Foreground methods update the default style so that the foreground attribute is pink, the italic attribute is true, the font family is Monospaced, and the font size is 24 points. However, the MainStyle itself overrides the font family (to Serif) and the font size (to 12). Only the foreground color and the italic attribute from the default style are actually used to render the text. In summary, setFont and setForeground affect the text in a JTextPane only if the logical style in the JTextPane is defaulted, or if the logical style(s) applied have the default style as resolving parent. As well as this, the logical style must not be disabled by installing paragraph styles that have their own resolving parent, unless the resolving parent is itself the default style or resolves through it. Core Note This behavior is implemented by the user interface (UI) class for JTextPane. It does not work for JEditorPane.
A Simpler Way to Apply Attributes The DefaultStyledDocument methods that have been used so far in connection attributes have all required you to specify the portion of the document to which they should be applied in the form of an offset and, possibly, a length. As you saw in Listing 2-2, however, this can be inconvenient because it requires you to manually calculate the required offset and length, a tedious task that may have to be repeated if you add or remove text. Fortunately, there is a simpler way to add attributes to a JTextPane, using the following four methods: public void setLogicalStyle (Style s); public void setParagraphAttributes (AttributeSet attr, boolean replace); public void setCharacterAttributes (AttributeSet attr, boolean replace); public void replaceSelection (String content); The first three of these look the same as the DefaultStyledDocument methods that you've already seen in this chapter. The important difference is that they do not specify a document position, or an offset. This also applies to replaceSelection, which is inherited from JTextComponent and was used in the last chapter to insert text into components derived from JTextField. The fact that you don't need to directly specify a location is the reason these methods are so much more convenient to use than those that directly manipulate the underlying document. These methods all operate on the portion of the document that is currently selected. The exact behavior varies slightly from method to method, as follows: setLogicalStyle and setParagraphAttributes operate on each paragraph between the beginning and the end of the selected range. Thus, for example, if the selection begins somewhere in paragraph A, covers paragraphs B and C, and ends somewhere in paragraph D, the attributes or style will be applied to all four paragraphs in their entirety, because paragraph attributes and styles operate at the paragraph level and cannot be applied to part of a paragraph. The setCharacterAttributes method operates on the exact range covered by the selection, no matter how many paragraphs it straddles. The replaceSelection method removes any text that is currently selected and installs the text supplied as its argument in its place. It also applies attributes to the new text where it gets these from will be covered shortly. What happens if there is no selection? In this case, the result is slightly different: setLogicalStyle and setParagraphAttributes apply to the single paragraph that contains the caret. The setCharacterAttributes method does not affect the document itself. Instead, the attributes are applied to a hidden set of attributes called the input attributes. The replaceSelection method inserts its text immediately after the caret location. The input attributes affected by the setCharacterAttributes method are maintained by JTextPane. They are applied, as character attributes, to all text inserted using the replaceSelection method, whether this text replaces an existing selection or is inserted at the caret location. Paragraph attributes and logical styles that apply to the inserted or replaced text are not, of course, affected by the use of input attributes. Both setParagraphAttributes and setCharacterAttributes have a replace argument that determines whether the supplied attributes will be merged with those already present or will completely replace them. You've already seen how this works in connection with the related DefaultStyled-Document methods. In the case of setCharacterAttributes, there is a small difference when no text is selected because the attributes will then be used to change the input attribute set instead of being applied to the document itself. As you might expect, if replace is false, the new attributes are merged into the existing input attributes, while if replace is true the input attribute set is cleared and then initialized from the new attributes. There is one more aspect of the management of the input attribute set that you need to be aware of: when you move the caret, the input attributes are set to the character attributes that apply at the caret's new location. If you think about it, this is the natural thing to do, as a simple example will show. Referring to Figure 2-2, consider any of the highlighted words in the text in the second paragraph. Each of these words is highlighted by applying character attributes that change the color and force the use of a monospaced font. If you were to move the caret into one of these words, you would want whatever you type to have the same color and font, so that it appears that you are just adding more text to the highlighted word. If, in fact, you run that example again and try this out, you'll find that this is exactly what happens. This works because when you move the caret to the middle of the word, the input attributes are cleared and then take on the foreground color and the monospaced font assigned in the active character attributes. As you type, the new text is inserted using replaceSelection, which, as described above, applies the attributes from the input attribute set to the content that it is adding. Another consequence of this is that, if you move the caret to a location that does not have character attributes applied, the input set is cleared. You'll see another case in which the input attributes are affected as a side effect of another operation in "Inserting Icons and Components". Let's now look at an example that demonstrates how to make use of these methods to simplify the addition of attributes to text within a JTextPane. This example creates a text component that looks just like the one shown in Figure 2-2, but does so by using a framework that you'll be able to reuse with different text and different attributes. The code in Listing 2-2 combined the code and the text together because of the need to know the correct offsets and lengths for the text to which the character attributes should be applied. This example, in contrast, uses a formal mechanism to describe the text together with its associated attributes, so that this data can be held independently from the code, which just has to know how to interpret the data. Before looking at the code, let's see how the data itself is represented. As you've already seen, a document can be represented as a set of paragraphs, each of which may have its own logical style and/or paragraph attributes. Within each paragraph, the content can be broken down into pieces, or runs, of contiguous text that have the same character attributes applied to them. For each paragraph, then, you need to be able to specify a set of paragraph attributes and the content that it should contain. The content consists of a series of runs, in which each run is a sequence of characters and an associated set of character attributes. If a paragraph does not need specific paragraph attributes, they should not need to be supplied. Similarly, a run that does not need attributes over and above the attributes that it will inherit from its containing paragraph need not have any character attributes specified. To represent these two cases, we invent classes called Paragraph and Run defined as follows: public static class Run { public Run(String styleName, String content) { this.styleName = styleName; this.content = content; } public String styleName; public String content; } public static class Paragraph { public Paragraph(String styleName, Run[] content) { this.styleName = styleName; this.content = content; } public String styleName; public Run[] content; } Core Note These two classes are declared as static because they are inner classes of the class used to implement the complete example that you'll see in Listing 2-3. Because they don't need access to the state of their containing class, it is logical to declare them as static.
The Run class contains the text, specified as a String and the name of the Style that will be applied, as character attributes, to the text. If no character attributes are required, the Style name should be supplied as null when invoking the constructor. Here is how you would typically create some text that has the Style called cwStyle applied to it: new Run ("cwStyle", "DefaultStyledDocument"); while the following text will use only the attributes assigned to its containing paragraph: new Run(null, "The simple "); Similarly, a Paragraph specifies paragraph attributes and an array of Run objects that make up the content of the paragraph. If the paragraph attributes are supplied as null, no paragraph attributes are supplied, which means that the paragraph will inherit the document's logical style if there is one. The code that uses these classes to create a JTextPane with the supplied text and the appropriate attributes applied is shown in Listing 2-3. Listing 2-3 Using JTextPane Methods to Insert Text and Apply Attributes package AdvancedSwing.Chapter2; import javax.swing.*; import javax.swing.text.*; import java.awt.*; public class StylesExample7 { public static void createDocumentStyles(StyleContext sc) { Style defaultStyle = sc.getStyle(StyleContext.DEFAULT_STYLE); // Create and add the main document style Style mainStyle = sc.addStyle(mainStyleName, defaultStyle); StyleConstants.setLeftIndent(mainStyle, 16); StyleConstants.setRightlndent(mainStyle, 16); StyleConstants.setFirstLineIndent(mainStyle, 16); StyleConstants.setFontFamily(mainStyle, "serif"); StyleConstants.setFontSize(mainStyle, 12); // Create and add the constant width style Style cwStyle = sc.addStyle(charStyleName, null); StyleConstants.setFontFamily(cwStyle, "monospaced"); StyleConstants.setForeground(cwStyle, Color.green); // Create and add the heading style Style heading2Style = sc.addStyle(heading2StyleName, null); StyleConstants.setForeground(heading2Style, Color.red); StyleConstants.setFontSize(heading2Style, 16); StyleConstants.setFontFamily(heading2Style, "serif"); StyleConstants.setBold(heading2Style, true); StyleConstants.setLeftIndent(heading2Style, 8); StyleConstants.setFirstLineIndent(heading2Style, 0); } public static void addText(JTextPane pane, StyleContext sc, Style logicalStyle, Paragraph[] content) { // The outer loop adds paragraphs, while the // inner loop adds character runs, int paragraphs = content.length; for (int i = 0; i < paragraphs; i++) { Run[] runs = content[i].content; for (int j = 0; j < runs.length; j++) { pane.setCharacterAttributes( runs[j].styleName == null ? SimpleAttributeSet.EMPTY : sc.getStyle(runs[j].styleName), true); pane.replaceSelection(runs[j].content); } //At the end of the paragraph, add the logical //style and any overriding paragraph style and //then terminate the paragraph with a newline. pane.setParagraphAttributes( SimpleAttributeSet.EMPTY, true); if (logicalStyle != null) { pane.setLogicalStyle(logicalStyle); } if (content[i].styleName != null) { pane.setParagraphAttributes( sc.getStyle(content[i].styleName), false); } pane.replaceSelection("\n"); } } public static void main(String[] args) { JFrame f = new JFrame("Styles Example 7"); // Create the StyleContext, the document and the pane final StyleContext sc = new StyleContext(); final DefaultStyledDocument doc = new DefaultStyledDocument(sc); final JTextPane pane = new JTextPane(doc); // Build the styles createDocumentStyles(sc); try { // Add the text and apply the styles SwingUtilities.invokeAndWait(new Runnable() { public void run() { // Add the text addText(pane, sc, sc.getStyle(mainStyleName), content); } }); } catch (Exception e) { System.out.println("Exception when constructing document: " + e); System.exit(1); } f.getContentPane().add(new JScrollPane(pane)); f.setSize(400, 300); f.setvisible(true); } // Style names public static final String mainStyleName = "MainStyle"; public static final String heading2StyleName = "Heading2"; public static final String charStyleName = "ConstantWidth"; // Inner classes used to define paragraph structure public static class Run { public Run(String styleName, String content) { this.styleName = styleName; this.content = content; } public String styleName; public String content; } public static class Paragraph { public Paragraph(String styleName, Run[] content) { this.styleName = styleName; this.content = content; } public String styleName; public Run[] content; } public static final Paragraph[] content = new Paragraph[] { new Paragraph(heading2StyleName, new Run[] { new Run(null, "Attributes, Styles and Style Contexts") }), new Paragraph(nul1, new Run[] { new Run(null, "The simple "), new Run(charStyleName, "PlainDocument"), new Run(null, " class that you saw in the previous " + "chapter is only capable of holding text. " + "The more complex text components use a more " + "sophisticated model that implements the "), new Run(charStyleName, "StyledDocument"), new Run(null, " interface. "), new Run(charStyleName, "StyledDocument"), new Run(null, " is a sub-interface of "), new Run(charStyleName, "Document"), new Run(null, " that contains methods for manipulating attributes " + "that control the way in which the text in the " + "document is displayed. The Swing text package " + "contains a concrete implementation of "), new Run(charStyleName, "StyledDocument"), new Run(null, " called "), new Run(charStyleName, "DefaultStyledDocument"), new Run(null, " that is used as the default model for "), new Run(charStyleName, "JTextPane"), new Run(null, " and is also the base class from which " + "more specific models, such as the "), new Run(charStyleName, "HTMLDocument"), new Run(null, " class that handles input in HTML format, can be " + "created. In order to make use of "), new Run(charStyleName, "DefaultStyledDocument"), new Run(null, " and "), new Run(charStyleName, "JTextPane"), new Run(null, " you need to understand how Swing represents " + "and uses attributes.") }) }; } The createDocumentStyles and main methods contain much of the code that was originally in the main method in Listing 2-2. The creation of the Styles that will be used in this example has been broken out into a separate method so that you can more clearly see how the whole process works and to make it easier for you to reuse this code for your own purposes. The Styles that are created by createDocumentStyles are, however, the same as the ones created in Listing 2-2. Notice, though, that in this case references to the Styles themselves are not kept they are simply local variables within the createDocumentStyles method. This is because the Styles will be referred to by name when the text is added, whereas in Listing 2-2 the Style references were used. The reason for this difference is modularity: In a real application, the Styles might be created by a piece of common code that is shared among many applications and would reside in a different class from the one that holds the text and creates the JTextPane. When the Styles are created in a separate class, the original Style references are not readily available to code that would subsequently need to use them. They can, however, be obtained from the documents StyleContext by using the getStyle method, which requires the name of the Style, and this is how the references are recovered as they are needed. The key to this example is the addText method, which is called after the Styles have all been created. This method is supplied with references to the JTextPane, the StyleContext, a global logical style to use, and the document content, in the form of an array of Paragraph objects. If a global logical style is not required, the logical style argument can be null. The addText method consists of two nested loops that build the document from scratch. Each iteration of the outer loop processes a single Paragraph and applies its paragraph attributes and the logical style, if there is one. The inner loop handles the array of Run objects for the Paragraph currently being built. Each Run installs some content and may have associated character attributes applied. That's the big picture now lets look at the details. First, let's consider the inner loop, which deals with the array of Run objects that make up a single paragraph. Because the paragraph text must be installed as a contiguous sequence of characters, it is convenient to use the replaceSelection method, which adds text at the current location of the caret and then advances the caret to the end of what it inserted. To install the text for the entire paragraph, it is only necessary to loop over the entries in the Paragraph's content array calling replaceSelection for the text in each Run object in the array. The other aspect of adding the text for a paragraph is arranging for the correct character attributes to be applied. As you know, replaceSelection automatically adds the attributes in the input attribute set as character attributes when it adds or replaces text, so it is only necessary to make sure that the input attribute set is correct before replaceSelection is called. Each Run has its own, optional, set of character attributes that apply to all the text in the Run. The attributes in each Run are independent of those of adjacent Runs, so we want to set the input attributes from those in the Run before each invocation of replaceSelection and we also want to replace any attributes that were placed in the input set by the previous call of setcharacterAttributes. This is achieved using the following line of code (from addText): pane.setCharacterAttributes ( runs[j].styleName == null ? SimpleAttributeSet.EMPTY : sc.getStyle (runs[j].styleName), true); Because there is no selection, this call affects the content of the input attribute set. The replace argument is true to remove from the input set any attributes installed by the previous call. The attribute set itself is obtained by taking its name, from the Run object, and resolving it through the Style-Context. If no character attributes are to be applied, the name is passed as null. It is not acceptable in this case just to skip setting the input attributes, because that would leave whatever was installed by the previous setCharacterAttributes call in the input set. Instead, an empty set of attributes is supplied. This empty set is applied to the input attributes after any existing attributes have been removed as a result of setting replace to true. This, of course, leaves an empty attribute set. The inner loop, then, creates a complete paragraph and installs the required character attributes. The job of the outer loop is to create a complete paragraph. Building a paragraph consists of installing the text, and then applying the logical style and the paragraph attributes, if either is required, and finally terminating the paragraph by adding a newline character. As with the character attributes, however, it is important to be careful about resetting attributes as each paragraph is installed. As you saw earlier, if you add one paragraph after another, the new paragraph inherits the earlier ones paragraph attributes (which may include its logical style). This is definitely not required here, so the first step is to clear any existing paragraph attributes by calling setParagraphAttributes passing an empty attribute set and with replace set to true. Now, we need to apply the logical style and the actual paragraph attribute for the current paragraph, by calling setLogicalStyle and setParagraphAttributes, this time passing the attributes in the current Paragraph object and with replace set to false, to avoid removing the logical style. Note that the sequence used in Listing 2-3 works for all combinations of logical style and paragraph attributes, as summarized here. | Logical Style == null, paragraph attributes == null | Neither set should be applied. As you can see from Listing 2-3, this is what happens. | | Logical Style != null, paragraph attributes == null | Only the logical style should be applied | | Logical Style == null, paragraph attributes != null | The paragraph attributes are applied no logical style. | | Logical Style != null, paragraph attributes != null | Both logical style and paragraph attributes should be applied, with the paragraph attributes having precedence over the logical style. | The last case is the most interesting one, because it contains a subtle point of ordering. As you can see from Listing 2-3, when both a logical style and paragraph attributes are supplied, setLogicalStyle is called before setParagraphAttributes. Usually the order of these calls does not matter, because the two attribute sets are usually distinct. However, as you saw earlier, it is possible for the paragraph attributes to have their own resolving parent. When this is the case, the attributes in the resolving parent should be used instead of those in the logical style. For this to happen, the paragraph attributes must be added after the logical style, because the logical style is installed as the resolving parent of the paragraph attributes applying the logical style after the paragraph attributes would lose the paragraph attributes' resolving parent. If you try the example in Listing 2-3 using the command java AdvancedSwing.Chapter2.StylesExample? you'll get the same result as you saw in Figure 2-2. However, this example is much more flexible because you can change what is displayed by simply modifying the data in the content array. In fact, there is no real reason for the code and data to reside in the same class that was done here only for convenience. Inserting Icons and Components As well as using attributes to control the way in which text is rendered, you can also use them to include images (in the form of Icons) or AWT and Swing components inline with the document text. The easiest way to do this is to use the following StyleConstants convenience methods: public static void setComponent (MutableAttributeSet a, Component c) public static void setIcon (MutableAttributeSet a, Icon c) Once you've got an attribute set with a Component or an Icon installed, you simply apply it, as character attributes, to a range of text to have the Component or Icon appear at that location. When you do this, the text to which the attributes have been applied is not displayed (at least not by the standard views you could write your own view to make use of the text, perhaps as a caption), so it is usual to supply a single space in the document where the Icon or Component is located. Another way to include a Component or an Icon is to make use of a couple of convenience methods provided by JTextPane: public void insertComponent (Component c) public void insertIcon (Icon c) These methods insert the Component or Icon at the current location of the caret, replacing any content that is currently selected. In both cases, a space is added to the document content and the appropriate attributes are then applied to it. These two methods are simple to use, but they have the side effect of clearing the text panes input attribute set before and after the object is inserted, so care may be needed if you are using these methods in conjunction with replaceSelection, which applies character attributes from the input set. We'll demonstrate how to add a Component to a text pane by adding an illustration to the example that we've been developing in this chapter. We could put an illustration into a document by creating an ImageIcon and adding that, but instead we'll use a JLabel, because that allows us to easily add a caption below the diagram. For the diagram itself, we use a GIF file that contains a screen shot of this example at an earlier stage of its development. To add the Component itself, we need a Style that contains the Component attribute. To separate the diagram from the text that precedes it, we also create a paragraph style that adds 16 points of space above it and place the Component on its own in this paragraph. The first step is to create these two Styles by adding the following code to the createDocumentStyles method shown in Listing 2-3: // Create and add the Component style Class thisClass = AdvancedSwing.Chapter2.StylesExample8.class; URL url = thisClass.getResource ("images/Style8img.gif") ; ImageIcon icon = new ImageIcon (url); JLabel comp = new JLabel ("Displaying text with attributes", icon, JLabe1.CENTER); comp.setVerticalTextPosition (JLabel.BOTTOM); comp.setHorizontalTextPosition(JLabel.CENTER); comp.setFont(new Font("serif", Font.BOLD | Font.ITALIC, 14)); Style componentStyle = sc.addStyle(componentStyleName, null); StyleConstants.setComponent(componentStyle, comp); // The paragraph style for the component Style compParagraphStyle = sc.addStyle(compParaName, null); StyleConstants.setSpaceAbove(compParagraphStyle, (float)16.0); The first part of this code creates a Uniform Resource Locator (URL) for the image file, relative to the class file for the example. This URL is used to create an ImageIcon, which then becomes part of the JLabel, together with the diagrams caption. By setting the vertical and horizontal text position attributes, we arrange for the text to appear below the diagram. The last step is to use addStyle to create a new Style and the StyleConstants setComponent method to create the attribute needed to display the JLabel. The paragraph style contains only an attribute that adds the necessary vertical space above the content of the paragraph. The names of these two styles are constant strings, defined as follows: public static final String componentStyleName = "Component"; public static final String compParaName = "CompPara"; The last thing we need to do is to place the Component in its own paragraph. We don't need to add any more code to achieve this, because the addText method can add any Style to either a paragraph or a run of text. To place the diagram in its own paragraph at the end of the document, we just add the following Paragraph to the end of the content array: new Paragraph (compParaName, new Run[ ] { new Run (componentStyleName, " ") }) You can see how this works using the command java AdvancedSwing.Chapter2.StylesExample8 The result is shown in Figure 2-6. Figure 2-6. A document with an embedded component.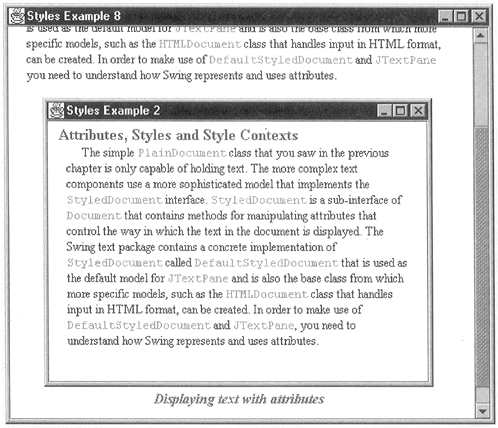 |