iDisk


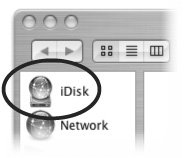
As a .Mac member, you have instant access to your iDisk one gigabyte of personal storage (including email storage) on Apple's servers. You can upgrade your iDisk storage capacity at any time (for a fee), up to four gigabytes.

Your .Mac uses iDisk to make its best features a reality: web site publishing, photocasting, backup protection, synchronization of calendars and address books, slideshow screen savers, and whatever else Apple's innovative imagination may offer in the future.

How Does Your Mac Know Which iDisk to Open?

How does your Mac know which iDisk is yours? After you set up an account, your member name and password appear in the .Mac preferences as shown below (click the "System Preferences" icon in your Dock, then click the ".Mac" icon). You can see below the .Mac member name and password. iDisk opens the account currently shown in this pane.
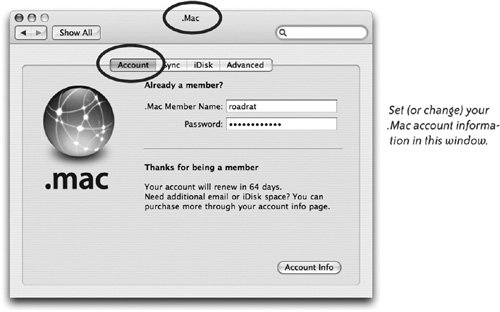
Put iDisk on Your Desktop

You can "mount" your iDisk so it appears on your Desktop just like any hard disk, then copy files between your Mac and the iDiskyou are really copying files from your Mac to Apple's server (or vice versa). Once files are on your iDisk (on the Apple computer), you can access them anywhere in the world. Directions on how to open your iDisk and use it are on the following page.

To open your iDisk, do one of the following:

  • Finder window. Click the iDisk icon in a Finder window Sidebar (shown to the left).

    If the iDisk icon does not appear in the Sidebar: From the Finder menu, choose "Preferences...." Click the "Sidebar" icon in the toolbar. Make sure that "iDisk" has a check next to it.

  • Go menu. From the Go menu in the Finder, choose "iDisk," then choose "My iDisk" from the submenu.

    If you don't see the Go menu in the menu bar, you are not at the Finderjust click on any blank space you see of the Desktop and that will take you to the Finder.

Tip

If you're not using a broadband connection, connecting to your iDisk can take time. Make sure you are connected to the Internet before you go to your iDisk.


You can access a different iDisk without changing your .Mac preferences:

1.

From the Go menu in the Finder, choose "iDisk."

2.

From the submenu, choose "Other User's iDisk...."

3.

Enter the name and password of your other account, or of someone else's account if they've given you the password.

When you open your iDisk, its icon appears on your Desktop and a window opens that shows your iDisk content (both shown below). Amazing.

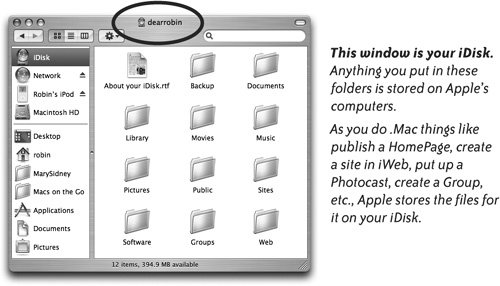
To open someone's Public folder:

1.

From the Go menu in the Finder, choose "iDisk."

2.

From the submenu, choose "Other User's Public Folder...."

3.

Enter the name of a .Mac member. An icon, as shown to the left, appears on your Desktop; double-click it. If there are files in that person's Public folder, you can see them in the window.

iDisk Contents

When you double-click the iDisk icon on your Desktop to open its window, as shown on the previous page, you're actually looking at files and folders that are on Apple's server. This explains why the window is sometimes slow to open (especially if you're using a dial-up connection instead of broadband).

All of your iDisk folders are private and accessible only to you (or someone who knows your password), except the folder called "Public."
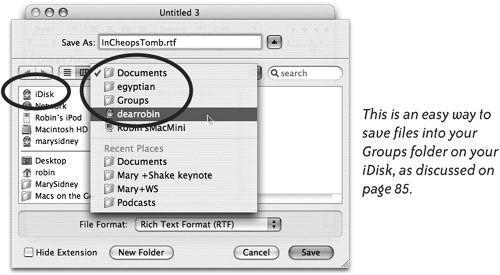
  • Backup folder. When you use Backup, Apple's software for .Mac members (see pages 98100), this folder on your iDisk is where the archived files are stored.

  • Documents folder. Drag into this folder any kind of document that you want to store and make available to yourself over the Internet.

  • Library folder. The Library folder contains application support files. Anything that needs to be in this folder will automatically be placed there. Don't drag files into or out of this folder.

  • Movies folder. Drag movies that you might use in a HomePage web site into this iDisk Movies folder so you'll have access to them when you're building the web pageor for anything else.

  • Music folder. Drag music files and playlists to this private iDisk folder so you can have access to them from anywhere in the world.

  • Pictures folder. Drag individual photos or a folder of photos that you plan to use in a HomePage web site into this iDisk Pictures folder so you'll have access to them when you're building the web page or for any other reason.

  • Sites folder. The Sites folder stores any web pages you've created using HomePage. You can also store sites here that were created with any other web authoring software. For instance, using Dreamweaver, Robin made a simple site she named LibraryAngels and put it in her iDisk Sites folder. You can view the site at homepage.mac.com/ dearrobin/LibraryAngels.

  • Software folder. The Software folder contains free software provided to you by Apple, including AppleWorks. If you see anything you want in these folders, drag it to your Desktop. The contents of this folder do not count against your iDisk storage space.

  • Groups folder. If you create or join a .Mac Group (pages 8285), then your Groups folder contains a subfolder with the same name as your Group. Inside that folder are other folders (Documents, Pictures, Movies, etc) into which you drag files to share with other members of the Group. Any files people put in their own Groups folder will appear in yours. Amazing.

  • Web folder. If you use iWeb to create a web site, your files will be stored in here. (However, if you create a web site from a Groups page, as shown on page 84, that web site is stored inside the Groups folder.)

  • Public folder. Put files and folders here that you want to make accessible for other people. Unless you set up password protection (see the opposite page), other people who have your .Mac member name can access files that you drag to your iDisk Public folder. You can open any one else's Public folder that doesn't use password protection if you have that person's .Mac member name.

Save Files Directly into Your iDisk

You don't have to open your iDisk to save files into it. While working in any application, you can go to the Save As dialog box and choose to save the file directly into any folder on your iDisk. We suggest you wait until you're finished with the document before you save it to the iDisk; otherwise, every time you save the slightest change, your Mac will have to access your iDisk on the Apple server to save the change. And you won't have a copy on your own computer.

To save a file directly to your iDisk:
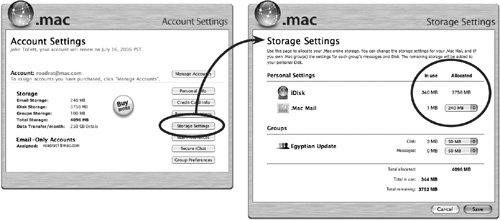
1.

Make sure your iDisk icon is showing in your window Sidebar, as explained at the top of page 60.

2.

When you're finished working on the document (of course you've been saving it to your computer along the way), go to the File menu and choose "Save As...."

3.

In the Sidebar of the Save As window, click the iDisk icon. It might take a minute or two, depending on the speed of your connection. Choose the folder in which you want to save your file, then click "Save."

Manage Your iDisk

To manage your iDisk, use the iDisk pane in the .Mac preferences, as shown below. You can monitor your storage allotment, buy more space, set access privileges and password protection for your Public folder, and even copy the contents of your entire iDisk to your laptop in case you want access while offline (you can sync it again when you get connected to a fast connection).

Tip

If you need to access an iDisk from a machine running Windows xp, download the free iDisk Utility for Windows xp. Installation instructions are included with the download.

You'll find it in the iDisk section of Mac.com.


To monitor your iDisk Storage:

Check here at any time to see how much .Mac storage space you're using and how much you have available. Click "Buy More" to see available options and prices and to purchase more space.

To copy (sync) your entire iDisk to your laptop:

If you know you won't have broadband access for a while on the road, you can copy the contents of your entire iDisk to your laptop; click the "Start" button. That way you have access to all the files. When you have a broadband connection again, you can synchronize the files with Apple's server.

To set access privileges or password protection:

The default is to allow visitors to "read" the files you've put in your Public folder, meaning they cannot change anything in your folder. To allow others to upload files to the Public folder on your iDisk, click the "Read & Write" button. You should then add a password check the box to "Password protect your Public Folder." Type a password in the fields that appear, then click ok.

iDisk Storage Settings

A default .Mac account includes combined email and iDisk storage of 1024 megabytes (which is one gigabyte) on Apple's servers. The total amount of storage is automatically divided evenly between email and iDisk when you start your account, but you can change that ratio if you need more email storage or more iDisk storage.

To re-allocate your iDisk storage settings:

1.

Open System Preferences and click the .Mac icon.

2.

Click the "Account" tab, if it isn't already.

3.

Click the "Account Info" button in the bottom-right corner to open a .Mac web page that contains your "Account Settings."

4.

Click the "Storage Settings" button (circled, below-left) to show the management tools.

5.

On the "Storage Settings" page, you can see the distribution of your storage space divided between your iDisk and .Mac Mail. If you want to change the settings, choose a different amount from the pop-up menu, as shown below. The allocated amounts will change instantly.

6.

When you're done, click "Save."


Macs on the Go!(c) Guide to Mobile Computing for Mac Laptops Using Mac OS X
Macs on the Go
ISBN: 0321247485
EAN: 2147483647
Year: 2006
Pages: 119

flylib.com © 2008-2017.
If you may any questions please contact us: flylib@qtcs.net