Flylib.com

Books Software


Viewing Your Photos


Viewing Your Photos

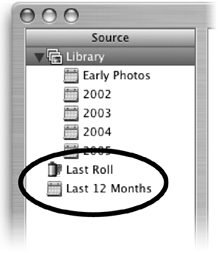
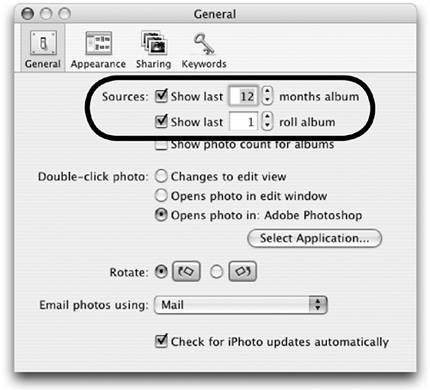
Once you've imported photos to iPhoto, there are several ways to view them within the main viewing area.

These are the recent import icons in the "Source" pane.

  • Single-click the Library icon in the "Source" pane to view all photos that have been imported into iPhoto.

  • Single-click one of the recent import albums ( Last Roll or Last 12 Months ) in the "Source" pane to show the most recently imported photos in the viewing area.

    You can change the number of rolls or the number of months to be shown: From the iPhoto application menu, choose "Preferences," then click the "General" icon in the Preferences toolbar.

    Enter new numbers in the "Sources" text fields, as shown to the right.

  • Single-click an album icon in the "Source" pane to show only photos that you've placed in that specific Album (how to create and use albums is explained on pages 1819).

  • From the View menu, shown on the left, choose Sort Photos, then select one of the following views from the submenu:

    By Film Roll sorts photos into the groups in which they were originally imported.

    By Date sorts photos by the date they were taken in the camera, if you set the date in your camera before you took pictures.

    By Keyword sorts photos alphabetically , according to keywords you've assigned. Learn how to assign keywords on page 12.

    By Title sorts photos alphabetically by title.

    By Rating sorts photos by your "star" rating, if you assigned ratings to photos. Rating photos is explained on page 11.

    Manually lets you drag photos to rearrange them, but only in albums, not in the Library view or the recent import albums.

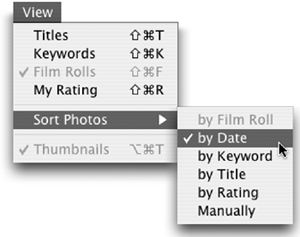
Checkmarks in the View menu indicate which descriptors you've selected to appear next to photos in the viewing area. Select an item to place a checkmark next to it. Select the item again to remove the checkmark.

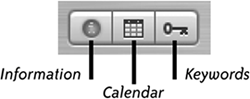
The bottom of the "Source" pane can show three different panes of information when you select one of the three buttons on the bottom-left edge of the iPhoto window (shown below).


The Information Pane

Click the Information button to see information about selected photos, albums, inserted discs, or mounted volumes (such as a camera's memory card). The Information pane also lets you enter some information.

This is where you can rename photos instead of using the strange default name that may have been assigned by your digital camera (such as DSCN7021 ). Assigning a descriptive name can be tremendously helpful later when you search for specific photos.

Comments you add to the lower area of the Information pane can be used for books (the snazzy, printed books you can order from iPhotosee page 37), email captions, or web pages that are automatically created by iPhoto. Comments are searchable and can be helpful when you need to find a certain photo. Learn how to search for photos on page 26.

To use the Information pane

1.

Single-click on a photo to select it.

2.

Click the Information button to show the Information pane.

3.

Click the "title" field to rename a photo. When you place your pointer over the title area, it highlights. Click once to make the title field editable.

4.

Place your pointer over the "rating" field to rate a photo. When you place your pointer over the rating area, it highlights. Click on the gray dots to assign a rating from 1 to 5 stars.

5.

Type any comments you want in the "comments" area.

6.

Click the Information button again to hide the Information pane.