User Authentication
User Authentication
User authentication is one of three FW-1 authentication types, used to authenticate users for HTTP, telnet, FTP, and rlogin only. This type of authentication can be used in-line, meaning that the user is not presented with any separate authentication challenge when using one of the available services; it is all handled using the client you are already using within the methods provided by the protocol. No additional software is required, nor is there any additional operation the user must remember in order to be authenticated.
One important aspect of user authentication to note is that there is no facility to restrict authentication based on source address. This means that if a user s login credentials are compromised, unauthorized users could use this information to gain access to your network.
User authentication is available only for HTTP, HTTPS, telnet, FTP, and rlogin because FW-1 proxies all of these connections. This means that you can only set up user authentication for services for which FW-1 has built-in server.
To configure user authentication, first define your users in SmartDashboard, under Manage Users and Administrators , as discussed above. Your users can be configured with any type of authentication scheme ”internal or external ”as long as that scheme is enabled in the Authentication tab of your firewall object s properties.
Once your users are defined, and before you can add the users to a rule, you must place them in groups. This is because FW-1 does not allow you to add individual users to rules ”only groups. If you want to add just one user, simply create a group with only that user as a member.
To configure user authentication, create a new rule in your rule base, right-click on the Source section, and choose Add User Access (see Figure 6.10).

Figure 6.10: User Access
Here, you will see a list of your current user groups. Choose the group you want to add to this rule. You also have the option of setting location restrictions, which will limit the sources from which the user can connect. Figure 6.11 displays the completed rule.
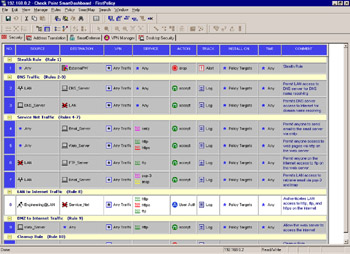
Figure 6.11: User Authentication Rule
Here, rule 9 is our user authentication rule. This rule states that all users in the Engineering group, when connecting to anywhere with services, HTTP, HTTPS, or FTP must authenticate with user authentication.
One important thing to note is that if there is a less restrictive rule above the user authentication rule in the rule base, the firewall will use the less restrictive rule and will not perform user authentication. For example, if you had an accept rule above rule 3 in this example that allowed all traffic from the user s source to any destination, the user would have access without being required to authenticate. This is the case for users going to the Web_Server on the Service_Net in rule 5. Also, if the user is not yet authenticated, it will not match the authentication rule, skip past it, and see if the user would still be allowed even if he or she is not authenticated. In the event that there is a rule that would allow the user to make the connection after the authentication rule (for example, Source: LAN, Destination: Service_Net (negate), Service: http, Action: Accept) it will not prompt the user for authentication because it is not required to gain access. An easy way to think of this behavior is to think that the firewall will check all the rules first for an accept and when it does not match one before it matches a drop, it will then scan the rulebase again to the position of the drop for an authentication rule.
To continue configuring user authentication, right-click User Auth , and choose Edit properties (see Figure 6.12).
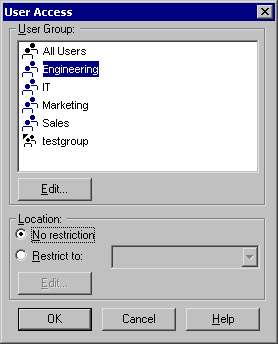
Figure 6.12: User Authentication Action Properties
The purpose of the Source and Destination fields is to resolve any conflicts in configuration between the user database and the rulebase. Remember earlier, when we discussed defining users, you had the option of restricting a user s access to certain source and destination addresses. You also have the ability to control this aspect of a user s access via the standard rulebase. What happens if the two conflict? This setting decides how the firewall should react .
Choosing Intersect with User Database means the firewall will combine the settings in the user definition with the standard rule base. Choosing Ignore User Database means that the firewall will use the settings defined in the standard rule base alone. For example, if a user has the source defined as LAN and is attempting to authenticate from the Internet, if Intersect with User Database is selected, the user will not be granted access because the username is not valid from that location. Conversely, if Ignore User Database is selected, the user will be able to be authenticated ” assuming that the user is allowed in the Source column of the rule (like All Users@Any ).
In addition, you have the option here of providing HTTP access to all servers or predefined servers. The Predefined Servers setting relates to the predefined servers in the Security Server section of Global Properties.
Under Authentication Settings in the properties of each individual firewall, the value for User Authentication session timeout defines how much time may elapse before a user is forced to reenter their login credentials, as shown in Figure 6.13. Back in the User Authentication Action Properties window, setting HTTP access to be to all servers essentially disables the User Authentication session timeout setting. Setting HTTP access to be only to predefined servers activates the timeout.
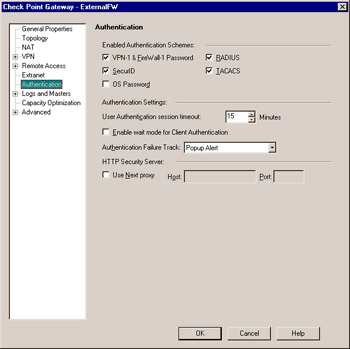
Figure 6.13: Firewall Object Authentication Tab
Note that these settings apply to both inbound and outbound authentication. If you are going to have users authenticate to external servers on the Internet, which is likely, your only option here is to set the HTTP access in the authentication action properties window to All servers , since it is not practical to define each external server that users may access.
Once you have configured these settings, you are ready to have your users authenticate with user authentication. In order to have the users authenticate in-line using their client (Web browser, ftp client, telnet client), they will need to add the firewall as a proxy server within their Web browser s configuration. This will cause their Web browser to first hit the firewall, which will challenge the user for their authentication credentials, and if they authenticate successfully, it will then pass the user on to the Web server.
If users do not configure the firewall as a proxy in their Web server s configuration, they can still use user authentication, but they will be asked to authenticate multiple times even when accessing one site (unless the All servers option is checked). This is because, unless the Web browser uses the firewall as a proxy, it does not cache the authentication data. The advantage to this is that if other users gain access to the authorized user s workstation, they will not have unprotected access to the site the original user was accessing. However, the continuous re-authentication may be time consuming and tedious for authorized users.
Configuring user authentication for other services, such as FTP or telnet, is done in the same manner. In these cases, since the user will not use a Web browser to connect, the FTP or telnet client, when transmitting usernames and passwords, will actually be sending these to the firewall first, allowing it to verify authentication parameters, before passing the connection on to the real destination.
When logging in to an FTP server, users will have to use a special username and password format, so that the firewall understands which username and password is to be used for what purpose. The username is of the format remote_user@FireWall-1_user@remote_host. For example, to use a remote username of anonymous, a local username of Joe, and a remote host of ftp.checkpoint.com, the user would enter anonymous@Joe@ftp.checkpoint.com as the username. When prompted for a password, the password format is remote_password@FireWall-1_password. Check with your FW-1 documentation for the syntax for Telnet logins.