Installing Check Point VPN-1FireWall-1 NG AI on Solaris
Installing Check Point VPN-1/FireWall-1 NG AI on Solaris
Finally all of your hard work at preparing for the firewall installation is about to pay off. This section is dedicated to installing the Check Point VPN-1/FireWall-1 NG on Solaris. Hopefully you have read the Before you Begin section at the beginning of the chapter and are prepared to start with the Check Point software installation. If you did not read the Before you Begin section above, then you should go back and read it before you continue.Although this section focuses on standalone installations, it will point out the different options you would make if you wanted to install the firewall on Solaris in a distributed environment. In other words, you will be installing the management and enforcement modules as well as the GUI all on one machine; however, you could install each piece on separate machines (and use different operating systems) if that is what your network design calls for. The distributed installation is not much different from the standalone installation, and the goal is for you to feel just as comfortable with the former as you do with the latter. This section assumes that you are already familiar with the Unix operating system, and know how to navigate the file system and list directories within Solaris.
If you are installing on Solaris 8, you can install in either 32- or 64-bit mode, and you must have patches 108434-01 (32-bit) or 108435-01 (64-bit), 108528-17, 113652-01 (only if 108528-17 is installed “anything later than 108528-17 is installed, 113625-01 is already included), 109147-18, and 109326-07 applied before you start installing VPN-1/FireWall-1 NG AI. In the event you are installing on Solaris 9 you will be required to install patch 112902-07. Solaris patches can be obtained from http:// sunsolve .sun.com.

Figure 2.46: Maintenance Finished
Installing from CD
In this section you ll see a Check Point VPN-1/FireWall-1 NG AI installation on Solaris using the Check Point Next Generation with Application Intelligence CD. You can obtain a copy of this CD from Check Point by going to www.checkpoint.com/getsecure.html and requesting an evaluation of the software. If you have a login setup with Check Point, then you can download the software and updates from Check Point at www.checkpoint.com/techsupport/downloads.jsp.
The following screenshots are taken from a new installation via CD to a Solaris 8 system. If you are installing on other versions of Solaris, the procedure is the same.
-
Insert the Check Point Next Generation with Application Intelligence CD into your computer s CD-ROM drive. If you have the automount daemon running on your Solaris system, then the drive will be mounted automatically. If not, mount the CD-ROM drive.
The syntax for mounting the CD-ROM drive is below. You will need to determine which disk to mount before you type this command.
mount o ro F hsfs <device> <mount point>
-
Move into the CD-ROM mount point directory by typing cd / cdrom /cpsuite-r54 and press Enter . The directory name that you are using may vary depending on the version of the CD that you have. There is a file in this directory titled ReadmeUnix.txt, which explains the contents of the CD and how to begin the installation process.
-
When you are ready to start with the installation, type ./UnixInstallScript and press Enter to initiate the Check Point installation wizard (see Figure 2.47). If you are in the Common Desktop Environment (CDE) then you can also use a file manager and double-click the UnixInstallScript file to begin.
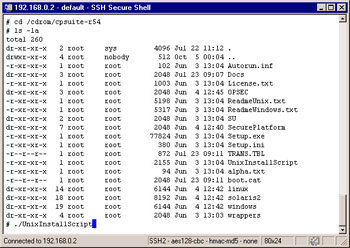
Figure 2.47: UnixInstallScriptAfter you press Enter , you will be presented with Check Point s welcome screen.
Note If you are installing Check Point NG on Linux, you use the same UnixInstallScript to begin the installation process. It will execute a separate executable behind the scenes (wrappers/unix/Install_Linux).
-
From the Welcome Screen (Figure 2.48) you have the options listed below. Type n to advance to the next screen.
-
V “ Evaluation Options Informational page on running this software on an evaluation license.
-
C “ Contact Information This option gives you telephone numbers on how to find and contact a local Check Point partner.
-
N “ Next Proceed to the next screen.
-
H “ Help To get help with navigating the installation screens.
-
E “ Exit To quit the installation and exit.
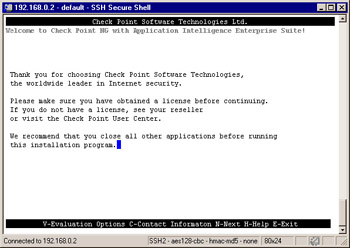
Figure 2.48: Welcome to Check Point NG
It makes no difference in the installation process whether you are installing a purchased product or if you are installing for evaluation purposes. The software installation is exactly the same; the only thing that is different is the license you apply during configuration. You can always apply a permanent license to a system installed on evaluation at any time to turn it into a production firewall.
Note While running the UnixInstallScript, keep your eye at the bottom of the screen to see your navigation options. You will enter the letter associated with the menu item to perform the requested action. For example, to exit the system, you see E “ exit at the bottom of the screen. Simply press e to exit and end the installation at any time.
-
-
You will receive the license agreement as shown in Figure 2.49. Press the space bar until you reach the end of the agreement. When you reach the end, the program will prompt you to indicate whether you accept the terms in the license agreement, Do you accept all the terms of this license agreement (y/n) ? Enter y and press Enter .
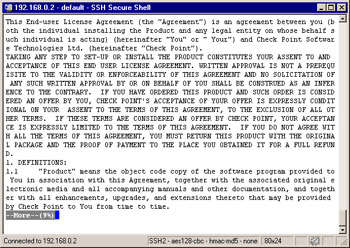
Figure 2.49: License Agreement -
The next screen (Figure 2.50) will prompt you with two options to continue with the installation. They are somewhat self-explanatory; New Installation and Advanced Upgrade. The advanced upgrade can be used to export a configuration from a previous version into a single compressed file. It can also be used to import the aforementioned configuration file into a new installation to create a new NG AI system with the configuration of the old system. For the purposes of this installation, we will press 1 to choose New Installation and then n to continue.
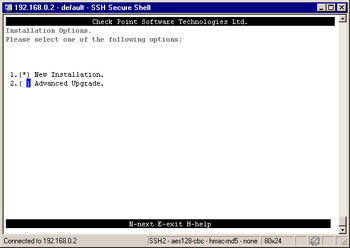
Figure 2.50: Select Installation -
You will now be presented with a screen where you will select the products that you want to install from this CD (Figure 2.51). Your options are explained below. Type in the numbers of the packages you wish to select in this window. Type the number again to unselect it. If you enter r for Review, then you will get a new screen in which you can select a product by entering its number, and then pressing r again to get a description of the product. You re going to type 1, 2 and then 4 to select VPN-1 & FireWall-1, SmartCenter, and SmartConsole respectively, then enter n to advance to the next screen.
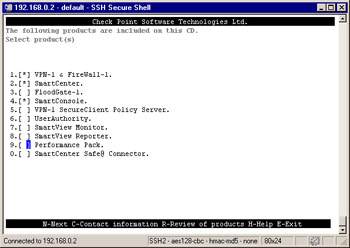
Figure 2.51: Select Products to Install-
VPN-1 & FireWall-1 This includes FireWall-1 enforcement point software along with the VPN-1 encryption component.
-
SmartCenter This option designates that you wish to install the management station component.
-
FloodGate-1 Provides an integrated Quality of Service (QoS) solution for VPN-1/FireWall-1.
-
SmartConsole The Graphical User Interface for Check Point including the Policy Editor, Log Viewer, and System Status GUI. Using the management clients on Solaris requires a Motif license and you may need to tweak your environment to get them to run, but you can connect with as many remote Windows GUI clients to a Solaris management server as you wish without any additional license.
-
VPN-1 SecureClient Policy Server Allows an enforcement module to install Granular Desktop Policies on mobile users SecureClient personal firewalls.
-
UserAuthority A user authentication tool that integrates with FireWall-1, FloodGate-1, and other e-business applications.
-
SmartView Monitor Allows an organization to monitor its VPN connections, Internet connections, etc.
-
SmartView Reporter An integrated reporting tool that can generate reports , graphs, and pie charts to display information obtained from the VPN-1/FireWall-1 logs.
-
Performance Pack Also available on the Linux platform (including SecurePlatform), the Performance Pack replaces the Sun
-
Solaris kernel with a SunTone Certified kernel optimized for firewall and VPN functions. By removing excess functionalities in the kernel and enabling inspection closer to the hardware by removing unnecessary processing cycles, the throughput is increased significantly and latency through the firewall is reduced. This software acceleration requires a SecureXL (performance pack) license to be activated.
-
SmartCenter Safe@ Connector Provides the ability to manage Sofaware Safe@ Appliances (including the Sofaware S-Box and Nokia s IP30 and IP40) via the same management infrastructure (management station and clients) as enterprise firewalls.
Note If you are installing the enforcement module only, then select VPN-1 & FireWall-1 . For those who have been using Check Point for some time, the option for installing SmartCenter here will be new. The installation of management is actually just a configuration option, not an extra package. If you select VPN-1 & FireWall-1 and do not SmartCenter, you will be prompted with options analog to legacy version. The first option asks whether this system will be part of a Distributed or Stand Alone installation. When Distributed is chosen , you will be presented with the following options:
-
Enterprise Module To install a firewall which will be managed by another system running the management software, choose this option.
-
Enterprise SmartCenter Select this option if this system will only be a management server.
-
Enterprise SmartCenter and Enforcement Module To install a firewall which will be managed by the management software which is also installed on this system, choose this option.
-
Enterprise Log Module To send logs to a system which is only used for retaining logs..
-
Enterprise Module and Enterprise Log Server To install an enterprise firea\s.
-
-
-
Next you will need to select the type of management installation you want on this system. You must select one of these options if you chose to install SmartCenter for management. Enter the desired option number. To select a different option number, simply enter that number. Select one of the options as shown in Figure 2.52. Enter 1 to select Enterprise Primary SmartCenter , and then press n to continue.
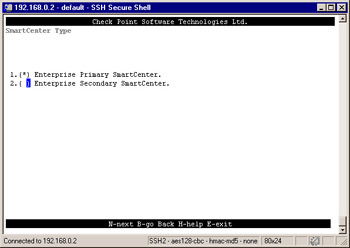
Figure 2.52: Choose the Type of Installation-
Enterprise Primary SmartCenter To install a management server that will be acting primarily in a primary capacity.
-
Enterprise Secondary SmartCenter To install a management server that will be acting primarily in a backup capacity. This option requires an Enterprise Primary SmartCenter to be already installed and licensed for Management High Availability in your infrastructure.
-
-
On the next screen ( illustrated in Figure 2.53) press n to continue. This will be the last screen where you can exit the configuration before the installation script will start copying files. While the installation script is installing the package and copying files, you will see a screen similar to the one in Figure 2.54. The installation could take a few minutes. Next, the firewall will install the VPN-1/FireWall-1 kernel module and begin the configuration process.
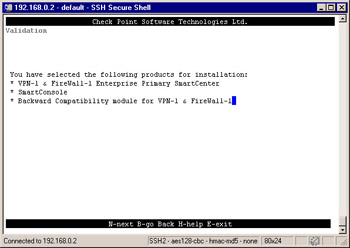
Figure 2.53: Validation Screen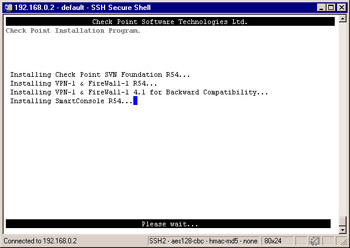
Figure 2.54: Installation Progress
| |
Installing Packages
If you have downloaded the packages to install on Solaris, you must first unzip and untar them to a temporary directory. Once the files are extracted, use pkgadd “d < directory > to install the Check Point VPN-1/FireWall-1 packages one at a time. Problems have been known to occur in previous versions if these temporary directories are several subdirectories away from the root of the file system. It would be best to extract these packages to /opt, /var/tmp, /tmp or directly to / instead of burying them too far down in the file system hierarchy. If you are in the same directory as the package, type pkgadd “d . to begin the installation.
You must install the SVN Foundation package prior to installing any other modules on your system. Make sure you download this package, too, if you want to install VPN-1/FireWall-1. You can install management clients without the SVN Foundation.
The simplest way to install the software, however, is to download the installation wrapper (also called the installation bundle), extract the files, and run the UnixInstallScript as shown below or install from the Check Point Next Generation with Application Intelligence CD.
| |
Configuring Check Point VPN-1/FireWall-1 NG AI on Solaris
Once the system has finished copying files during the installation procedure, it will begin to go through the configuration screens shown in Figure 2.55. If you read the first section of this chapter, then you should be prepared to configure the firewall. After this initial configuration, you can always come back to any of these screens by running cpconfig from the root shell. It is recommended that you go through all of these screens during the installation without canceling; you can always go back in to change your initial configuration settings.
The initial configuration will take you through the following screens:
-
SecureXL Acceleration
-
Licenses
-
Administrators
-
GUI Clients
-
SNMP Extension
-
Certificate Authority Configuration
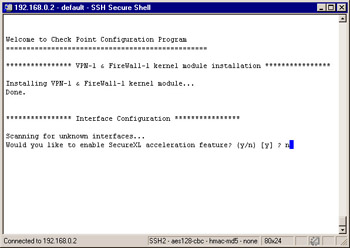
Figure 2.55: SecureXL Acceleration
SecureXL Acceleration
The first configuration option you are asked is in regard to SecureXL Acceleration. If you wish to offload the processing VPN encryption information onto a third-party hardware acceleration device, you can answer this question with y for yes to prepare the module for processing offload. For the installation within this chapter, enter n for no and press Enter .
Licenses
You should have obtained all of your licenses before you get to this step. If you need help getting your license, read the first part of this chapter titled Before you Begin. If you don t have any permanent licenses to install at this time, you can either continue without a license and use the built-in 15-day evaluation license or at any time, request an evaluation license from either Check Point directly or your Check Point reseller.
| Note | The license configuration option will be displayed regardless of which modules you have installed. |
When installing a primary management module, one will be installing a local license that was registered with the local management station s IP address. Follow this step-by-step procedure for adding your license(s). You can see the license configuration input and output in Illustration 2.3.
-
When prompted to add licenses, enter y for yes and press Enter .
-
Enter m to add the license manually and press Enter . Now you will be prompted for each field of the license. The illustration below shows the following license installed: cplic putlic 192.168.0.1 never aoMJFd63k-pLdmKQMwZ-aELBqjeVX-pJxZJJCZy CPMP-VFE-U-NG CK-af80d80852ad
-
Host The IP address or hostid associated with this license.
-
Date The date that the license expires , which is never for any purchased license.
-
String The license string provided by Check Point to validate the license. This key will be unique for each license and IP Address/Host.
-
Features These are the features that this license will enable (e.g. management and/or 3DES).
As you can see in Illustration 2.3, you also have the option of choosing f for Fetch from file. If you select this option, the configuration will prompt you to enter the file name of the file received from UserCenter.
-
-
Enter the values for Host , Date , String , and Features , pressing Enter after each entry.
| |
Configuring Licenses... ======================= The following licenses are installed on this host: Host Expiration Features Do you want to add licenses (y/n) [n] ? y Do you want to add licenses [M]anually or [F]etch from file?: M Host: 192.168.0.1 Date: never String: aoMJFd63k-pLdmKQMwZ-aELBqjeVX-pJxZJJCZy Features: CPMP-VFE-U-NG CK- af80d80852ad
| |
Administrators
If you have installed a management module, you will be prompted to add an administrator as soon as you enter a license into the configuration program.You must define at least one administrator at this time to allow you to log in using the SmartConsole GUI clients. You can always come back later to add, edit, or delete your administrators. Illustration 2.4 depicts the steps involved to add your administrator.
| Note | If you have installed an enforcement module only, then you will not configure administrators. |
It is best to use individual administrative usernames instead of a generic username like fwadmin. The problem with using a generic login ID is that you cannot properly audit the activities of the firewall administrators. It may be important for you to know who installed the last security policy when you are troubleshooting a problem. This becomes more and more important when there are several people administering a firewall system. You will have to complete the following fields:
-
Administrator Name Choose a login name for your administrator. This field is case-sensitive.
-
Password Choose a good alphanumeric password. It must be at least four characters long and is also case-sensitive.
-
Verify Password Repeat the same password entered above.
-
Permissions for all Management Clients (Read/[W]rite All, [R]ead Only All, [C]ustomized)
| |
Configuring Administrators... ============================= No VPN-1 & FireWall-1 Administrators are currently defined for this SmartCenter Server. Administrator name: Joe Password: Verify Password: Permissions for all Management Clients (Read/[W]rite All, [R]ead Only All, [C]ustomized) w Permission to Manage Administrators([Y]es, [N]o) y Administrator Joe was added successfully and has Read/Write Permission for all products with Permission to Manage Administrators Add another one (y/n) [n] ? n
| |
Use the following steps to add an administrator:
-
Enter the login ID for your Administrator and press Enter . Joe is used in this example.
-
Enter the password for this username and press Enter .
-
Confirm the password entered in step 2 and press Enter .
-
Enter w for Read/Write All to give the administrator full permissions to access and make changes to all SmartConsole GUI clients.
Setting permissions enables you to define the access level that you will require on an individual basis for each administrator. If you select Read/[W]rite All or [R]ead Only All, then your administrator will have access to all the available GUI client features with the ability to either make changes and updates or to view the configuration and logs (perhaps for troubleshooting purposes) respectively. You may also choose to customize their access so that they may be able to update some things and not others. To do this, select Customized and configure each of these options (see Illustration 2.5):
-
SmartUpdate This GUI tool enables you to manage licenses and update remote modules.
-
Monitoring This option enables access to the Log Viewer, System Status, and Traffic Monitoring GUI clients.
| |
Permissions for all products (Read/[W]rite All, [R]ead Only All, [C]ustomized) c Permission for SmartUpdate (Read/[W]rite, [R]ead Only, [N]one) w Permission for Monitoring (Read/[W]rite, [R]ead Only, [N]one) w Administrator Doug was added successfully and has Read/Write permission for SmartUpdate Read/Write permission for Monitoring
| |
GUI Clients
The Graphical User Interface clients are the management clients you installed. These clients can be installed on as many desktops as you wish, but before they can connect to the management server, you need to enter their IP addresses into the GUI clients configuration (Illustration 2.6). You can use this feature, for example, if you install the GUI clients on your own workstation to enable you to control the management server from your PC. This will allow you to connect remotely to manage the security policy and view your logs and system status. You do not need to configure any clients at all during the installation, but if you are already prepared for this step, you may enter as many clients into this window as necessary. This client information will be saved in a file on your firewall under $FWDIR/conf and will be named gui-clients. This file can be edited directly, but should be edited using the GUI clients window at any time in the future by running cpconfig . If you do not add any GUI clients, you will only be able to connect using the X-Motif GUI from this system.
| Note | If you have installed an enforcement module only, then you will not configure GUI clients. |
-
Press y to define the GUI clients.
-
Type in a GUI client IP address and press Enter .
-
Repeat step two for each GUI client you want to add to the list.
-
Press Ctrl + D to complete the list.
-
Verify that the list is correct, enter y for yes and press Enter to continue.
| |
Configuring GUI clients... ========================== GUI clients are trusted hosts from which Administrators are allowed to log on to this SmartCenter Server using Windows/X-Motif GUI. No GUI Clients defined Do you want to add a GUI Client (y/n) [y] ? y You can add GUI Clients using any of the following formats: 1. IP address. 2. Machine name. 3. "Any" Any IP without restriction. 4. A range of addresses, for example 1.2.3.4-1.2.3.40 5. Wild cards for example 1.2.3.* or *.checkpoint.com Please enter the list of hosts that will be GUI Clients. Enter GUI Client one per line, terminating with CTRL-D or your EOF character. 192.168.0.10 172.17.3.2 ^D Is this correct (y/n) [y] ? y
| |
As you enter GUI clients into this configuration, you type their hostname or IP address, one per line, pressing Enter at the end of each. When you are finished editing the client list, press Ctrl + D to send an end of file (EOF) control character to the program to continue. You are allowed to use wildcards as follows :
-
Any If you enter the word Any , this will allow anyone to connect without restriction (not recommended).
-
Asterisks You may use asterisks in the hostname. For example, 192.168.0.* means any host from 192.168.0.0 to 192.168.0.255, and *.domainname.com means any hostname within the domainname.com domain.
-
Ranges You may use a dash (-) to represent a range of IP addresses. For example, 192.168.0.5-192.168.0.9 means the 5 hosts including 192.168.0.5 and 192.168.0.9 and each one in between.
-
DNS or WINS resolvable hostnames
Illustration 2.7 displays an example of the configured GUI clients window with various options that you can use for your GUI client entries. It is recommended that you avoid using hostnames or domain names , however, since this requires DNS to be configured and working on the firewall. Using IP addresses is the best method since it doesn t rely on resolving, and will continue to work even if you cannot reach your name servers from the management station.
| |
Please enter the list hosts that will be GUI clients. Enter hostname or IP address, one per line, terminating with CTRL-D or your EOF character. *.mycompany.com 192.168.0.5-192.168.0.9 172.17.3.2 172.17.2.* noc.mycompany.com Is this correct (y/n) [y] ? y
| |
Certificate Authority Initialization
Your management server will be a Certificate Authority for your firewall enforcement modules, and will use certificates for Secure Internal Communication (SIC). This is the step in the installation process where the management server s CA is configured, and a certificate is generated for the server and its components .
You will be presented with the Key Hit Session configuration option, where you will be asked to input random text until you hear a beep. The data you enter will be used to generate the certificate, and it is recommended that you enter the data at a random pace; some keystrokes may be close together and others could have a longer pause between them. The more random the data, the less likely that the input could be duplicated . If the system determines that the keystrokes are not random enough, it will not take them as input, and will display an asterisk to the right of the progression bar.
| Note | The Key Hit Session screen will also be presented to you if you have installed an enforcement module, only so that you can generate an internal certificate for SIC. |
-
Type random characters at random intervals into the Key Hit Session window until the progress bar is full, and the message Thank you appears at the bottom of the window as seen in Figure 2.56.
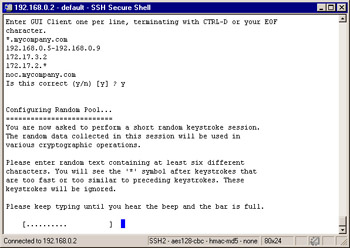
Figure 2.56: Random Pool -
The next step is to initialize the internal Certificate Authority for SIC. It may take a minute for the CA to initialize. Figure 2.57 displays the messages you will receive on the console while configuring the CA. Press Enter to initialize the Certificate Authority.
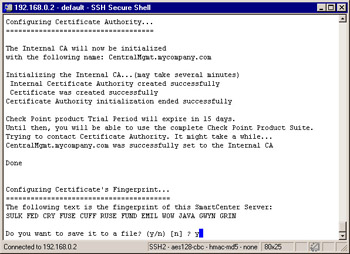
Figure 2.57: Configuring Certificate Authority -
Once the CA is initialized successfully, you will be presented with the fingerprint of the management server s certificate. This fingerprint is unique to your CA and the certificate on your management server used for communication with the management server (another certificate would be generated for VPN). The first time your GUI clients connect to the management server, they will receive the fingerprint so that they can match it to the string listed here and verify that they are connecting to the correct manager. After the first connection, every time the clients connect to the management server, the fingerprint is verified . If the fingerprint presented by the management server doesn t match what s known on the workstation, a warning message will be displayed, and the administrator can decide whether or not to continue with the connection. Type y and press Enter to save the fingerprint to a file.
-
Enter the filename and press Enter . The file will be saved in $CPDIR/conf.
Installation Complete
When the configuration program ends, you may see a few messages on the screen, such as generating GUI-clients INSPECT code, as the system finishes up the installation of the VPN-1/FireWall-1 package. Finally, you will receive the following question, Would You like to reboot the machine [y/n]: (shown in Figure 2.58). If you select not to reboot, then you will exit the installation and go back to a shell prompt. If you choose to reboot, then the system will be restarted.
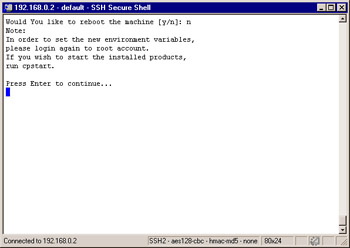
Figure 2.58: Installation Complete
| Note | If you are connected to this firewall remotely, then you will not have access after rebooting. The firewall loads a policy named InitialPolicy, which will prevent all access after an installation. |
-
Enter n for no and press Enter .
-
Press Enter again to exit the installation script.
When you exit the installation script, you will see the shell. The last message you received on the console was concerning new environment variables. Let s address these environment variables for a moment. The firewall will create a .profile in root s home directory, which runs the Check Point environment script located at /opt/CPshrd-54/tmp/.CPprofile.sh (for bourne shell) or .CPprofile.csh (for c shell). This script sets your
Check Point variables such as $FWDIR and $CPDIR among others. See Figure 2.59 for a list of environment variables that are set after installation on a new system. Without setting these variables, various firewall commands will fail. For example, if you log in to the system as your standard user and then type su to root instead of su “ , you will maintain the standard user s environment; then when executing fw unload localhost to unload the InitialPolicy, you will receive the following error message: ld.so.1: /etc/fw/bin/fw: fatal: libkeydb.so: open failed: No such file or directory Killed.
-
When you are ready to restart the server, as a best practice, type sync; sync; reboot and press Enter.
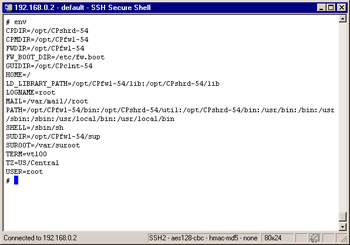
Figure 2.59: Environment Variables
| |
Unload InitialPolicy Script
If you are performing a remote upgrade or installation, you may run into trouble when you reboot at the end of the installation. Before a security policy is loaded, the system will install a default policy, called InitialPolicy, which will block all access to the VPN-1/FireWall-1 host computer. You can log in to the console and verify that the filter is loaded with the fw stat command:
| |
# fw stat HOST POLICY DATE localhost InitialPolicy 8Nov2003 16:51:48 : [>hme1] [<hme1] [>qfe0] [<qfe0] [>qfe1] [<qfe1] [>qfe2] [<qfe2]
If you have access to the console, then log in as root and unload the filter with the following command:
# fw unloadlocal Uninstalling Security Policy from all.all@CentralMgmt Done.
If you do not have access to the console, you can write a shell script to unload the filter and enable it in cron or place it in /etc/rc3.d/S99fwunload. Here s a sample /etc/rc3.d/S99fwunload script that one Check Point user used for his firewalls:
#!/bin/sh . /.profile/opt/CPfw1-54/bin/fw unloadlocal
Unfortunately, just running the unload command is not enough. The various environment variables in the $CPDIR/tmp/.CPprofile.sh have to be defined. To do this, copy the contents of the .CPprofile.sh file into the middle of the script before the unload command or source them using the . /.profile command. Even before you reboot, you can test that the script works. To ensure the policy unload is run after reboot, first verify that you have enabled execute permissions on the file:
chmod +x /etc/rc3.d/S99fwunload
Now you can safely reboot the system and log back into it after it has booted . Don t forget to remove the file once you are back in the firewall. If you are using a version other than NG with Application Intelligence, the commands in the script may have to be changed because the package name will likely be different.
Getting Back to Configuration
Now that installation is complete, you may need to get back into the configuration screens that you ran through at the end of the installation. You can add, modify, or delete any of the previous configuration settings by running cpconfig .
If you did not log in as root or login and type su “ to gain root access, then your Check Point environment variables may not be set, and you could receive the errors displayed in Illustration 2.8:
| |
# /opt/CPshrd-54/bin/cpconfig You must setenv CPDIR before running this program # CPDIR=/opt/CPshrd-54/; export CPDIR # /opt/CPshrd-54/bin/cpconfig ld.so.1: /opt/CPshrd-54/bin/cpconfig_ex: fatal: libcpconfca.so: open failed: No such file or directory Can not execute cpconfig
| |
If this happens, simply login with su “ . The dash is an optional argument to su, which provides you with the environment that you would have, had you logged in directly as root. You can also set your environment by sourcing root s .profile by executing . /.profile if using sh as your shell or source /. cshrc if you are using csh as your shell. See Figure 2.60 for the output of cpconfig on Solaris.
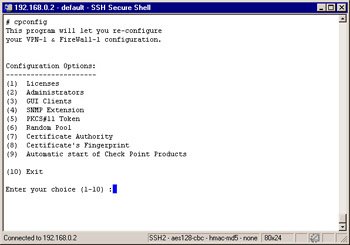
Figure 2.60: cpconfig
There are a few options listed here that did not come up during the initial installation process. Number 5 configures a PKCS#11 Token, which enables you to install an add-on card such as an accelerator card, and number 9 enables you to configure the automatic start of Check Point modules at boot time.
If you installed an enforcement module only, the cpconfig screens will also include the following:
-
Secure Internal Communication Enables a one-time password that will be used for authentication between this enforcement module and its management server, as well as any other remote modules that it might communicate with (see Figure 2.61).
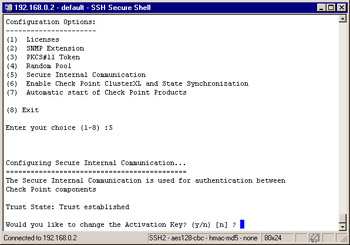
Figure 2.61: Secure Internal Communication Configuration -
High Availability Allows you to enable this enforcement module to participate in a High Availability or Load Sharing configuration with one or more other enforcement modules. This tab will not show up in your installation since you cannot have a management module installed on an enforcement module in a cluster.
Figure 2.62 illustrates the High Availability option available from the cpconfig menu. If you enable high availability here, then you will need to set up state synchronization between the firewalls that will be participating in the cluster. This is covered in detail in Chapter 12.
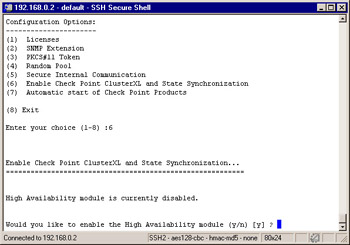
Figure 2.62: High Availability Configuration
- Challenging the Unpredictable: Changeable Order Management Systems
- ERP System Acquisition: A Process Model and Results From an Austrian Survey
- The Effects of an Enterprise Resource Planning System (ERP) Implementation on Job Characteristics – A Study using the Hackman and Oldham Job Characteristics Model
- Healthcare Information: From Administrative to Practice Databases
- Development of Interactive Web Sites to Enhance Police/Community Relations