.NET Synchronization Strategies
|
| < Day Day Up > |
|
The Common Language Infrastructure provides three strategies to synchronize access to instance and static methods and instance fields, namely:
-
Synchronized contexts
-
Synchronized code regions
-
Manual synchronization
Synchronization Context
A context is a set of properties or usage rules that are common to a collection of objects with related run-time execution. The context properties that can be added include policies regarding synchronization, thread affinity, and transactions. In short, a context groups together like-minded objects. In this strategy, we use the SynchronizationAttribute class to enable simple, automatic synchronization for ContextBoundObject objects. Objects that reside in a context and are bound to the context rules are called context-bound objects. .NET automatically associates a synchronization lock with the object, locking it before every method call and releasing the lock (to allow other competing threads to access the object) when the method returns. This is a huge productivity gain, because thread synchronization and concurrency management are among the most difficult tasks that a developer encounters.
The SynchronizationAttribute class is useful to programmers who do not have experience of dealing with synchronization manually because it covers the instance variables, instance methods, and instance fields of the class to which this attribute is applied. It does not, however, handle synchronization of static fields and methods. It also does not help if you have to synchronize specific code blocks; synchronizing the entire object is the price you have to pay for ease of use. SynchronizationAttribute is very handy when programming with System.EnterpriseServices where objects belonging to a context (for example a transaction) are grouped together by the COM+ runtime.
Going back to our Account example, we can make our pseudo-code Account class thread-safe by using the SynchronizationAttribute. The listing below shows an example of synchronizing the Account class using the SynchronizationAttribute:
[SynchronizationAttribute(SynchronizationOption.Required)] public class Account : ContextBoundObject { public ApprovedOrNot Withdraw (Amount) { 1. Check the Account Balance 2. Update the Account with the new balance 3. Send approval to the ATM } }
The SynchronizationAtttribute class has two constructors; a no-argument constructor and a constructor that takes in the SynchronizationOption enumeration as its only parameter. When using the default (no-argument) constructor, the SynchronizationOption is by default SynchronizationOption.Required. The other supported options are Disabled, NotSupported, RequiresNew, and Supported. The table below describes these options.
| Synchronization Option | Description |
|---|---|
| Disabled | The synchronization requirements of the object are ignored, which means that the object is never thread-safe |
| NotSupported | The component is created without any governing synchronization, that is, the object cannot participate in any synchronization, regardless of the status of the caller |
| Required | Ensures that all the objects that are created are synchronized |
| RequiresNew | The component always participates in a new synchronization irrespective of the caller |
| Supported | Objects with this option participate in synchronization only if it exists (dependent on the caller) |
Synchronized Code Regions
The second synchronization strategy concerns the synchronization of specific code regions. These specific code regions are critical pieces of code in methods that either change the state of the object or update another resource (for example a database, file). In this section we will look at the Monitor and ReaderWriterLock classes.
Monitors
Monitors are used to synchronize sections of code by acquiring a lock with the Monitor.Enter() method and then releasing that lock using the Monitor.Exit() method. The concept of a lock is normally used to explain the Monitor class. One thread gets a lock, while others wait until the lock is released. Once the lock is acquired on a code region, you can use the following methods within the Monitor.Enter() and Monitor.Exit() block:
-
Wait() - This method releases the lock on an object and blocks the current thread until it reacquires the lock
-
Pulse() - This method notifies a thread that is waiting in a queue that there has been a change in the object's state
-
PulseAll() - This method notifies all threads that are waiting in a queue that there has been a change in the object's state
The Enter() and Exit() Methods
It is important to note that the Monitor methods are static and can be called on the Monitor class itself rather than an instance of that class. In the .NET Framework, each object has a lock associated with it that can be obtained and released so that only one thread at any time can access the object's instance variables and methods. Similarly, each object in the .NET Framework also provides a mechanism that allows it to be in a waiting state. Just like the lock mechanism, the main reason for this mechanism is to aid communication between threads. The need for such mechanism arises when one thread enters the critical section of an object and needs a certain condition to exist and assumes that another thread will create that condition from the same critical section.
The trick is now that only one thread is allowed in any critical section at any point of time, and when the first thread enters the critical section, no other thread can. So, how will the second thread create a condition in the critical section when the first thread is already in it? For example, if thread A has to get some data from the database and another thread B has to wait until all the data is received and then process the data, thread B calls the Wait() method and waits for thread A to notify it when the data arrives. When the data does arrive, A calls the Pulse() method, which notifies B so that B can process the data. This is achieved by the "Wait and Pulse" mechanism. The first thread enters the critical section and executes the Wait() method. The Wait() method releases the lock prior to waiting and the second thread is now allowed to enter the critical section, changes the required condition, and calls the Pulse() method to notify the waiting thread that the condition has been reached and it can now continue its execution. The first thread then reacquires the lock prior to returning from the Monitor.Wait() method and continues execution from the point where it called Monitor.Wait().
No two threads can ever enter the Enter() method simultaneously. It is analogous to an ATM machine where only one person is allowed to operate at any point of time and no one else can get their chance until after the first person leaves. You can see that the names Enter and Exit have been chosen very aptly. Figure 2 illustrates the Monitor functionality.
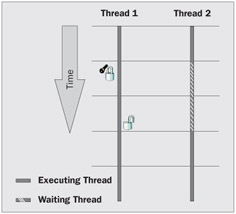
Figure 2
Let's see an example of using the Enter() and Exit() methods, MonitorEnterExit.cs:
using System; using System.Threading; namespace MonitorEnterExit { public class EnterExit { private int result = 0; public EnterExit() { } public void NonCriticalSection() { Console.WriteLine("Entered Thread " + Thread.CurrentThread.GetHashCode()); for(int i = 1; i <= 5; i++) { Console.WriteLine("Result = " + result++ + " ThreadID " + Thread.CurrentThread.GetHashCode()); Thread.Sleep(1000); } Console.WriteLine("Exiting Thread " + Thread.CurrentThread.GetHashCode()); } public void CriticalSection() { //Enter the Critical Section Monitor.Enter(this); Console.WriteLine("Entered Thread " + Thread.CurrentThread.GetHashCode()); for(int i = 1; i <= 5 ; i++) { Console.WriteLine("Result = " + result++ + " ThreadID " + Thread.CurrentThread.GetHashCode()); Thread.Sleep(1000); } Console.WriteLine("Exiting Thread " + Thread.CurrentThread.GetHashCode()); //Exit the Critical Section Monitor.Exit(this); } public static void Main(String[] args) { EnterExit e = new EnterExit( ); if(args.Length > 0) { Thread nt1 = new Thread(new ThreadStart(e.NonCriticalSection)); nt1.Start( ); Thread nt2 = new Thread(new ThreadStart(e.NonCriticalSection)); nt2.Start( ); } else { Thread ct1 = new Thread(new ThreadStart(e.CriticalSection)); ct1.Start( ); Thread ct2 = new Thread(new ThreadStart(e.CriticalSection)); ct2.Start( ); } } } }
When you run the application without providing an input parameter you will get the output from the CriticalSection() method as follows:
Entered Thread 2 Result = 0 ThreadID 2 Result = 1 ThreadID 2 Result = 2 ThreadID 2 Result = 3 ThreadID 2 Result = 4 ThreadID 2 Exiting Thread 2 Entered Thread 3 Result = 5 ThreadID 3 Result = 6 ThreadID 3 Result = 7 ThreadID 3 Result = 8 ThreadID 3 Result = 9 ThreadID 3 Exiting Thread 3
Conversely, when you provide an input parameter, the corresponding output will be from the NonCriticalSection() method:
Entered Thread 2 Result = 0 ThreadID 2 Entered Thread 3 Result = 1 ThreadID 3 Result = 2 ThreadID 2 Result = 3 ThreadID 3 Result = 4 ThreadID 2 Result = 5 ThreadID 3 Result = 6 ThreadID 2 Result = 7 ThreadID 3 Result = 8 ThreadID 2 Result = 9 ThreadID 3 Exiting Thread 2 Exiting Thread 3
In the above example, we declare an EnterExit class with a global result variable and two methods: NonCriticalSection() and CriticalSection(). In the NonCriticalSection() section we don't specify any monitors to lock the section, while in the CriticalSection() method we lock the critical section using a monitor. Both the methods modify the value of result.
The critical section is defined as the code block between the Monitor.Enter(this) and Monitor.Exit(this) lines. The this parameter indicates that the lock should be held on the current object in consideration. It is always confusing to decide on which object to pass into the Enter() method as a parameter. When you need to lock the object so that no other thread can access the object under consideration, pass a this pointer as the parameter. For example, in the AccountWrapper example previously discussed, we passed the Account object to the Monitor, rather than a this pointer of the AccountWrapper object. This was because our intention was to lock the Account object and not the AccountWrapper object. We don't want multiple threads to access the Account object, but we don't mind multiple threads accessing AccountWrapper object.
In the Main() method, we run the appropriate methods based on the arguments provided. If no argument is supplied, we use the CriticalSection() method and, if any argument is supplied, we use the NonCriticalSection() method. In both the cases, we have two threads accessing the methods, started from the Main() method, at the same time and changing the result variable. Though they are declared sequentially, the For loop and the sleep time will ensure that the threads will try to compete for resources.
Comparing the outputs of the critical and non-critical sections makes the concept of critical sections clear. If you observe the output from the NonCriticalSection() method, both the threads nt1 and nt2 are changing the result variable at the same time, thus resulting in a mixed output. This is because there are no locks in the NonCriticalSection() method and thus the method is not thread-safe. Multiple threads can access the method and so the global variable at the same time. On the other hand, if you observe the output from the CriticalSection() method, it is clear that until the thread ct1 exits the critical section, no other thread (ct2 in this case) is allowed access to the critical section.
The Wait() and Pulse() Mechanism
The Wait() and Pulse() mechanism is used for interaction between threads. When a Wait() method is issued on an object, the thread that is accessing that object waits until it gets a signal to wake up. The Pulse() and PulseAll() are used for signaling to waiting thread(s). The following listing is an example of how the Wait() and Pulse() methods work, WaitAndPulse.cs:
The Wait() and Pulse() methods can be called only within the Enter() and Exit() code block.
using System; using System.Threading; namespace WaitAndPulse { public class LockMe { } public class WaitPulse1 { private int result = 0; private LockMe lM; public WaitPulse1() { } public WaitPulse1(LockMe l) { this. lM = l; } public void CriticalSection() { Monitor.Enter(this._lM); //Enter the Critical Section Console.WriteLine("WaitPulse1:Entered Thread " + Thread.CurrentThread.GetHashCode()); for(int i = 1; i <= 5; i++) { Monitor.Wait(this. lM); Console.WriteLine("WaitPulse1:WokeUp"); Console.WriteLine("WaitPulse1:Result = " + result++ + " ThreadID " + Thread.CurrentThread.GetHashCode()); Monitor.Pulse(this. lM); } Console.WriteLine("WaitPulse1:Exiting Thread " + Thread.CurrentThread.GetHashCode()); //Exit the Critical Section Monitor.Exit(this. lM); } } public class WaitPulse2 { private int result = 0; internal LockMe _lM; public WaitPulse2() { } public WaitPulse2(LockMe 1) { this. lM = l; } public void CriticalSection() { Monitor.Enter(this. lM); //Enter the Critical Section Console.WriteLine("WaitPulse2:Entered Thread " + Thread.CurrentThread.GetHashCode()); for(int i = 1; i <= 5; i++) { Monitor.Pulse(this. lM); Console.WriteLine("WaitPulse2:Result = " + result++ + " ThreadID " + Thread.CurrentThread.GetHashCode()); Monitor.Wait(this. lM); Console.WriteLine("WaitPulse2:WokeUp"); } Console.WriteLine("WaitPulse2:Exiting Thread " + Thread.CurrentThread.GetHashCode()); //Exit the Critical Section Monitor.Exit(this. lM); } } public class ClassForMain { public static void Main(String[] args) { LockMe l = new LockMe(); WaitPulse1 e1 = new WaitPulse1(1); WaitPulse2 e2 = new WaitPulse2(1); Thread t1 = new Thread(new ThreadStart(e1.CriticalSection)); t1.Start( ); Thread t2 = new Thread(new ThreadStart(e2.CriticalSection)); t2.Start( ); //Wait till the user enters something Console.ReadLine(); } } }
The output from WaitAndPulse is:
WaitPulse1:Entered Thread 2 WaitPulse2:Entered Thread 3 WaitPulse2:Result = 0 ThreadID 3 WaitPulse1:WokeUp WaitPulse1:Result = 0 ThreadID 2 WaitPulse2:WokeUp WaitPulse2:Result = 1 ThreadID 3 WaitPulse1:WokeUp WaitPulse1:Result = 1 ThreadID 2 WaitPulse2:WokeUp WaitPulse2:Result = 2 ThreadID 3 WaitPulse1:WokeUp WaitPulse1:Result = 2 ThreadID 2 WaitPulse2:WokeUp WaitPulse2:Result = 3 ThreadID 3 WaitPulse1:WokeUp WaitPulse1:Result = 3 ThreadID 2 WaitPulse2:WokeUp WaitPulse2:Result = 4 ThreadID 3 WaitPulse1:WokeUp WaitPulse1:Result = 4 ThreadID 2 WaitPulse1:Exiting Thread 2 WaitPulse2:WokeUp WaitPulse2:Exiting Thread 3 WaitPulse1: Exiting Thread 2 WaitPulse2: WokeUp WaitPulse2: Exiting Thread 3
In the Main() method, we create a LockMe object called 1. Then we create two objects of type WaitPulse1 and WaitPulse2, and pass them as delegates so that the threads can call the CriticalSection() method of both the objects. Note that the LockMe object instance in WaitPulse1 is the same as the LockMe object instance in WaitPulse2, as the object has been passed by reference to their respective constructors. After initializing the objects, we create two threads, t1 and t2, and pass them the two CriticalSection() methods respectively.
Assuming that WaitPulse1.CriticalSection() gets called first, then thread t1 enters the critical section of the method with a lock on the LockMe object and then executes Monitor.Wait() in the for loop. By executing Monitor.Wait(), it is waiting for a runtime notification (Monitor.Pulse()) from another thread to be woken up. We lock the LockMe object because we want only one thread to access the shared LockMe instance at any point of time.
Note that when the thread executes the Monitor.Wait() method, it releases the lock on the LockMe object temporarily, so that other threads can access it. After thread t1 goes into the waiting state, thread t2 is free to access the LockMe object. Even though the LockMe object is a separate object (WaitPulse1 and WaitPulse2), they both refer to the same object reference. Thread t2 acquires the lock on the LockMe object and enters the WaitPulse2.CriticalSection() method. As soon as it enters the for loop, it sends a run-time notification (Monitor.Pulse()) to the thread that is waiting on the LockMe object (t1 in this case) and goes off to the waiting state. As a result, t1 wakes up and acquires the lock on the LockMe object. Thread t1 then accesses the result variable and sends a run-time notification to the thread waiting on the LockMe object (thread t2 in this case). This cycle continues until the for loop ends.
If you compare the description above with the output of the program, the concept will be crystal clear. It is important to note that every Enter() method should be accompanied by an Exit() method or else the program will never quit.
The Enter() method takes an object as a parameter. If the object parameter is null, a method variable, or an object of a value type like an integer an exception will be thrown.
The TryEnter() Method
The TryEnter() method of the Monitor class is similar to the Enter() method in that it tries to acquire an exclusive lock on an object. However, it does not block like the Enter() method. If the thread enters successfully then the TryEnter() method will return true.
Two of the three overloads of TryEnter() take a timeout parameter representing the amount of time to wait for the lock. Let's see an example of how to use TryEnter(), MonitorTryEnter.cs:
using System; using System.Threading; namespace MonitorTryEnter { public class TryEnter { public TryEnter() { } public void CriticalSection() { bool b = Monitor.TryEnter(this, 1000); Console.WriteLine("Thread " + Thread.CurrentThread.GetHashCode() + " TryEnter Value " + b); for (int i = 1; i <= 3; i++) { Thread.Sleep(1000); Console.WriteLine(i + " " + Thread.CurrentThread.GetHashCode() + " "); } Monitor.Exit(this); } public static void Main() { TryEnter a = new TryEnter(); Thread t1 = new Thread(new ThreadStart(a.CriticalSection)); Thread t2 = new Thread(new ThreadStart(a.CriticalSection)); t1.Start(); t2.Start(); } } }
One possible output from MonitorTryEnter is:
Thread 2 TryEnter Value True Thread 3 TryEnter Value False 1 2 1 3 2 2 2 3 3 2 3 3
TryEnter() is useful in situations where contention is likely to occur and you don't want to put the thread sleep for an unspecified period of time. A good example of this is dialing in to an ISP. Assume there are two applications A and B that both want to dial in to an ISP using the same modem. There is only one modem connection available and once the connection is established, we do not know how much time the connected application will stay connected. Suppose application A dials the ISP first and after some time application B wants to dial; there is no point in application B waiting indefinitely, as we don't know how long application A will remain connected. In this case, application B could use TryEnter() to determine whether the modem is already locked by anyother application (A in this case), rather than waiting indefinitely using the Enter() method.
The lock Statement
The lock keyword can be used as an alternative to the methods of the Monitor class. The following two blocks of code are equivalent:
Monitor.Enter(x) ... Monitor.Exit(x) lock(this) { ... }
The following example, Locking.cs, uses the lock keyword instead of the explicit Monitor methods:
using System; using System.Threading; namespace Lock { public class LockWord { private int result = 0; public void CriticalSection() { lock(this) { //Enter the Critical Section Console.WriteLine("Entered Thread " + Thread.CurrentThread.GetHashCode()); for(int i = 1; i <= 5; i++) { Console.WriteLine("Result = " + result++ + " ThreadID " + Thread.CurrentThread.GetHashCode()); Thread.Sleep(1000); } Console.WriteLine("Exiting Thread " + Thread.CurrentThread.GetHashCode()); } } public static void Main() { LockWord e = new LockWord(); Thread t1 = new Thread(new ThreadStart(e.CriticalSection)); t1.Start(); Thread t2 = new Thread(new ThreadStart(e.CriticalSection)); t2.Start(); } } }
The output from Locking.cs will be the same as for MonitorEnterExit (when a parameter has been supplied):
Entered Thread 2 Result = 0 ThreadID 2 Result = 1 ThreadID 2 Result = 2 ThreadID 2 Result = 3 ThreadID 2 Result = 4 ThreadID 2 Exiting Thread 2 Entered Thread 3 Result = 5 ThreadID 3 Result = 6 ThreadID 3 Result = 7 ThreadID 3 Result = 8 ThreadID 3 Result = 9 ThreadID 3 Exiting Thread 3
The ReaderWriterLock Class
A ReaderWriterLock defines the lock that implements single-writer and multiple-reader semantics. This class is popularly used in file operations where the file can be read by multiple threads but can be updated by one and only one thread. The four main methods in the ReaderWriterLock class are:
-
AcquireReaderLock(): This overloaded method acquires a reader lock, using either an integer or a TimeSpan for the timeout value. The timeout can be an invaluable tool used to detect deadlocks.
-
AcquireWriterLock(): This overloaded method acquires a writer lock, using either an integer or a TimeSpan for the timeout value.
-
ReleaseReaderLock(): Releases the reader lock.
-
ReleaseWriterLock(): Releases the writer lock.
Using the ReaderWriterLock class, any number of threads can safely read data concurrently. Only when threads are updating is data locked. Reader threads can acquire a lock only if there are no writers holding the lock. Writer threads can acquire lock only if there are no readers or writers holding the lock.
The following listing, ReadWriteLock.cs, demonstrates the use of the ReaderWriterLock() lock:
using System; using System.Threading; namespace ReadWriteLock { public class ReadWrite { private ReaderWriterLock rwl; private int x; private int y; public ReadWrite() { rwl = new ReaderWriterLock(); } public void ReadInts(ref int a, ref int b) { rwl.AcquireReaderLock(Timeout.Infinite); try { a = this.x; b = this.y; } finally { rwl.ReleaseReaderLock(); } } public void WriteInts(int a, int b) { rwl.AcquireWriterLock(Timeout.Infinite); try { this.x = a; this.y = b; Console.WriteLine("x = " + this.x + " y = " + this.y + " ThreadID = " + Thread.CurrentThread.GetHashCode()); } finally { rwl.ReleaseWriterLock(); } } } public class RWApp { private ReadWrite rw = new ReadWrite(); public static void Main(String[] args) { RWApp e = new RWApp(); //Writer Threads Thread wt1 = new Thread(new ThreadStart(e.Write)); wt1.Start(); Thread wt2 = new Thread(new ThreadStart(e.Write)); wt2.Start(); //Reader Threads Thread rt1 = new Thread(new ThreadStart(e.Read)); rt1.Start(); Thread rt2 = new Thread(new ThreadStart(e.Read)); rt2.Start(); } private void Write() { int a = 10; int b = 11; Console.WriteLine("******** Write *********"); for (int i = 0; i < 5; i++) { this.rw.WriteInts(a++, b++); Thread.Sleep(1000); } } private void Read() { int a = 10; int b = 11; Console.WriteLine("******** Read *********"); for (int i = 0; i < 5; i++) { this.rw.ReadInts(ref a, ref b); Console.WriteLine("For i = " + i + " a = " + a + " b = " + b + " ThreadID = " + Thread.CurrentThread.GetHashCode()); Thread.Sleep(1000); } } } }
An example output from ReadWriteLock could be as follows:
******** Read ********* For i = 0 a = 0 b = 0 ThreadID = 5 ******** Read ********* For i = 0 a = 0 b = 0 ThreadID = 4 ******** Write ******** x = 10 y = 11 ThreadID = 3 ******** Write ******** x = 10 y = 11 ThreadID = 2 For i = 1 a = 10 b = 11 ThreadID = 4 x = 11 y = 12 ThreadID = 3 x = 11 y = 12 ThreadID = 2 For i = 1 a = 11 b = 12 ThreadID = 5 For i = 2 a = 11 b = 12 ThreadID = 4 x = 12 y = 13 ThreadID = 3 x = 12 y = 13 ThreadID = 2 For i = 2 a = 12 b = 13 ThreadID = 5 For i = 3 a = 12 b = 13 ThreadID = 4 x = 13 y = 14 ThreadID = 3 x = 13 y = 14 ThreadID = 2 For i = 3 a = 13 b = 14 ThreadID = 5 For i = 4 a = 13 b = 14 ThreadID = 4 x = 14 y = 15 ThreadID = 3 x = 14 y = 15 ThreadID = 2 For i = 4 a = 14 b = 15 ThreadID = 5
In the above listing, threads wt1 and wt2 are writer threads that acquire writer locks in the WriteInts() method and threads rt1 and rt2 are reader threads that acquire reader locks in the ReadInts() method. In the WriteInts() method, the instance variables x and y are changed to the new values a and b respectively. When thread wt1 or wt2 acquires a writer lock by calling AcquireWriterLock(), no other thread (including the reader threads rt1 and rt2) is allowed access to the object until the thread releases the lock by calling the ReleaseWriterLock() method. This behavior is similar to that of Monitors. In the ReadInts() method, threads rt1 and rt2 acquire reader locks by calling the AcquireReaderLock() method. In the ReadInts() method, both the threads rt1 and rt2 can be given concurrent access to the instance variables x and y. Until the reader threads release their reader locks, neither of the writer threads (wt1 and wt2) is given access to the object. Only reader threads can have concurrent access to the object after acquiring the reader lock.
Monitors might be "too safe" for threads that plan only to read the data rather than modify it. Monitors also have a performance hit associated with them and, for read-only type access, this performance hit is not necessary. The ReaderWriterLock class offers an elegant solution to dealing with read-and-write access to data by allowing any number of concurrent threads to read the data. It locks the data only when threads are updating the data. Reader threads can acquire a lock if and only if there are no writer threads holding the lock. Writer threads can acquire the lock if and only if there are no reader or writer threads holding the lock. Thus, the ReaderWriterLock behaves in the same way as a critical section. ReaderWriterLock also supports a timeout value that can be very useful in detecting deadlocks.
Manual Synchronization
The third synchronization strategy concerns manual techniques and the .NET Framework provides a classic suite of techniques. They give the programmer the ability to create and manage multithreaded applications using a low-level threading API analogous to the WIN32 Threading API.
The table overleaf shows some of the classes in the System.Threading namespace that can be used for Manual Synchronization.
| Class | Description |
|---|---|
| AutoResetEvent | The AutoResetEvent class is used to make a thread wait until some event puts it in the signaled state by calling the Set() method. A signaled state indicates that there are no threads waiting. The AutoResetEvent is automatically reset to non-signaled by the system after a single waiting thread has been released. If no threads are waiting, the event object's state remains signaled. The AutoResetEvent corresponds to a Win32 CreateEvent call, specifying false for the bManualReset argument. |
| ManualResetEvent | The Manual ResetEvent class is also used to make a thread wait until some event puts it in the signaled state by calling Set() method. The state of a Manual ResetEvent object remains signaled until it is set explicitly to the non-signaled state by the Reset() method. The ManualResetEvent corresponds to a Win32 CreateEvent call, specifying true for the bManualReset argument. |
| Mutex | A Mutex lock provides cross-process as well as cross-thread synchronization. The state of the Mutex is signaled if no thread owns it. The Mutex class doesn't have all of the wait-and-pulse functionality of the Monitor class, but it does offer the creation of named mutexes (using the overloaded constructor) that can be used between processes. The benefit of using a Mutex over a Monitor is that a Mutex can be used across processes whereas a Monitor cannot. |
| Interlocked | The Interlocked class provides methods for atomic, non-blocking integer updates that are shared between multiple threads. The threads of different processes can use this mechanism if the variable is in shared memory. |
The ManualResetEvent Class
A ManualResetEvent object can possess only one of the two states; signaled (true) or non-signaled (false). The ManualResetEvent class inherits from the WaitHandle class and the ManualResetEvent constructor takes in a parameter that affirms the initial state of the object. The Set() and Reset() methods return a Boolean value indicating whether the change has taken place successfully or not.
The following listing, NETThreadEvents.cs, shows the use of the ManualResetEvent class with a non-signaled state. First we create an object called mansig and give it a value of false. The WaitOne() method will wait until the mansig turns into true or the time value expires. Since the time duration elapsed while waiting, and the value of mansig was not set to true, it stopped blocking and returned with a value of false:
using System; using System.Threading; namespace NETThreadEvents { public class NonSignaledManual { public static void Main() { ManualResetEvent mansig; mansig = new ManualResetEvent(false) ; Console.WriteLine("ManualResetEvent Before WaitOne " ); bool b = mansig.WaitOne(1000,false); Console.WriteLine("ManualResetEvent After WaitOne " + b); } } }
The output from NETThreadEvents with a value of false is:
ManualResetEvent Before WaitOne ManualResetEvent After WaitOne False
In NETThreadEvents.cs, we construct a ManualResetEvent object with a value of false. The Boolean value false sets the initial state of the ManualResetEvent object to non-signaled. Then we call the WaitOne() method of the base class WaitHandle. The WaitOne() method takes two parameters. The first one is the number of milliseconds for which we want the thread to wait at the WaitOne() method; the thread therefore waits for one second before quitting. The second parameter is the exitContext. If you are already in the synchronization domain for the context and want to exit the synchronization context or if you want to reacquire the synchronization context, you should set this parameter to true.
The program blocks for one second at the WaitOne() method and then quits because of the timeout. The state of the ManualResetEvent is still false, thus the Boolean b returned by WaitOne() is false. Now let's figure out what will happen if we set the state of ManualResetEvent to signaled (true) when we create it:
using System; using System.Threading; namespace NETThreadEvents { public class NonSignaledManual { public static void Main() { ManualResetEvent mansig; mansig = new ManualResetEvent(true); Console.WriteLine("ManualResetEvent Before WaitOne "); bool b = mansig.WaitOne(1000,false); Console.WriteLine("ManualResetEvent After WaitOne " + b); Console.ReadLine(); } } } The output from NETThreadEvents with a value of true is:
ManualResetEvent Before WaitOne ManualResetEvent After WaitOne True
By changing initial state of the ManualResetEvent to signaled, the thread does not wait at the WaitOne() method even though we specified the timeout value of 1,000 milliseconds. When the ManualResetEvent was non-signaled in the previous sample, the thread waited for the state to change to signaled, but it timed out after 1,000 milliseconds. The state is already signaled, so the thread has no reason to wait on the WaitOne() method. To change the state of the ManualResetEvent to non-signaled, we have to call the Reset() method of ManualResetEvent, and to change the state to signaled, we have to call the Set() method.
The following listing, ManualReset.cs, shows the usage of the Reset() method, and the next, ManualSet.cs, shows the usage of the Set() method:
using System; using System.Threading; namespace ManualReset { class Reset { [STAThread] static void Main() { ManualResetEvent manRE; manRE = new ManualResetEvent(true); bool state = manRE.WaitOne(1000,true); Console.WriteLine("ManualResetEvent After first WaitOne " + state); //Change the state to non-signaled manRE.Reset(); state = manRE.WaitOne(5000,true); Console.WriteLine("ManualResetEvent After second WaitOne " + state); } } }
The output from ManualReset is:
ManualResetEvent After first WaitOne True ManualResetEvent After second WaitOne False
In ManualReset, we set the state of the ManualResetEvent object to signaled (True) in its constructor. As a result, the thread does not does not wait at the first WaitOne() method and returns true. Then we reset the state of the ManualResetEvent object to non-signaled (false), so we see that the thread has to wait for five seconds until it times out.
In Manual Set.cs we use the Set() method:
using System; using System.Threading; namespace ManualSet { class Set { [STAThread] static void Main(string[] args) { ManualResetEvent manRE; manRE = new ManualResetEvent(false); Console.WriteLine("Before WaitOne"); bool state = manRE.WaitOne(5000,true); Console.WriteLine("ManualResetEvent After first WaitOne " + state); //Change the state to signaled manRE.Set(); state = manRE.WaitOne(5000,true); Console.WriteLine("ManualResetEvent After second WaitOne " + state); } } }
The output from ManualSet is:
Before WaitOne ManualResetEvent After first WaitOne False ManualResetEvent After second WaitOne True
In Manual Set, we set the initial state of the ManualResetEvent object to non-signaled (false). As a result, the thread has to wait on the first WaitOne() method. Then we set the state to signaled using the Set() method, and the thread refuses to wait on the second WaitOne() method, and quits.
Just as the WaitOne() method waits for a single event object to become signaled, the WaitAll() method waits for all the event objects to become true or signaled, or it will stay there until the timeout occurs and the WaitAny() method waits for any of the event objects to become true or signaled.
The AutoResetEvent Class
The AutoResetEvent class works in a similar way to the ManualResetEvent class. It waits for the timeout to take place or the event to be signaled and then notifies the waiting threads about the event. One important difference between ManualResetEvent and AutoResetEvent is that AutoResetEvent changes state at the WaitOne() method. The following listing shows the usage of the AutoResetEvent class:
using System; using System.Threading; namespace AutoReset { class Auto { [STAThread] static void Main() { AutoResetEvent aRE; aRE = new AutoResetEvent(true); Console.WriteLine("Before First WaitOne "); bool state = aRE.WaitOne(1000,true); Console.WriteLine("After First WaitOne " + state); state = aRE.WaitOne(5000,true); Console.WriteLine("After Second WaitOne " + state); } } }
The output from AutoReset is the same as that from the ManualReset example shown earlier:
Before First WaitOne After First WaitOne True After Second WaitOne False
In AutoReset, the differences between the AutoResetEvent and ManualResetEvent are clear. The state of the event object changes from signaled to non-signaled at the first WaitOne(), and then it changes state again from non-signaled to signaled at the second WaitOne() method. As a result, the thread does not wait at the first WaitOne() method and has to wait at the second WaitOne() method until the time expires.
The Mutex Class
Like the ManualResetEvent and the AutoResetEvent classes, the Mutex class is also derived from the WaitHandle class. It is very similar to the Monitor class with the exception that it can be used for interprocess synchronization. Let's look at an example, WroxMutex.cs:
using System; using System.Threading; namespace WroxMutex { class NETMutex { static Mutex myMutex; public static void Main() { myMutex = new Mutex(true, "WROX"); NETMutex nm = new NETMutex(); Thread t = new Thread(new ThreadStart(nm.Run)); t.Start(); Console.WriteLine("Thread Sleep for 5 sec"); Thread.Sleep(5000); Console.WriteLine("Thread Woke Up"); myMutex.ReleaseMutex(); Console.WriteLine("Before WaitOne"); myMutex.WaitOne(); Console.WriteLine("Lock owned by Main Thread"); } public void Run() { Console.WriteLine("In Run"); myMutex.WaitOne(); Console.WriteLine("Thread sleeping for 10 secs"); Thread.Sleep(10000); Console.WriteLine("End of Run() method"); } } }
The output from WroxMutex is:
Thread will sleep for 5 seconds In Run method Thread Woke Up Thread will sleep for 10 seconds Before WaitOne End of Run method Lock owned by Main Thread
In WroxMutex, we construct a Mutex with a Boolean value indicating that the calling thread should have initial ownership of the Mutex, and a string that is the name of the Mutex. We then create a thread, which calls the Run() method. The Mutex is still owned by the main thread. In the Run() method, the thread t has to wait until the main thread releases the ownership of the Mutex. Thus, the thread t waits at the WaitOne() method call in the Run() method. After sleeping for five seconds, the main thread releases the Mutex lock. Thread t then gets the ownership of the Mutex lock and then goes off for a sleep. Now, the Main() method will not be able to acquire the ownership of the Mutex until the thread t releases the ownership or aborts. In this case, thread t times out and dies, so the ownership of the Mutex is transferred back to the main thread.
The Interlocked Class
Interlocked synchronizes access to an integer variable that is being shared by a number of threads. The operation is carried out in an atomic manner. Let's see an example, WroxInterlocked.cs:
using System; using System.Threading; namespace WroxInterlocked { class WinterLocked { public ManualResetEvent a = new ManualResetEvent(false); private int i = 5; public void Run(object s) { Interlocked.Increment(ref i); Console.WriteLine("{0} {1}", Thread.CurrentThread.GetHashCode () , i); } } public class MainApp { public static void Main() { ManualResetEvent mR = new ManualResetEvent(false); WinterLocked wL = new WinterLocked(); for(int i = 1; i <= 10; i++) { ThreadPool.QueueUserWorkItem(new WaitCallback(wL.Run), 1); } mR.WaitOne(10000, true); } } }
The output for WroxInterLocked is:
Thread ID = 2 Count = 1 Thread ID = 2 Count = 2 Thread ID = 2 Count = 3 Thread ID = 2 Count = 4 Thread ID = 2 Count = 5 Thread ID = 2 Count = 6 Thread ID = 2 Count = 7 Thread ID = 2 Count = 8 Thread ID = 2 Count = 9 Thread ID = 2 Count = 10
WroxInterLocked shows the use of the Interlocked class. We increment the value of the global variable i in an atomic manner. Like the Increment() method, there is also a Decrement() method that reduces the value of a variable by one. In the same manner, the Exchange() method changes the value of two variables passed to it as ByRef parameters.
Static Variables and Methods and Synchronization
Variables and methods that are static are affected differently from instance variables and methods in a synchronization lock. static variables are class variables, whereas variables that belong to an object are object or instance variables. In other words, there will be only one instance of a static variable and a static method will be shared by multiple objects of the same class and every object of the same class has its own set of instance variables and methods. So, if you synchronize a static variable or a static method, the lock is applied on the entire class. As a result, no other object will be allowed to use the static variables of the class.
The ThreadStaticAttribute Class
ThreadStaticAttribute is used on a static variable to create a separate variable for each thread executing it, rather than sharing (default behavior) the static variable across threads. This means that a static variable with the ThreadStaticAttribute is not shared across different threads accessing it. Each thread accessing it will have a separate copy of the same variable. If one thread modifies the variable, another thread accessing it will not be able to see the changes. This behavior is contrary to the default behavior of static variables. In short, ThreadStaticAttribute gives us the best of both worlds (static and instance).
The following listing shows the use of ThreadStaticAttribute (WroxShared.cs):
using System; using System.Threading; namespace WroxStatic { class ThreadStatic { [System.ThreadStaticAttribute()] public static int x = 1; public static int y = 1; public void Run() { for (int i = 1; i <= 10; i++) { Thread t2 = Thread.CurrentThread; x++; y++; Console.WriteLine("i = " + i + " ThreadID = " + t2.GetHashCode() + " x(static attribute)= " + x + " y = " + y); Thread.Sleep(1000); } } } public class MainApp { public static void Main() { ThreadStatic tS = new ThreadStatic(); Thread t1 = new Thread(new ThreadStart(tS.Run)); Thread t2 = new Thread(new ThreadStart(tS.Run)); t1.Start(); t2.Start(); } } }
The output from WroxStatic is:
i = 1 ThreadID = 2 x(static attribute)= 1 y = 2 i = 1 ThreadID = 3 x(static attribute)= 1 y = 3 i = 2 ThreadID = 2 x(static attribute)= 2 y = 4 i = 2 ThreadID = 3 x(static attribute)= 2 y = 5 i = 3 ThreadID = 2 x(static attribute)= 3 y = 6 i = 3 ThreadID = 3 x(static attribute)= 3 y = 7 i = 4 ThreadID = 2 x(static attribute)= 4 y = 8 i = 4 ThreadID = 3 x(static attribute)= 4 y = 9 i = 5 ThreadID = 2 x(static attribute)= 5 y = 10 i = 5 ThreadID = 3 x(static attribute)= 5 y = 11 i = 6 ThreadID = 2 x(static attribute)= 6 y = 12 i = 6 ThreadID = 3 x(static attribute)= 6 y = 13 i = 7 ThreadID = 2 x(static attribute)= 7 y = 14 i = 7 ThreadID = 3 x(static attribute)= 7 y = 15 i = 8 ThreadID = 2 x(static attribute)= 8 y = 16 i = 8 ThreadID = 3 x(static attribute)= 8 y = 17 i = 9 ThreadID = 2 x(static attribute)= 9 y = 18 i = 9 ThreadID = 3 x(static attribute)= 9 y = 19 i = 10 ThreadID = 2 x(static attribute)= 10 y = 20 i = 10 ThreadID = 3 x(static attribute)= 10 y = 21
We all know a static variable is a class variable and its value remains the same across multiple objects of the class. ThreadStaticAttribute allows each thread accessing a static variable to have its own copy. In WroxStatic, variable x has ThreadStaticAttribute applied to it. As a result, each of the threads t1 and t2 will have a separate copy of the static variable x and changes made to x by thread t1 will not be visible to thread t2. On the other hand, changes made to the variable y by thread t1 will be visible to thread t2. If you observe the output of the program, variable x is incremented separately for threads t1 and t2.
The difference between a static variable with a ThreadStaticAttribute and an instance variable is that the static variable does not require an object to access it, whereas an exception will be thrown if you try to access an instance variable without creating the instance of an object.
Synchronization and Performance
Synchronization carries the overhead of the time required to acquire the synchronization lock. As a result, the performance is always poorer than the non-thread-safe version. As multiple threads might be trying to access objects at the same time to acquire the synchronization lock, the performance of the entire application might be affected inadvertently. This is a tradeoff a developer must be aware of when designing larger applications. The important part is that these thread contentions are not visible until a thorough stress test is performed. Stress testing is extremely important in designing large-scale multithreaded applications. The developer has to balance these factors:
-
To be safe, synchronize as much as possible. This makes the program slower, at worst no better than its single-threaded version.
-
For performance, synchronize as little as possible.
Multithreaded design is a continual tradeoff between these two factors.
|
| < Day Day Up > |
|
EAN: 2147483647
Pages: 74