System.Threading Namespace
|
| < Day Day Up > |
|
We have already mentioned that threads in managed code are represented by a System.Threading.Thread class instance. In this section, we will discuss the System.Threading namespace in depth, as well as its contents. The classes available in the System.Threading namespace are listed in the following table.
| Class | Description |
|---|---|
| AutoResetEvent | This event notifies one or more waiting threads that an event has occurred. |
| Interlocked | This class protects against errors by providing atomic operations for variables that are shared by multiple threads. |
| ManualResetEvent | This event occurs when notifying one or more waiting threads that an event has occurred. |
| Monitor | This class provides a mechanism that synchronizes access to objects. |
| Mutex | A synchronization primitive that grants exclusive access to a shared resource to only one thread. It can also be used for inter-process synchronization. |
| ReaderWriterLock | This class defines a lock that allows single-writer and multiple-reader semantics. |
| RegisteredWaitHandle | This class represents a handle that has been registered when calling the RegisterWaitForSingleObject() method. |
| SynchronizationLockException | This exception is thrown when a synchronized method is invoked from an unsynchronized block of code. |
| Thread | This class creates and controls a thread, sets its priority, and gets its status. |
| ThreadAbortException | This exception is thrown when a call is made to the Abort() method. |
| ThreadExceptionEventArgs | This class provides data for the ThreadException event. |
| ThreadInterruptedException | This exception is thrown when a thread is interrupted while it is in a waiting state. |
| ThreadPool | This class provides a pool of threads that can be used to post work items, process asynchronous I/O, wait on behalf of other threads, and process timers. |
| ThreadStateException | This is the exception that is thrown when a thread is in an invalid state for the method call. |
| Timeout | This class simply contains a constant integer used when we want to specify an infinite amount of time. |
| Timer | This class provides a mechanism for executing methods at specified intervals. |
| WaitHandle | This class encapsulates operating system-specific objects that wait for exclusive access to shared resources. |
We won't use all of these classes in this section, but it's useful to understand what this namespace makes available to us. The other classes will be discussed in later chapters.
Thread Class
Right now, we are going to focus on the Thread class, since this class represents our processing threads. This class allows us to do everything, from managing a thread's priority, to reading its status.
Let's start by looking at a table of this class's public methods.
| Public Method Name | Description |
|---|---|
| Abort() | This overloaded method raises a ThreadAbortException in the thread on which it is invoked, to begin the process of terminating the thread. Calling this method usually terminates the thread. |
| AllocateDataSlot() | This static method allocates an unnamed data slot on all the threads. |
| AllocateNamedDataSlot() | This static method allocates a named data slot on all threads. |
| FreeNamedDataSlot() | This static method frees a previously allocated named data slot. |
| GetData() | This static method retrieves the value from the specified slot on the current thread, within the current thread's current domain. |
| GetDomain() | This static method returns the current domain in which the current thread is running. |
| GetDomainID() | This static method returns a unique application domain identifier. |
| GetHashCode() | This method serves as a hash function for a particular type, suitable for use in hashing algorithms and data structures like a hash table. |
| GetNamedDataSlot() | This static method looks up a named data slot. |
| Interrupt() | This method interrupts a thread that is in the WaitSleepJoin thread state. |
| Join() | This overloaded method blocks the calling thread until a thread terminates. |
| ResetAbort() | This static method cancels an Abort() requested for the current thread. |
| Resume() | This method resumes a thread that has been suspended. |
| SetData() | This static method sets the data in the specified slot on the currently running thread, for that thread's current domain. |
| Sleep() | This static and overloaded method blocks the current thread for the specified number of milliseconds. |
| SpinWait() | This static method causes a thread to wait the number of times defined by the iterations parameter. |
| Start() | This method causes the operating system to change the state of the current instance to ThreadState.Running. |
| Suspend() | This method will either suspend the thread, or if the thread is already suspended, has no effect. |
Now let's look at another table, this time containing its public properties.
| Public Property Name | Description |
|---|---|
| ApartmentState | Sets or gets the apartment state of this thread. |
| CurrentContext | This static property gets the current context in which the thread is executing. |
| CurrentCulture | Sets or gets the culture for the current thread. |
| CurrentPrincipal | This static property sets or gets the thread's current principal. It is used for role-based security. |
| CurrentThread | This static property gets the currently running thread. |
| CurrentUICulture | Used at run time, this property sets or gets the current culture used by the Resource Manager to look up culture-specific resources. |
| IsAlive | Gets a value that indicates the execution status of the current thread. |
| IsBackground | Sets or gets a value that indicates whether a thread is a background thread or not. |
| IsThreadPoolThread | Gets a value indicating whether a thread is part of a thread pool. |
| Name | Sets or gets the name of the thread. |
| Priority | Sets or gets a value that indicates the scheduling priority of a thread. |
| ThreadState | Gets a value that contains the states of the current thread. |
Again, we won't use all of these properties and methods in this chapter. We've seen these class members, but it does us little good until we can at least create a thread - or a reference to one. So let's get our feet wet with a simple C# threading example.
Creating a Thread
We are going to use a simple example here. This isn't a good example of why you should use a new thread but it strips off all of the complexities that will be covered later. Create a new console application with a file called simple_thread.cs and place the following code in it:
using System; using System.Threading; public class SimpleThread { public void SimpleMethod() { int i = 5; int x = 10; int result = i * x; Console.WriteLine("This code calculated the value " + result.ToString() + " from thread ID: " + AppDomain.GetCurrentThreadId().ToString()); } public static void Main() { // Calling the method from our current thread SimpleThread simpleThread = new SimpleThread(); simpleThread.SimpleMethod(); // Calling the method on a new thread ThreadStart ts = new ThreadStart(simpleThread.SimpleMethod); Thread t = new Thread(ts); t.Start(); Console.ReadLine(); } }
Now save, compile, and execute the file. Your output should look something like this:
This code calculated the value 50 from thread id: 1400 This code calculated the value 50 from thread id: 1040
Let's walk through this simple example and make sure we understand what is happening here. As we have already established, the threading functionality is encapsulated in the System.Threading namespace. As such, we must first import this namespace into our project. Once the namespace is imported, we want to create a method that can be executed on the main (primary) thread and on our new worker thread. We use SimpleMethod() in our example:
public void SimpleMethod() { int i = 5; int x = 10; int result = i * x; Console.WriteLine("This code calculated the value " + result.ToString() + " from thread ID: " + AppDomain.GetCurrentThreadId().ToString()) ; } As you can see, we are using the AppDomain class that we introduced in Chapter 1 to find out what thread we are running on. This method, whenever it is executed, simply does a sum, and prints the result, along with a report of which thread the calculation was performed on.
Our program's entry point is the Main() method. The first thing we do inside this method is execute our SimpleMethod() method. This calls the method on the same thread as that on which the Main() method is running. The next part is important: we get our first look at creating a thread. Before we can create a thread in C#, we must first create a ThreadStart delegate instance. A delegate is really an object-oriented type-safe function pointer. Since we are going to tell a thread what function to execute, we are essentially passing a function pointer to the thread's constructor. This is demonstrated in our application as follows:
ThreadStart ts = new ThreadStart(simpleThread.SimpleMethod);
One thing to notice is that the method name is not accompanied by parentheses; it simply takes the method's name. Once we have created our ThreadStart delegate, we can then create our Thread for execution. The only constructor for a Thread takes an instance of the ThreadStart delegate. We again demonstrated this in our code with the following line:
Thread t = new Thread(ts);
We are declaring a variable called t as a new Thread. The Thread class constructor takes the ThreadStart delegate as its sole parameter.
On our next line we call the Start() method of the Thread object. This starts off a new execution thread, which begins by invoking the ThreadStart delegate we passed into the constructor, which in turn invokes the method. We follow this up with Console.ReadLine() so the program will wait on your key input before exiting our main thread:
t.Start(); Console.ReadLine();
When the method is executed this second time, we can see that the code is indeed executing on a different thread.
OK, so we've created a thread, but that doesn't really provide any insight into the power of threads. The fact that we are displaying different thread IDs doesn't really do much - we haven't executed more than one thing at once yet. To see how we can use this same threading code in a more realistic application, we are going to create another program that simulates a long process executing in the background while another process executes in the foreground. Create a new console application and place this code in a new file called do_something_thread.cs:
using System; using System.Threading; public class DoSomethingThread { static void WorkerMethod() { for(int i = 1; i < 1000; i++) { Console.WriteLine("Worker Thread: " + i.ToString()); } } static void Main() { ThreadStart ts = new ThreadStart(WorkerMethod); Thread t = new Thread(ts); t.Start(); for(int i = 1; i < 1000; i++) { Console.WriteLine("Primary Thread: " + i.ToString()); } Console.ReadLine(); } }
Your output may be somewhat different every time. The thread execution will be switched at different points in the loop every time. But your concatenated results will look something like this:
Primary Thread: 1 Primary Thread: 2 Primary Thread: 3 ... Worker Thread: 743 Worker Thread: 744 Worker Thread: 745 ... Primary Thread: 1000
We won't walk through this code because it doesn't introduce any new coding techniques. However, as we can see, execution time is shared between the two threads. Neither thread is completely blocked until the other finishes. Instead, each thread is given a small amount of time to execute. After one thread has run out of execution time, the next thread begins executing in its time slice. Both threads continue to alternate until execution is completed. Actually, there are more than just our two threads that are alternating and sharing time slices. We aren't just switching between the two threads in our application. In reality, we are sharing our execution time with many other threads currently running on our computer.
ThreadStart and Execution Branching
Take a look, once again, at the ThreadStart delegate we mentioned earlier. We can do some interesting work with these delegates. Let's examine a quick example in a real-world scenario. Suppose that you want to perform some background routine when a user launches an application. Depending on who is launching the application, you want to perform different routines. For instance, let's say that when an administrator logs into an application, you want to run a background process that will gather report data and format it. That background process will alert the administrator when the report is available. You probably wouldn't want to perform the same reporting function for an ordinary user as you would for an administrator. This is where the object-oriented nature of ThreadStart is useful.
Let's look at some example code. We aren't going to code the exact scenario described above, but we will show you how you can branch based on a certain criteria defined in a ThreadStart. Create a new console application and place the following code in a file called ThreadStartBranching.cs:
using System; using System.Threading; public class ThreadStartBranching { enum UserClass { ClassAdmin, ClassUser } static void AdminMethod() { Console.WriteLine("Admin Method"); } static void UserMethod() { Console.WriteLine("User Method"); } static void ExecuteFor(UserClass uc) { ThreadStart ts; ThreadStart tsAdmin = new ThreadStart(AdminMethod); ThreadStart tsUser = new ThreadStart(UserMethod); if(uc == UserClass.ClassAdmin) ts = tsAdmin; else ts = tsUser; Thread t = new Thread(ts); t.Start(); } static void Main() { // execute in the context of an admin user ExecuteFor(UserClass.ClassAdmin); // execute in the context of a regular user ExecuteFor(UserClass.ClassUser); Console.ReadLine(); } }
The output from the code is quite simple:
Admin Method User Method
We will detail some of the important points to observe here. First, you will notice that we created an enumeration of the types of user that may be executing code:
enum UserClass { ClassAdmin, ClassUser } The next thing you'll notice is that we created two methods: AdminMethod() and UserMethod(). These would theoretically execute a long series of instructions that would be completely different for the two different user types. In our case, we just want to identify that they have run so we write them out to the console:
static void AdminMethod() { Console.WriteLine("Admin Method"); } static void UserMethod() { Console.WriteLine("User Method"); } The next thing you'll notice is that within the ExecuteFor() method we declared a variable called ts as a ThreadStart class, but didn't create an instance with the New keyword. We then created two new ThreadStart objects that point to the different methods created above:
ThreadStart ts; ThreadStart tsAdmin = new ThreadStart(AdminMethod); ThreadStart tsUser = new ThreadStart(UserMethod);
So, now we have two new ThreadStart objects and a variable that can hold an instance of a ThreadStart. Then we branch our code with an If statement and set our empty ts variable to the instance of the ThreadStart that coincides with our business rule:
if(uc == UserClass.ClassAdmin) ts = tsAdmin; else ts = tsUser;
Lastly, we pass the dynamically assigned ThreadStart delegate to our Thread constructor to create a thread, and begin its execution:
Thread t = new Thread(ts); t.Start();
Thread Properties and Methods
As we showed in the beginning of this chapter, there are many properties and methods of the Thread class. We promised that controlling the execution of threads was made much simpler with the System.Threading namespace. So far, all we have done is create threads and start them.
Let's look at two more members of the Thread class; the Sleep() method and the IsAlive property. In Chapter 1 we said that a thread may go to sleep for a time until it is clock-interrupted. Putting a thread to sleep is as simple as calling the static Sleep() method. We also stated that we could determine a thread's state. In the following example we are going to use the IsAlive property to determine if a thread has completed its executions, and the Sleep() method to pause the execution of a thread. Look at the following code, thread_sleep.cs, where we will make use of both of these members:
using System; using System.Threading; public class ThreadState { static void WorkerFunction() { string ThreadState; for(int i = 1; i < 50000; i++) { if(i % 5000 == 0) { ThreadState = Thread.CurrentThread.ThreadState.ToString(); Console.WriteLine("Worker: " + ThreadState); } } Console.WriteLine("Worker Function Complete"); } static void Main() { string ThreadState; Thread t = new Thread(new ThreadStart(WorkerFunction)); t.Start(); while(t.IsAlive) { Console.WriteLine("Still waiting. I'm going back to sleep."); Thread.Sleep(200); } ThreadState = t.ThreadState.ToString(); Console.WriteLine("He's finally done! Thread state is: " + ThreadState); Console.ReadLine(); } }
Your output should look similar to the following (try experimenting with the values in the for loop and passed to the sleep() method to see different results):
Still waiting. I'm going back to sleep. Worker: Running Worker: Running Worker: Running Worker: Running Worker: Running Worker: Running Worker: Running Worker: Running Worker: Running Worker: Running Worker Function Complete He's finally done! Thread state is: Stopped
Let's look at the Main() method where we have used our new concepts First, we create a thread and pass it the method we want to execute as a delegate:
Thread t = new Thread(new ThreadStart(WorkerFunction)); t.Start();
Notice that instead of creating a variable to hold our ThreadStart class, we simply created one on the fly and passed it as the parameter of our Thread constructor. As usual, our Main() method continues to execute alongside our new thread as the processor switches between them. Then we use the IsAlive property of our newly created thread to see if it is still executing. We will continue to test this variable. While the worker thread is alive, the main thread will continue to sleep for 200 milliseconds, wake up the thread, and test if our worker thread is still alive again:
while(t.IsAlive) { Console.WriteLine("Still waiting. I'm going back to sleep."); Thread.CurrentThread.Sleep(200); } Next we want to look at the ThreadState property that we have used twice in our code. The ThreadState property is actually a property that returns an enumerated type. The enumeration tells you exactly what state the thread is in. We can either test this property with an if statement as we did in our last example or use the ToString() method on the property and write out its state in text form:
ThreadState = t.ThreadState.ToString(); Console.WriteLine("He's finally done! Thread state is: " + ThreadState); The rest of this code is standard and doesn't need to be reviewed. There are some important things to note. The first is that we tell one thread to sleep for a specified period so that we yield execution to our other threads. We do that with the Thread object's Sleep() method - passing in the length of time in milliseconds that we want to the thread to sleep. In addition, we can test our threads to see if they have finished executing by using the IsAlive property. Lastly, we can use the ThreadState property of our thread instances to determine their exact thread state.
Thread Priorities
The thread priority determines the relative priority of the threads against each other. The ThreadPriority enumeration defines the possible values for setting a thread's priority. The available values are:
-
Highest
-
AboveNormal
-
Normal
-
BelowNormal
-
Lowest
When a thread is created by the runtime and it has not been assigned any priority then it will initially have the Normal priority. However, this can be changed using the ThreadPriority enumeration. Before seeing an example for the thread priority, let's see what a thread priority looks like. Let's create a simple threading example that just displays the name, state, and the priority information about the current thread, thread_priority.cs:
using System; using System.Threading; public class ThreadPriority { public static Thread worker; static void Main() { Console.WriteLine("Entering void Main()"); worker = new Thread(new ThreadStart(FindPriority)); // Let's give a name to the thread worker.Name = "FindPriority() Thread"; worker.Start(); Console.WriteLine("Exiting void Main()"); } public static void FindPriority() { Console.WriteLine("Name: " + worker.Name); Console.WriteLine("State: " + worker.ThreadState.ToString()); Console.WriteLine("Priority: " + worker.Priority.ToString()); } }
There is a simple method called FindPriority() that displays the name, state, and priority information of the current thread, which produces output like the following:
Entering the void Main() Exiting the void Main() Name: FindPriority() Thread State: Running Priority: Normal
We know the worker thread is running with a Normal priority. Let's add a new thread, and call our reporting method with a different priority. Here's thread_priority2.cs:
using System; using System.Threading; public class ThreadPriority2 { public static Thread worker; public static Thread worker2; static void Main() { Console.WriteLine("Entering void Main()"); worker = new Thread(new ThreadStart(FindPriority)); worker2 = new Thread(new ThreadStart(FindPriority)); // Let's give a name to the thread worker.Name = "FindPriority() Thread"; worker2.Name = "FindPriority() Thread 2"; // Give the new thread object the highest priority worker2.Priority = System.Threading.ThreadPriority.Highest; worker.Start(); worker2.Start(); Console.WriteLine("Exiting void Main()"); Console.ReadLine(); } static public void FindPriority() { Console.WriteLine("Name: " + worker.Name); Console.WriteLine("State: " + worker.ThreadState.ToString()); Console.WriteLine("Priority: " + worker.Priority.ToString()); } } The output from thread_priority2.cs will be something like the following:
Entering void Main() Name: FindPriority() Thread2 State: Running Priority: Highest Exiting void Main() Name: FindPriority() Thread State: Running Priority: Normal
Threads are scheduled for execution based on the priority set using the Priority property. Every operating system will execute a thread priority differently and the operating system could change the priority of the thread.
There is no way that our application can restrict the operating system from changing the priority of the thread that was assigned by the developer, since the OS is the master of all threads and it knows when and how to schedule them. For example, the priority of the thread could be dynamically changed by the OS due to several factors, such as system events like user input that has higher priority, or lack of memory that will trigger the garbage-collection process.
Timers and Callbacks
We've seen some simple examples of threading. What we haven't covered at all is the issue of synchronization, although we will cover that in much greater detail in the next chapter. As threads run out of sequence from the rest of the application code, we cannot be certain that actions affecting a particular shared resource that occur in one thread will be completed before code in another thread wants to access that same shared resource. There are various methods of dealing with these issues, but here we will cover one simple way; the use of timers. Using a timer, we can specify that a method is executed at a specific regular interval, and this method could check that the required actions have been completed before continuing. This is a very simple model, but can apply to a variety of situations.
Timers are made up of two objects, a TimerCallback and a Timer. The TimerCallback delegate defines the method to be called at a specified interval, whereas the Timer is the timer itself. The TimerCallback associates a specific method with the timer. The Timer's constructor (which is overloaded) requires four arguments. The first is the TimerCallback specified earlier. The second is an object that can be used to transmit state across to the method specified. The last two arguments are the period after which to start periodic method calls, and the interval between subsequent TimerCallback method calls. They can be entered as integers or longs representing numbers of milliseconds, but as you will see below, an alternative is to use the System.TimeSpan object with which you can specify the intervals in ticks, milliseconds, seconds, minutes, hours, or days.
The easiest way to show how this works is by demonstration, so below we will detail an application that fires two threads. The second thread will not perform its operations until the first has completed its operations; thread_timer.cs:
using System; using System.Threading; using System.Text; public class TimerExample { private string message; private static Timer tmr; private static bool complete;
Everything is straightforward above. We declare tmr as static and class-wide as it will be defined in the Main() method:
public static void Main() { TimerExample obj = new TimerExample(); Thread t = new Thread(new ThreadStart(obj.GenerateText)); t.Start(); TimerCallback tmrCallBack = new TimerCallback(obj.GetText); tmr = new Timer(tmrCallBack, null, TimeSpan.Zero, TimeSpan.FromSeconds(2));
Here we fire up a new thread that will execute on the GenerateText() method, which iterates through a for loop to generate a string and store it in the class-wide message field:
do { if( complete ) break; } while(true); Console.WriteLine("Exiting Main..."); Console.ReadLine(); }
The above loop just freezes the Main() loop until the complete field is true. In a GUI different methods could be used, as the Application.Run() method puts the application in a perpetual loop anyway:
public void GenerateText() { StringBuilder sb = new StringBuilder(); for(int i = 1; i < 200; i++) { sb.Append(sb.Length, "This is Line "); sb.Append(sb.Length, i.ToString()); sb.Append(sb.Length, System.Environment.NewLine); } message = sb.ToString(); }
Above is the first method used, which just generates 200 lines of text using a StringBuilder object, and then stores them in the message field.
public void GetText(object state) { if(message == null) return; Console.WriteLine("Message is :"); Console.WriteLine(message); tmr.Dispose(); complete = true; } } // class
The last method used in this class is fired every two seconds by the timer. If message hasn't been set yet, then it exits; otherwise it outputs a message and then disposes of the timer. This stops the timer from continuing to count. This should be performed as soon as the timer is no longer necessary.
The output from thread_timer.cs will be as follows:
Message is : This is Line 1 This is Line 2 ... This is Line 199 This is Line 200 Exiting Main...
Spinning Threads with Threads
We've seen in code how to spawn a thread from the void Main(). In a similar way, we can also spawn multiple threads within a thread. For example, let's say we have a Car class that has a public method called StartTheEngine(). The StartTheEngine() method calls another three private methods called CheckTheBattery(), CheckForFuel(), and CheckTheEngine(). Since each of these tasks, checking the battery, fuel, and engine, can happen simultaneously, we can run each of these methods in a different thread. Here is how the Car class is implemented in thread_spinning.cs:
using System; using System.Threading; class Car { public void StartTheEngine() { Console.WriteLine("Starting the engine!"); //Declare three new threads Thread batt = new Thread(new ThreadStart(CheckTheBattery)); Thread fuel = new Thread(new ThreadStart(CheckForFuel)); Thread eng = new Thread(new ThreadStart(CheckTheEngine)); batt.Start(); fuel.Start(); eng.Start(); for(int i = 1; i < 100000000; i++) { // some real executing code here } Console.WriteLine("Engine is ready!"); } private void CheckTheBattery() { Console.WriteLine("Checking the Battery!"); for(int i = 1; i < 100000000; i++) { // some real executing code here } Console.WriteLine("Finished checking the Battery!"); } private void CheckForFuel() { Console.WriteLine("Checking for Fuel!"); for(int i = 1; i < 100000000; i++) { // some real executing code here } Console.WriteLine("Fuel is available!"); } private void CheckTheEngine() { Console.WriteLine("Checking the engine!"); for(int i = 1; i < 100000000; i++) { // some real executing code here } Console.WriteLine("Finished checking the engine!"); } }
In the StartTheEngine() method, we create three threads and then start each of them one by one. Let's add an entry point to our class so we can see some results of our code:
public static void Main() { Console.WriteLine("Entering void Main!"); int j ; Car myCar = new Car(); Thread worker = new Thread(new ThreadStart(myCar.StartTheEngine)); worker.Start(); for(int i = 1; i < 100000000; i++) { // } Console.WriteLine("Exiting void Main!"); Console.ReadLine(); }
In the void Main() method we simply create one more thread and execute the StartTheEngine() method in that thread, as illustrated in Figure 1.

Figure 1
The output should look something like the following:
Entering void Main! Exiting void Main! Starting the engine! Checking the Battery! Checking for Fuel! Checking the engine! Finished checking the Battery! Fuel is available! Finished checking the engine! Engine is ready!
As you can see, each of these methods works in it's own thread and is executed in its own time-sliced slot.
Spinning Threads with Threads with Threads
We can split the Car class into separate classes and we could build two more methods in a new Engine class called check1() and check2(). Then the Engine class will execute the check1() and check2() methods in its own thread as shown in Figure 2.

Figure 2
We'll remove the CheckTheEngine() method from the Car class and create one more class called Engine; see thread_spinning2.cs:
using System; using System.Threading; class Engine { public void CheckTheEngine() { Thread chck1 = new Thread(new ThreadStart(Check1)); Thread chck2 = new Thread(new ThreadStart(Check2)); chck1.Start(); chck2.Start(); Console.WriteLine("Checking the engine!"); for(int i = 1; i < 100000000; i++) { // some real executing code here } Console.WriteLine("Finished checking the engine!"); } private void Check1() { Console.WriteLine("Starting the engine check!!"); for(int i = 1; i < 100000000; i++) { // some real executing code here } Console.WriteLine("Finished engine check1!"); } private void Check2() { Console.WriteLine("Starting the engine check2!"); for(int i = 1; i < 100000000; i++) { // some real executing code here } Console.WriteLine("Finished engine check2!"); } }
The Engine class has the public method CheckTheEngine() that creates two more threads and calls the check1() and check2() methods. Here is how the results may look:
Entering void Main! Exiting void Main! Starting the engine! Checking the Battery! Checking for Fuel! Checking the engine! Starting the engine check!! Starting the engine check2! Finished checking the Battery! Fuel is available! Engine is ready! Finished engine check1! Finished checking the engine! Finished engine check2!
As you can see, spawning threads from within threads is very easy. However, you may be interested in knowing the disadvantages: as the number of active threads goes up, the performance degrades.
Performance Considerations
The more threads you create, the more work the system has to do to maintain the thread contexts and CPU instructions. The Processes tab of the Windows Task Manager will tell you how many processes and threads are currently running. However, these will be OS processes and they're not equivalent to the AppDomains. You can also look at the running threads while debugging a given .NET application by using the threads window.
If we want to know how many threads are running inside the CLR then you have to use the Windows Performance Monitor tool and add a couple of CLR-specific performance categories. The CLR exposes a performance counter category called .NET CLR LocksAndThreads and we can use this category to get more information about the CLR-managed threads. Let's run the Performance Monitor and add the counters shown in the following table from the .NET CLR LocksAndThreads category.
| Performance Counter | Description |
|---|---|
| # of current logical Threads | This counter displays the number of current managed threads in the application and includes both the running and stopped threads. |
| # of current physical Threads | This counter displays the number of OS threads created and owned by the CLR. This counter may not map one to one with managed threads. |
| # of total recognized threads | This counter displays the number of current threads recognized by the CLR |
| Current Queue Length | This counter displays number of threads that are waiting to acquire locks in the managed application. |
| Total # of Contentions | This counter displays the number of failures when the managed applications try to acquire locks. |
Here is how the values looks for our thread_spinning2 application:
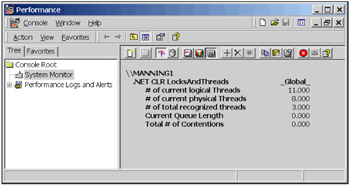
Here is a comprehensive overview of the ".NET CLR LocksAndThreads" performance counter information.
-
The counter # of current local Threads specifies that 11 managed threads are created and owned by the CLR

Since we've added the counter instance "_Global_", we see all the threads created by the CLR.
-
The counter # of current physical Threads specifies that 8 OS threads are created and owned by the CLR
-
The counter # of total recognized Threads specifies that 3 OS threads are recognized by the CLR and they're created by the Thread object
-
The counter Total # of Contentions specifies that the runtime did not fail when it tried to acquire managed locks. Managed lock fails are bad for the execution of code
|
| < Day Day Up > |
|
EAN: 2147483647
Pages: 74