Chapter 10: Configuring Connections to the Universe
| |
Even after you complete the installation of Windows Server 2003, you're still faced with a number of decisions you have to make before you can safely say, "mission accomplished." What role will the server play in the network? Will it host multiple network interfaces? Will you need remote access? In this chapter, you look into the answers to these questions and see the steps you can take to implement your decisions.
| Warning | Before you get too excited, we want to warn you that certain topics brought in is chapter are just flat-out complicated. We try to give a general overview of each topic, but in some cases, these issues are beyond the scope of this book. When this happens, we refer you to other resources and materials where you can find meaningful, reliable, more detailed coverage of the topics. |
Meeting the Configure Your Server Wizard
In this section, you go through the steps needed to get your Windows Server 2003 up and running. Starting at square one, you see that the first time you log on to Windows Server 2003 after completing the initial installation, you're Part III: Servers, Start Your Engines! confronted with the Configure Your Server Wizard. This wizard appears by default when you first log on. You can always access it again by choosing Start All Programs Administrative Tools Configure Your Server.
This wizard has a new look and functions completely differently than the Configure Your Server wizard in Windows 2000. If you're used to a Windows 2000 environment, brace yourself for a bit of newness.
First, from the Welcome page of the Configure Your Server wizard, click Next to move to the Preliminary Steps page. The Preliminary Steps page informs you that the computer must have the following:
-
Network connectivity
-
Internet connectivity
-
Peripherals (such a printers and external drives ) that are properly attached and powered on
-
The distribution files for Windows Server 2003 (if not the entire CD) available
If you can curtsey to these stipulations, click Next.
You can use the Server Role page in Figure 10-1 to install a wide range of networking services, including the following:
-
Dynamic Host Configuration Protocol (DHCP) - see Chapter 14
-
Domain Name Service (DNS) - see Chapter 14
-
Active Directory - see Chapter 11 and 12
-
File services - see Chapter 16
-
Print services - see Chapter 13
-
Remote Access service - covered later in this chapter
-
Internet Information Services (IIS) - covered later in this chapter
-
Windows Internet Naming Service (WINS) - see Chapter 14
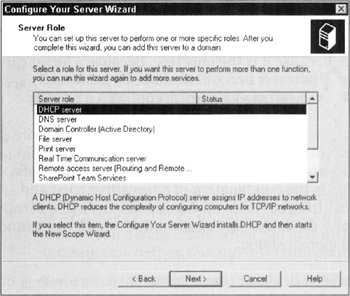
Figure 10-1: The server roles that can be installed through the Configure Your Server Wizard.
As for the more advanced network services, such as Terminal Services, Streaming Media server, SharePoint Team Services, and Real Time Communication server, you'll need to consult other documentation, such as the Windows Server 2003 Resource Kit.
Planting your first forest
To get your Windows Server 2003 system up and running, the first bit of information you need to feed it is whether it's the first server in your domain. If it is the first server, the Configure Your Server Wizard helps you install the core services required to maintain a domain. If it's not the first server on the network, you can set the server up as another domain controller or as just a member server. You can also elect to make the server a stand-alone server.
If you're setting up the first domain controller in the first domain for your entire organization, you're setting up more than just a domain; you're also defining the root of your first tree and the root of your first forest. In Active Directory domain lingo, a group of computers that shares a single namespace and DNS structure is called a domain. A group of domains linked in parent-child relationships (also like the roots of a tree) is called a tree. A domain tree is a set of domains connected through a two-way transitive trust, sharing a common schema, configuration, and global catalog. The domains also form a contiguous hierarchical namespace with one domain being the domain root.
The first domain installed in a tree is considered the root domain of that tree. It would be considered the forest root domain only if it was also the first domain in the forest, which is discussed next.
Groups of trees are linked together as a forest. The capability to organize a network into complex logical namespace structures gives Windows 2003 (and Windows 2000) its scalability and versatility as an enterprise-capable network operating System.
A forest is the collection of one or more domains that share a common schema, configuration, and global catalog. A forest may or may not have a common domain namespace. If the forest has only a single tree, it will have a common domain namespace because it is the only tree. Because a forest can have more than one domain tree (it is not a requirement, but it is allowed), these different domain trees will have their own individual, contiguous namespaces.
All the domains in a domain tree and all the trees in a single forest have the connectivity benefit of the two-way, transitive trust relationship, which is the default trust relationship between Windows 2000 and 2003 domains. A two-way, transitive trust is the combination of a transitive trust and a two-way trust. This complete trust between all domains in an Active Directory domain hierarchy helps form the forest as a single unit through its common schema, configuration, and global catalog.
The first Windows 2000 or 2003 domain installed in the forest is considered to be the forest root domain.
The first domain controller you create also defines the domain. If it's the first domain on your network, it's also the root of the first tree and the first tree in the forest. For more detailed information on the logical structure of domains, trees, and forests, please consult the Windows Server 2003 Resource Kit.
For now, we assume that your server is the first server on the network. To set up your server, follow these steps:
-
On the Configure Your Server Wizard, click Next. Then, on the Preliminary Steps page, click Next.
REMEMBER The Configure Your Server Wizard appears automatically the first time you log on to your Windows Server 2003. If it's not already open , launch it from the Start menu by choosing Start All Programs Administrative Tools Configure Your Server.
-
Select the Domain Controller (Active Directory) option and then click Next.
A summary of the changes to be made is displayed.
-
Click Finish.
The Active Directory Installation Wizard is launched.
Tip During this configuration process, you may be prompted for the Windows Server 2003 distribution CD. If so, place the CD in the local CD-ROM drive or provide a path to a local or network copy of the distribution files.
-
Click Next.
The Domain Controller Type page appears.
-
Assuming that this is the first domain controller in your new domain, select the Domain Controller for a New Domain Option. Click Next.
The Create New Domain page appears.
-
Assuming that this is the first domain in a new forest (which implies that it's also a new tree), select the Domain in a New Forest option. Click Next.
The New Domain Name page appears.
-
Type the name of your new domain.
The name must be in fully qualified domain name (FQDN) format, such as my company.local or googleplex.com . This is not the name of your server; you defined that when you first installed Windows Server 2003. Instead, this defines the top-level domain name.
You can use the same name that will be used on the Internet to access your organization (such as googleplex.com ), or you can use an internal, network-only domain name that will not be Internet capable (such as mycompany.local or mycompany.ad ).
-
Click Next.
The NetBIOS Domain Name page appears, with an automatically generated name for the domain. This name is used by systems and applications that are not Active Directory compliant. In most cases, this name is just the first 15 characters before the first period of your domain name, such as googleplex or mycompany.
-
If the suggested name is satisfactory (it usually is), click Next. Otherwise, provide a new name and then click Next.
The only restrictions on the NetBIOS domain name are that it must be 15 characters or less, use only NetBIOS- and DNS-approved characters ( Aa-Zz , 1-9, and hyphen), and be unique within the domain in which it resides.
The Database and Log Folders page appears, requesting the paths for the storage folders for the main directory and log files. Defining paths to hard drives other than the one hosting the system partition improves overall performance, but the default suggested locations is sufficient for most purposes.
-
Click Next.
The Shared System Volume page appears, requesting the path to store the SYSVOL folder. This can be defined on a separate hard drive to improve performance or the default suggestion can be accepted.
-
Click Next.
Unless you already have DNS installed, the DNS Registration Diagnostics page appears. This indicates that no DNS server was located to service the new zone being created for the new domain.
-
Select the Install and Configure DNS Server on This Computer option and then click Next.
The Permissions page appears, asking whether to use permissions that are compatible with pre-Windows 2000 systems. In most cases, it's a good idea to use permissions compatible with pre-Windows 2000 Servers only when you're sure you'll be using legacy systems, such as Windows 9 x or Windows NT Workstation, because this affects the security of the domain and possibly the forest and is required only when using these legacy systems in the domain.
When you elect to use permissions compatible with pre-Windows 2000 Server operating systems, you allow the Active Directory Installation Wizard to configure the domain (and possibly the forest if this installation is the first one in the forest), so the Anonymous Logon group and the Everyone security groups are added to the Pre-Windows 2000 Compatible Access group.
If you do not want the Anonymous Logon group to be able to read user and group information for the domain and no legacy clients are involved, you should choose the Permissions compatible only with Windows Server 2003 Operating Systems option.
-
Select the desired option for a permissions preference and then click Next.
The Directory Services Restore Mode Administrator Password page appears, requesting a unique password to be used to enter into Directory Services Restore mode if a system failure requires an Active Directory restore.
-
Type a password and then click Next.
The Summary page appears, listing the changes that will be made to the system.
-
Click Next.
The installation and configuration process takes a considerable amount of time (up to an hour on some systems), so hurry up and wait.
-
If your system was using a DHCP assign (dynamically or automatically assigned) IP address, you may see a warning pop-up stating that you need to define a static IP address for reliable DNS services. Click OK in this dialog box.
-
In the Local Area Connection Properties dialog box, select the Internet Protocol (TCP/IP) component, and then click Properties.
The Internet Protocol (TCP/IP) Properties dialog box appears.
-
Choose the Use the Following IP Address option. In the IP Address and Subnet Mask boxes, type your preferred settings. Click OK.
If you don't have or don't know an IP address to assign, use the following:If you don't have or don't know an IP address to assign, use the following: 192.168.0.1 and 255.255.255.0. For more details on managing, assigning, and configuring the Transmission Control Protocol/Internet Protocol (TCP/IP), please see Chapter 14.
-
Click Close to close the Local Area Connection Properties dialog box.
-
When the installation complete message is displayed, click Finish.
-
When you're prompted to reboot your system, click Restart Now.
-
After the system reboots, log back in. You're finished!
At this point, you can decide which network or application components you want to install on the new server. The second, third, and fourth servers installed on a network can each have a different network role, including serving as one of the following:
-
A peer domain controller hosting Active Directory
-
A network management server hosting DHCP, DNS, WINS, Routing and Remote Access, or any other of a myriad of network services
-
A file or print server
-
A Web, media, or application server
We cover Active Directory in Chapters 11 and 12, file servers in Chapter 16, and print servers in Chapter 13. All you need to know about these Configure Your Server options appears in these chapters.
A Windows Server 2003 is just a stand-alone system that acts like a workstation until you employ the configurations offered through the Configure Your Server Wizard. After you do that, your Windows Server 2003 machine can take on almost any role you want. Unlike Windows NT, in which you have either primary or backup domain controllers, all domain controllers on Windows Server 2003 are essentially the same. Each and every domain controller shares the responsibility of maintaining the domain, updating changes to the Active Directory, and distributing the authentication and communication load.
Getting the word out
Windows Server 2003 includes Internet Information Services (IIS) 6.0 and supports Streaming media server, also known as Windows Media Services (WMS). IIS allows you to host Web and File Transfer Protocol (FTP) sites to intranet and Internet users. With WMS, you can create stunning multimedia presentations, combining audio, video, slides, interactive media, and more - all delivered by means of streaming connection.
You can use the IIS and WMS items on the Configure Your Server Wizard to jump directly to the administrative tools for IIS 6.0 and Media Services. You can also access Internet Information Services Manager (also known as the IIS MMC snap-in), shown in Figure 10-2, by choosing to Start Administrative Tools Internet Information Services (IIS) Manager.
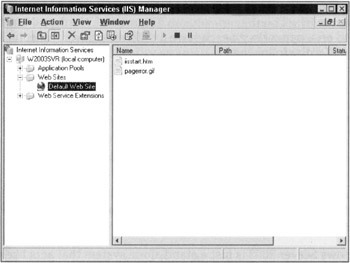
Figure 10-2: Internet Information Services Manager for IIS version 6.0.
To host Windows Media Services on your Windows Server 2003 system, you first need to configure it as a streaming media server by choosing Start Administrative Tools Configure Your Server Wizard. Next, choose the Streaming media server role, which allows you to complete the setup of your server to stream audio and video content to clients over the Internet or your company's intranet.
IIS 6.0 is its own application, and its features are far beyond the scope of this book. If you really want to set up this service on your server, see the Windows Server 2003 Resource Kit or TechNet.
Organizing the neighborhood
The Configure Your Server Wizard's Networking option offers you quick access to the configuration tools used to manage DHCP, DNS, Remote Access, and Routing.
DHCP is a method of automatically configuring TCP/IP settings of clients and non-critical servers upon bootup . DNS is a method of resolving host names into IP addresses. We cover both DHCP and DNS in Chapter 14
| Warning | Although DHCP and DNS qualify as neat stuff, they're fairly complex topics that are not covered in detail in this book. Please look in the Windows Server 2003 Resource Kit for complete instructions on configuration and management of these services. |
Routing and Remote Access is the service that combines two functions: routing and remote access (duh!). Routing is the capability to direct network communications in a local area network (LAN) or - with the help of a remote access link - across a wide area network (WAN). Remote Access is the capability to establish network connections over either telephone or Integrated Services Digital Network (ISDN) lines. Windows Server 2003 can act as a client to connect to remote systems, or it can act as a server to accept inbound calls. The Remote Access and Routing selections under the Networking option (in the Configure Your Server Wizard) offer a link to the Routing and Remote Access management console shown in Figure 10-3. With this console, you can install and configure Routing and Remote Access.
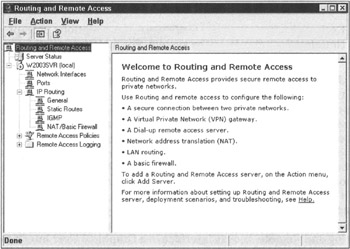
Figure 10-3: The Routing and Remote Access management console.
Here are the basic steps to enable this service:
-
Open the Routing and Remote Access management console (Start Administrative Tools Routing and Remote Access).
-
Click the Routing and Remote Access item in the left pane.
The list of servers on the network is displayed.
-
right-click your server and choose Configure and Enable Routing and Remote Access.
The Routing and Remote Access Server Setup Wizard appears.
-
Click the Next button to continue.
The wizard provides a selection list of common configurations and the option to manually define settings. The options available in the Common Configurations windows are as follows :
-
Remote access (dial-up or VPN)
-
Network address translation (NAT)
-
Virtual private network (VPN) access and NAT
-
Secure connection between two private networks
-
Custom configuration
-
-
Choose the option that best matches your needs, or choose Custom Configuration and set things up manually.
-
Click Next.
Each of the four common configuration suggestions prompt you for further details to fine tune the system. For more information on these selections, consult the Windows Server 2003 Resource Kit.
-
Just follow the prompts through the rest of the wizard to complete the configuration.
| Tip | Keep in mind that to enable routing, you need at least two network interfaces. These can be NICs, specialized connections to the Internet, or even modems. |
Although it looks like everything has been enabled, we recommend that you reboot before you make any further modifications.
After the reboot, Routing and Remote Access is configured and functioning. All it needs now are network interfaces and a bit of configuration. The Routing and Remote Access interface is a Graphical User Interface (GUI), which - compared to the previous command-line, text-only control and display - is a great improvement. Furthermore, this management tool allows you to install routing protocols, monitor interfaces and ports, watch dial-up clients, define access policies, and modify logging parameters. You'll never want to use the ROUTE command again!
However, routing is not a subject for the timid. For this reason, we recommend that you consult the Windows Server 2003 Resource Kit for more information. We don't want to leave you completely in the dark, so we list a few more features of Remote Access in the "Other frills" section a little later in the chapter.
| |
EAN: 2147483647
Pages: 195