The Windows 2003 Backup Facility
| |
Microsoft has always included a backup program called NTBACKUP with its Windows NT operating systems. Windows 2003 continues the tradition. The Windows Server 2003 version of NTBACKUP retains the capability to back up to non-tape media and access network resources, and includes built-in scheduling capabilities. These features were present in the Windows 2000 version of this tool but were blatantly absent from the Windows NT version.
The big picture
Windows Server 2003 ships with a new version of NTBACKUP that includes two methods for backing up your server: a GUI interface (Start All Programs Accessories System Tools Backup) and command-line execution ( \WINNT\system32\ntbackup ). We prefer the advanced mode of the GUI interface (shown in Figure 17-1) for quick manual backups and the command-line interface for batched and scheduled backups .
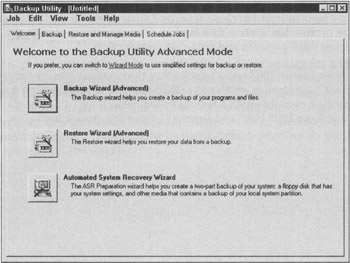
Figure 17-1: The built-in GUI backup in Windows 2003.
These methods are not exactly unattended because you have to start them to run manually unless you set them up with a scheduler task to run automatically at a present time. Although somewhat crude and not so fancy. NTBACKUP is better than nothing. If your budget is low and you can't afford to purchase a solution from a third-party vendor that specializes in backup software, this is the way to go. And the best part is that it's free (it's included in the price of Windows Server 2003)!
Before purchasing a third-party backup product or using the Windows Server 2003 built-in backup program, search Microsoft Knowledgebase (http://www.microsoft.com/support/) for known bugs and problems regarding backup issues. Be specific in the search (that is, search for Windows Server 2003 NTBACKUP ). Also, always install the latest service pack, which will correct most minor bugs known to Microsoft.
Command-line backups
You execute NTBACKUP from the command prompt using the following syntax:
ntbackup backup [ systemstate ] "@bks file name" /J {"job name"} [/P {"pool name"}] [/G {"guid name"}] [/T { "tape name"}] [/N {"media name"}] [/F {"file name"}] [/D {"set description"}] [/DS {"server name"}] [/IS {"server name "}] [/A] [/V:{yesno}] [/R:{yesno}] [/L:{fsn}] [/M {backup type}] [/RS:{yesno}] [/HC: {onoff}] [/SNAP:{onoff}] Yikes, that looks complicated! But don't worry, its really not that bad. In most cases, you'll need only a handful of parameters instead of all of them. The best place to get more details on using NTBACKUP from a command line is the Command-line Reference, which you can access by typing ntbackup /? from the Run command. This displays a help window that contains the correct syntax for NTBACKUP along with excellent descriptions, restrictions, requirements, and suggested uses of each parameter. Plus, several examples help you figure out how to use the command-line syntax.
However, we really don't see much of a need for command-line operation of NTBACKUP, especially because the GUI tool offers scheduling. But if you're really into batch scripts and would rather do things the hard way, be our guest.
Some files that are hard-coded into NTBACKUP don't get backed up, and you can't change or alter this. Following are some of the files and other things that don't get backed up:
-
Open files: Users can't have files open while the backup is running. Those files won't be backed up. Have the users log off the system and disconnect them from any shares.
-
Temporary files: No temporary files, such as PAGEFILE.SYS, are backed up.
-
Permissions: The account used to perform the backup must have permission to read files.
-
Registry: Only the local Registry is backed up. Registries on other servers are not backed up.
Selecting files and folders
In the Windows NT version of NTBACKUP, you could choose the files that you want to back up only through the GUI. The Windows 2000 and Windows 2003 versions allow you to either select a root drive or directory from the command line or use the GUI to define a backup selection file (a .bks file). To create a .bks file, follow these steps:
-
Choose Start All Programs Accessories System Tools Backup.
The Welcome to the Backup or Restore Wizard screen appears.
-
Click Advanced Mode.
-
Click the Backup tab.
-
Choose the desired folders and drives that you want to back up. (See Figure 17-2.)

Figure 17-2: Selecting files and folders to be backed up. -
Choose Job Save Selections.
-
Name your .bks file.
-
Use the bks filename parameter as part of your command-line syntax.
If you prefer to use the GUI version of NTBACKUP, just omit Step 7 and read the "Specifying backup destination and media settings" section next for more information on using the GUI version.
Specifying backup destination and media settings
Now that you've selected the files that you want to back up, you can choose the backup destination. If you don't have a tape drive installed on your system, the NTBACKUP program defaults to a file as its backup destination. Otherwise, simply select the backup device to which you would like to back up the information as follows :
-
Choose Start All Programs Accessories System Tools Backup.
The Welcome to the Backup or Restore Wizard screen appears.
-
Click Advanced Mode.
-
Click the Backup tab.
-
Choose the backup destination (file or tape).
-
If you chose to backup the data to a file, choose File in the Backup Destination pull-down list. In the Backup Media or File Name box, type the full path and filename (or click the Browse button to find it).
-
If you chose to back up to a tape, choose a tape from the Backup Destination pull-down list.
-
-
Click the Start Backup button.
Scheduling backup jobs
As mentioned previously, scheduling backup jobs is now a built-in feature of Windows Server 2003. Scheduling backup jobs is now as simple as following these steps:
-
Go to Start All Programs Accessories System Tools Backup.
-
Click Advanced Mode.
-
Click the Schedule Jobs tab.
-
Click the Add Job button (in the lower-right corner).
This starts the Backup Wizard.
-
Answer the questions presented to you by the Wizard.
You'll notice that you're prompted for a username and password. The user performing the backup (probably you) must be either an administrator, a member of the Backup Operators group , or have equivalent rights of these groups.
-
Specify the frequency of the job and click the Finish button.
The calendar in the Schedule Jobs tab changes to reflect the jobs.
| |
EAN: 2147483647
Pages: 195