| In previous versions of Windows, you had no control over how much space your users used on your hard disks. In Windows 2000, this has changed, thanks to the disk quotas capability. Disk quotas allow you to specify how much disk space a user is allowed to use on any particular NTFS volume. You must be using NTFS 5.0 for this feature to be available. You can specify disk quotas universally for all users of a volume or individually for specific users. The following points of concern apply to disk quotas: -
As previously stated, you can only implement disk quotas on Windows 2000 NTFS 5.0 volumes . -
Disk quotas can only be applied at the root level of the volume, not to specific folders. -
Disk usage is based on all files that the user creates, copies, or takes ownership of. -
Disk quotas are based on the actual file size, not the compressed file size. -
Disk quotas affect the free size that an installed application will see during the installation process. -
Disk quotas will not be applied to any users accessing data on a Windows 2000 disk from Windows NT 4.0 (with the required Service Packs installed). To configure disk quotas, open the volume's root properties by right-clicking a volume and selecting Properties from the shortcut menu. Click the Quota tab (see Figure 6.16) to configure disk quotas for that volume. Figure 6.16. Managing disk quotas. 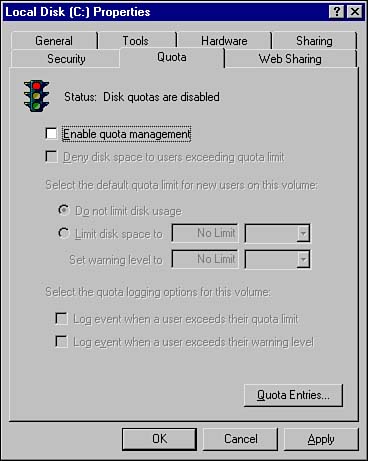 The first thing you should notice is the Status indicator, which visually indicates the status of disk quota applications on the volume. The disk quota traffic light has the following indications : -
Green light Disk quotas are enabled on the volume. -
Yellow light Disk quotas are currently inactive on the volume due to quota information being rebuilt. -
Red light Disk quotas are not enabled on the volume (this is the default). Table 6.3 outlines each of the disk quota options found in the dialog box in Figure 6.16. Table 6.3. Disk Quota Configuration Options | Option | Description | | Enable quota management | Enables quota management when checked. | | Deny disk space to users exceeding quota limit | Denies additional disk space usage by users when they have exceeded their assigned quota limit. | | Do not limit disk usage | Automatically assigns unlimited quota to new users on the volume. | | Limit disk space to | Automatically assigns the configured quota limit to new users on the volume. | | Log event when a user exceeds their quota limit | Generates an event log entry when a user's usage has exceeded the quota limit. | | Log event when a user exceeds their warning level | Generates an event log entry when a user's usage has exceeded the warning level. | Notice that in Table 6.3, the phrase new user was used when discussing the application of quota limits on the volume. In Windows 2000, disk quota settings are only automatically applied to users who have yet to use any space on the volume. Thus you can see that it is best to implement disk quotas from the very beginning so that any user using disk space on that volume will automatically be subjected to the disk quota limitations. To enable disk quotas for new users on a volume, follow these steps: -
Open the Properties dialog box of the volume you want to configure the quota settings for. Click the Quota tab. -
Select the Enable Quota Management check box. -
Select the Deny Disk Space to Users Exceeding Quota Limit check box to prevent users from being allowed to exceed their quota setting. -
Select Limit Disk Space, and configure the Limit level and Warning level to something such as 10MB and 8MB, respectively. -
Click Apply to apply the quota control settings. -
If you already have data on the disk, a dialog box will open informing you that the disk must be rescanned. Click OK to acknowledge this information. As mentioned previously, disk quota settings will not be automatically applied to users who have already started using disk space on that volume. You need to manually configure the disk quota for these users. You may also find the need to configure disk quotas for other users who have special needs or issues, such as a user in the graphic design department who has the legitimate need to store several hundred megabytes of graphics files. The user in the human resources department who routinely downloads MP3s to the file server, however, needs to have a much stricter quota put in place.  | If a user already has data on the drive, then a quota entry is automatically created for that user when the drive is scanned after enabling quotas. This may take several minutes if the drive has a lot of data on it. Users are all considered to be new users for the quota system, so they get the default quota settings. |
No matter what reason you have for creating user disk quotas manually, the process is the same and performed as follows : -
Open the Properties dialog box of the volume you want to configure the quota settings for. Click the Quota tab. -
Click the Quota Entries button to open the window shown in Figure 6.17. You can see the status of each of your users who currently has a quota enforced on their disk usage. Figure 6.17. The Quota Entries window. 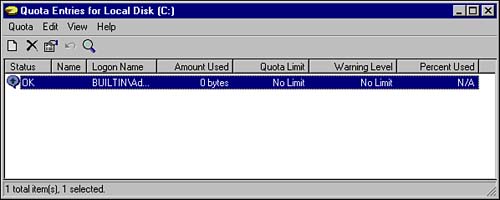 -
To create a new quota entry (for a user who is not listed), click Quota, New Quota Entry. -
Select the user or users to whom to apply the new quota. -
Configure the desired quota settings and click OK. -
To edit the quota settings of an existing (listed) user, double-click the user and modify the settings as desired. Click OK when done. You can monitor each user's disk usage as well through the Quota Entries window shown in Figure 6.17. The following information is available to you through this window: -
The Quota status . A green arrow in the dialog bubble is OK, an exclamation point in a yellow triangle indicates that the warning limit has been exceeded, and an exclamation point in a red circle indicates that the usage limit has been exceeded. -
The name and logon name of each user with a disk quota entry. -
The amount of disk space each user has used. -
The quota entry setting for each user. -
The warning entry setting for each user. -
The percentage of disk space each user has used relative to their configured quota entry setting.  |