Setting Up the X Window System (X11)
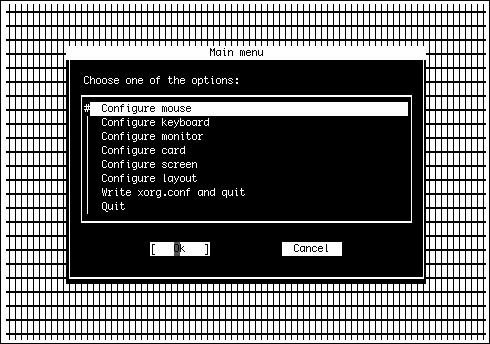
| The X Window System, also known as X11 (or simply X), is the ubiquitous windowing system for UNIX and Linux. Originally developed at MIT in the early 1980s, X reached its eleventh major revision in 1987, and was subsequently released to the public as an open-source project, and was developed through several more releases by the X Consortium. Development stalled for several years during the 1990s, at which time X11's rather arcane client-server architecture and lack of modern features did not daunt the geeks experimenting with FreeBSD and Linuxthey, after all, loved a challenge. However, since 2004, a new organization called the X.org Foundation (founded by the X Consortium and sponsored by a number of deep-pocketed corporations such as IBM, Sun, and Hewlett-Packard) has been pursuing a modernization of X11 with renewed vigor. You will learn more about the day-to-day operation of X11 in Chapter 5, "Working with the X Window System." For now, the goal is to get X11 installed on your computer so that you can run graphical applications. This is not by any means an easy task. Rest assured, though, that it used to be a whole lot worse. If you did not install the X Window System during the procedure described in this chapter, or if you don't want to use X11 at all, you can skip this section. If you change your mind, you can always install X11 laterinstall the xorg package, or build the port /usr/ports/x11/xorg in the ports collection. See Chapter 16 for more information on using the packages and ports. Auto-Detecting Your Video HardwareThe core of X11 is what's called the X Server, a daemon that "serves" windows to a client program that draws the windows on the screen. This arrangement may seem confusing if you're coming from the Windows world. Just remember that X11 was originally developed for cluster-based computing, where many relatively low-powered computers in a lab or in dorm rooms around a campus would run lightweight window manager programs to request application windows from a central mainframe server. All the computing power, and all the applications, were centrally stored; in this context, it makes sense for the windowing system's heavy lifting to be done where all the power is, letting the client computers remain low-powered and inexpensive. Today, powerful desktop computers are cheap and plentiful, and cluster computing is all but obsolete; in this environment, the X Server and the windowing client (known as a "desktop" or "window manager") both run on the same computer. This greatly simplifies many aspects of installing and managing a graphical user environment on a UNIX system like FreeBSD. However, it doesn't change the fact that you have to set up the X Server first and independently before you can configure the client end of the equation, the desktop. Note Double-check to make sure you know the specifications of your monitor (vertical and horizontal sync rates) and the make and model of your video card, including how much video RAM is installed. X11 does its best to auto-detect this information, but chances are that you'll have to supply it yourself at some point during this procedure, even if it's auto-detected at first. The first step is to run a utility that auto-detects your video hardware. Make sure you're logged in as root (if not, type logout and log back in as the root user); then type: # Xorg -configureThis program probes your video card to detect its chipset and capabilities, and writes out a skeleton configuration file for the X Server. This file, saved into the /root directory, is named xorg.conf.new. Examine this file to see what it found out. Use the following command to page through the file: # less xorg.conf.newUse the up and down arrows to move up and down line by line, or the spacebar and W key to page up and down. Skip through until you find the section labeled Section "Device". In the lines in this section, you should see information describing your video card: Section "Device" ### Available Driver options are:- ### Values: <i>: integer, <f>: float, <bool>: "True"/"False", ### <string>: "String", <freq>: "<f> Hz/kHz/MHz" ### [arg]: arg optional #Option "SWcursor" # [<bool>] #Option "HWcursor" # [<bool>] #Option "NoAccel" # [<bool>] #Option "ShowCache" # [<bool>] #Option "ShadowFB" # [<bool>] #Option "UseFBDev" # [<bool>] #Option "Rotate" # [<str>] Identifier "Card0" Driver "nv" VendorName "NVidia / SGS Thomson (Joint Venture)" BoardName "Riva128" BusID "PCI:1:0:0" EndSection Make sure this information agrees with what you know about your video card, and note the values for the Driver, VendorName, and BoardName fields. They'll be important as you further configure the X Server. Note If you're working with an already-installed version of FreeBSD 5.2.1 or earlier, the X11 implementation included with FreeBSD is XFree86, the older and more stagnant version, not Xorg. Configuring XFree86 is much the same as configuring Xorg; only a few commands are different. To run the hardware auto-detection script, type the following: # XFree86 -configureThe file written by this program is XF86Config.new, rather than xorg.conf.new. Testing the X ServerNext, you need to test the operation of this auto-detected configuration. Type the following command: # Xorg -config xorg.conf.newThe X Server launches using your newly created, bare-bones configuration file. Because the file contains no high-resolution screen modes or information about your monitor's capabilities, the best you can hope to see is a black-and-gray grid pattern that looks like diagonal burlap, and an X-shaped cursor in the middle of the screen, as shown in Figure 2.13. If you see this, you're in luckX11 will work with your video card in at least its simplest display mode. Figure 2.13. The test screen indicating that your Xorg configuration is working. Try moving the mouse. If the cursor moves, count yourself doubly luckyyou've got a working mouse driver. If not, make sure you enabled the mouse driver during the initial installation procedure; if you didn't, you'll need to enable it now. Type sysinstall to reenter the Sysinstall program, and then navigate to Configure and then Mouse. Follow the instructions in the "Configuring the Mouse" section earlier in this chapter. There are no controls in this test mode of X11; to end the test, press Ctrl+Alt+Backspace. This will return you to the command prompt. Caution Always remember the Ctrl+Alt+Backspace keystrokethis is your way out of X11 if something goes haywire. If the display doesn't appear correctly (for example, if you see a lot of wavy lines instead of a stable grid and cursor), press Ctrl+Alt+Backspace immediately to kill X11. If you let X11 run for too long in a video mode that your CRT doesn't support, you could permanently damage the monitor. Configuring Xorg with xorgcfgThe next step is to tell X11 how it should treat your display. You're about to embark on a research project; whereas a lot of the configuration of X11 has come a long way in recent years, the process of determining a monitor's capabilities is still a matter of trial and error. Your monitor is capable of several resolutions (pixel counts); this is determined by the vertical and horizontal sync rates that it can support. Your monitor's manual should tell you the appropriate sync ranges. If not, you should be able to look it up online by simply doing a Google search on your monitor's make and model, adding the keywords refresh rate or vertical sync if necessary. A monitor with a given vertical and horizontal sync range can only support certain resolutions; if the sync rate is too low for a chosen resolution, the display might be too flickery to use, or the monitor might not be able to use that resolution at all. Now that you know the driver name to supply for your video card, you need to use it as the basis for a more full-fledged X11 configuration file than the one you created earlier. There is a graphical or text-mode configuration tool called xorgcfg that you can use for this purpose. Running this program in graphical mode under X11 might be tempting, but it's better to use it in text mode for now, just to be safethe text-mode version works a lot better. Type the following command: # xorgcfg -textmodeNote If you're using an older FreeBSD installation with XFree86, use the command: # xf86cfg -textmodeAfter all the driver modules are loaded, you enter a full-screen textual utility similar to Sysinstall. Read the introduction screen and select OK. You enter a Main Menu screen with several options, as shown in Figure 2.14. Figure 2.14. The xorgcfg Main Menu. Go through each of the menu options in order. In each area, you set up a profile for your mouse, keyboard, display, and so on, giving each a name (such as Mouse0, Keyboard0, and so on). First select Configure Mouse and specify an identifier such as the given Mouse0. The default port setting, Auto, should be appropriate for a standard PS/2 mouse. Otherwise, select the appropriate port. Enable three-button emulation if desired, and then specify the mouse driver (/dev/sysmouse is generally appropriate). Next, select Configure Keyboard to set up your keyboard in the same manner. Select the appropriate keyboard layout for your region, for example U.S. English. Next you need to configure your monitor (select Configure Monitor). From the list of horizontal sync rates presented, scroll until you find one that matches your monitor's capabilities as listed in its manual or online specs. If you've used this monitor in Windows, you can use that to help you determine the monitor's capabilitiesif you know you've been able to run in 1280x1024 mode, for example, you can choose an option such as 31.5 79.0; Monitor That Can Do 1280x1024 @ 74 Hz. Just make sure you don't choose too high a frequencyif X11 tries to put the monitor into a mode with a sync rate higher than it can support, you could end up blowing out your monitor. Try selecting the lowest sync rate for the resolution you know the monitor can handle, and then you can work up from there later. Better safe than sorry! Similarly, choose a vertical sync rate corresponding to your monitor's specs. Choose a range narrower than what your monitor can support, if possible; if your monitor is listed as being capable of 45120 Hz, choose 50100, or enter the sync rate manually to match the monitor's specs exactly. Next you need to select Configure Card to specify your video card's driver. This is where it's important to know what the auto-detection script thought your card is; because xorgcfg doesn't read in that file's contents automatically, you have to specify the card settings again manually. View the card database when it's offered, and scroll through the list until you find an entry matching your card's make and model. Note FreeBSD's support for modern video cards is difficult to pin down. There is support for almost all recent NVidia cards explicitly available in the driver database, but ATi cards are woefully unrepresented. If you can't find your card in the list, choose Unlisted Card and proceed to the next screen where you can pick the driver manually. If you have an ATI Radeon card or any of several other modern 3D-accelerated cards, you might need to add support for them in the kernel before X11 will recognize them. (See Chapter 18, "Kernel Configuration," for more on recompiling your kernel.) A final fallback option is to choose the vesa driver and choose a resolution of 800x600; this setting will support almost any video card made in the last few years, though it won't have any 3D acceleration. Choose a driver appropriate to your card. This can be tricky, as the drivers are cryptically named. Remember that nv is the NVidia driver, ati drives ATi cards, and mga is the Matrox driver. You should be able to select the same driver name that was originally configured in the auto-detection phase, earlier; it's what was listed in the Driver field in xorg.conf.new. Next, choose Configure Screen. This is where you define the color depth of your display modes. This bit depth is limited by the amount of video RAM on your card. Most video cards produced in the last few years have plenty of video RAM, and displaying 24-bit color even at the highest resolutions is no problem; but if you have an older video card, this can be an important consideration. Again, if you used this computer for Windows previously, you should know what bit depths and at what resolutions you were able to run the video card; if not, choose a modest bit depth, for example 8 Bit, 256 Colors. (You can fine-tune this setting later, either by rerunning this configuration program, or by editing the config file manually, if you want to get 16-bit or 24-bit color.) In the next screen, use the arrow keys and the spacebar to place an X next to each of the resolutions you want to be able to use. X11 tries the highest resolution first, and then goes down the list to lower and lower resolutions if it can't put the display into that mode. Try selecting 1152x864, 1024x768, 800x600, and 640x480tried-and-true resolutions that any monitor should be able to handle. Select Configure Layout to define a layout. This isn't really important if you only have one combination of monitor, keyboard, mouse, and video card, but it doesn't hurt. Finally, select Write xorg.conf and Quit. This lets you choose to install the new global config file into /etc/X11/xorg.conf so that it applies to all users who start X11 from the local console. Fine-Tuning the xorg.conf FileAfter you're done with xorgcfg, you'll want to edit the file it created manually in a text editor to make sure the entries are sensible. Use an editor such as the built-in ee, as follows: # ee /etc/X11/xorg.confUse the arrow keys to browse through the file. Make sure the Device block shows information accurately identifying your card. Similarly, make sure the display modes shown in the Screen section correspond to valid modes that you know your monitor and card can handle. If you need to make any changes, save the file by pressing Esc and then Enter, then choosing Save Changes when you exit. Note X11 configuration is covered in much more detail in Chapter 7, "Advanced X11 Configuration." If you have any difficulties getting X11 to work properly with your video and display hardware, refer to that chapter for additional techniques for determining their appropriate settings. When the file is configured to your satisfaction, start X11 with the following command: # startxRemember to press Ctrl+Alt+Backspace to kill X11 if you get put into a display mode that's unusable or that fails to achieve video syncdon't risk damage to your monitor! If X11 starts up properly, it does so using a very basic desktop: the TWM window manager (shown in Figure 2.15). This is a venerable but very lightweight desktop environment, providing the very basics in mouse-based control of window shapes and desktop utilities. In the default configuration, you get a command-line xterm window labeled login (which is tied to your X11 sessionexit this window and you'll drop to the command line), two more unlabeled xterm windows, and a clock. You can work in any of the terminal windows just as you would at the command line. TWM has "sloppy focus," meaning that the active windowthe one where your keyboard input goesis the one where your mouse pointer is; so if your typing doesn't go into the window where you expect to see it, move the mouse to point to that window and leave it there. Also note that each new program you launch, or each new window spawned by a running program, requires you to click the mouse to place its new window in a location of your choice on the screen. Figure 2.15. The initial X11 desktop layout, running under the bare-bones TWM window manager.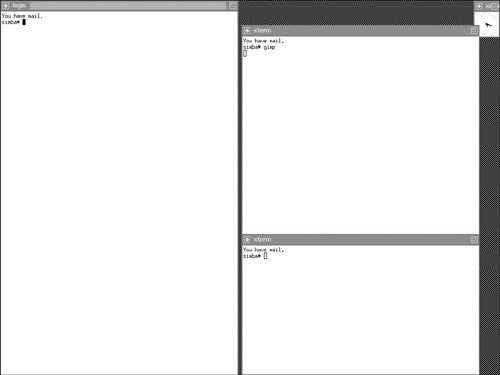 TWM is good for experts and ascetics, but it's a pretty miserable experience trying to make it behave like a modern desktop GUI. For that, we have a variety of excellent desktop environments to choose from: GNOME, KDE, XFce, Window Maker, and many others. To see how to switch from TWM to one of those desktop environments, proceed to Chapter 5. If you left-click on the desktop area in TWM, a menu appears with several window-management options; two of these, at the bottom, are Restart and Exit. Note that these do not mean "restart the computer" and "exit X11"; instead, they refer specifically to TWM, and will only restart or kill the TWM process, respectively, leaving you in a bare X11 session with no window manager. Shut down X11 for now by typing exit in the login window, or by using the Ctrl+Alt+Backspace keystroke. |