Develop Project Execution Plan
| As shown in Figure 15.2, the development of a project schedule involves five steps. The development of a schedule for a project is best completed on an electronic whiteboard so that all participants in the RAP session can be involved. Also, the process is iterative and you'll generally need to loop through the five steps a number of times to get an appropriate schedule. Figure 15.2. Developing a schedule The key in scheduling is to understand that there is never one schedule. There will be many alternatives for scheduling a project and the optimum schedule depends on deadlines, the skill levels of the team members , and availability of people. Again, the advantage of team-based planning is that you'll have lots of people to help you work out the alternative schedules and to select the optimum one for your project, team, and stakeholders. As we discuss later, the process of developing a project schedule (or project execution plan) involves further refining of your initial estimates and, in many cases, this process also leads to major estimation errors. Step 1: Develop a First-Cut NetworkThis step requires the team to examine the tasks identified during the planning session and determining the relationship in terms of inputs and outputs. There are two questions that need to be asked when developing the network:
All PC-based scheduling tools will enable the diagram shown in Figure 15.3 to be created. The use of alternative relationships such as start-to-start becomes more important in later steps. The typical relationship in dependency is a deliverable dependency . For example, until the initial interviews with the business stakeholders are complete and an interview summary is produced, the initial analysis cannot start, as it needs the interview summary for input. You can also have a resource dependency ; that is, until one person finishes a task, another task cannot start, as he or she is going to do it. Figure 15.3. Developing a first-cut network
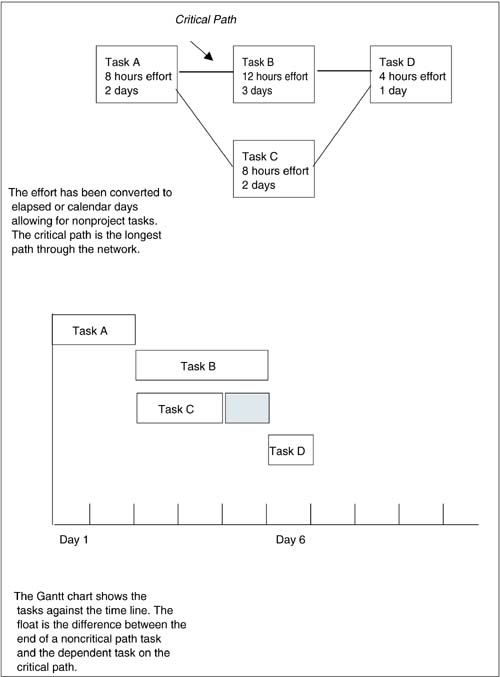
The key to the first step is brainstorming as many variations to the network as possible for optimizing in later steps. Step 2: Adjust Estimates to Elapsed DaysThe next step is to enter or load the network with the raw effort estimates developed during the RAP session. As discussed earlier, the estimated effort needs to be adjusted to include nonproject activities. In most scheduling tools, there are calendars for each person who is to be scheduled. The default setting in most tools is eight hours per day. Most organizations will have some guideline on productive time (e.g., five hours per day), so the calendars need to be modified to reflect five-hour, not eight-hour days. You need to be very careful here. As we state in the sidebar, there are a number of nonproject activities that most people seem to seriously underestimate when converting the effort to elapsed days. Step 3: Develop First-Cut ScheduleBy entering the adjusted effort into the task entry screens in the scheduling tool, a first-cut schedule can be viewed . This step simply provides a schedule that assumes that only one person is completing the project. Figure 15.4 shows a loaded network and the first-cut schedule. Figure 15.4. Developing a first-cut schedule The most important steps are the final two, in which the actual resources, their costs, and other factors such as resource dependencies where a person is undertaking two concurrent tasks or where a task depends on a person completing another task so that person can commence another because of his or her skills are factored into your plan.
As we cover later, this is where you start making assumptions about your team members and their skills and, of course, this is another cause of estimating error. In addition, as discussed in the sidebar (Mythical Man-Month), you have to be careful when adding more than one person to a task, as the default in scheduling tools is that each person adds an equal amount of effort. That is, a two-day task for one person would be automatically scheduled for one day with two people. You'll have to adjust the person calendar option in the software.
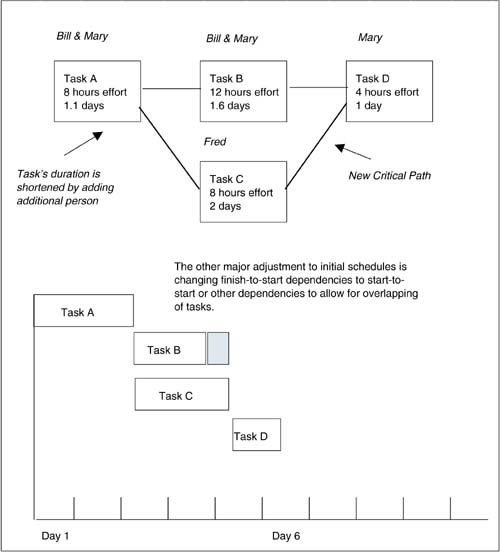
Step 4: Schedule Actual ResourcesThis step involves the allocation of the actual people to the tasks identified in the schedule (see Figure 15.5). This step can be quite complex, as factors such as skill levels, costs, time lost through communication, and the specific nonproject activities of each person (as distinct from the organization norm) need to be calculated and reviewed. For example, Bill is a key analyst in the project but he is working on production support activities as well as supervising some new programmers. As a result, Bill may have only two hours per day to spend on the project, rather than the five hours assumed. The sidebar provides you with the typical guideline that we recommend when adding more than one person to a task. Figure 15.5. Scheduling actual resources In addition, there are many tasks (e.g., conducting interviews) that make adding people to the task increase the total effort (and cost) rather than shortening the duration. These final two steps need input from the actual people, as the calculations and various combinations can be quite complex. Step 5: Adjust the Schedule as RequiredThe final step involves optimizing the schedule to use the project people most efficiently and minimize the development duration. The use of alternative dependencies (start-to-start, finish-to-finish , and start-to-finish ) and the more effective allocation of people to the same task are the type of activities that will be required (see Figure 15.6). Most scheduling tools will provide reports on overallocation of resources, resource conflicts, and similar information that can assist with this step. Figure 15.6. Adjusting the schedule It should be noted that PC-based scheduling tools are becoming more feature-laden and that the learning curve can be quite considerable. Most Windows-based tools are more than capable of handling business and IT projects and the use of the real-time planning approach means that the complexity of tasks is limited. However, formal training courses are available for most tools and a professional project manager should complete these courses to ensure competency with some of the advanced features of the tools.
|
EAN: 2147483647
Pages: 136