Section 6.5. Installing Memory
6.5. Installing MemoryInstalling memory modules is straightforward. Most recent motherboards automatically detect installed memory modules regardless of the slot they occupy, but it is good practice to install modules in the lowest numbered slots first. For example, if a single-channel memory motherboard has four memory slots, they will be numbered 0 to 3 (or 1 to 4). Fill slot 0 (or 1) first, then the other slots sequentially as you add modules. If you are installing memory in a dual-channel memory motherboard, install memory modules in pairs, filling the lowest numbered slots first. For example, if the motherboard has two slots each for channel A and channel B, numbered 0 and 1, fill the slots for channel A slot 0 and channel B slot 0 first. Some motherboards require higher-capacity modules to be installed in lower-numbered slots. For example, if you are installing two 256 MB DIMMs in a dual-channel motherboard that has four DIMM sockets, with 128 MB DIMMs already installed in the 0 slots for channel A and channel B, you may have to move those 128 MB DIMMs to the 1 slots for channel A and channel B and install the new 256 MB DIMMs in the 0 slots for both channels. That rule is not invariable, though. A few motherboards require smaller modules to be installed in the lower banks. Some motherboards don't care which module you install in which bank. Best practice is to check the manual before installing memory. If no documentation is available, experiment by moving modules around. If some or all of the memory is not recognized during the boot-time memory check or in CMOS Setup, power down the system, rearrange the modules, and restart the system. If all memory is recognized, you can safely assume that you have the modules installed correctly. 6.5.1. Installing and removing a DIMMTo install a DIMM, locate a free memory slot and pivot the ejector arms on each side of the socket as far as possible toward the horizontal. The contact edge of the DIMM module is keyed with notches that correspond to protuberances in the DIMM socket. Align the notches and slide the DIMM straight down into the socket. Position your thumbs on top of the DIMM at each end and press down firmly, as shown in Figure 6-5. Figure 6-5. Align the memory module and press straight down until it seats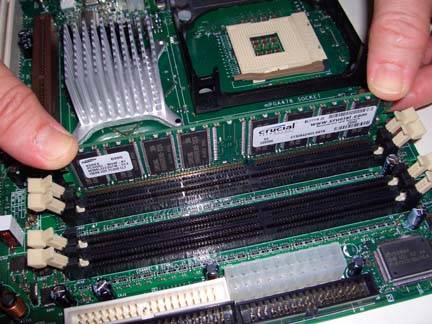
The DIMM slides (sometimes snaps) into the socket, which automatically pivots the ejector arms toward the vertical. If the ejector arms are not fully vertical, press them toward the DIMM until they lock into the vertical position, as shown in Figure 6-6. Note that some DIMM sockets have minor physical variations. If the DIMM does not fit easily into the socket, do not force it. Contact the vendor who supplied the DIMM for a replacement. Figure 6-6. When the memory module is fully seated, the ejector arms pivot back to the vertical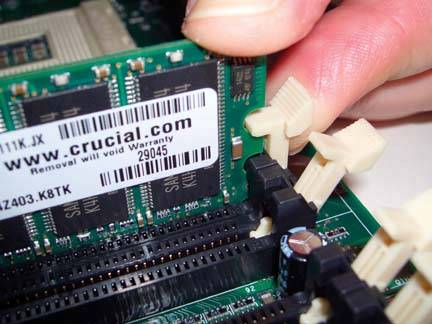 To remove a DIMM, pivot both ejector arms simultaneously toward the horizontal position. The DIMM simply pops out.
6.5.2. Testing and configuring newly installed memoryAfter you install the new memory modules and verify that all is as it should be, apply power to the system. The memory self-test should increment up to the newly installed amount of memory. (If your system displays a logo splash screen rather than the BIOS boot screen, turn off the splash screen in BIOS Setup so that you can see the BIOS boot screen.) If it instead shows only the original amount of memory, the cause is almost always that you have not seated the new memory module completely. Power down, reseat the module, and try again. If the memory check shows an amount of memory larger than the original amount but smaller than the expected new amount, the problem is almost always that the BIOS and/or chipset do not support memory modules of the size you've installed. If that occurs, you may need to do one or more of the following things to resolve the problem:
|
EAN: 2147483647
Pages: 126
- ERP Systems Impact on Organizations
- Enterprise Application Integration: New Solutions for a Solved Problem or a Challenging Research Field?
- Distributed Data Warehouse for Geo-spatial Services
- Intrinsic and Contextual Data Quality: The Effect of Media and Personal Involvement
- Relevance and Micro-Relevance for the Professional as Determinants of IT-Diffusion and IT-Use in Healthcare
- Chapter VI Web Site Quality and Usability in E-Commerce
- Chapter VII Objective and Perceived Complexity and Their Impacts on Internet Communication
- Chapter XIII Shopping Agent Web Sites: A Comparative Shopping Environment
- Chapter XIV Product Catalog and Shopping Cart Effective Design
- Chapter XVIII Web Systems Design, Litigation, and Online Consumer Behavior