2.1. Rules to Upgrade and Repair By We've upgraded and repaired hundreds of systems over the years, and learned a lot of lessons the hard way. Here are the rules we live by. We'll admit that we don't always take each of these steps when we're doing something simple like swapping a video card, but you won't go far wrong if you follow them until you have enough experience to know when it's safe to depart from them. | Bigger is Better | If you don't have a DVD writer, installing one is an excellent first upgrade project. In addition to backing up data, a DVD writer is useful for duping audio and data CDs and DVD Video discs. |
Back everything up. -
Twice. Do a verify pass, if necessary, to make sure that what is on the backup matches what is on the hard drive. Better still, do at least a partial restore to a scratch directory to make sure that your backups are readable. If you're connected to a network, copy at least your data and configuration files to a network drive. If there's room on the network drive, create a temporary folder and copy the entire contents of the hard disk of the machine about to undergo surgery. If you don't have a network but you do have a CD or DVD writer, back up at least your important data and configuration files to optical discs. About 99 times in 100, all of this will be wasted effort. The hundredth timewhen everything that can go wrong does go wrongwill pay you back in spades for the other 99. Be sure to check out Chapter 3, which discusses backups and other preventative maintenance in detail.
Make sure you have everything you need before you start. -
Have all of the hardware, software, and tools you'll need lined up and waiting. You don't want to have to stop mid-upgrade to go off in search of a small Phillips screwdriver or to drive to the store to buy a cable. If your system can boot from the optical drive, configure it to do that and test it before proceeding. Otherwise, make sure that you have a boot disk with drivers for your optical drive, and test it before you start tearing things down. Create a new emergency repair disk immediately before you start the upgrade. Make certain that you have the distribution discs for the operating system, service packs, backup software, and any special drivers you need. If you're tearing down your only PC, download any drivers you will need and copy the unzipped or executable versions to floppies or burn them to CD before you take the computer apart. | DON'T WORK IN THE DARK | You can't work efficiently and effectively without adequate light. Don't try to work on a PC that's under a desk or otherwise inaccessible. Disconnect all the external cables and move the system to a well-lit working area (the kitchen table is traditional) before you begin work. The more light, the better. We often use a desk lamp or two to shed more light on a system while we're working on it. Barbara prefers to use a head-mounted light to provide hands-free lighting that points automatically in the direction she's looking. |
Make sure you can get the answers you need. -
Read the manual first. A quick read-through often uncovers potential problems, hints, and tips that can make the upgrade much smoother. Check the web site for any new component you are installing. You'll often find FAQs (Frequently Asked Questions), readme files, updated drivers, and other information that can make the difference between a trouble-free upgrade and a major mess. In fact, the quality of the web site that supports a component is a large factor in our purchase decision, and we suggest that you make it one in yours. Before we even consider buying a major component, we check the web site to verify that it is likely to have answers to any questions that may arise. | YOU NEED ANSWERS | Google (http://www.google.com) is your friend. When we encounter a problem, our usual first step is to Google for pages that describe that problem. Often, you'll find a quick solution without having to reinvent the wheel. The secret is to be specific. For example, if you're having problems getting an ATI X800XT video card to work properly in your MSI K8N Neo4-F motherboard, don't just search for "video problem". You'll get thousands or millions of hits, most of which have nothing to do with your problem. Search instead for combinations of specific terms such as "X800XT" and "K8N Neo4-F". If it exists, you'll probably find exactly the document you need on the first page of hits. If Google doesn't help right away, use Google Groups (http://groups.google.com). On the surface, it may look like a clone of Yahoo Groups, but Google Groups has the added benefit of including the entire archive of articles ever posted to USENET (except that embarrassing one you wrote in sixth grade that you asked Google to remove). A dud web search on Google's site often turns to gold when you click that "Groups" link on the top of the results page. |
Make the technology work for you. -
You might have a choice between a slow manual way and a quick automatic way to accomplish a given task. The easy way could require spending a few bucks for a special-purpose utility program, but could also save you hours of trial and error, manual labor, and aggravation. For example, if you are replacing a hard disk, you can move the contents of the existing disk to the new disk by spending hours doing a backup and restore, or you can use a free or inexpensive utility program that does the same thing in a few minutes. (Most hard drives now come with software to migrate your data and programs automatically from the old hard drive to the new one. All you need to do is download it from the manufacturer's web site.)
Record everything. -
During an upgrade, it's often important to be able to return to your starting point. If you've just spent an hour swapping components in and out and changing jumpers, it's almost impossible to remember what went where originally. So, record each change as you make it. Use a digital camera to take "before" close-up shots of each change, dictate the details of each change into a digital voice recorder, or simply make detailed written notes.
Change one thing at a time. -
When replacing multiple components, change one thing at a time. If you're replacing the video card and adding more memory, leave the old video card in place until the new memory is installed and working. If you swap multiple components simultaneously, problems are harder to troubleshoot, because you're never sure which change caused the problem.
Ground yourself frequently to avoid static electricity damage. -
Many PC components are vulnerable to static electricity, particularly processors and memory. The easiest way to avoid damaging components is to ground yourself frequently while working on the system. Do that by touching the metal chassis or the power supply, as shown in Figure 2-1. You needn't keep the system plugged in while you work on it; the chassis and power supply provide a sufficient "sink" to dissipate any static charge. Figure 2-1. Ground yourself by touching the chassis or power supply 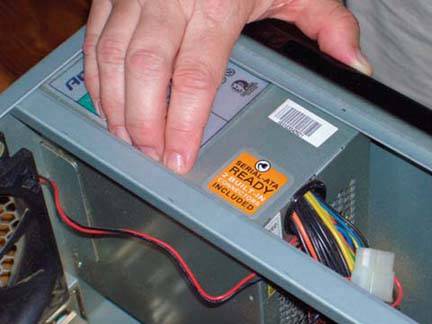
Keep track of the screws and other small parts. -
Disassembling a PC yields an incredible number of screws and other small pieces. As you tear a PC down, organize these parts using an egg carton or old ice cube tray. One errant screw left on the floor can destroy a vacuum cleaner, or, if left in the case, even short out and destroy the motherboard. Make sure that all of the small parts are accounted for when you reassemble the PC. | Screwed Up | Some PCs use a variety of screws that look very similar but are in fact threaded differently. For example, the screws used to secure some case covers and those used to mount some disk drives appear to be identical, but swapping them could result in stripped threads. If in doubt, keep each type of screw in a separate compartment of your organizer. |
Use force when necessary, but use it cautiously. -
Many books tell you never to force anything, and that's good advice as far as goes. If doing something requires excessive force, chances are that a part is misaligned, that you have not removed a screw, or something similar. But sometimes there is no alternative to applying force judiciously. For example, drive power cables sometimes fit so tightly that the only way to get them off is to grab them with pliers and pull hard. Some combinations of expansion card and slot fit so tightly that you must press very hard to seat the card. If you encounter such a situation, verify that everything is lined up and otherwise as it should be (and that there isn't a stray wire obstructing the slot). Then use whatever force it takes to do the job, which may be substantial.
Check and recheck before you apply power. -
An experienced PC technician does a quick scan of the entire PC before performing the smoke test by applying power to the PC. Don't skip this step, and don't underestimate its importance. Most PCs that fail the smoke test do so because this step was ignored. Until you gain experience, it may take several minutes to verify that all is as it should beall components secure, all cables connected properly, no loose screws, no tools or other metal parts shorting anything out, and so on. Once you are comfortable working inside PCs, this step takes 15 seconds, but that can be the most important 15 seconds of the whole upgrade. (We usually pick up the case and shake it, then rotate it vertically and back gently to see if anything rattles.)
Start small for the first boot. -
The moment of greatest danger comes when you power up the PC for the first time. Do what's necessary to minimize damage if the smoke test fails. If the system fails catastrophicallywhich sometimes happens no matter how careful you aredon't put any more of your components at risk than you have to. If you're installing a fast new video adapter and a new power supply to support its higher current draw, for example, install the new power supply first. Once you're sure it's working properly, then install your expensive new video adapter.
Don't throw the old stuff away. -
Don't discard the components you pull. With new hard drives selling for $0.50 per gigabyte, an old 20 GB hard drive may not seem worth keeping. But you could be glad you have it the next time you need to troubleshoot your system. (It can also come in handy if you pop it into one of the external USB/FireWire drive enclosures described in Chapter 9.) Despite those correspondence school ads that show a technician using an oscilloscope to troubleshoot a PC, nobody really does it that way. In the real world, you troubleshoot PCs by swapping components. Keeping old components you pull during upgrades is a convenient (and free) way to accumulate the swappers you'll need later on to troubleshoot problems with this or another PC. Label them "known good," date them, and put them on the shelf. Conversely, label bad stuff "BAD," even if you're going to throw it out. There's nothing more frustrating in an emergency than finding out that the unlabeled hard drive in the back of your closet is actually dead. | Swap Meet | If you have more than one computer, use the second system as a source of parts for swap-out troubleshooting. Just make sure that the parts are compatible and of sufficient capacity. For example, if you suspect that the 500W power supply in your gaming system is the problem, swapping in a 300W power supply from a secondary system won't accomplish anything except burning out the 300W power supply. |
Leave the cover off until you're sure everything works. -
Complete the upgrade or repair and test the system before you reassemble the case. Otherwise, you may find yourself repeatedly assembling and disassembling the case. The corollary to this rule is that you should always put the cover back on the case when you're finished working. Cases are designed to direct cooling air across the major heat-generating components, processors, and drives, but this engineering is useless if you run the PC uncovered. Replace the cover to avoid overheating components. The other good reason to replace the cover is that running a system without the cover releases copious amounts of RF to the surrounding environment. An uncovered system can interfere with radios, monitors, televisions, and other electronic components over a wide radius.
|