24.3 Configuring USB When you are installing new USB devices or troubleshooting existing USB devices, you may need to determine detailed configuration information about your USB interfaces, drivers, hubs, and ports, including the following: - USB Host Controller Interface
-
It's frequently necessary to know which USB Host Controller Interface your system uses. For example, the system requirements for a USB peripheral may state that it is incompatible with certain USB HCIs. Also, if you have occasion to troubleshoot a USB problem, knowing which USB HCI your system uses may allow you to pinpoint the problem more quickly, because various USB HCIs have known limitations and incompatibilities. - USB driver information
-
Although Windows generally installs a suitable USB driver, there are times when upgrading (or downgrading) the default driver is required to allow USB devices to function properly. - USB power information
-
A USB port provides 500 milliamps of current, which is shared by all devices connected to that port. Connecting several unpowered devices to a port can exceed the maximum allowable current, which may cause problems ranging from sporadic operation to complete failure of all connected devices. Windows allows you to view the total power consumption for each USB port as well as the power consumed by each device connected to that port. The following sections detail the steps necessary to view and change USB configuration. 24.3.1 Identifying the USB HCI Under Windows 9X To determine which USB HCI your system uses under Windows 9X, right-click My Computer, choose Properties, and click the Device Manager tab to display Device Manager, shown in Figure 24-4. Double-click the Universal Serial Bus controllers item to expand it. Figure 24-4. Windows 9X Device Manager shows this system uses an Intel 82801AA UCHI 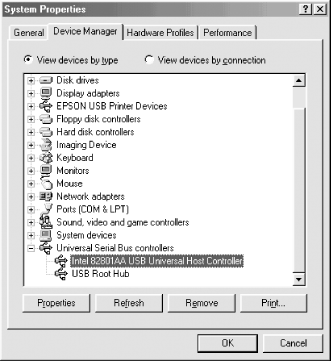 24.3.2 Viewing USB HCI Properties Under Windows 9X From Device Manager, double-clicking the Host Controller Interface item displays the Properties dialog for the HCI, shown in Figure 24-5. This dialog includes detailed HCI information that may be useful in troubleshooting USB problems and resolving conflicts. Figure 24-5. The Windows 9X HCI Properties dialog displays detailed HCI information 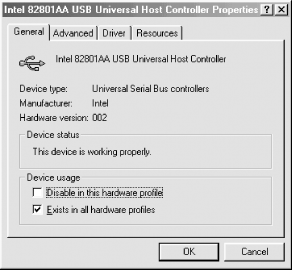 The HCI Properties dialog includes the following pages: - General page
-
The General page displays summary information about the HCI type, manufacturer, and version. It also includes the Device status pane, which indicates when the HCI is working properly and may indicate the cause when the HCI is not working properly. You can also use the General page to disable the device in one or more hardware profiles. - Advanced page
-
The Advanced page includes the Disable USB error detection checkbox, which sounds like a dangerous thing to do. In fact, disabling USB error detection is sometimes necessary if USB is to run properly. If you are not experiencing USB conflicts or problems, leave USB error detection enabled. Otherwise, try disabling it. This page also includes the BandwidthUsage button. Clicking that button displays the percentage of the available bandwidth consumed by each device connected to the port. This can be useful information when you troubleshoot USB problems because some USB devices, particularly early models, are "bandwidth hogs" that claim bandwidth whether they are using it or not and thereby prevent other devices connected to the same port from functioning correctly, if at all. - Driver page
-
The Driver page displays the HCI driver provider and version in use by the HCI. Click the DriverFileDetails button to display the paths and filenames of the USB driver files. Click the UpdateDriver button to invoke the Update Device Driver Wizard, which allows you to replace the current driver with a different version. Although the default driver generally works properly, depending on the HCI your system uses and the particular devices you have connected, you may need to replace the driver with a later (or earlier) version for full functionality. - Resources page
-
The Resources page displays the IRQ and I/O port being used by the HCI. By default, the Use automatic settings checkbox is marked, which is the proper setting for routine operation. But, depending on the HCI your system uses and the particular devices you have connected, you may need to clear that checkbox and assign settings manually. For example, Windows 9X typically assigns a shared interrupt to the HCI. Although this usually works properly, some HCIs and some hardware configurations do not work properly using a shared interrupt. If that occurs, use Device Manager to locate an unused interrupt, clear the Use automatic settings checkbox, and assign the unused interrupt to the HCI. 24.3.3 Viewing USB Root Hub Properties Under Windows 9X From Device Manager, double-clicking the USB Root Hub item displays the Properties dialog for the root hub, shown in Figure 24-6. This dialog includes detailed root hub information that may be useful in troubleshooting USB problems and resolving conflicts. Figure 24-6. The Windows 9X Root Hub Properties dialog displays detailed root hub information 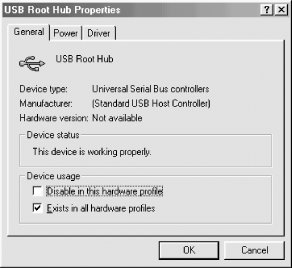 The USB Root Hub Properties dialog includes the following pages: - General page
-
The General page displays summary information about the root hub type, manufacturer, and version. It also includes the DeviceStatus pane, which indicates when the root hub is working properly and may indicate the cause when the root hub is not working properly. You can also use the General page to disable the device in one or more hardware profiles. - Power page
-
The Power page includes only the PowerProperties button. Clicking this button displays the Power dialog, shown in Figure 24-7. The HubInformation pane of this dialog lists the hub type and the maximum total power available per port. The Devices on this hub pane lists the name and description of each device connected to the hub and the power it requires. Connecting multiple unpowered USB devices to a hub is one of the most common causes of USB problems. If you experience USB problems, use this dialog to verify that the total power consumption of all connected devices does not exceed the maximum the port can deliver. Note that powered USB devices (those that connect to AC power directly) show very low power consumption, often only 0 mA to 5 mA. That is because this dialog shows only the power being drawn from the root hub, and not the power being supplied to the device by a wall outlet. Figure 24-7. The Windows 9X Power dialog shows all devices connected to the hub 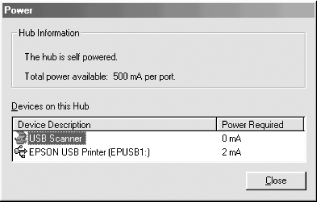 - Driver page
-
The Driver page displays the root hub driver provider and version in use by the root hub. Click the Driver File Details button to display the paths and filenames of the USB driver files. Click the Update Driver button to invoke the Update Device Driver Wizard, which allows you to replace the current driver with an updated version. Unlike the HCI driver, you will seldom have occasion to replace the root hub driver file. 24.3.4 Verifying USB Interrupt Sharing Under Windows 9X Windows ordinarily assigns a shared interrupt to the USB HCI, which sometimes works properly. Often, however, USB works improperly unless the HCI has a dedicated interrupt. To verify USB interrupt sharing status under Windows 9X, from the main Device Manager dialog, click the Properties button to display the Computer Properties dialog shown in Figure 24-8. Figure 24-8. Windows 9X Device Manager shows this system shares an interrupt between the USB HCI and an Ethernet adapter 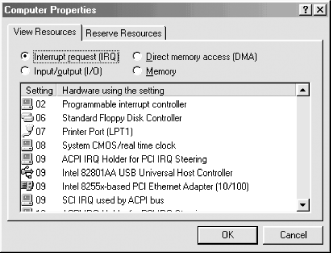 In this instance, Device Manager shows that USB HCI is sharing interrupt 09. You can safely disregard the ACPI IRQ Holder for PCI IRQ Steering entry; IRQ Steering entries are simply placeholders, and are unlikely to cause conflicts (at least on motherboards that have ACPI properly implemented, which essentially includes only recent motherboards that use recent Intel chipsets). Similarly, the SCI IRQ used by ACPI bus is a system-level entry, which is unlikely to cause a problem. The Intel 8255x-based PCI Ethernet Adapter (10/100) entry, however, represents a real piece of hardware that is using real interrupts and therefore has the potential to cause a conflict. In this case, it does not. If it did, we would go to the Resources page of USB HCI Properties and manually assign a dedicated IRQ to it. 24.3.5 Identifying the USB HCI Under Windows 2000/XP To determine which USB HCI your system uses under Windows 2000 or Windows XP, right-click My Computer, choose Properties, display the Hardware page, and then click the Device Manager button to display Device Manager. Double-click the Universal Serial Bus controllers item to expand it, as shown in Figure 24-9. Figure 24-9. Windows XP Device Manager shows this system uses two Intel 82801BA/BAM UHCIs 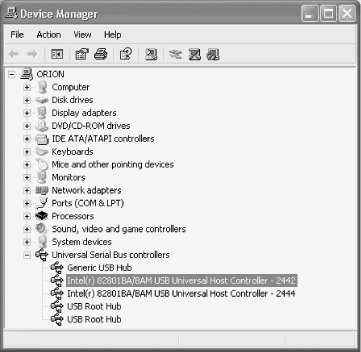 In this case, as is common on recent systems, the motherboard includes two distinct HCIs. These operate completely independently, and each HCI has a separate root hub associated with it. This doubles the number of root hub ports available, some of which may appear at the front of the case and some of which connect directly to the traditional location on the rear ATX I/O panel. Note that the secondary root hub ports often appear as a set of header pins on the motherboard, which may be extended to the front or the rear of the case, as necessary. 24.3.6 Viewing USB HCI Properties Under Windows 2000/XP From Device Manager, double-clicking the Host Controller Interface item displays the Properties dialog for the HCI, shown in Figure 24-10. This dialog includes detailed HCI information that may be useful in troubleshooting USB problems and resolving conflicts. Figure 24-10. The Windows XP HCI Properties dialog displays detailed HCI information 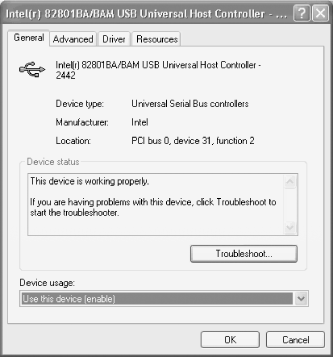 The HCI Properties dialog includes the following pages: - General page
-
The General page displays summary information about the HCI name, type, manufacturer, and location on the bus. It also includes the Device Status pane, which indicates when the HCI is working properly and may indicate the cause when the HCI is not working properly. The Device Usage drop-down list allows you to enable or disable the device. The Troubleshoot button (Troubleshooter in Windows 2000) invokes an automated dialog that attempts to resolve USB connectivity problems, although we must say that we seldom find the suggestions it offers very useful in solving an actual USB problem. - Advanced page
-
The Advanced page includes the Don't tell me about USB errors checkbox (Disable USB error detection in Windows 2000). Although error-detection sounds like a Good Thing, there are times when it must be disabled for USB to operate properly. During routine USB operation, leave USB error detection enabled unless you experience problems or conflicts. If that happens, try disabling error detection by marking this checkbox. This page also includes the Bandwidth-consuming device pane, which displays the percentage of the available bandwidth consumed by each device connected to the port. This can be useful information when you troubleshoot USB problems because some USB devices, particularly early models, are "bandwidth hogs" that claim bandwidth whether they are using it or not and thereby prevent other devices connected to the same port from functioning correctly, if at all. - Driver page
-
The Driver page displays the HCI driver provider, date, and version in use by the HCI, as well as the name of the entity that digitally signed the driver. Click the Driver Details button to display the paths and filenames of the USB driver files. Click the Update Driver button to invoke the Hardware Update Wizard (Upgrade Device Driver Wizard in Windows 2000), which allows you to replace the current driver with a different version. Although the default driver generally works properly, depending on the HCI your system uses and the particular devices you have connected, you may need to replace the driver with a later (or earlier) version for full functionality. Windows XP includes a fourth button, Roll Back Driver, which allows you to easily revert to the previous driver version if the updated driver does not function properly. - Resources page
-
The Resources page displays the IRQ and I/O port being used by the HCI. By default, the Use automatic settings checkbox is marked, which is the proper setting for routine operation. But, depending on the HCI your system uses and the particular devices you have connected, you may need to clear that checkbox and assign settings manually, if that option is available. 24.3.7 Viewing USB Root Hub Properties Under Windows 2000/XP From Device Manager, double-clicking the USB Root Hub item displays the USB Root Hub Properties dialog, shown in Figure 24-11. This dialog includes detailed root hub information that may be useful in troubleshooting USB problems and resolving conflicts. Figure 24-11. The Windows XP Root Hub Properties dialog displays detailed root hub information 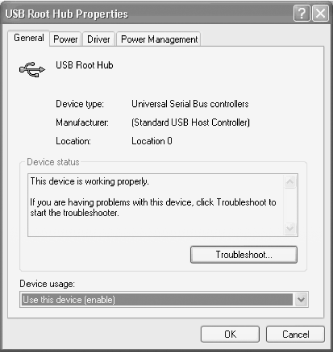 The USB Root Hub Properties dialog includes the following pages: - General page
-
The General page displays summary information about the root hub type, manufacturer, and location. It also includes the Device Status pane, which indicates when the root hub is working properly and may indicate the cause when the root hub is not working properly. The Device Usage drop-down list allows you to enable or disable the device. The Troubleshoot button (Troubleshooter in Windows 2000) invokes an automated dialog that attempts to resolve USB connectivity problems. The Windows 2000 version is rudimentary, but may be helpful in resolving simple problems. The Windows XP version is more polished, but is little more substantive than the Windows 2000 version. - Power page
-
The Power page Hub Information pane lists the hub type and maximum total power available per port. The Attached Devices pane (Devices on this hub in Windows 2000) lists the name and description of each device connected to the hub and the power it requires. If you have USB problems, use this dialog to verify that the total power consumption of all connected devices does not exceed the maximum the port can deliver. - Driver page
-
The Driver page displays the root hub driver provider, date, and version in use by the root hub, as well as the name of the entity that digitally signed the driver. Click the Driver Details button to display the paths and filenames of the USB driver files. Click the Update Driver button to invoke the Hardware Update Wizard (Upgrade Device Driver Wizard in Windows 2000), which allows you to replace the current driver with a different version. Windows XP includes a fourth button, Roll Back Driver, which allows you to easily revert to the previous driver version if the updated driver does not function properly. Unlike the HCI driver, you will seldom need to replace the root hub driver file. - Power Management page
-
This page, not present in Windows 2000, contains only two checkboxes: - Allow the computer to turn off this device to save power
-
Marking this checkbox, which is enabled by default, allows ACPI to power down the root hub port after a period of inactivity. We recommend disabling this option on desktop systems, because USB peripherals frequently do not recover properly when coming out of standby mode. Problems range from connected peripherals no longer being recognized to two instances of the same peripheral appearing in Device Manager to the peripheral appearing to be recognized properly but simply not working. - Allow this device to bring the computer out of standby
-
If you have one or more USB devices attached to the root hub that are capable of waking the system from standby, enabling this checkbox allows them to do so. For example, you might use a USB modem to receive incoming faxes. You may want your system available to receive faxes 24 hours a day, but prefer that it not run constantly. If so, use the Screen Saver tab in Display Properties to enable power management, shutting down power to the monitor and hard drive after a specified interval of inactivity, and enable this checkbox. When an inbound fax call arrives, your USB modem will wake the system and allow it to receive the fax. Note, however, that PCs do not awake instantaneously, and the time delay between the wake-up event and when the system actually becomes available may cause problems. 24.3.8 Verifying USB Interrupt Sharing Under Windows 2000/XP To verify USB interrupt sharing status under Windows 2000 or Windows XP, from Device Manager, choose View  Resources by Type, and expand the Interrupt request (IRQ) item, as shown in Figure 24-12. Resources by Type, and expand the Interrupt request (IRQ) item, as shown in Figure 24-12. Figure 24-12. Windows XP Device Manager shows this system dedicates PCI interrupts 19 and 23 to the two USB HCIs 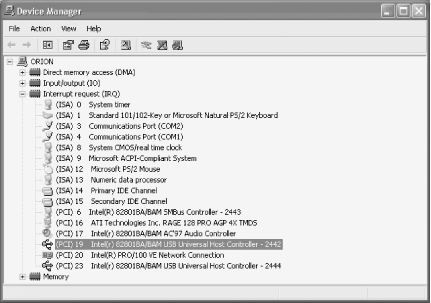 On recent motherboards, Windows 2000 and Windows XP typically assign a dedicated PCI interrupt above 15 to each device. On older motherboards, Windows 2000 and Windows XP typically assign a shared PCI interrupt to the HCI, as shown in Figure 24-13. Despite all assurances by hardware manufacturers and Microsoft that USB operates properly with a shared interrupt, that is frequently not true. If Windows has assigned a shared interrupt to USB, use Device Manager to locate an unused interrupt, clear the Use automatic settings checkbox, and assign the unused interrupt to the HCI. Figure 24-13. Windows 2000 Device Manager shows this system shares one interrupt among the USB HCI and four other devices 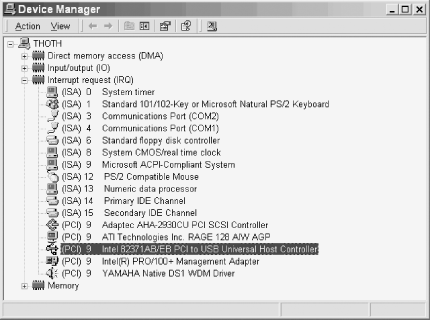 On this system, Windows 2000 has assigned one shared PCI interrupt among the USB HCI, the SCSI host adapter, the video card, the network adapter, and the sound adapter. Surprisingly enough, all of these functions work properly. If a conflict did occur, we would use the Resources page of USB HCI Properties to manually assign a dedicated IRQ to it. |