A Transition Example
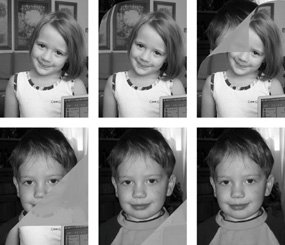
| To close out this chapter on Core Image, let's look at a sample application that animates a Core Image transition. We'll use the built-in Page Curl transition to switch between two images. Figure 10.2 shows several frames of the animation that the code creates: Figure 10.2. Frames from the Page Curl Animation The code draws the animation in a custom subclass of NSView, called transitionView. In addition to drawing the animation, the transitionView keeps track of Core Image objects and animation parameters. This code sample uses Cocoa as its application framework so the animation is driven with an NSTimer. Because it is using a timer, a user can continue to interact with the application, moving windows around and such, while the animation runs simultaneously. Listing 10.2 shows the class declaration for our custom NSView class. Listing 10.2. TransitionView Class Declaration
The first two fields give the starting and ending images of the transition. The mtransitionFilter field contains the transition object that generates the frames of the animation. The animation timer is the timer responsible for telling the view when to draw a new frame. The mCurrentTime field keeps track of how much of the animation has already been drawn. This value will track from 0.0 to 1.0 as the animation progresses and will become the inputTime for our transition filter. The code loops the animation forward and backward, and the mAnimationDirection field keeps track of which direction the animation is currently running. When this field is 1.0, the animation will run forward from the source image to the destination. When the field is -1.0, the animation runs backward from the destination image back toward the source. The TRansitionView class has six methods. The first, initWithRect:, sets up the transformation filter. The next is runAnimation:. It is the method that restarts the animation from the beginning. In interface builder, this method is the action of a button on the main window that you can press to start the animation. The drawRect: method is the method that Cocoa calls when it wants you to draw a portion of your view. The handleTimerEvent: method is what the timer will call when our animation should draw the next frame. The loadImages method is a utility method that uses Image I/O to load the two images our transition is moving between. The dealloc method cleans up the instance variables stored in the object. An examination of this code begins with the initWithRect: method. This method sets up most of the parameters of the animation. It creates the transition and timer objects and initializes the mCurrentTime and mAnimationDirection fields. The code for initWithRect: is given in Listing 10.3. Listing 10.3. The initWithFrame: Method of the Transition Sample Code
The routine begins by creating an instance of CIVector. A CIVector is simply a collection of two, three, or four floating point numbers. Among other uses, Core Image employs CIVectors as convenient objects for specifying parameters to CIFilters. In this case, the vector we are creating represents the rectangle that our animation will be drawn in. You will see what this information is for very shortly. The code continues by creating two filters. These filters will define the CIImages used for the backside of the curling page and the shading that the computer applies to the animation. The first filter is a CIConstantColor filter which generates a CIImage that contains nothing more than a solid ARGB color. The output of the constant color filter is a rectangle of solid color that is infinite in size. Because the computer would have a lot of trouble rendering something that is infinite in size, you need to limit the image to just that area of the drawing space that you are interested in. To do that, you create a crop filter. After the computer has created the crop filter, it assigns the constant color image as the input image and uses the extent CIVector to tell the crop filter what area of the infinite color plane you are interested in using as the backside of your curled page. Next, the code creates the Page Curl transition filter and stores the result in the field of the view object. The Page Curl transition has many more parameters than the simple blur filter examined in the beginning of the chapter. The code specifies the source and destination images by using the fields of the view that contain those images. It asks the crop filter for its output image and attaches that to the backside and shading images of the filter. The inputAngle parameter tells the filter in which direction the page should curl. This parameter is expressed in radians, but the value used in the sample is equivalent to -45 degrees (or on the compass, from northwest to southeast). Finally, you use the CIVector again to tell the filter how much of the drawing space you want this transition to affect. In this case you use the full size of the images, 480x640 pixels. The runAnimation: method creates and manages the timer that will drive the animation. The transitionView object creates a single timer and reuses that timer each time the user asks it to run the animation. The routine used to create the timer the first time has a lot of parameters, but they are pretty straightforward. The rate at which the timer fires is given by the constant kFrameInterval, which in the sample, is defined to be 1.0/30.0, or If the timer already exists, then you simply tell the timer to call you back at your frame interval. This portion of the code is given in Listing 10.4. Listing 10.4. The runAnimation: Method of the Transition Sample Code
The last call of the method is the way you tell the computer you are ready to draw the first frame of the animation. The computer, in turn, will call back to the drawRect: method whenever it is ready for the application to redraw the TRansitionView. This same pattern appears when we examining the way the sample handles the timer callback. All of the drawing for the transitionView is done in the drawRect: method. This method can be found in listing 10.5. Listing 10.5. The drawRect: Method of the Transition Sample
The drawRect: method begins by asking the current graphics context for the CIContext that the view is drawing into. This is the CIContext that you will draw all your CIImages into. To generate the current frame of the transition, the code needs to ask the transition object for a CIImage. As the first step in doing so, the code creates a CICrop filter. This filter is very similar to the one used in the runAnimation: method. When the CICrop filter was used before, the goal was to limit the output of a filter that generates an infinitely large image to only the area of the drawing space. The Page Curl filter does not generate an image of infinite extent, but it can generate an image that extends beyond the bounds of the source or destination images. The crop filter chops off the uninteresting pixels that lie outside of the view's extent. The system passes the cropping information to the Page Curl transition. The transition, in turn, may only calculate the values of pixels that fall inside of the cropped area. This improves the performance of the transition filter by avoiding unnecessary work. The last interesting method of the transitionView class to explore is the handleTimerEvent: method. This is the method that the animation timer invokes each time it fires. The method has two primary responsibilities. It manages the progression of the animation with the mCurrentTime and mAnimationDirection fields of the view. It also lets the system know when the view would like to draw the next frame of the animation. The contents of the handleTimerEvent: method are given in Listing 10.6: Listing 10.6. The handleTimerEvent: Method of the TransitionView
The first thing the timer callback does is advance the mCurrentTime field to the next appropriate value. It uses a bit of cleverness regarding the mAnimationDirection field to progress the animation in the proper direction. If mAnimationDirection is 1.0, the current time will increase by the frame interval. When the animation direction is -1.0, the code decreases the current time by the frame interval. The next two if statements manage the animation at the middle and end of the cycle respectively. The animation time variable starts at 0 and progresses to 1.0 and then reverses direction and returns back from 1.0 to 0. When the animation reaches 1.0, and the computer reverses the animation direction. It clamps the current time to 1.0 just in case the frame rate introduces round-off errors into the current time calculations. When the current time returns to zero, you want to stop the animation. To do this, you take the timer and set its next fire time to [NSDate distantFuture]. This does not mean that the timer would never fire again. However, you would have to leave the program running for many centuries before the timer actually fired again. If the transition is running, the code sets the inputTime parameter of the transition to the same value as mCurrentTime. Finally, the handleTimerEvent: method tells the computer that you want the view to redraw a new frame. Core Image is remarkably easy to use, and this makes it a very interesting technology to play with. This chapter presented some of the basic concepts of Core Image and provided examples of the fundamental techniques an application uses to interact with the framework, but it has only been able to scratch the surface. You can get a lot of interesting behavior very quickly simply by chaining together the built-in filters. This chapter has expanded on a few of the built-in transitions, but there are dozens more for you to explore. Moreover, your application can extend Core Image by providing filters of its own. The goal here was to get you started on what will hopefully be a fruitful exploration of this exciting technology. |
EAN: 2147483647
Pages: 100