Working with Tables
Often, it's useful to present columns of numbers or text within a word processor document. To make it easy to align the columns, OpenOffice.org offers the Table tool. This lets you quickly and easily create a grid in which to enter numbers or other information. You can even turn tables into simple spreadsheets, and tally rows or columns via simple formulas.
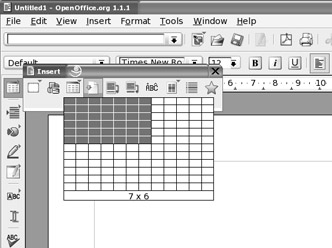
To insert a table, click and hold the Insert icon on the Main toolbar (which runs down the left side of the screen). Then select the Insert Table icon and simply drag the mouse until you have a table of the correct size. Click to create it, as shown in Figure 24-5.

Figure 24-5. Just select the Insert Table icon on the Main toolbar and drag the mouse to define the size of the table; click when you're finished.
As with spreadsheets, tables consist of cells arranged into rows (running horizontally) and columns (running vertically). Altering the size of a column is easy. Just hover the mouse over the edge of a cell until it changes to a resizing cursor, and then click and drag. Altering a row's height is a matter of right-clicking within it, selecting Row ®Height, and entering a value for the height.
| Tip | An alternative way of resizing cells is to click in a cell and press the Enter key, which inserts a carriage return, too. Cells expand in size to fit their contents. If you don't want this to happen, select the entire table and click the Table:Fixed icon on the Object bar. |
Once the cursor is within a table, you can move from cell to cell using the Tab key. Alternatively, you can move backward through the cells by pressing Shift+Tab.
To add more rows or columns, click the relevant icon on the Object bar. To split existing cells, select them and click the Split icon on the Object bar.
If you want to total figures within tables, click the Sum icon. This is similar to inserting a function in a spreadsheet. The table cell holds the formula for the sum, and clicking additional cells adds them to the sum.
| Note | Only correctly formatted cells can be summed using the Sum icon on the Object bar. Cells with spaces or text within them cannot be added to the formula. |
Tables come with their own paragraph styles, which are available on the left side of the Object bar. There are predefined styles for table headers, for example. By using the icons on the right side of the toolbar, you can alter the style of borders around each cell, as well as the background color for each cell.
EAN: 2147483647
Pages: 293