15.4 Configuring and Using the OSS This section explains how to configure and use the Oracle Security Server at your site. The details of software installation are operating-system dependent and will not be discussed here. Please refer to your operating system documentation for installation instructions. From the physical installation perspective, the Oracle Security Server consists of three components : -
A command-line tool, which provides the osslogin (connect OSS) utilities -
The Advanced Networking Option Authentication Adapter (see Chapter 17, for more information on ANO) -
A repository that stores OSS information The osslogin command-line tool is activated from the DOS prompt on your Windows NT or Windows 95 system. You type in the utility name and respond to the prompts. Notice that the prompts are in the opposite order from the order in which you enter information when creating a global user. The interaction for the user mary , who we created earlier, would look like the following: C:\> osslogin Oracle Security Server for 32-bit Windows : version 2.0.4.0.0 - Production on 21-JUN-98 16:35:13 Copyright 1997 Oracle Corporation. All rights reserved. Oracle Security Server Login Program Please Enter the following information: Common Name: mary Locality: Vienna State: VA Organization Unit: MyDept Organization: MyCompany Country: US Once you have entered the last piece of information (Country), the utility will generate a wallet for the user mary . The section "More about osslogin" provides additional details about the osslogin syntax.  | The OSS repository will use the system account and will need the system password during installation. However, interaction with the OSS will be performed using an account created during installation. The account you must log in to is oracle_security_service_admin . The password for this account will also be created during the OSS installation. If you try to create an account with another name to house the repository, the tool's data will not be available. | | 15.4.1 Creating and Deleting the OSS Repository After you have installed the OSS toolset, you will find a new entry in the Start  Programs menu of your Windows NT or Windows 95 system. This entry is titled "Oracle Security Server." There are four options available under this entry: Programs menu of your Windows NT or Windows 95 system. This entry is titled "Oracle Security Server." There are four options available under this entry: -
Create Oracle Security Server -
Oracle Security Server Manager -
README -
Remove Oracle Security Server Two of the options enable you to create and delete the OSS repository: the "Create Oracle Security Server" and the "Remove Oracle Security Server." When you select the "Create Oracle Security Server" option from the Start Program Oracle Security Server menu, the create utility runs NZDOCRT.SQL and creates an OSS tablespace ( oss ), datafile ( oss.dbf ), and the two user accounts, which will be used to interact with the utility. The script is very straightforward. First, you'll run the NXDODROP.SQL script to attempt to remove any existing OSS objects and users. Then, you'll create the tablespace for the repository with the script: CREATE TABLESPACE oss DATAFILE 'oss.dbf' SIZE 10M; Finally, you'll run the script NZDOUSER.SQL to create the users. The script performs the following commands: CREATE USER oracle_security_service_admin IDENTIFIED BY oss DEFAULT TABLESPACE oss QUOTA UNLIMITED ON oss; GRANT CREATE SESSION TO oracle_security_service_admin; GRANT CREATE TABLE TO oracle_security_service_admin; GRANT CREATE SEQUENCE TO oracle_security_service_admin; GRANT CREATE PROCEDURE TO oracle_security_service_admin; GRANT CREATE TRIGGER TO oracle_security_service_admin; GRANT CREATE VIEW TO oracle_security_service_admin; CREATE USER oracle_security_service IDENTIFIED BY oracle_security_service; GRANT CREATE SESSION TO oracle_security_service; GRANT CREATE SYNONYM TO oracle_security_service; GRANT CREATE ANY SYNONYM to oracle_security_service_admin; GRANT DROP ANY SYNONYM TO oracle_security_service_admin; Make a note of the passwords used for the two accounts, since you will need to know them to interact with the OSS. If you run the "Create Oracle Security Server" option interactively, a DOS window appears and you are prompted with a Username/Password screen with no guidance or indication of what you are expected to enter. The expected response is system/<current_system_password> and the correct network connection, if you are not using a default database on your current system. If a repository already exists, you will be notified of that fact and asked if you want to continue. If you continue, the current repository is dropped and a new one is created. If you decide that the OSS must be removed, you can invoke the "Remove Oracle Security Server" option to remove the account. You select the Start Program Oracle Security Server Remove Oracle Security Server menu option. However, the remove utility script that is run will completely erase all of the contents in the OSS repository and should be used only if you are absolutely sure you want to destroy all of the identities and authorizations that exist. Be sure you do not run the remove utility script while anyone is logged on to the OSS as the oracle_security_service_admin user. While running either the create utility or the remove utility, you will be prompted to supply information about the database in which you are creating or destroying the repository. You will be asked for the system username, its password, and the Net8 information. Since the utilities are written to assume a local database, if the database with which you are interacting is not a remote one, you will only need to supply the system username and password. 15.4.2 A Known Problem In the Oracle 8.0.4.0.0 version, a known problem exists with the OSS utility. If you have already run either the "Create Oracle Security Server" ( create ) or the "Remove Oracle Security Server" ( remove ) script against a database and you rerun the create script, you may receive the following set of errors: XP-07016: A database error has occurred: create tablespace oss datafile 'oss.dbf' SIZE 10M ORA-01119: error in creating database file 'oss.dbf' ORA-27038: skgfrcre: file exists XP-07031: An error occurred while processing file C:\ORANT/OSS/nzdocrt.sql The errors occur because the datafile to support the OSS tablespace exists in the $ORACLE_HOME/Database or $ORACLE_HOME/DBS directory. If you look at the NZDODROP.SQL script, which performs the work of dropping the tablespace and users, the internal comments within the script show that the developer realized that the datafile will not be removed. Perhaps the file is left behind because it could easily be relocated to another location on the system. If the errors are encountered and the remove script was previously run, you should first ensure that the OSS tablespace has been logically removed by logging on as a DBA account and issuing the commands: ALTER TABLESPACE oss OFFLINE; DROP TABLESPACE oss INCLUDING CONTENTS; Even if the tablespace has already been successfully removed, issuing these commands will not hurt anything. You can then physically delete the oss.dbf file from the appropriate directory and rerun the create script if you want to be able to continue to use OSS.  | Before you alter the OSS tablespace offline and drop it, take the time to identify where the actual physical file is located so that you can remove it. Next , ensure that you really want to take this action. If you have accidentally run the "Create Oracle Security Server" script on a database in which the repository currently exists and you take action to drop the tablespace, you will destroy your current OSS repository and its contents. | | 15.4.3 Securing the OSS Repository The Oracle documentation indicates that the Oracle Security Server is run from the Oracle Enterprise Manager tool. When the OSS is installed on a Windows NT system, however, the Start Programs menu currently shows the listing in a separate set of menu options. See the "Creating and Deleting the OSS Repository" section above. | | Be aware that the Oracle Enterprise Manager tool offers a "Security Manager" menu option. This option is used to administer roles and users in a database and is not the same option as the OSS. | | After you have run the script to create the OSS repository, you can activate the OSS tool by selecting the "Oracle Security Server Manager" option from the Start Programs Oracle Security Server menu option. You will be prompted for a username and password. Use the oracle_security_service_admin account with the oss password and the appropriate network connection string to your OSS repository location. Since this is the first connection to the OSS, you are prompted with the information that the proposed action is to create the Oracle Repository Manager. Responding by clicking on the "OK" button enables the tool to run the appropriate create scripts to create the repository. A box appears and messages are displayed as the repository is built. Once the script has completed, the actual OSS window is displayed. Figure 15.4 shows the initial login screen with the account oracle_security_service_admin and password oss . Figure 15.4. The OSS login screen 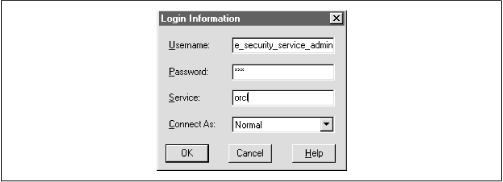 Once you are in the OSS application (see Figure 15.5), notice that there are options available from the pull-down menu: -
Identity -
Server -
Authorization -
Enterprise Authorization In each available menu action, there is a Create, Create like, Drop, and Delete option. There is no Modify option available in this application for any object. If you need to modify an object, you must drop or delete that object and then create it again. Figure 15.5. Initial OSS window 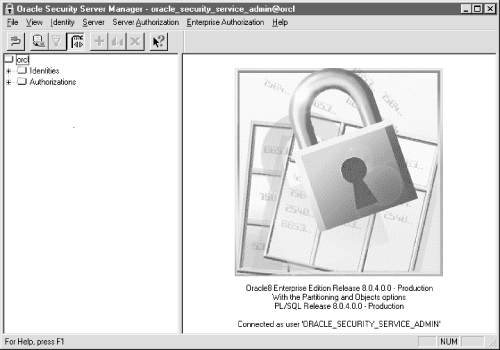 15.4.3.1 Creating the OSS certificate authority Because the appearance and functionality of the OSS application seems to be changing with each new release of the product set, we won't present the step-by-step details on interacting with the toolset. However, we'll include an overview of the actions you must take to configure and use the tools. Once you are logged on to the OSS window, you must first create the certificate authority (CA). You create the certificate authority by selecting the "create" option from the Identity pull-down menu. Use the Oracle-provided documentation to perform the appropriate steps to configure the CA. In version 8.0.4.0.0, the first action you take must be to configure the CA. The first Identity option which is presented is, by default, the CA configuration. Once you have walked through and established the first identity, by default, the next identity is the "Repository" identity. After you configure the repository identity, all other identities you create will be global users. In other words, in the 8.0.4.0.0 version, you only get one chance to configure a CA and one chance to configure the repository identity. Figure 15.6 shows the initial screen you fill out to begin to create the CA. Notice that the radio button at the top of the screen indicates you are creating the certificate authority. Figure 15.6. The initial CA Create screen 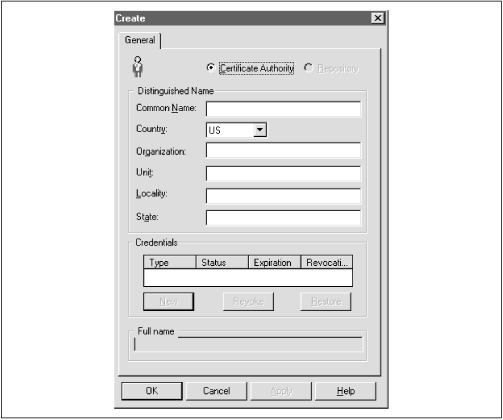 | | Do not use underscores or other punctuation in the common name in version 8.0.4. The credentials creation will fail. | | You do not need to put information into all of the fields. The country and common name are the only Oracle-required fields that must be filled in. However, commercial CAs will insist on the complete list of values being filled in. We therefore encourage you to get into the habit of filling in each of these fields and keeping track of the entries. | | Since the product is case-sensitive, decide whether you want to enter all values in uppercase or lowercase and stick with whatever convention you have chosen . When you download a wallet, you will have to exactly mirror the information you are entering during configuration in the specific case in which it was originally entered here. We recommend entering all values in uppercase. | | Once you have entered the information for the CA and pressed the "OK" button, you are prompted to supply an encryption key password in the "Create New Credentials" form, to verify the password, and to enter a random encryption seed. The seed, which will be used as a base for creating the keys, can be any word or phrase which you would like to use. As you can see from Figure 15.7, when creating the CA, you will not be prompted to supply a decryption password. However, for all other identities you create, you will be expected to supply both encryption and decryption passwords. Figure 15.7. The OSS Create New Credentials screen 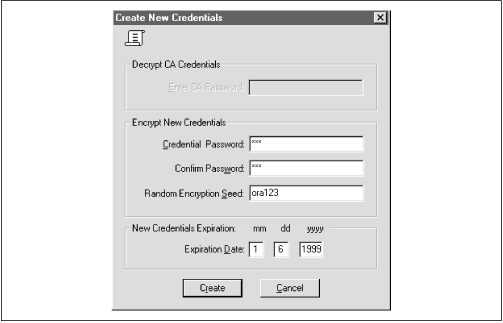 | | Be sure to remember the password you enter for the CA identity (or write it down in a truly secret location). You'll need to know the CA's password when you download a wallet later in the configuration process. | | The password will be used to decrypt the encrypted private key stored in its wallet. We'll look more closely at wallets later in this chapter. The tool will present a default expiration date, which is six months from the day on which you create the credential. You can modify this date to whatever value you want. When you complete entering the required information and press the "Create" button, the credential is created and you will see an entry in the credential area of the master OSS screen (see Figure 15.8). Figure 15.8. The OSS main screen with the CA created and a credential 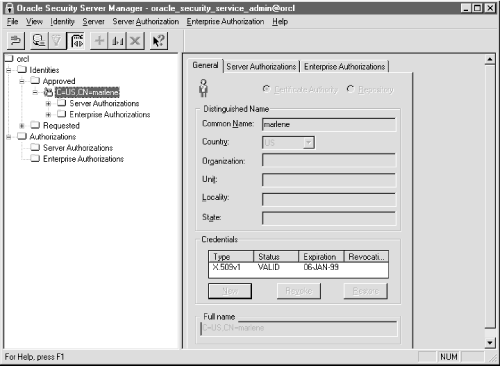 15.4.3.2 Creating the repository identity The next identity you create is the repository. Selecting the Identity pull-down option, choose "Create." Figure 15.9 shows the general Create screen. This time, however, the radio button for repository is marked . Figure 15.9. Creating the repository 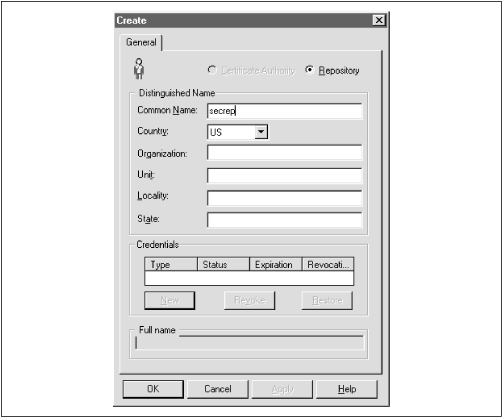 When you have completed filling in the required information, press the "OK" button and the Create New Credentials screen is presented (see Figure 15.10). Figure 15.10. Create New Credentials screen for the repository and other identities 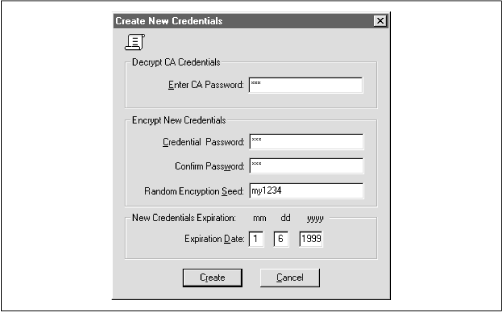 This time, you are prompted to fill in both the decrypt and encrypt areas. When you have finished entering the required information, press the "Create" button, and the OSS main screen will be displayed (similar to Figure 15.8 but with the repository information displayed). 15.4.3.3 Creating other identities Once the CA and repository identities have been created, every other identity you create will default to being a global user. Figure 15.11 shows the Create screen for a global user. The only difference between this screen and the other Create screens we've displayed is the fact that a radio button is not lit. Figure 15.11. The Create screen for a global user 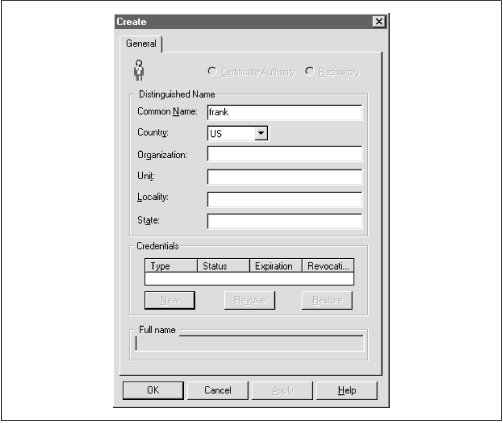 15.4.3.4 Defining a server Once the CA, repository, and one global user have been created, you can begin to define servers that are to be made available to interact with the OSS. To designate a server value for the repository or, more generally , to define a server to the system, select the "Server Create options from the pull-down menu. Enter the name of the server. If you do not have any other servers to define, click "OK." If you have other servers to define, click "Apply" and define the next server. Figure 15.12 shows the server configuration screen. Figure 15.12. The Define a new Server screen 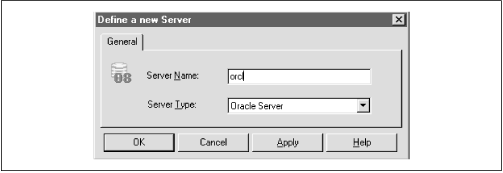 15.4.3.5 Defining a Server Authorization A Server Authorization is a role created in the database on a specific server and identified as a global role. To define a Server Authorization within the OSS application, select the "Server Authorization Create" options from the pull-down menu. Enter the name for the role you want to designate and select a server from the pull-down list of servers available. Alternatively, you can apply the role to all servers you have identified by selecting the "Create for All servers" option. Again, you can either choose "OK" to exit the option or choose "Apply" to continue to define Server Authorizations. Figure 15.13 shows the "Define a new Server Authorization" screen. Figure 15.13. The Define a new Server Authorization screen 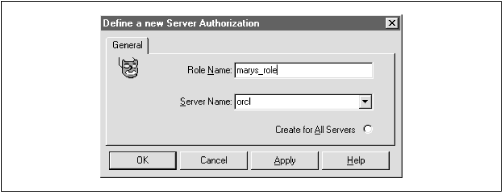 15.4.3.6 Defining an Enterprise Authorization An Enterprise Authorization is a role that contains actions a global user can perform across multiple Oracle8 databases. The difference between a Server Authorization and an Enterprise Authorization seems to be the scope of the role. The Enterprise Authorization can be used to encompass many servers, while a Server Authorization encompasses only one node. To define an Enterprise Authorization, select the "Enterprise Authorization Create options from the pull-down menu. Enter the value for the new Enterprise Authorization and click either "OK" or "Apply." 15.4.3.7 Creating/downloading a wallet Once the CA has been defined, a wallet must be created to hold its credentials. A wallet is a file that stores an X.509 certificate and a public/private key pair. The private key stored in the wallet is encrypted. The SQLNET.ORA file, which is located on either the Net8 client or Oracle8 server, is used to define where an entity's wallet is stored. A client or server downloads its wallet from the OSS repository. The local client or server has the responsibility of protecting the contents of the wallet. As we saw in the "Create New Credentials" discussion, the password you supply for decryption is used to decrypt the encrypted private key in the wallet. The following template defines a location for a user's wallet: OSS.SOURCE.MY_WALLET= (SOURCE= (METHOD=ORACLE) (METHOD=DATA= (DIRECTORY= directory path))) In this example, directory_path is the full name of the appropriate directory being used to store the wallets. If you do not supply a value for the OSS.SOURCE.MY_WALLET location, the default value of $HOME/oracle/oss will be used. $HOME is UNIX-specific so, if you are not on a UNIX system, you will want to change this reference. Once the OSS.SECURITY.MY_WALLET location is defined, the OSS repository location must be defined. The syntax for defining this value is: OSS.SOURCE.LOCATION= (SOURCE= (METHOD=ORACLE) (METHOD=DATA= (SQLNET_ADDRESS=<service_name>))) In this example, service_name is the value defined in the TNSNAMES.ORA file for "oracle_repository." If no OSS.SOURCE.LOCATION is supplied, the default is "oss." However, there must be a reference for the OSS repository location either in the TNSNAMES.ORA file or in a Names Server definition. 15.4.3.8 More about osslogin In the section entitled "Configuring and Using the OSS," we looked briefly at the osslogin utility that Oracle supplies to download a wallet or create a clear private key. The osslogin utility can take an encrypted private key in a wallet and decrypt it to create the clear private key. The general syntax of the utility is: osslogin [-d] [-f] ['<x.509 name>'] The results of the command vary depending on the form of the command you use and the information that exists in various locations on the system. To download a wallet for the global user "mary.us" from the OSS, use the syntax: osslogin -d 'mary.us' The tool will download (-d) a wallet from the OSS repository to the directory location specified for OSS.SOURCE.MY_WALLET in the SQLNET.ORA file. To convert the private key to a decrypted "clear" private key, issue the command (without any options): osslogin 'X.509 name' The utility will first look in the location specified for the OSS.SOURCE.MY_WALLET directory. If the wallet is there, the utility will prompt you for the password to use and the key will be decrypted. If the wallet is not there, the utility will go to the OSS repository and download a wallet using the X.509 name. You will then be prompted for the password and the decryption will occur. You can force (-f) the tool to go directly to the OSS Repository from the client or server wallet by using the syntax: osslogin -f 'X.509 name' To be prompted for the X.509 name, you can just issue the command without arguments: osslogin The tool will first look for the wallet in the OSS.SOURCE.MY_WALLET directory and, if it doesn't find the wallet, will prompt you for the X.509 name and go to the OSS repository. Once the wallet is downloaded, the tool will prompt you for the password to use to decrypt the encrypted private key. | | In all cases, the wallets are protected only by the operating system directory protections available for your system. Therefore, take care to ensure maximum protection for these directories. If users can access the location where clear private keys are stored, there is the potential for a user to masquerade as the client or server on a network and obtain privileged information. Oracle recommends that a wallet and its contents be deleted as soon as a communication session is completed. Either the system administrator or security administrator will potentially need to create an application that could be used to remove wallets when clients complete their communications sessions. | | 15.4.3.9 Revoking and restoring credentials The OSS provides you with the ability to revoke a client's credentials. If an employee leaves the company or goes on an extended leave of absence, you might want to revoke his credentials to ensure that no one can use the account owned by that person. Revoking a credential is very straightforward. You select the identity within the tree structure displayed in the OSS Manager main screen and click on it. The information for that specific identity will be displayed including the "credentials" area with the options to create new credentials, revoke credentials, or restore credentials. You can then select the credential of interest and click the Revoke option. To restore a credential, perform the same actions as above, but select Restore instead of Revoke as the option of choice. | | The revoke option revokes credentials for a user or process but does not completely remove the identity, making it easy to later restore the credentials if appropriate. To remove completely, see the next section. | | 15.4.3.10 Removing an identity You can completely remove an identity from the system by selecting an identity from the tree structure and then selecting "Drop" from the "Identity" pull-down menu. If you decide to drop the certificate authority's identity, be aware of the fact that you will also remove all other established identities in the system. 15.4.4 Removing the Oracle Security Server Repository As we mentioned earlier, Oracle supplies a utility and menu option for removing the OSS Repository. The option, from the Start Programs Oracle Security Server menu, is "Remove Oracle Security Server." Only use this option if you have migrated the Security Server to another location or are really sure that you want to discontinue using certificates of authority on your system through this server. When you launch the utility to remove the OSS repository, you will be prompted for a username and password. Although there is nothing to advise you, use the system username and password, along with the name of the database in which the repository is resident. You will be prompted to confirm that you want to remove the OSS repository; when you acknowledge that you want to continue, the tool will connect to the database and remove the objects associated with the OSS repository. |