Making Room for Red Hat Linux
|
There are three possible scenarios you may face when attempting to repartition your hard disk:
-
Unpartitioned free space is available
-
An unused partition is available
-
Free space in an actively used partition is available
The following sections look at each scenario in order.
| Note | Please keep in mind that the illustrations in this chapter are simplified for clarity and do not reflect the exact partition layout that you will encounter when actually installing Red Hat Linux. |
Using Unpartitioned Free Space
In this situation, the partitions already defined do not span the entire hard disk, leaving unallocated space that is not part of any defined partition. Figure D-8 shows what this might look like.
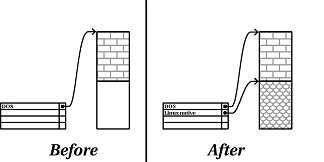
Figure D-8. Disk Drive with Unpartitioned Free Space
| Note | If you think about it, an unused hard disk also falls into this category. The only difference in that case is that all the space is not part of any defined partition. |
You can simply create the necessary partitions from the unused space. Unfortunately, although very simple, this scenario is not very likely (unless you have just purchased a new hard disk just for Red Hat Linux). Most preinstalled operating systems are configured to take up all available space on a disk drive (see the “Using Free Space from an Active Partition” section later in this chapter).
Using Space from an Unused Partition
In this case, maybe you have one or more partitions that you do not use any longer. Perhaps you have dabbled with another operating system in the past and the partition(s) you dedicated to it never seems to be used anymore. Figure D-9 illustrates such a situation.
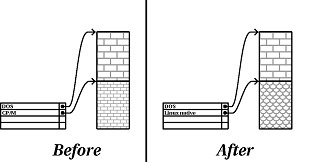
Figure D-9. Disk Drive with an Unused Partition
If you find yourself in this situation, you can use the space allocated to the unused partition. You will first need to delete the unused partition and then create the appropriate Linux partition(s) in its place using the reclaimed free space. You can either delete the partition using the DOS fdisk utility, or you will be given the opportunity to do so during a custom installation.
Using Free Space from an Active Partition
This is the most common situation. Unfortunately, it is also the hardest to handle. The main problem is that, even if you have enough free space, that space is presently allocated to a partition that is already in use.
If you purchased a computer with preinstalled software, the hard disk most likely has one massive partition holding the operating system and data.
Aside from adding a new hard drive to your system, you have two choices: destructive repartitioning and non-destructive repartitioning. The following sections discuss both of these choices in detail.
Destructive Repartitioning
Basically, destructive repartitioning involves deleting the single large partition and creating several smaller ones. As you might imagine, any data you had in the original partition is destroyed. This means that making a complete backup of any files that you don’t want to lose is necessary. For your own sake, make two backups of important files, use verification (if available in your backup software), and try to read data from your backup before you delete the partition.
| Caution | If there was an operating system of some type installed on that partition, it will need to be reinstalled as well (assuming you want to continue using that operating system, of course). Be aware that some computers sold with preinstalled operating systems may not include the CD-ROM media to reinstall the original operating system. The best time to notice if this applies to your system is before you destroy your original partition and its operating system installation. |
After creating a smaller partition for your existing software, you can reinstall any software, restore your data, and continue your Red Hat Linux installation. Figure D-10 shows this being done.
| Note | New computers often come with recovery disks so that you can restore your computer to its factory settings in case your operating system becomes corrupted. Using these recovery disks will undo everything you do with fdisk. |
| Caution | Again (we can’t stress this enough), as Figure D-10 shows, any data present in the original partition will be lost without proper backup! |
Non-Destructive Repartitioning
Here, you run a program that does the seemingly impossible: it makes a big partition smaller without losing any of the files stored in that partition. Many people have found this method to be reliable and trouble-free. What software should you use to perform this feat? There are several disk management software products on the market. You will have to do some research to find the one that is best for your situation.
While the process of non-destructive repartitioning is rather straightforward, there are a number of steps involved:
-
Compress existing data.
-
Resize the existing partition.
-
Create new partition(s).
The following sections look at each step in a bit more detail.
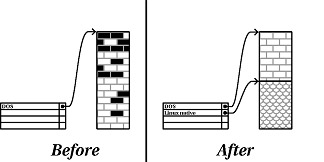
Step 1: Compress existing data
As Figure D-11 shows, the first step in non-destructive repartitioning is to compress the data in your existing partition. The reason for doing this is to rearrange the data such that it maximizes the available free space at the "end" of the partition.
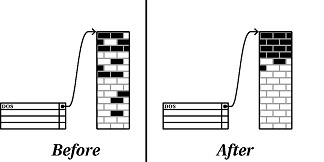
Figure D-11. Disk Drive Being Compressed
This step is crucial. Without it, the location of your data could prevent the partition from being resized to the extent desired. Note also that, for one reason or another, some data cannot be moved. If this is the case (and it severely restricts the size of your new partition(s)), you may be forced to destructively repartition your disk.
For Windows operating systems utilizing the FAT partition type, the FIPS program can be used (after defragging the hard drive) to perform this step. See Appendix C for more details.
Step 2: Resize the existing partition
Figure D-12 shows the actual resizing process. While the actual result of the resizing operation varies depending on the software used, in most cases the newly freed space is used to create an unformatted partition of the same type as the original partition.
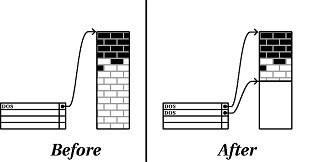
Figure D-12. Disk Drive with Partition Resized
It is important to understand what the resizing software you use does with the newly freed space so that you can take the appropriate steps. In the case we have illustrated, it would be best to simply delete the new DOS partition and create the appropriate Linux partition(s) using the reclaimed space.
Create new partition(s)
As the previous step implied, it may or may not be necessary to create new partitions. However, unless your resizing software is Linux-aware, it is likely you will need to delete the partition that was created during the resizing process. Figure D-13 shows this being done.
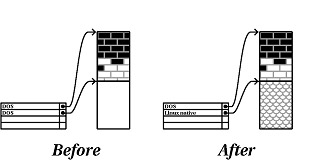
Figure D-13. Disk Drive with Final Partition Configuration
| Note | The following information is specific to x86-based computers only. |
As a convenience to Red Hat Linux users, the DOS FIPS utility is included on the Red Hat Linux CD-ROM #1 in the dosutils directory. FIPS is a freely available program that can resize FAT (File Allocation Table) partitions.
| Warning | Many people have successfully used FIPS to resize their hard drive partitions. However, because of the nature of the operations carried out by FIPS and the wide variety of hardware and software configurations under which it must run, Red Hat cannot guarantee that FIPS will work properly on your system. Therefore, no installation support is available for FIPS. Use it at your own risk. |
With the preceding warning in mind, if you decide to repartition your hard drive with FIPS, it is vital that you do two things:
-
Perform a backup — Make two copies of all the important data on your computer. These copies should be made on removable media (CD writables, diskettes, or tape), and you should make sure they are readable before proceeding.
-
Read the documentation — Completely read the FIPS documentation, which is located in the dosutils/fipsdocs subdirectory on Red Hat Linux CD-ROM #1.
After FIPS runs you will be left with two partitions: the one you resized and the one FIPS created out of the newly freed space. If your goal is to use that space to install Red Hat Linux, you should delete the newly created partition either by using fdisk under your current operating system or while setting up partitions during a custom installation.
|
EAN: N/A
Pages: 223